Dear customer, congratulations on the purchase of the 3D aerobatic model Blast. Before
you begin, please read carefully the building instructions and make sure that you understand
the building process. Eventually contact the manufacturer or your dealer
DESCRIPTION OF THE MODEL:
This 3D aerobatic model was designed according to a principle of merging features of
a precise-flying aerobat with top-performing 3D machine. Thanks to the high fuselage it flies
in both in a normal and harrier-like knife-edge flight. Rolling turns and loops do not bring
absolutely any difficulty to an experienced pilot. The weight of the unequipped model is 220
grams. We suggest that you use 80 to 150 W AC motor. It is possible to use the motors from
the Free Air production – the HCS type of 110 to 150 W output. The recommended power
source is 2 or three LiPol battery cells of 800-1500 mAh capacity with available current-carrying
capacity of 15-20C.The flight weight should not exceed 550 grams, however the ideal weight
is 440 grams. Thanks to the well thought-out design, the actual assembly of the model would
take only some 240 minutes of building time.
BUILDING PROCESS:
The fuselage is milled from an EPP slab of 25 mm thickness and has a printed colour
finish on both sides. It is strengthened with carbon composite strips cut and glued according to
the Fig 2. Strengthen the elevator with two carbon composite pieces, glue the elevator horn,
insert into the fuselage and check that the empennage is parallel to the respective planes.
Then glue according to the fig.3. The rudder is all-flying (slab), glued from two 10 mm-thick
slabs of EPP to ensure torsional stiffness. Bevel the front edges of the rudder where they
contact the fuselage to a wedge shape and attach to the fuselage, using two hinges as shown
on fig. 4.
The wing has a symmetric biconvex section and cut-off ailerons; it is decorated with printed
colour motifs on the topside.
Lay the wing halves with their roots mating, and, using a sharp knife, cut a slit for the
reinforcing carbon strip in both the top and bottom surface of the wing, at an equal 80mm
distance from the leading edge. Do not glue the strips at the moment (fig.5)
Prepare the openings for the aileron servos and glue the aileron horns in place (fig. 6). Insert
the carbon strips into one wing half and glue in place, then insert the wing half into the
fuselage opening (fig. 7). Insert the other wing half so that the carbon strips from the first one
would slide into the slits in the first wing half, and glue the wing halves together. Attention!
DO NOT glue the wing halves to the fuselage now! Now insert the carbon strips into the second
half of the wing, check their alignment (both wing halves should lie in the same plane) and
glue the carbon strips in place. Then set the wing into the fuselage, check its alignment (angle
of incidence etc.) again and glue in place. Another way to do this operation is to put (glue)
the wing together, reinforce it with the carbon strips, cut the fuselage horizontally above the
reinforcing carbon strips (fig. 8) from the front bulkhead to the wing cutout and then place
the finished, equipped wing (fig. 9) into the cutout, adjust and glue in place as per fig. 10.
Glue the motor bulkhead, reinforce it with two dural wires 60 mm long, pushed into the
fuselage through the openings in the bulkhead and aligned each above other in the same
plane (fig. 11).
Insert the carbon fibre undercarriage into the ready-made slit, slide the teardrop-shaped
reinforcing doublers and following a check of alignment glue in place according to the fig. 12.
Drill 2mm holes for the wheel axles and attach the wheels in place with bolts. Then you have
to just put the servos, aluminium wire control rods in place (fig. 13), electric motor (fig. 14),
controller and receiver (fig. 15).
To make the compartments for these components either cut at their perimeter by a sharp knife
and gouge out the EPP, or cut out the plastic using the hot wire loop in a soldering gun. We
recommend a thin or medium thick cyanoacrylate glue (CA), but epoxy or Purex (PU foaming
glue) would do as well, indeed. Insert the empennage control rods through the bowden cable
guides, glued to the fuselage by the CA glue. The centre of gravity for the beginners is 95
mm from the wing root leading edge, with increasing skills we recommend you to move the
CG of the model backwards, up to a distance of 110 mm from the wing root leading edge.
We recommend to adjust the deflection of the control surfaces – ailerons and empennage-
according to one´s own habits and experience, however, they should be at least +/- 15
degrees. The thrust line should be offset, according to the propeller used, 3 to 5 degree right.
Initial flying:
The experienced pilots may “test-hover” the machine, the less experienced ones should test fly
it. If you have built the model undistorted and straight and the centre of gravity is all right,
the first flight should be completely without trouble. The Blast virtually lacks the stall speed
and is rather viceless. Flying the Blast bring a lot of fun and it is very suitable for the condition
flying/training of aerobatic pilots.
A lot of fun and many smooth landings with your model wishes FreeAir.
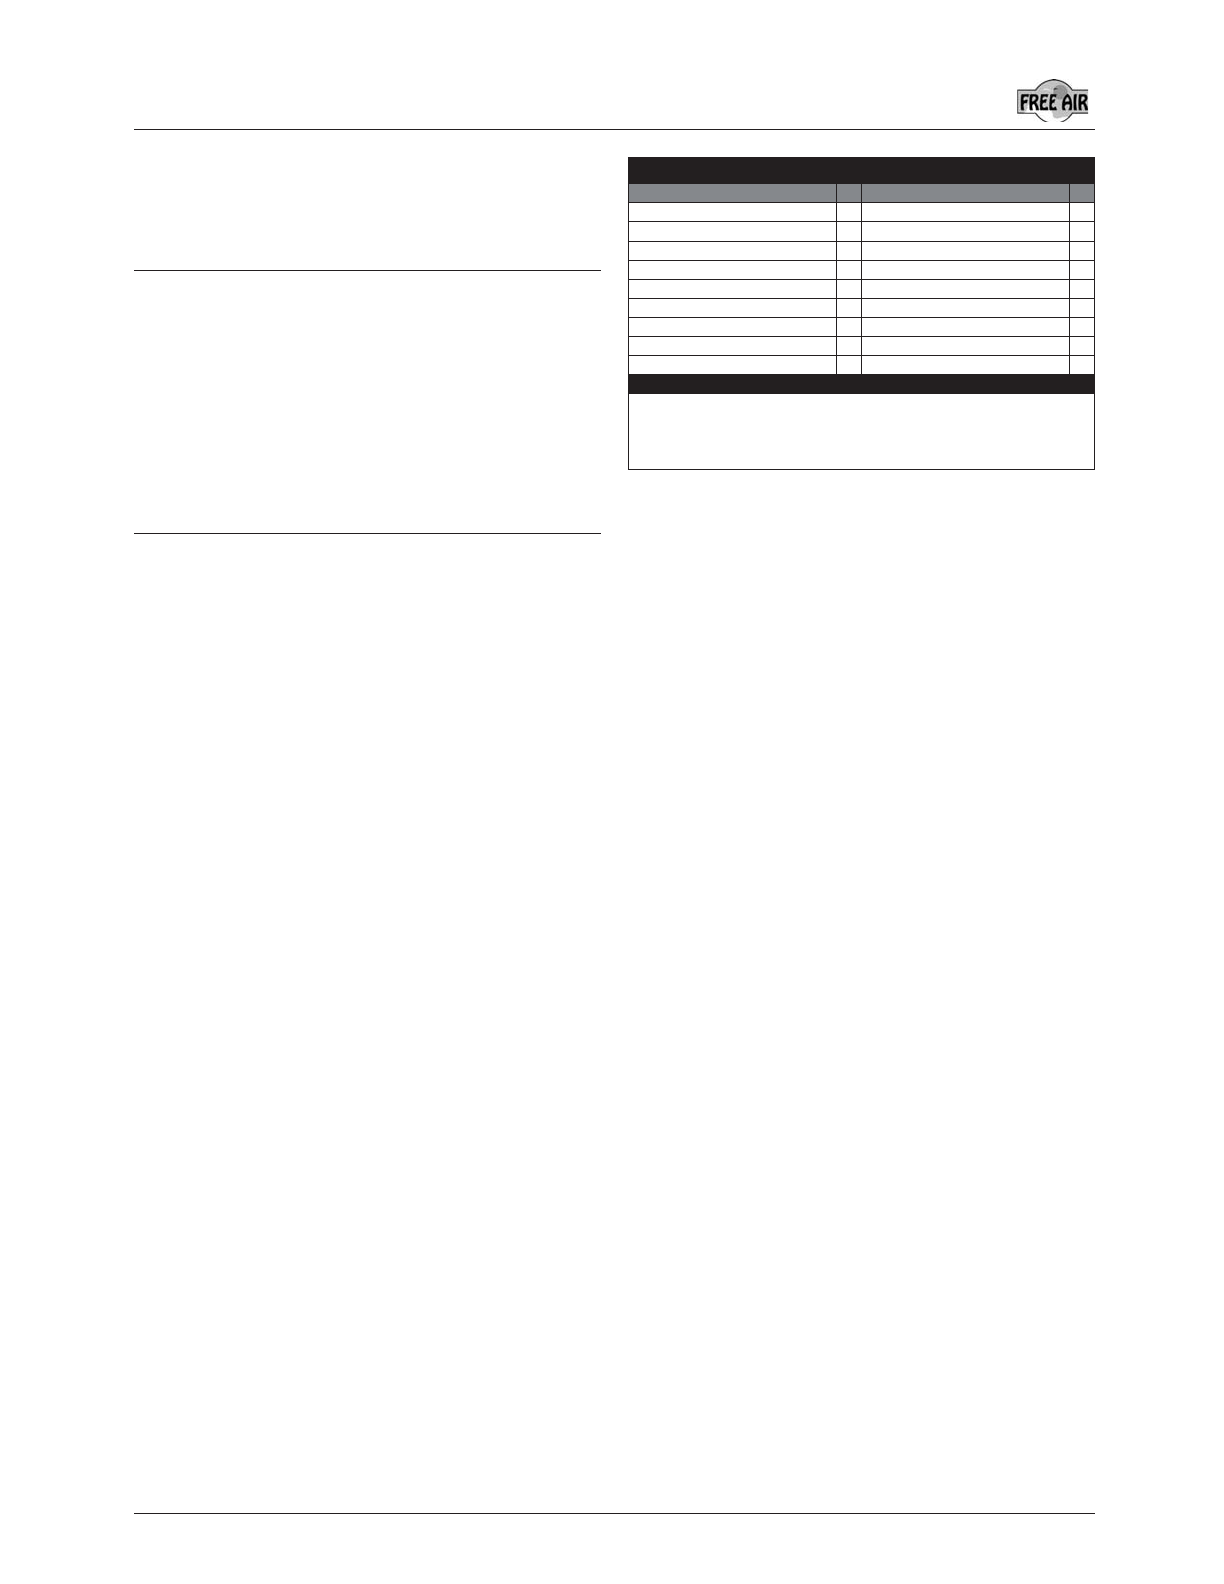
PARTS LIST
Part name Pcs Part name Pcs
Wing of EPP 2 Rudder 2
Fuselage of EPP 1 Elevator 1
Instructions 2 Elevator and rudder horns 4
Elevator and rudder control rods (Al wire)
2
Undercarriage wheels, 35 mm diameter
2
Wing stiffener (carbon 1x800 mm) 2 Control rod guide 5x5x10 mm 6
Fuselage stiffener (carbon 1x800 mm)
2 Motor bulkhead (glassfibre) 1
Undercarriage (carbon) 1
Aileron control rods (Al wire 1,5x60 mm)
4
Undercarriage anchor plates (glassfibre)
2 Rudder hinges 2
Horizontal tailplane struts (carbon 1x330 mm)
2
You will need the following tools and materials:
CA glue, CA glue accelerator, sharp (modelling) knife.
To complete the model you need the following: Receiver (MZK), 4 servos (Waypoint W-060),
controller (TMM 1210-3 or Jeti 12), battery pack (2-3 LiPol cells of 800-1500 mAh), motor
(HCS 110-150 W), propeller GWS 9/5 or 10/6).
BLAST
2
BLAST www.freeair.cz


