manuals.online logo
Brands
  1. Home
  2. •
  3. Brands
  4. •
  5. Gardigo
  6. •
  7. Computer Accessories
  8. •
  9. Gardigo 62321 User manual

Gardigo 62321 User manual

MAUS-WEG-FALLE
Gebrauchsanweisung
Art.-Nr. 62321
Sehr geehrter Kunde,
vielen Dank, dass Sie sich für eines unserer Qualitätsprodukte entschieden haben.
Im Folgenden werden wir Ihnen die Funktionen und die Handhabung unseres Pro-
dukts erklären. Bitte nehmen Sie sich die Zeit, lesen die Gebrauchsanweisung in
Ruhe durch und benutzen Sie das Produkt in der beschriebenen Form. Beachten
Sie alle enthalten Sicherheits- und Bedienungshinweise. Bewahren Sie diese Ge-
brauchsanweisung auf und geben Sie diese bei Weitergabe des Produkts mit. Soll-
ten Sie Fragen oder Anregungen zu diesem Produkt haben, wenden Sie sich bitte
an Ihren Fachhändler oder an unser Service-Team.
Wir freuen uns, wenn Sie uns weiter empfehlen und wünschen Ihnen viel Erfolg
mit diesem Produkt.
1. Sicherheitshinweise
• Die Falle und das Verpackungsmaterial gehören nicht in den Aktionsbereich von
Kindern. Kinder dürfen nicht mit dem Gerät spielen.
• In jedem Fall ist zu prüfen, ob die Falle für den jeweiligen Einsatzort geeignet ist.
• Bewahren Sie diese Gebrauchsanweisung auf und geben Sie diese bei Weiterga-
be des Gerätes mit.
2. Inbetriebnahme
Mäuse gehören nicht ins Haus und können zu einer Plage werden, wenn sie nicht
rechtzeitig bekämpft werden. Mit dieser Mausefalle werden Mäuse hygienisch und
sicher gefangen. Die Maus betritt das Kunststogehäuse, löst die Falle aus und
wird sofort getötet. Durch das Gehäuse kann die Falle nicht versehentlich durch
Haustiere oder spielende Kinder ausgelöst werden und der Anblick der toten Maus
bleibt erspart.
Legen Sie einen Köder in die Falle. Ziehen Sie dazu den grünen Spannhahn (1) nach
unten und halten sie ihn fest während Sie den Köder (Leberwurst, Nuss-Nougat-
Creme) (2) möglichst weit hinten auf den Auslöser legen (3). Lassen Sie erst jetzt
den grünen Spannhahn los, da sie sich sonst beim Einlegen des Köders die Finger
klemmen könnten. Positionieren Sie die Falle an den Ort, an dem Mäuse gesichtet
wurden. Es empfiehlt sich, Sie nahe und parallel zu einer Wand aufzustellen, da
Mäuse eher dort langlaufen.
Kontrollieren Sie regelmäßig die Falle. Sie sehen, dass eine Maus gefangen wur-
de, wenn der grüne Spannhahn nicht mehr in seiner arretierten Position ist. Zum
Entsorgen der gefangenen Maus, önen Sie die Klappe (2) an der Unterseite der
Falle und drücken Sie den grünen Spannhahn (1) herunter. Die Maus fällt heraus.
Abmessungen: 6 x 7,5 x 17 cm
Es ist zu beachten, dass Schäden, die durch Nichtbeachtung der Gebrauchsanwei-
sung entstehen, außerhalb des Einflussbereichs der Gardigo liegen und für daraus
resultierende Schäden keinerlei Haftung übernommen werden kann. Dies gilt auch
dann, wenn Veränderungen oder Reparaturversuche an dem Gerät vorgenommen
wurden. Es erlischt der Gewährleistungsanspruch.
Stand: 10/17 Sollten Sie Fragen oder Anregungen zu diesem Gerät haben, wenden Sie sich bitte
an Ihren Fachhändler oder an unser Service-Center.
4. Gewährleistung
Die Gewährleistung umfasst die Beseitigung aller Mängel, die auf nicht einwand-
freies Material oder Fabrikationsfehler zurückzuführen sind. Da Gardigo keinen
Einfluss auf die richtige und sachgemäße Montage oder Bedienung hat, kann
verständlicherweise nur die Gewähr der Vollständigkeit und einwandfreien Be-
schaffenheit übernommen werden. Es wird weder eine Gewähr noch Haftung für
Schäden oder Folgeschäden im Zusammenhang mit diesem Produkt übernom-
men. Dies gilt vor allem dann, wenn Veränderungen oder Reparaturversuche an
dem Gerät vorgenommen wurden, Schaltungen abgeändert oder andere Bauteile
verwendet wurden oder in anderer Weise Fehlbedienungen, fahrlässige Behand-
lung oder Missbrauch zu Schäden geführt haben.
Service-Hotline: Telefon (0 53 02) 9 34 87 88 Ihr Gardigo-Team
Instruction manual
Art.-No. 62321
Dear client,
thank you for choosing one of our quality products. In the following, we will ex-
plain the functions and operation of our product. Please take the time to read
through the instructions carefully. Please take some time to read through the ins-
tructions carefully. Please note all the included safety and operating instructions.
Keep this manual safe and ensure that you include it when passing on the product
on to a third party. If you have any questions or suggestions about this product,
please contact your supplier or our service team.
We would appreciate it if you would recommend us to others, and we hope you
enjoy using this product.
1. Safety instructions
• Children should be supervised to ensure that they do not play with the appliance.
• Always check whether the device is suitable for the respective place where you
intend using it.
• Keep these instructions in a safe place and pass them on when giving the device
to a third person.
2. Getting started
Mice don’t belong in your house and can become a plague if not controlled in time.
The Gardigo Hide Away Mouse Trap catches them in a hygienic and safe way. The
mouse enters the plastic enclosure, triggers the trap and gets killed immediately.
The enclosure ensures that the trap cannot be triggered by pets or playing children
by accident. It also saves them the sight of the dead mouse.
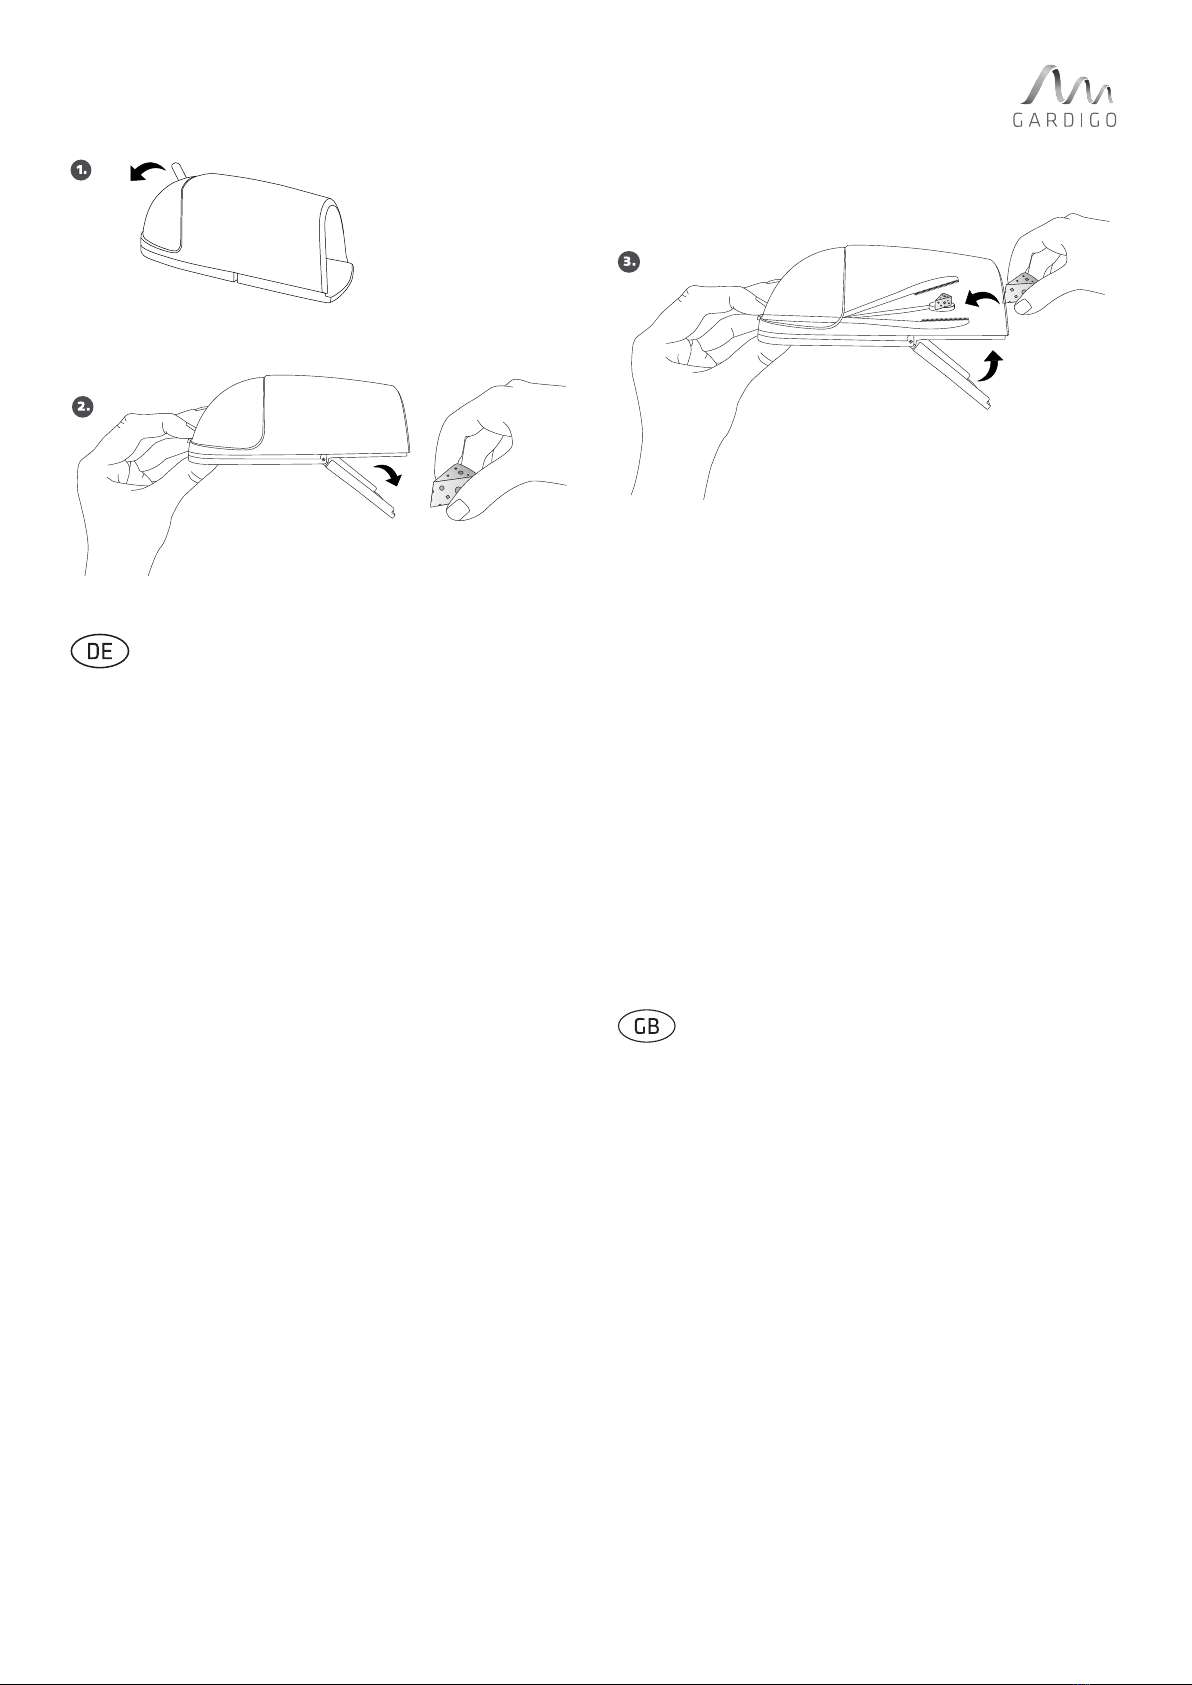
Place a bait in the trap. For this purpose, pull down the green tensioning lever (1)
whilst placing the bait (liver sausage, chocolate or hazelnut spread) (2) as far back
on the trigger plate as possible (3). Only now you must release the trigger. Other-
wise your finger could get caught in the trap.
Place the trap in an environment infested with mice. It is recommended to place it
close to and in parallel with a wall, as this is where mice prefer to run.
Check the trap regularly. The green lever not being in its locked position anymore
is a visual indicator that a mouse has been caught. To dispose of the mouse, open
the hatch at the bottom of the trap (2) and pull down the green tensioning lever (1)
again. The mouse will drop out of the trap.
Dimensions: 6 x 7.5 x 17 cm
This device has a warranty of two years. As Gardigo has no control of the correct
of appropriate installation and use of the device the warranty can only be applied
to a fully equipped device in prime condition. We assume neither warranty nor
liability for damages or following damages related to this product. This applies
especially if it has been modifications or repairs have been made by the customer,
if the circuitry has been modified or components have been used other than the
original components and/or if the operation of the device has been incorrect, ca-
reless or abusive.
If you have any questions or suggestions about this product, please contact your
dealer or our service centre.
3. Guarantee
The guarantee covers the elimination of all shortcomings, which can be attributed
to imperfect materials or manufacturing errors. As Gardigo has no influence on the
correct and proper assembly or operation, we can only guarantee the quality of the
components – and that the product is complete. We assume neither a guarantee
nor liability for damage or resulting damage in connection with this product. This
applies in particular when amendments or attempts to repair the product have
been conducted, circuits have been modified or other components have been used
or damage has been caused through operator errors, negligent handling or misuse.
Service Hotline: Phone +49 (0) 53 02 9 34 87 88 Your Gardigo-Team
Návod k používání
Prod. č. 62321
Vážený zákazníku,
děkujeme za nákup jednoho z našich kvalitních výrobků .Prosím udělejte si čas a
přečtěte si klidu návod na obsluhu. Dodržujte prosím všechny bezpečnostní poky-
ny a pokyny k obsluze. Pokud máte otázky nebo podněty k tomuto přístroji, ob-
raťte se prosím na Vašeho odborného prodejce nebo na náš servisní tým. Budeme
rádi, když nás doporučíte dál a přejeme Vám hodně úspěchu s tímto přístrojem.
1. Bezpečnostní upozornění
• Zařízení, obal atd. chraňte před dětmi. Děti si s přístrojem nesmí hrát.
• V každém případě musí být zkontrolováno zda je přístroj vhodný pro místo kde
bude použiván.
• Prosím přečtěte si tento návod důkladně a v klidu. Pokud se rozhodnete přístroj
prodat nebo darovat, nezapomeňte na tento návod k použití.
2. Uvedení do provozu
Vložte do pasti návnadu. K tomu natáhněte napínací spoušť dolů a držte ji pe-
vně, pokud možno, co nejvíce dozadu, zatímco vkládáte návnadu (paštiku, oříško-
vo-nugátový krém) na spouštěč. Nyní pusťte napínací spoušť, jinak byste si mohli
při vkládání návnady přiskřípnout prsty. Umístěte past na místo, na kterém byly
myši pozorovány. Je doporučeno položit past blízko ke zdi a paralelně s ní, protože
podél ní myši běhají nejčastěji.
Past pravidelně kontrolujte. Pokud byla myš chycena, poznáte to tak, že červená
napínací spoušť už není v uzamčené pozici. K likvidaci chycené myši otevřete
klapku (2) na spodní straně pasti a stlačte zelenou napínací spoušť (1) dolů. Myš
vypadne ven.
Míry: 6 x 7,5 x 17 cm
Je třeba mít na paměti, že ovládací chyby či chyby z připojení, které vzniknou ne-
dodržením návodu na obsluhu, jsou mimo oblasti vlivu Gardigo a za škody, vzniklé
z tohoto důvodu, nebude převzata žádná záruka. To platí také tehdy, když byly
na přístroji provedeny změny nebo pokusy o opravy, byla změněna zapojení nebo
když byly použity jiné stavební součástky, stejně jako u škod a následných škod,
které byly způsobeny chybnou nebo nedbalou obsluhou či zneužitím. Ve všech
těchto případech také zanikne záruka.
Pokud máte otázky nebo podněty k tomuto přístroji, obraťte se prosím na vašeho
odborného prodejce.
3.Záruka
Záruka zahrnuje odstranění veškerých závad, které jsou způsobeny vadným ma-
teriálem nebo výrobní chybou. Jelikož společnost Gardigo nemá vliv na správnou a
vhodnou montáž či obsluhu, může pochopitelně převzít pouze ručení za úplnost
a bezvadný stav. Nepřebírá ani odpovědnost, ani ručení za škody nebo následné
škody v souvislosti s tímto výrobkem. To platí zejména tehdy, když byly provedeny
změny nebo pokusy o opravu přístroje, byly změněny elektrické spoje nebo byly
použity jiné díly, nebo kvůli chybné obsluze, nedbalé manipulaci nebo zneužití byly
způsobeny škody.
Služba: [email protected] Váš tým Gardigo
tevigo GmbH · Raiffeisenstr. 2 D · 38159 Vechelde (Germany) · www.gardigo.com

Other Gardigo Computer Accessories manuals

Gardigo 62340 User manual

Gardigo

Gardigo 62340 User manual

Gardigo 70070 User manual

Gardigo

Gardigo 70070 User manual

Gardigo 62361 User manual

Gardigo

Gardigo 62361 User manual

Gardigo 70074 User manual

Gardigo

Gardigo 70074 User manual

Gardigo 700764 User manual

Gardigo

Gardigo 700764 User manual

Gardigo 62321 User manual

Gardigo

Gardigo 62321 User manual

Gardigo 700734 User manual

Gardigo

Gardigo 700734 User manual

Gardigo 62319 User manual

Gardigo

Gardigo 62319 User manual

Gardigo 62362 User manual

Gardigo

Gardigo 62362 User manual

Gardigo 70074 User manual

Gardigo

Gardigo 70074 User manual

Gardigo 62343 User manual

Gardigo

Gardigo 62343 User manual

Gardigo 66950 User manual

Gardigo

Gardigo 66950 User manual

Gardigo 62359 User manual

Gardigo

Gardigo 62359 User manual

Popular Computer Accessories manuals by other brands

Logitech MK710 Getting started

Logitech

Logitech MK710 Getting started

LaZee Tek Mouse Cursor quick start guide

LaZee Tek

LaZee Tek Mouse Cursor quick start guide

Verbatim 94691 brochure

Verbatim

Verbatim 94691 brochure

KLIM UNITY quick guide

KLIM

KLIM UNITY quick guide

Apevia X-Dreamer4 user manual

Apevia

Apevia X-Dreamer4 user manual

Sony MicroVault USM1GH operating instructions

Sony

Sony MicroVault USM1GH operating instructions

Fujitsu silicone sleeve user guide

Fujitsu

Fujitsu silicone sleeve user guide

Konig & Meyer 19796 manual

Konig & Meyer

Konig & Meyer 19796 manual

Antec SX1030 user manual

Antec

Antec SX1030 user manual

ATEN CS261 user manual

ATEN

ATEN CS261 user manual

Logitech S 520 quick start guide

Logitech

Logitech S 520 quick start guide

2E GAMING GALAXY Operation guide

2E

2E GAMING GALAXY Operation guide

Fractal design ARC Mini R2 user manual

Fractal design

Fractal design ARC Mini R2 user manual

ATEN cs533 user manual

ATEN

ATEN cs533 user manual

camry eQCM 10m installation guide

camry

camry eQCM 10m installation guide

Supermicro SC743 Series user guide

Supermicro

Supermicro SC743 Series user guide

Icy Box IB-DK4039-2C manual

Icy Box

Icy Box IB-DK4039-2C manual

Apevia X-Plorer ATXB8KLW Series installation guide

Apevia

Apevia X-Plorer ATXB8KLW Series installation guide

manuals.online logo
manuals.online logoBrands
  • About & Mission
  • Contact us
  • Privacy Policy
  • Terms and Conditions

Copyright 2025 Manuals.Online. All Rights Reserved.