7
Safety instructions
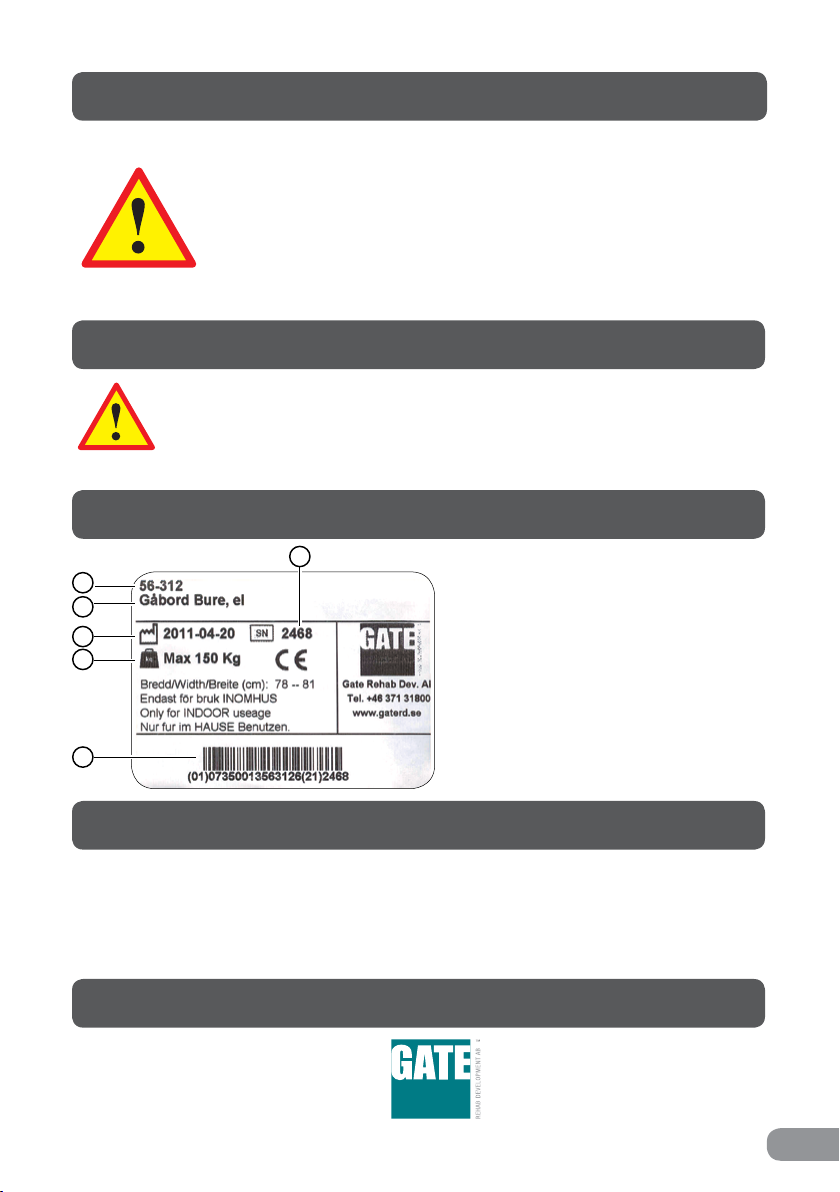
ID label
The Bure Walker may only be used:
• as a WALKING AID, indoors
• on HARD, LEVEL surfaces.
MAX USER WEIGHT: 150 KG
1. Uttag för batterikontakt
2. Uttag för stickpropp
(OBS! För att IP-klassning ska gälla så ska
stickpropp ALLTID vara ansluten till styrbox)
3. Uttag för fjärrkontroll
4. Uttag för ställdon - höj/sänk
5. Uttag för ställdon - breddning (Endast
Bure Double)
OBS! Var noga med att kontakter ansluts
till rätt uttag eftersom detta annars kan
skada ställdon.
Kopplingsschema Styrbox Laddning Batteri
Laddning av batteri
Laddning av batteri ska ske då gåbordet inte
används. (Batteriet kan aldrig överladdas.)
Laddning görs genom att stickpropp ansluts
till eluttag.
Innan första användningen så
bör batteriet laddas 24 timmar..
2
3
4
1
5
Skötsel • • •
Generell skötselinstruktion Åtgärd
• Torka av gåbord och armstödsplattor vid behov – använd tvållösning
• Produkten ska ALLTID kännas stabil
Om gåbordet lutar eller har missljud – tillkalla servicepersonal.
• Byt ut trasiga delar omedelbart – skall göras av kunnig personal
• För gåbord med elställdon – använd ALDRIG gåbordet under laddning.
• Kontrollera att styrrör (g) är åtdragna i överstativ (3).
Övriga instruktioner • • •
5
1. Part number
2. Product name
3. Date of manufacture
4. Max user weight
5. Serial number
6. EAN code
5
3
4
1
6
2
General maintenance advice
• Wipe the walker and its armrests clean as necessary; use soap solution/
surface disinfectant.
• The product may be cleaned in a tunnel washer or similar as electrical
systems have IP65 protection. However, the product is not corrosion
proof which means washing by machine may reduce its lifetime.
• Replace damaged parts immediately; must be done by experienced
personnel.
• The product is only intended for indoor use.
1. Uttag för batterikontakt
2. Uttag för stickpropp
(OBS! För att IP-klassning ska gälla så ska
stickpropp ALLTID vara ansluten till styrbox)
3. Uttag för fjärrkontroll
4. Uttag för ställdon - höj/sänk
5. Uttag för ställdon - breddning (Endast
Bure Double)
OBS! Var noga med att kontakter ansluts
till rätt uttag eftersom detta annars kan
skada ställdon.
Kopplingsschema Styrbox Laddning Batteri
Laddning av batteri
Laddning av batteri ska ske då gåbordet inte
används. (Batteriet kan aldrig överladdas.)
Laddning görs genom att stickpropp ansluts
till eluttag.
Innan första användningen så
bör batteriet laddas 24 timmar..
2
3
4
1
5
Skötsel • • •
Generell skötselinstruktion Åtgärd
• Torka av gåbord och armstödsplattor vid behov – använd tvållösning
• Produkten ska ALLTID kännas stabil
Om gåbordet lutar eller har missljud – tillkalla servicepersonal.
• Byt ut trasiga delar omedelbart – skall göras av kunnig personal
• För gåbord med elställdon – använd ALDRIG gåbordet under laddning.
• Kontrollera att styrrör (g) är åtdragna i överstativ (3).
Övriga instruktioner • • •
5
Warranty
We provide two years’ warranty for
manufacturing faults (does not apply
to wear parts). For further information
or enquiries please contact:
Gate Rehab Development AB
Industrigatan 2, SE-330 21 Reftele
Tel: +46 371 31800
info@gaterd.se
Recycling/Scrapping
When the product is no longer usable it should be recycled in accordance with legisla-
tion and regulations in the country concerned. All electrical parts including batteries
must be removed and recycled as electrical components. (Ask your local recycling
station for further information about how the different materials in the product (metals,
plastics, electronics) should be recycled).


 Gas User manual")