GBC AutoUltima Pro User manual

AutoUltima Pro
Laminator
G
Instruction Manual
F
Manuel d’utilisation
D
Bedienungsanleitung
I
Manuale d’istruzioni
O
Gebruiksaanwijzing
E
Manual de instrucciones
P
Manual de Instruções
S
Bruksanvisning
Q
Instrukcja obsługi
o
Návod k obsluze
H
Használati útmutató
o
Руководствo по
зкcплyатации
CZ
RUS

English 4
Français 16
Deutsch 28
Italiano 40
Nederlands 52
Español 64
Português 76
Svenska 88
Polski 100
Česky 112
Magyar 124
Pyccкий 136

4
Start Stop
Enter
17
8
9
J
K
L
2
3
4
4
M
N O
5
6

4
General safeguards
• Use this laminator only for its intended purposes as according to the
specifications outlined in the operating instructions.
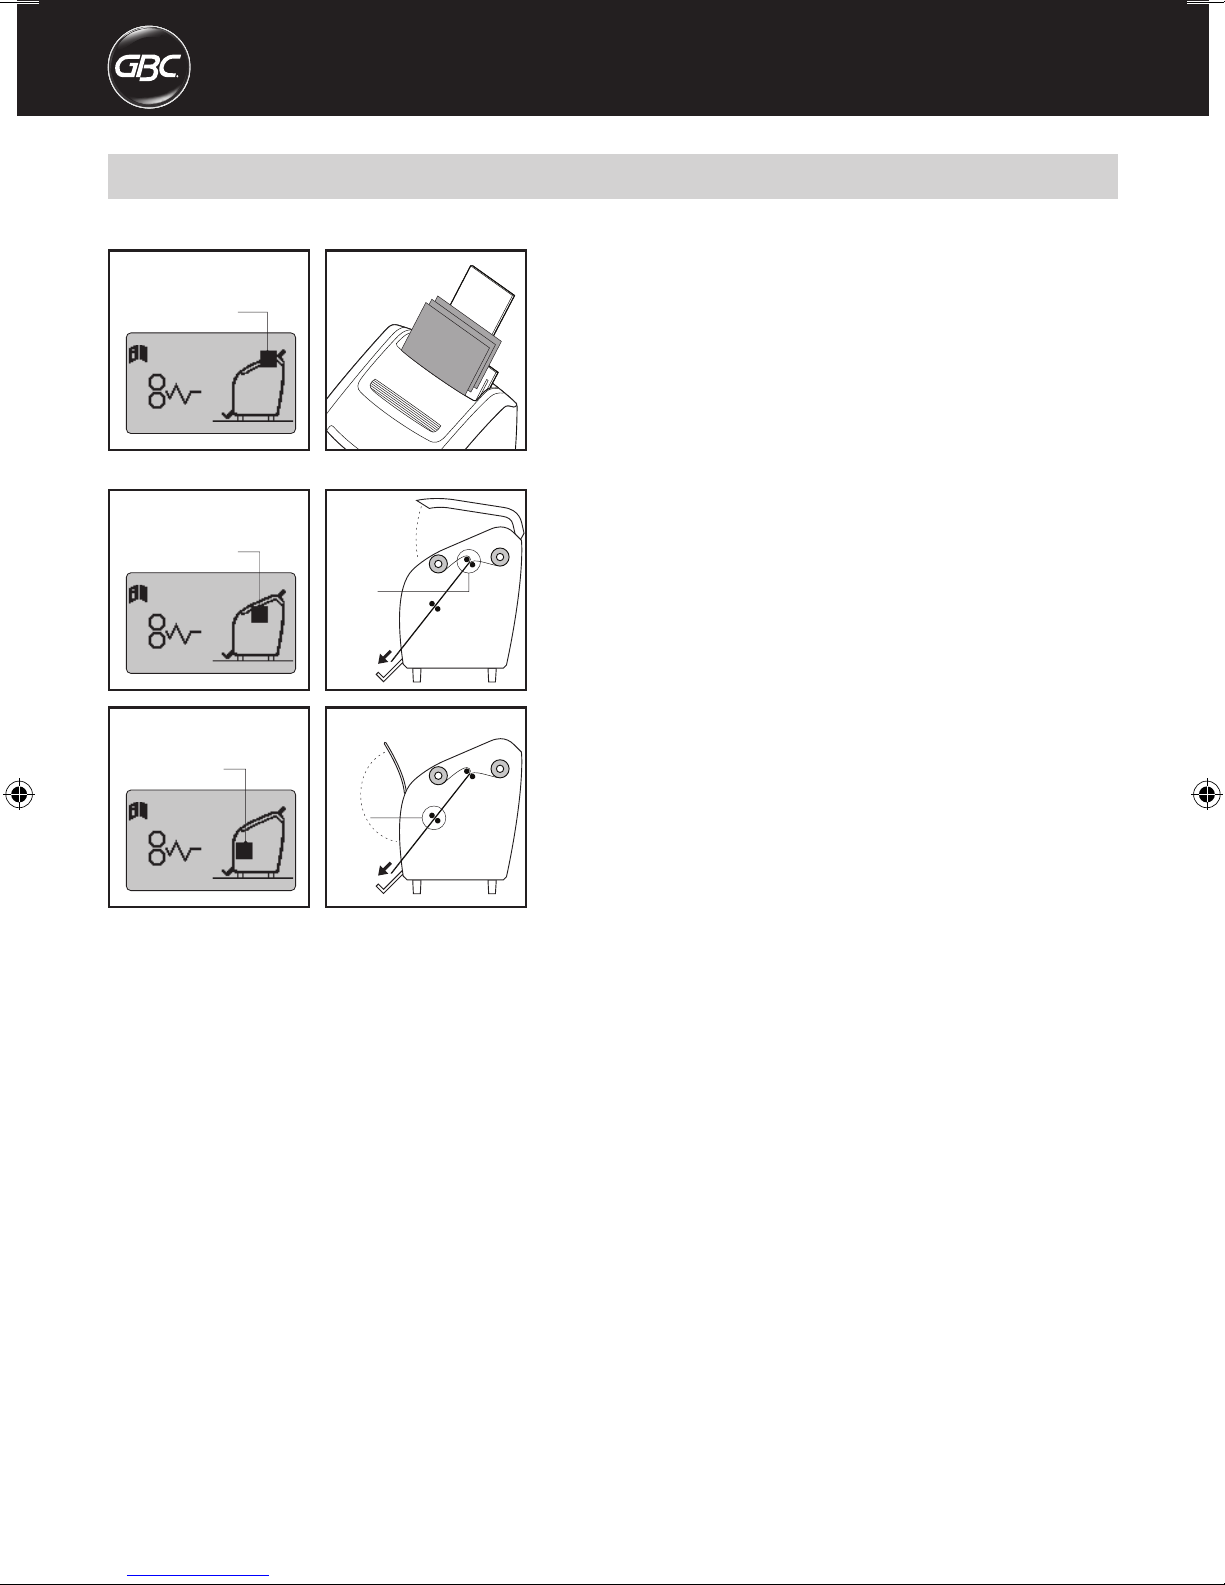
• Keep hands, long hair, loose clothing and articles such as necklaces
or ties away from the front of the pull rollers to avoid entanglement
and entrapment
• Avoid contact with the heat shoes during operation or shortly after the
laminator has been turned off, The heat shoes can reach temperatures
in excess of 30O"F.
• Keep hands and fingers away from the path of the sharp film cutter
blade located at the film exit.
• Place the laminator on a stable cart, stand or table capable of
supporting at least 50kg. An unstable surface may cause the laminator
to fall resulting in serious bodily injury, Avoid quick stops. excessive
force and uneven floor surfaces when moving the laminator on a cart
or stand.
• Do not defect or remove electrical and mechanical safety equipment
such as interlocks, shields and guards.
• Do not insert objects unsuitable for lamination.
• Do not expose laminator to liquids.
THE FOLLOWING WARNINGS ARE FOUND ON THIS PRODUCT.
Electrical shock hazard.
Do not open. No user
serviceable parts inside.
Refer servicing to qualified
service personnel.
WARNING
m
c
This safety message means that you could be seriously hurt or killed if
you open the product and expose yourself to hazardous voltage.
THE SAFETY ALERT SYMBOL PRECEDES EACH SAFETY
MESSAGE IN THIS INSTRUCTION MANUAL.
ON THE PRODUCT YOU WILLFIND IMPORTANT SAFETY
MESSAGES. READ THESE MESSAGES AND INSTRUCTIONS
CAREFULLY SAVE THESE INSTRUCTIONS FOR LATER USE.
m
Important safety instructions
YOUR SAFETY AS WELL AS THE SAFETY OF OTHERS IS IMPORTANT
TO ACCO BRANDS EUROPE. IN THIS INSTRUCTION MANUAL AND ON
THE PRODUCT ARE IMPORTANT SAFELY MESSAGES. READ THESE
MESSAGES CAREFULLY.
m
Do not touch heat shoes until they have cooled.
Hot
surface.
CAUTION
m
This safety message means that you could cut yourself if you are not
careful.
SHARP BLADE.
Keep hand and
fingers away.
CAUTION
m
WARNING: THE SAFETY ALERT SYMBOL PRECEDES
EACH SAFETY MESSAGE IN THIS INSTRUCTION
MANUAL. THIS SYMBOL INDICATES A POTENTIAL
PERSONAL SAFETY HAZARD THAT COULD HURT YOU
OR OTHERS, AS WELL AS CAUSE PRODUCT DAMAGE OR
PROPERTY DAMAGE.
m
WARNING: DO NOT ATTEMPT TO SERVICE OR REPAIR
THE LAMINATOR.
m
WARNING: DO NOT CONNECT THE LAMINATOR TO AN
ELECTRICAL SUPPLY OR ATTEMPT TO OPERATE THE
LAMINATOR UNTIL YOU HAVE COMPLETELY READ THESE
INSTRUCTIONS. MAINTAIN THESE INSTRUCTIONS IN A
CONVENIENT LOCATION FOR FUTURE REFERENCE.
m
WARNING: FOR YOUR PROTECTION, DO NOT CONNECT
THE LAMINATOR TO ELECTRICAL POWER OR ATTEMPT
TO OPERATE UNTIL YOU READ THESE INSTRUCTIONS
COMPLETELY. KEEP OPERATING INSTRUCTIONS IN
A CONVENIENT LOCATION FOR FUTURE REFERENCE.
TO GUARD AGAINST INJURY, THE FOLLOWING BASIC
SAFETY PRECAUTIONS MUST BE OBSERVED IN THE
SET·UP AND USE OF THE LAMINATOR.
m
Important safeguards m
Electrical safeguards
• This laminator must be connected to a supply voltage corresponding
to the electrical rating as indicated on the serial plate located on the
rear of the machine.
• Unplug the laminator before moving it, or when it is not in use for an
extended period of time.
• Do not operate the laminator with a damaged power supply cord or
plug.
• Do not overload electrical outlets as this can result in fire or shock.
• Do not alter the attachment plug, This plug is configured for the
appropriate electrical supply.
• The unit is intended for indoor use only.
CAUTION: The power source must be located near the
equipment and easily accessible. Do not use an extension cord.
• Disconnect the attachment plug from the power source to which it is
connected and keep the power supply cord in your possession while
moving the laminator.
• Do not operate the laminator with a damaged power supply cord or
attachment plug, upon occurrence of a malfunction, or after laminator
has been damaged. Contact an authorized GBC service representative
for assistance.
m
m

5
G
Location of controls
1 Feed Tray
2 Paper Side Guide
3 Top Cover
4 Control Panel
5 Exit Tray
6 Power Button
7 4 EZ Load Levers
8 Heat Button
9 Feed Switch
J Idler Bar Assembly
K Heat Shoe
L Film Roll
M Power LED (Red)
N Ready LED (Green)
O Scroll Button
Perform only the routine maintenance procedures referred to in these
instructions.
Do not attempt to service or repair the laminator.
Unplug the unit and contact an authorised GBC service representative if
one or more of the following has occurred:
• The power supply cord or attachment plug is damaged.
• Liquid has been spilled into the laminator.
• The laminator is malfunctioning after being mishandled.
• The laminator does not operate as described in these instructions.
m
Service
WARNING: THIS IS NOT A TOY - DO NOT ALLOW
CHILDREN TO OPERATE THIS LAMINATOR!
m
Installation
• Shipping damage should be brought to the immediate attention of the
delivering carrier.
• Place the laminator on a stable flat surface capable of supporting
50kg. The surface should be at least 76cm high to assure comfortable
positioning during operation. All four rubber feet should be on the
supporting surface.
• Connect power cord to an appropriate power source. Avoid connecting
other equipment to the same branch circuit to which the laminator is
connected as this may cause nuisance tripping of the circuit breaker
or blown fuses.
• The laminator should be positioned to allow exiting film to drop freely
to the floor. Accumulation of laminate as it exits the laminator may
cause film to wrap around the rollers causing a jammed condition.
• Avoid placing laminator near sources of heat or cold. Avoid locating the
laminator in the direct path of forced, heated or cooled air.
Caring for the AutoUltima Pro Laminator
The only maintenance required by the operator is to periodically dean
the heal shoes. This should only be done when changing film rolls,
please see page 7 steps 1, 2, &3. The following procedure will help keep
the heal shoes free of adhesive that has been deposited along the edge
of the laminating film.
CAUTION: THE FOLLOWING PROCEDURE IS PERFORMED
WHILE THE LAMINATOR IS HOT. USE EXTREME CAUTION.
WARNING: Do not apply cleaning fluids or solvents to
the rollers.
WARNING: Do not attempt to laminate adhesives
marked 'flammable'.
1 Preheat the laminator using the heat button.
2 Clean the top and bottom heat shoes with a soft cloth.
3 Follow the procedure on page 7, steps 4, 5, 6 & 7.
NOTE: Do not use metal scouring pads to clean the heat shoes!
WARNING: Do not laminate glitter and/or metallic items. Damage to
the rollers may result.
m
m
m

6
AutoUltima Pro - Setup
Laminator comes pre-Ioaded with 75mic film, Approximately 90 metres.
1 In back of machine turn on power.
Power light LED front control panel
lights up.
4 Insert and secure feed tray into
position.
Enter
2 First time only, scroll up or down
to select language setting, then
press "Enter". To reset language,
hold down both scroll buttons for
5 seconds, select language then
press enter.
3 Open tray for normal operation. For
longer paper or banners close tray.
Tra y
5 Adjust "Paper Side Guides" to fit
document(s).
Side
Guides
AutoUltima Pro - Setup
Laminator comes pre-Ioaded with 75mic film, Approximately 90 metres.
3 Laminated document(s) will stack
in Exit Tray. Lamination will stop
when job is complete.
1 Adjust paper side guides and place
document(s) in feed tray.
Side
Guides
Start Stop
Enter
2 Press start and lamination will
begin after warm up.
Screen
Start Stop
Enter
4 LCD screen will display number of
documents being laminated.
Screen

7
G
AutoUltima Pro – Load Film
IF POSSIBLE, ALWAYS LOAD FILM BEFORE RUNNING COMPLETELY OUT.
1 Cut laminating film as indicated. If
film is not present see next page.
5 Insert and lock Idler Bar Assembly,
then close 4 EZ Load levers.
2 Open all 4 "EZ" Load levers and
remove film.
4 Insert new film, overlap film on
Heat Shoe.
Note: Match colours of film core
ends to EZ Load Levers.
3 Remove Idler Bar Assembly, then
press "Heat" button.
Heat
Button
6 Press feed switch (forward) and
hold until wrinkle-free lamination.
Close top.
7 Scroll up or down to select film
thickness. Press "Enter" to
confirm. Press "Start" to resume
lamination. To reset film thickness,
hold enter button for 5 seconds,
select film thickness then press
"Enter".
Screen

8
AutoUltima Pro – Load Film
USE INSTRUCTIONS BELOW TO LOAD NEW FILM IF COMPLETELY EMPTY.
1 First, complete steps 2, 3 and 4
from "Load Film" page 7. Close 4
EZ levers.
2 Press "Feed" switch (forward)
and insert "Feed Card" as shown.
Insert card with slight force
through film rollers.
3 Insert Idler Bar Assembly. Continue
pressing feed switch and wait for
clear, wrinkle-free lamination.
4 Close top cover, scroll up or down
to select film thickness. Press
"Enter" to confirm. Press "Start" to
resume lamination.
Screen
AutoUltima Pro – Status Message
Laminator comes pre-Ioaded with 75mic film, Approximately 90 metres.
Standby Screen.
Counting screen,
showing pages
laminated so far.
Load document(s) to
be laminated.
Job complete screen.
Total pages laminated.
Machine is in heat
mode. Machine is
warming to operating
temperature.

9
G
AutoUltima Pro – Alert Messages
Do not attempt to take machine apart - No User Servicable Parts.
TOP COVER ALERT
Top cover is open. Close it and resume
lamination.
FRONT DRAWER ALERT
Close front drawer and resume
lamination.
LOW FILM ALERT
Open top cover and load new film rolls.
Refer to "Load Film", pg. 7 and 8.
IDLER BAR ASSEMBLY ALERT
Insert and lock the Idler Bar assembly.
Close top cover and resume
lamination.
(Alert Message)
(Alert Message)
(Alert Message)
(Alert Message)

10
AutoUltima Pro – Error Messages
Do not attempt to take machine apart - No User Serviceable Parts.
FEED JAM ERROR
Remove document(s) and any debris
from feed tray, Fan documents and
adjust size guides, Press "Start" to
resume.
(Jam Message)
Jam Location
JAM ERROR
A) Open covers
B) Locate film Jam
C) Press Heat button
Use Feed switch (forward/reverse) to
clear jam, It may be necessary to cut
and remove film, (Take care not to
damage rollers when cutting film), If
cutting is required, use Feed switch
(forward I reverse) to re-feed film
through machine.
(Jam Message)
(Jam Message)
Jam Location
Jam Location
Jam
Jam

11
G
If possible, always load documents in
landscape format. Top and bottom film
border is always 6mm, and side film borders
will vary depending on document size.
For recommended max document length,
see specifications, pg. 14.
For best lamination results, avoid irregular
shapes as shown below.
Lamination Direction
305mm
5mm
4mm
41.5mm
420mm
210mm
297mm
A3
297x420mm
A4
297x210mm
A4
210x297mm
297mm
297mm
210mm
AutoUltima Pro – Document Size

12
AutoUltima Pro – Troubleshooting
Symptoms Possible cause Corrective action
No power switch, does not illuminate when
in on position
Power cord is not plugged
into live power outlet
Plug into live outlet
Circuit breaker has tripped Reset circuit breaker at
rear of machine
Machine does not respond after pressing
standby button
Cover is open Close cover
No paper in feeder Insert paper
Idler bar assembly
not latched
Latch idler bar levers
Document collection tray
is not fully inserted
Fully insert document
into exit tray
Main power switched off Turn on power
Low film Load new film
Faint lines across the document
Cloudy lamination
Wavy lamination
Unsatisfactory adhesion to media
Machine is not fully warm Allow time to warm up
Incorrect film setting Select correct film setting
Insufficient heat Verify correct film setting
Media not compatible Media is not suitable
for thermal lamination
Feeder does not feed document Media not compatible
with feeder
Manually feed single
sheets
Paper is not fully inserted
to feeder
Fully insert paper to
feeder
Document is skewed in film Feeder side guides
not set correctly
Adjust feeder side guides
to paper size
Feeder picks multiple documents Static electricity on media, or
media is stuck together
Fan paper and replace
in feeder
Wrinkles in document EZ Load levers not closed Close EZ Load Levers

13
G
AutoUltima Pro – Specifications
1. WARM-UP TIME
Note: If machine is warm, the warm up times are reduced.
1.7 mil - 42 micron Max 2.5 minutes from cold
3 mil - 75 micron Max 1minutes from cold
5 mil - 125 micron Max 1minutes from cold
6. FEEDER CAPACITY
A) Maximum of 50 sheets at 75 gsm
7. MACHINE WEIGHT
A) In box 36 kg
B) Out of box 32 kg
8. DIMENSIONS (with tray open)
483mm Wide x 787mm High x 686mm Deep
9. ELECTRICAL SPECIFICATIONS
230v, @50Hz, 3.5A
5. FILM THICKNESS
42 microns Very Flexible
75 microns Flexible
125 microns Semi Rigid
2. SPEED
A) The machine throughput speed is 1000mm per minute
B) Equivalent to 4 letter or A4 documents per minute
C) 50 letter or A4 sheets take approximately 12 minutes
3. PAPER SIZES AND THICKNESS
Max paper thickness 360 gsm
Min paper thickness 75 gsm
Max paper width 12" film, 11.6" - 297 mm
11.5" film, 11" - 280 mm
Min paper width 152mm
Max paper length 1220 mm
4. BORDER SIZES
A4 paper (side border) 305 mm wide film 4mm
A4 paper (top &bottom border) 305 mm wide film 5mm

14
Guarantee
Operation of this machine is guaranteed for one year from date of
purchase, subject to normal use. Within the guarantee period, ACCO
Brands Europe will at its own discretion either repair or replace the
defective machine free of charge. Defects due to misuse or use for
inappropriate purposes are not covered under the guarantee. Proof
of date of purchase will be required. Repairs or alterations made by
persons not authorised by ACCO Brands Europe will invalidate the
guarantee. It is our aim to ensure that our products perform to the
specifications stated. This guarantee does not affect the legal rights
which consumers have under applicable national legislation governing
the sale of goods.
Register this product online at www.accoeurope.com
AutoUltima Pro – Lamination Tips
• Before laminating important or unique documents, always run a test
document through the laminator using a similar media
• Laminator is only designed to laminate specified paper products
• Do not laminate 'odd' shape documents
• Do not completely run out of film when in Manual mode (loading film)
• NOTE: First sheets will be film only
• Do not use punched paper
• Avoid folded or creased paper
• CLOSE document capture tray if laminating documents longer than
regular
• A4 or letter size documents
• For ease of film loading, stick new film to existing film, see page 7,
step 4 diagram.

15
G

16
Consignes de sécurité générales
• Utilisez cet appareil uniquement aux fins prévues, conformément aux
spécifications précisées dans le mode d’emploi.
• Gardez les mains, cheveux longs, vêtements amples et objets comme
les colliers et cravates à l’écart de l’avant du plateau d’alimentation afin
d’éviter qu’ils ne s’emmêlent ou y restent coincer.
• Évitez tout contact avec les sabots chauffants pendant le fonctionnement
de l’appareil et attendez quelques instants après la mise hors tension de
l’appareil avant d’y toucher. Les sabots chauffants peuvent atteindre des
températures dépassant 150° C.
• Ne mettez pas les mains et doigts sur la trajectoire de la lame tranchante
du dispositif de coupe de film située à la sortie du film.
• Placez l'appareil sur un chariot, un stand ou une tablette stable, capable
de soutenir une charge d’au moins 36 kg. Si vous le placez sur une
surface instable, l’appareil risque de tomber et de provoquer des
blessures corporelles graves. Lors du déplacement de l’appareil sur un
chariot ou un stand, évitez les arrêts brusques, la pression excessive et
les sols irréguliers.
• Ne rendez pas inopérant ou n’enlevez pas les dispositifs de sécurité
mécaniques ou électriques comme les systèmes de verrouillage et de
protection.
• N’insérez pas d’objets ne se prêtant pas à la plastification.
• N’exposez pas l’appareil aux liquides.
LES AVERTISSEMENTS SUIVANTS FIGURENT SUR CE PRODUIT.
Risque de choc électrique. Ne
pas ouvrir. Aucune des pièces
se trouvant à l’intérieur ne peut
être réparée par l’utilisateur. En
cas de panne, s'adresser à du
personnel de dépannage qualifié.
ATTENTION
m
c
Ce message d’avertissement signifie que vous risquez de vous blesser
gravement ou de vous tuer si vous ouvrez le produit et vous exposez à
une tension dangereuse.
CE SYMBOLE D’AVERTISSEMENT PRÉCÈDE CHAQUE
MESSAGE DE SÉCURITÉ DONNÉ DANS CE MANUEL.
D’IMPORTANTS MESSAGES DE SÉCURITÉ FIGURENT SUR LE
PRODUIT. VEUILLEZ LIRE ATTENTIVEMENT CES MESSAGES ET
INSTRUCTIONS. CONSERVEZ CES INSTRUCTIONS POUR UN
USAGE ULTÉRIEUR.
m
Consignes de sécurité
importantes
ACCO BRANDS EUROPE SE SOUCIE DE VOTRE SÉCURITÉ AINSI QUE DE
CELLE D’AUTRUI. DES MESSAGES DE SÉCURITÉ IMPORTANTS SONT
DONNÉS DANS CE MANUEL D’INSTRUCTIONS ET SUR LE PRODUIT.
VEUILLEZ LES LIRE ATTENTIVEMENT.
m
Ne pas toucher les sabots chauffants avant leur refroidissement.
Surface très
chaude.
ATTENTION
m
Ce message de sécurité signifie que vous devez faire preuve de
vigilance pour ne pas vous couper.
LAME TRANCHANTE.
Tenir main et doigts
à l’écart.
ATTENTION
m
AVERTISSEMENT : CE SYMBOLE D’AVERTISSEMENT
PRÉCÈDE CHAQUE MESSAGE DE SÉCURITÉ DONNÉ
DANS CE MANUEL. IL INDIQUE UN DANGER POTENTIEL
SUSCEPTIBLE DE PROVOQUER DES BLESSURES
PERSONNELLES AINSI QUE DES DOMMAGES AU
PRODUIT OU À D’AUTRES BIENS MATÉRIELS.
m
AVERTISSEMENT : N’ESSAYEZ PAS D'ENTRETENIR OU
DE RÉPARER VOUS-MÊME CETTE PLASTIFIEUSE.
m
AVERTISSEMENT : NE BRANCHEZ PAS LA PLASTIFIEUSE
À UNE PRISE ÉLECTRIQUE ET N’ESSAYEZ PAS DE
L’UTILISER AVANT D’AVOIR LU L’INTÉGRALITÉ
DES INSTRUCTIONS CI-APRÈS. CONSERVEZ CES
INSTRUCTIONS DANS UN ENDROIT FACILE D’ACCÈS
POUR TOUTE RÉFÉRENCE ULTÉRIEURE.
m
AVERTISSEMENT : POUR VOTRE PROTECTION, NE
BRANCHEZ PAS LA PLASTIFIEUSE À UNE PRISE
ÉLECTRIQUE ET N’ESSAYEZ PAS DE L’UTILISER AVANT
D’AVOIR LU L’INTÉGRALITÉ DES INSTRUCTIONS CI-APRÈS.
CONSERVEZ CES INSTRUCTIONS DANS UN ENDROIT
FACILE D’ACCÈS POUR TOUTE RÉFÉRENCE ULTÉRIEURE.
POUR ÉVITER TOUT ACCIDENT, IL EST INDISPENSABLE
DE RESPECTER RIGOUREUSEMENT LES CONSIGNES DE
SÉCURITÉ DE BASE SUIVANTES LORS DE L’INSTALLATION
ET DE L’UTILISATION DE CETTE PLASTIFIEUSE.
m
Consignes de sécurité
importantes m
Consignes de sécurité électrique
• L’appareil doit être branché à une prise de courant correspondant à la
tension précisée sur la plaque signalétique située à l’arrière de l'appareil.
• Débranchez l’appareil avant de le déplacer ou en cas d’inutilisation
prolongée.
• N’utilisez pas l’appareil si le cordon d’alimentation ou la fiche est
endommagée.
• Ne surchargez pas les prises électriques ou vous risquez de provoquer un
incendie ou un choc électrique.
• Ne modifiez pas la fiche du cordon d’alimentation. Celle-ci est configurée
pour l’alimentation électrique appropriée.
• Cet appareil est destiné uniquement à un usage intérieur.
ATTENTION : L’appareil doit être installé à proximité d’une prise
de courant facilement accessible. N’utilisez pas de rallonge.
• Débranchez la fiche du cordon d’alimentation de la prise de courant
et conservez le cordon d’alimentation en votre possession pendant le
déplacement de l’appareil.
• N’utilisez pas l’appareil si le cordon d’alimentation ou la fiche est
endommagée. En cas de dysfonctionnement ou d’endommagement de
l’appareil, contactez un représentant GBC agréé pour toute assistance.
m
m

17
F
Effectuez uniquement les procédures d’entretien périodiques
mentionnées dans ces instructions.
N’essayez pas d’entretenir ou de réparer vous-même
cette plastifieuse.
Débranchez l’appareil et contactez un représentant GBC agréé dans
tous les cas suivants :
• endommagement du cordon d’alimentation ou de sa fiche ;
• déversement de liquide dans l'appareil ;
• dysfonctionnement de l’appareil après une mauvaise manipulation ;
• fonctionnement de l’appareil non conforme aux descriptions données
dans ces instructions
m
Entretien
AVERTISSEMENT : CE N’EST PAS UN JOUET – NE
LAISSEZ PAS VOS ENFANTS JOUER AVEC CETTE
PLASTIFIEUSE !
m
Installation
• Tout dommage survenu pendant le transit doit être signalé
immédiatement au transporteur.
• Placez l’appareil sur une surface plate et stable, capable de supporter
une charge de 50 kg. Cette surface doit faire au moins 76 cm de
hauteur pour assurer une utilisation en tout confort. Les quatre pieds
en caoutchouc doivent tous se trouver sur la surface de support.
• Branchez le cordon d’alimentation à une prise secteur appropriée.
Évitez de brancher un autre appareil sur le circuit de dérivation
sur lequel est branchée la plastifieuse pour ne pas faire sauter le
disjoncteur ou les fusibles.
• Positionnez la plastifieuse de façon à permettre au film sortant de
tomber facilement au sol. L’accumulation de documents plastifiés à
la sortie de l'appareil peut provoquer l’enroulement du film sur les
rouleaux et entraîner un blocage.
• Évitez de placer l’appareil près de sources de chaleur ou de froid.
Évitez de placer l’appareil directement sous une ventilation d’air ou un
courant d’air chaud ou climatisé.
Maintenance
La seule opération de maintenance requise de la part de l’opérateur est
le nettoyage périodique des sabots chauffants. Elle ne doit être effectuée
que lors du changement des bobines de film ; voir étapes 1, 2 et 3 à la
page 19. La procédure suivante permet d’enlever tout dépôt de colle qui
a pu adhérer le long du bord du film de plastification.
ATTENTION : LA PROCÉDURE SUIVANTE EST EFFECTUÉE
ALORS QUE LA PLASTIFIEUSE EST CHAUDE. FAITES
PREUVE D’UNE GRANDE PRUDENCE POUR NE PAS VOUS
BRÛLER.
AVERTISSEMENT : N’appliquez pas de liquide de
nettoyage ou de solvant sur les rouleaux.
AVERTISSEMENT : N’essayez pas d’utiliser de films
dotés d’adhésifs portant la mention « inflammable ».
1 Préchauffez l’appareil à l’aide du bouton de préchauffage.
2 Nettoyez les sabots chauffants inférieur et supérieur avec un linge
doux.
3 Suivez la procédure indiquée aux étapes 4, 5, 6 & 7 à la page 19.
REMARQUE : N'utilisez pas de tampons à récurer métalliques pour
nettoyer les sabots chauffants !
AVERTISSEMENT : Ne plastifiez pas d'éléments scintillants et/ou
métalliques au risque d’endommager les rouleaux.
m
m
m
Emplacement des pièces
et commandes
1 Plateau d’alimentation
2 Guide papier
3 Capot
4 Panneau de commande
5 Plateau de réception
6 Bouton marche/arrêt
7 4 leviers EZLoad™
8 Bouton de préchauffage
9 Bouton d’alimentation feuilles
J Barre d’entraînement
K Sabot chauffant
L Bobine de film
M Voyant de mise sous tension LED (rouge)
N Voyant prêt à l’emploi LED (vert)
O Touche de défilement

18
AutoUltima Pro – Préparation
À la vente, la plastifieuse contient un film de 75 microns d’épaisseur et d’environ 90 mètres de long.
1 Mettez l’appareil sous tension à
l’aide du bouton situé à l’arrière
de l’appareil. Le voyant de mise
sous tension LED (panneau de
commande avant) s’allume.
4 Insérez et fixez le plateau
d’alimentation.
Enter
2 Uniquement avant la toute
première utilisation, sélectionnez
la langue à l’aide des touches
de défilement, puis appuyez
sur « Enter ». Pour reconfigurer
la langue, maintenez les deux
touches de défilement abaissées
pendant 5 secondes, sélectionnez
la langue, puis appuyez sur
« Enter ».
3 Ouvrez le plateau de réception en
cas de plastification de documents
de formats standard. Fermez-le
pour les bannières ou les formats
papier plus longs.
Plateau
5 Réglez les guides papier en
fonction du format des documents.
Guides
papier
AutoUltima Pro – Fonctionnement
À la vente, la plastifieuse contient un film de 75 microns d’épaisseur et d’environ 90 mètres de long.
3 Le ou les documents plastifiés
s’empilent sur le plateau de
réception. La plastification s’arrête
en fin de tâche.
1 Réglez les guides papier et placez
le ou les documents sur le plateau
d'alimentation.
Guides
papier
Start Stop
Enter
2 Appuyez sur la touche « Start »
pour lancer la plastification après
la période de préchauffage.
Écran
Start Stop
Enter
4 L’écran LCD affiche le nombre
de documents en cours de
plastification.
Écran

19
AutoUltima Pro – Chargement du film
SI POSSIBLE, N’ATTENDEZ PAS D’AVOIR ÉPUISÉ COMPLÈTEMENT LE FILM POUR LE REMPLACER.
1 Coupez le film de plastification
selon l’illustration. S'il ne reste
plus de film, voir page suivante.
5 Insérez et verrouillez la barre
d’entraînement, puis fermez les 4
leviers EZLoad™.
2 Ouvrez les 4 leviers EZLoad™ et
retirez le film.
4 Insérez le nouveau film en
chevauchant les deux extrémités
de film sur le sabot chauffant.
Remarque : Faites correspondre
la couleur des extrémités de
bobine aux leviers EZLoad™.
3 Enlevez la barre d’entraînement,
puis appuyez sur le bouton de
préchauffage.
Bouton de
préchauffage
6 Faites basculer le bouton
d’alimentation des feuilles vers
l’avant et maintenez-le dans
cette position jusqu’à ce que la
plastification ne présente aucun
pli. Fermez le capot.
7 Sélectionnez l’épaisseur du film à
l'aide des touches de défilement.
Appuyez sur « Enter » pour
confirmer la sélection. Appuyez
sur « Start » pour continuer la
plastification. Pour reconfigurer
l’épaisseur du film, maintenez
la touche « Enter » abaissée
pendant 5 secondes, sélectionnez
l’épaisseur, puis appuyez sur
« Enter ».
Écran
F

20
AutoUltima Pro – Chargement du film
S’IL NE RESTE PLUS DE FILM DU TOUT, SUIVEZ LES INSTRUCTIONS CI-DESSOUS POUR CHARGER UN NOUVEAU FILM.
1 Suivez les étapes 2, 3 et 4 de la
section « Chargement du film »
à la page 7. Fermez les 4 leviers
EZLoad™.
2 Faites basculer le bouton
d’alimentation des feuilles
vers l’avant et insérez la carte
d’alimentation selon l’illustration.
Poussez-la fermement pour la faire
passer à travers les rouleaux.
3 Installez la barre d’entraînement.
Continuez à appuyer sur le bouton
d’alimentation des feuilles jusqu’à
la sortie de la carte plastifiée nette
et sans plis.
4 Fermez le capot. Sélectionnez
l’épaisseur du film à l'aide des
touches de défilement. Appuyez
sur « Enter » pour confirmer la
sélection. Appuyez sur la touche
« Start » pour continuer la
plastification.
Écran
AutoUltima Pro – Messages d’état
À la vente, la plastifieuse contient un film de 75 microns d’épaisseur et d’environ 90 mètres de long.
Écran de veille
Écran de comptage
indiquant le nombre
de documents déjà
plastifiés.
Invitation à charger le
ou les documents à
plastifier.
Écran de fin de tâche.
Nombre total de
feuilles plastifiées.
Appareil en mode
de préchauffage
jusqu'à l'atteinte de
la température de
fonctionnement.
Table of contents
Languages:
Other GBC Laminator manuals

GBC
GBC HeatSeal H400 User manual

GBC
GBC HEATSEAL H220 User manual

GBC
GBC CLA402 User manual

GBC
GBC FUSION 3000L Instruction Manual

GBC
GBC GBC A4 POLAR User manual

GBC
GBC HeatSeal H520 User manual

GBC
GBC HeatSeal H65 User manual

GBC
GBC GBC Ultima 65 Roll User manual

GBC
GBC GBC4250 User manual

GBC
GBC Pro-Tech NORD ORCA-I SP User manual

GBC
GBC HEATSEAL H220 User manual

GBC
GBC 3500 PRO-SERIES User manual

GBC
GBC 5031TS ROLL User manual

GBC
GBC FUSION 3000L User manual

GBC
GBC GBC Photo User manual

GBC
GBC F - 160 User manual

GBC
GBC VOYAGER User manual

GBC
GBC Talon 44 CE User manual

GBC
GBC 930-028 Operating instructions

GBC
GBC HeatSeal H210 User manual