Gecko in.k1000 User manual

in.k1000
full-featured color capacitive
touchscreen display keypad for spas
TechBook
Gecko Alliance
450 des Canetons, Québec (Qc), G2E 5W6 Canada, 1.800.78.GECKO
www.geckoalliance.com Printed in Canada
9919-101309-C
Rev. 02-2016
© Groupe Gecko Alliance inc., 2016
All trademarks or registered trademarks
are the property of their respective owners.
Fun, simple, engaging
Truly interactive control
Larger, faster and cooler
1

1
1
Warning ��������������������������������������������������������������������������������������������������������������������������������������������������������������������������� 2
Introduction ��������������������������������������������������������������������������������������������������������������������������������������������������������������������� 3
Overview
-in�k1000 dimensions ������������������������������������������������������������������������������������������������������������������������������������������ 4
Installation
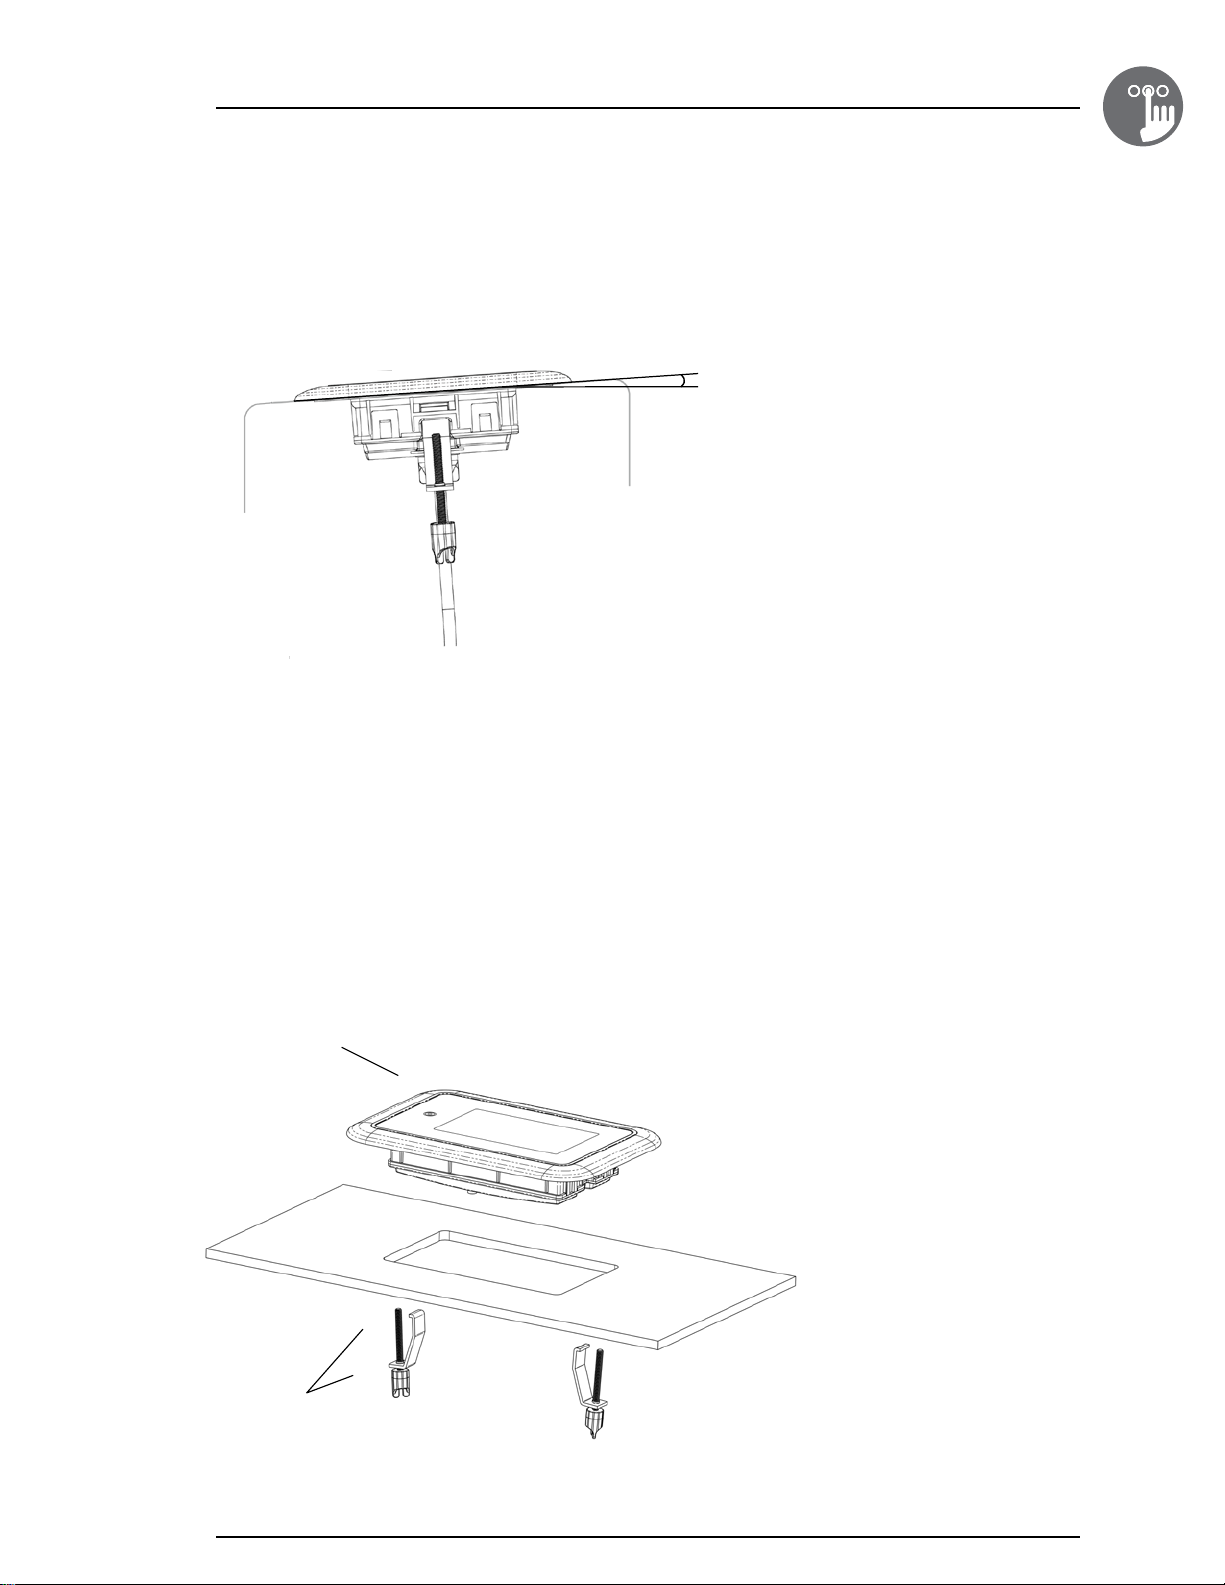
-Installation of in�k1000 ��������������������������������������������������������������������������������������������������������������������������������������� 5
-Drilling template ������������������������������������������������������������������������������������������������������������������������������������������������� 6
-Installation notes ������������������������������������������������������������������������������������������������������������������������������������������������� 8
-Connecting in�k1000 to the spa pack ����������������������������������������������������������������������������������������������������������������� 8
Keypad functions
-in�k1000 keypad layout ������������������������������������������������������������������������������������������������������������������������������������ 10
-Power ��������������������������������������������������������������������������������������������������������������������������������������������������������������� 10
-Main screen ����������������������������������������������������������������������������������������������������������������������������������������������������� 10
-Start or stop accessories ����������������������������������������������������������������������������������������������������������������������������������� 11
-Notifications ������������������������������������������������������������������������������������������������������������������������������������������������������ 11
-Water temperature ������������������������������������������������������������������������������������������������������������������������������������������� 12
-Spa menu ��������������������������������������������������������������������������������������������������������������������������������������������������������� 12
-Display page ����������������������������������������������������������������������������������������������������������������������������������������������������� 12
-Contrast page ��������������������������������������������������������������������������������������������������������������������������������������������������� 13
-Settings������������������������������������������������������������������������������������������������������������������������������������������������������������� 13
-Water care �������������������������������������������������������������������������������������������������������������������������������������������������������� 14
-Modifying schedules����������������������������������������������������������������������������������������������������������������������������������������� 15
-Maintenance ���������������������������������������������������������������������������������������������������������������������������������������������������� 15
-Error Log ����������������������������������������������������������������������������������������������������������������������������������������������������������� 15
-Date and time ��������������������������������������������������������������������������������������������������������������������������������������������������� 16
-Keypad settings ������������������������������������������������������������������������������������������������������������������������������������������������ 17
-Temperature units �������������������������������������������������������������������������������������������������������������������������������������������� 17
-Display page ����������������������������������������������������������������������������������������������������������������������������������������������������� 17
-Contrast page ��������������������������������������������������������������������������������������������������������������������������������������������������� 18
-Language Select ����������������������������������������������������������������������������������������������������������������������������������������������� 18
-Electrical configuration ������������������������������������������������������������������������������������������������������������������������������������� 18
-Wi-Fi ����������������������������������������������������������������������������������������������������������������������������������������������������������������� 19
-About���������������������������������������������������������������������������������������������������������������������������������������������������������������� 19
-Wipe screen ����������������������������������������������������������������������������������������������������������������������������������������������������� 20
-in�stream 2 functions ���������������������������������������������������������������������������������������������������������������������������������������� 20
-in�clear functions ���������������������������������������������������������������������������������������������������������������������������������������������� 21
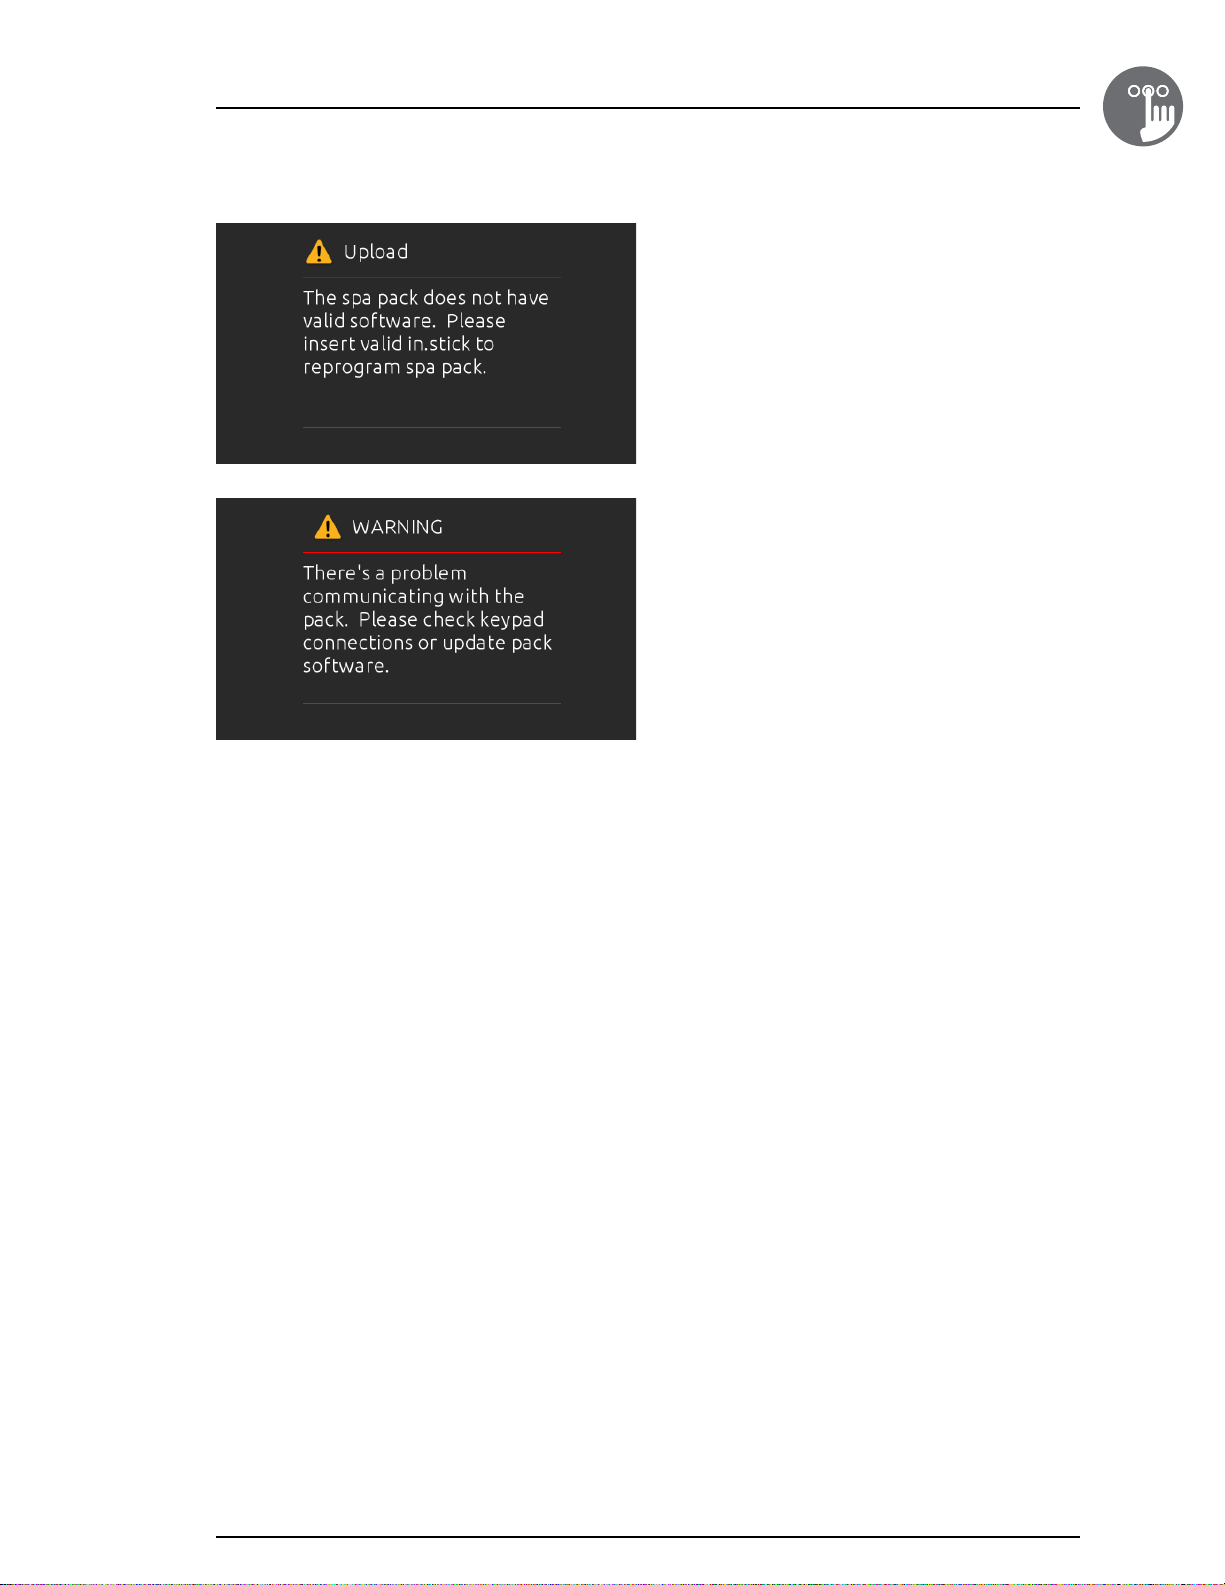
Error messages �������������������������������������������������������������������������������������������������������������������������������������������������������������� 23
Feature matrix ��������������������������������������������������������������������������������������������������������������������������������������������������������������� 24
Specifications ���������������������������������������������������������������������������������������������������������������������������������������������������������������� 25
Table of contents

2
1
WARNING:
Before installing or connecting the unit, please read the following�
FAILURE TO COMPLY WITH THE FOLLOWING WARNINGS MAY SIGNIFICANTLY SHORTEN THE PRODUCT’S LIFE TIME,
AND LEAD TO FAILURES AS WELL AS HAZARDOUS CONDITIONS*� COMMON SENSE MUST ALWAYS PREVAIL WHEN
EVALUATING THE INSTALLATION AND/OR USE OF ANY ELECTRONIC CONTROL IN
A FINAL APPLICATION�
*RESPECT ENVIRONMENTAL CONDITIONS LISTED AT END OF TECHBOOK�
*THIS UNIT MUST BE INSTALLED BY QUALIFIED PERSONNEL�
*ONLY QUALIFIED PERSONNEL ARE TO SERVICE THIS UNIT�
THERE ARE NO USER SERVICEABLE PARTS INSIDE�
*THIS UNIT SHOULD BE INSTALLED ON A CLEAN FLAT SURFACE�
*THE GASKET ON THE BACK OF THE UNIT WILL PREVENT WATER INFILTRATION INSIDE, BEHIND THE MOUNTED
SURFACE� IF THE GASKET IS DAMAGED, SEAL THE BACK OF THE UNIT WITH SILICONE TO AVOID ANY LEAKAGE
BEHIND THE MOUNTED SURFACE�
* THIS UNIT MUST BE MOUNTED ON THE OUTSIDE EDGE OF THE SPA� SEE INSTALLATION SECTION FOR DETAILS�
• THE BACK OF THIS UNIT SHOULD NOT BE ENCLOSED IN A WAY THAT CAUSES WATER TO COLLECT�
SEE INSTALLATION SECTION FOR DETAILS�
*HAZARDOUS CONDITION:
A CONDITION THAT IS POTENTIALLY DAMAGING AND/OR DANGEROUS TO THE OPERATOR OR SURROUNDINGS�
THIS INCLUDES, BUT IS NOT LIMITED TO: FIRE, FLOODING OR OTHER WATER DAMAGE, DIELECTRIC BREAKDOWNS
(PRESENCE OF HIGH VOLTAGE), ETC�
MAINTENANCE
IF YOU HAVE PROBLEMS, DO NOT ATTEMPT TO REPAIR THE UNIT YOURSELF� RETURN IT TO YOUR DEALER OR
SERVICE STATION FOR SERVICING�
ACCESSORY PARTS
BE SURE TO USE ONLY THE SPECIFIED ACCESSORY PARTS� USE OF OTHER THAN DESIGNATED PARTS MAY DAMAGE
THIS UNIT INTERNALLY OR MAY NOT SECURELY INSTALL THE UNIT IN PLACE� THIS MAY CAUSE PARTS TO BECOME
LOOSE RESULTING IN HAZARDS OR PRODUCT FAILURE�
DISPOSAL OF THE PRODUCT
THE APPLIANCE (OR THE PRODUCT) MUST BE DISPOSED OF SEPARATELY
IN ACCORDANCE WITH THE LOCAL WASTE DISPOSAL LEGISLATION IN FORCE�
Compatible spa controllers:
in�xm2, in�xe, in�yt, in�yj and in�ye with compatible software revision�
Aeware®, Gecko®, and their respective logos are Registered Trademarks of Gecko Alliance Group�
in�k1000™, in�xm2™, in�xe™, in�yt™, in�ye™, in�yj™, in�tune™, in�stream™, in�stream 2, in�mix™, in�clear™, in�touch™ and
in�therm™, and their respective logos are trademarks of Gecko Alliance Group�
All other product or company names that may be mentioned in this publication are tradenames, trademarks
or registered trademarks of their respective owners�
Warning

3
1
Introduction
in�k1000
full-featured color capacitive
touchscreen display keypad for spas
Fun, simple, engaging one level menu interface
Parting ways with physical buttons, keys and overlays,
Gecko’s in�k1000 touchscreen keypad is fun to use,
simple to learn and features an intuitive and engaging
one level menu interface�
Truly interactive control of all spa and accessory
functions and settings
Mode and function selection wheels, all-on or all-off one
touch activation key of last used settings, interactive
display icons and on-screen reminders and messages
make for a unique user interface� Control and get
direct feedback and seamless interaction with your spa
equipment and connected value added accessories like
in�clear, in�mix and in�stream 2�
Larger, faster, and cooler touch screen display
Driven by a powerful 400 MHz processor, the in�k1000
keypad features an eye-catching 4�3 inch 256K color
LCD capacitive touchscreen display resting within a thin
and beautiful enclosure that houses its cutting-edge
electronics� The in�k1000 keypad fits perfectly on
the edge of any spa�

4
1
Overview
Side view
0,26"
(6,6 mm)
1,69"
(43 mm)
Front view
7,49"
(190 mm)
5,17"
(131 mm)
3,5"
(89 mm)
MAX
in.k1000 dimensions

5
1
4°
Installation of in.k1000
Installation
Gasket with or without adhesive
Optional wing nuts
and spacers
To install the in�k1000, use the drilling template provided in this section�
Determine the mounting location and stick the template on the chosen location�
Cut out an opening according to the template (see illustration)�
Clean the installation surface and peel the adhesive gasket from the back
of the keypad�
Insert the keypad and align it correctly, then ensure it is properly glued
by gently pressing evenly on the entire surface�
When installing the keypad on the spa, a minimum angle of 4 degrees must be respected�

6
1
Installation
Drilling template
3,19"
(90 mm)
5,5"
(140 mm)
0,19"
5 mm)

7
1
Drilling template
Installation
1,75"
(44 mm)
TYP
1,5"
(38 mm)
TYP 2,5"
(64 mm)
TYP

8
1
The in�k1000 must be installed on the outside edge
of the hot tub, so that it is not subject to moisture trapped
by the cover�
The back of the in�k1000 should not be enclosed where
water can gather, but instead cut out�
Connecting in.k1000 to the spa pack
To connect the in�k1000 keypad, simply insert its in�link
connector into the appropriate keypad connector of the
pack enclosure (as illustrated)�
Main keypad in�k1000
The vent hole on back of keypad should not be blocked�
Installation notes
Installation

9
1
Installation
Installation errors
Upon connecting the in�k1000 to the spa pack you may
see one of two error messages�
Please follow the instructions in the message or contact
your dealer for more information�

10
1
Keypad functions
Power
Touch the screen to turn on the keypad� 3 minutes after
the last pump is turned off, the screen will shut off if there
is no touch activity�
Then follow the instructions on the screen to access the
main screen�
Main screen
The main screen gives you access to your accessories
and water temperature� At the bottom of the screen
you will see any error or maintenance messages that
are present�
in.k1000 keypad layout
all-on or all-off key
(one touch activation)
direct to function
selection wheel
(settings and
additional options)
on-screen
system messages
and reminders
interactive display icons
(main spa functions)
mode selection
wheel (settings and
accessories)

11
1
Start or stop accessories
To start or stop an accessory, touch the associated icon�
Icons will become animated when their accessory is
turned on, and animation will stop when turned off�
Icons on the screen will reflect the speed or state of
the devices running on your spa� When an accessory has
more than two speeds press the button until it reaches
the desired speed�
Notifications
A notification area at the top right-hand side of the screen
shows the state of certain accessories installed in the spa�
Keypad functions
Notification icons
in.touch:
• Indicates that the in�touch module is detected
and connected to a Wi-Fi network�
• A red cross indicates that the in�touch module
is detected but isn't connected to a Wi-Fi network�
• An animated icon indicates that the in�touch
module is connecting to a Wi-Fi network�
For more information about the in�touch,
refer to the Wi-Fi section�
in.clear:
• The icon is green when the in�clear is
generating bromine�
• The icon is grey when the in�clear isn't
generating bromine�
• A red cross indicates that the in�clear is
turned off�
For more information about the in�clear,
refer to the in�clear functions section�
in.stream 2:
• The icon is green when the in�stream 2 is on�
• The icon is grey when the in�stream 2 is off�
For more information about the in�stream 2,
refer to the in�stream 2 functions section�

12
1
Water temperature
The temperature shown at the bottom of the screen shows
the current water temperature� Use the Up and Down
icon to set the desired temperature� The set point will
appear in blue� After 3 seconds without any change to the
set temperature value, the current water temperature will
reappear�
When the set value is lower than the current temperature
Cooling to xx�x will appear below� When the set value is
higher than the current temperature, Heating to xx�x will
be indicated under the value� Normally there is a short
delay before the heating starts, during which Heating
Suspended is indicated under the value�
Spa menu
From the home page you can access the following:
•
in�clear (if installed)
•
in�stream 2 (if installed)
•
spa menu
•
settings
To select an option, slide the left wheel up or down until
the desired icon menu is highlighted in the middle�
On the right side is a menu for access to the Display and
Contrast pages�
Keypad functions
Display page
Use this page to change the display orientation�

13
1
Contrast page
Use this page to change the display contrast�
Settings
In the Settings page you can access the following:
•
WaterCare
•
Maintenance
• Date & Time
•
Keypad
•
Electrical Config
•
Wi-Fi
•
About
To select an item, slide the right wheel until the desired
icon is highlighted in the middle or press on the menu
name�
Keypad functions

14
1
Water care
The Water Care page will help you set up your ideal
filtration and heating settings�Choose between Away from
Home, Beginner, Energy Savings, Super Energy and
Weekender, depending on your need� Touch the Water
care name to choose your setting�A green checkmark will
appear on the selected icon to confirm your choice �
In Economy mode, the set point will be reduced by 20°F*,
which means that the heating system will not be engaged
unless the temperature falls to 20°F below the spa's set
temperature�
The filtration schedule shown on the screen will apply to
the main filtration pump, most likely pump 1� If your spa
uses a circulation pump configured to run 24 hours, the
screen will show you the purge setting instead of filtration�
The purges are pre-programmed for a fixed number of
minutes, therefore the duration will be set to N/A on the
screen, and only the start time can be modified�
* Default pack value
Water care modes
Away:
In this mode the spa will always be in economy;
the set point will be reduced by 20° F�
Beginner:
The spa will never be in economy mode and will be
filtering according to the pack's low level configuration�
Energy Savings:
The spa will be in economy mode during the peak hours
of the day and resume normal mode on the weekend�
Super Energy Savings:
The spa will always be in economy mode during peak
hours, every day of the week�
Weekender:
The spa will be in economy mode from Monday
to Friday, and will run normally on the weekend�
Keypad functions

15
1
Keypad functions
Modifying schedules
To modify a Water Care category, touch the pen icon at
the right end of the desired watercare to open the selected
Water Care menu�
Touch the Economy tab to change the economy setting
and filter cycle tab for the filtration settings (or schedules)�
You can add economy or filtration schedules by touching
the « + » symbol �
To delete a schedule, touch the garbage can icon at the
right end of the desired line�
You can modify the programmed schedules by selecting
one and adjusting the schedule�
You have several possibilities for the schedule (Mon-Fri,
weekend, every day, or single days)� The schedules will
be repeated every week� The time and duration are set in
30 minute increments� Once you have set the schedule,
use the calendar icon to go back� Ensure that you have
selected the desired Water Care mode in the main Water
Care menu�
Maintenance
From the Maintenance page you can access the following:
• Error log
To acces the desired option simply touch the desired
menu item�
Error Log
In this section you can see errors that have been archived
by the system� Drag the list Up and Down to move through
the list� Errors are archived chronologically, from the most
recent at the top to the oldest at the bottom�
The Error log page shows the error code, the date
of the error, and the time�Touching the garbage can icon
will delete the Error log (with a confirmation)�
For more information, see the Error messages section�

16
1
Keypad functions
Date and time
Simply touch the item you want to change�
Set date
Here you can adjust the year, month and day�
Simply swipe up and down the column you want to
change, and select the desired value� When done,
touch the calendar icon at the right of the screen�
Set time
Here you can change the hour, minute and time format�
Simply swipe up and down the column you want to
change, and select the desired value� When done,
touch the calendar icon at the right of the screen�

17
1
Keypad settings
Here you can adjust the Temperature Units, Day/Night
contrast, and Display orientation and language�
Simply touch the item you want to change�
Temperature units
Choose the appropriate units to display temperatures�
Display page
Use this page to change the display orientation�

18
1
Keypad functions
Electrical configuration
Please do not make changes in this section unless you
are a qualified electrician.
In this section you can change the low-level configuration,
as well as modify the number of phases and the input
current�
Please note that if there are two spa packs in the system
(i�e�a SwimSpa installation), the master unit’s chosen
configuration must support a slave unit� If, after re-booting,
the chosen configuration does not support SwimSpa
installations, the in�k1000 will return (after about
45 seconds) to this configuration menu and prompt the
user to select a configuration number again�
Contrast page
Simply touch the item you want to change�
Language Select
Use this page to select the display language of the
in�k1000 keypad�

19
1
Keypad functions
About
This section shows information about the in�k1000
software number, and the revision numbers of the
different components of your system�
Wi-Fi
This menu is present if the in�touch module is present�
This page allows you to connect your in�touch module to a
Wi-Fi network or to change its network�
For more details about other in�touch connection methods
please see the in�touch techbook�
After a few seconds the available networks will appear on
the screen, as well as their signal strength�
Swipe Up or Down the list to select your network�
If the Wi-Fi network is password protected enter it when
prompted� Use Enter to validate the password�
If no password is required the in�touch will connect
automatically�
Once the in�touch module is connected to a
Wi-Fi network a green check mark will appear in
the Wi-Fi menu, and the network name will appear
in the
Settings
menu�
Other manuals for in.k1000
3
Table of contents
Other Gecko Spa Accessories manuals

Gecko
Gecko MSPA-1-AS User manual

Gecko
Gecko M-CLASS MC-MP-SBD User manual

Gecko
Gecko in.yj-3 Technical manual

Gecko
Gecko in.touch 2 User manual

Gecko
Gecko Aeware3 in.ye User manual

Gecko
Gecko DJS-1 User manual

Gecko
Gecko Aeware 3 in.ye User manual

Gecko
Gecko in.k300 User manual

Gecko
Gecko in.ye-V3 User manual

Gecko
Gecko in.ye-5 Technical manual

Gecko
Gecko in.k330 User manual

Gecko
Gecko BAHAMA SPAS Reference guide

Gecko
Gecko in.k506 User manual

Gecko
Gecko in.mix 300 Series User manual

Gecko
Gecko Aeware In.Xe User manual

Gecko
Gecko Aeware3 in.touch User manual

Gecko
Gecko Y Series User manual

Gecko
Gecko Y Series User manual

Gecko
Gecko S-CLASS 0202-205162 Technical manual