Press and hold the Program key
for 20 seconds until you access
the breaker setting menu.
The values displayed by the
system correspond to 80% of the
maximum amperage capacity of
the GFCI.
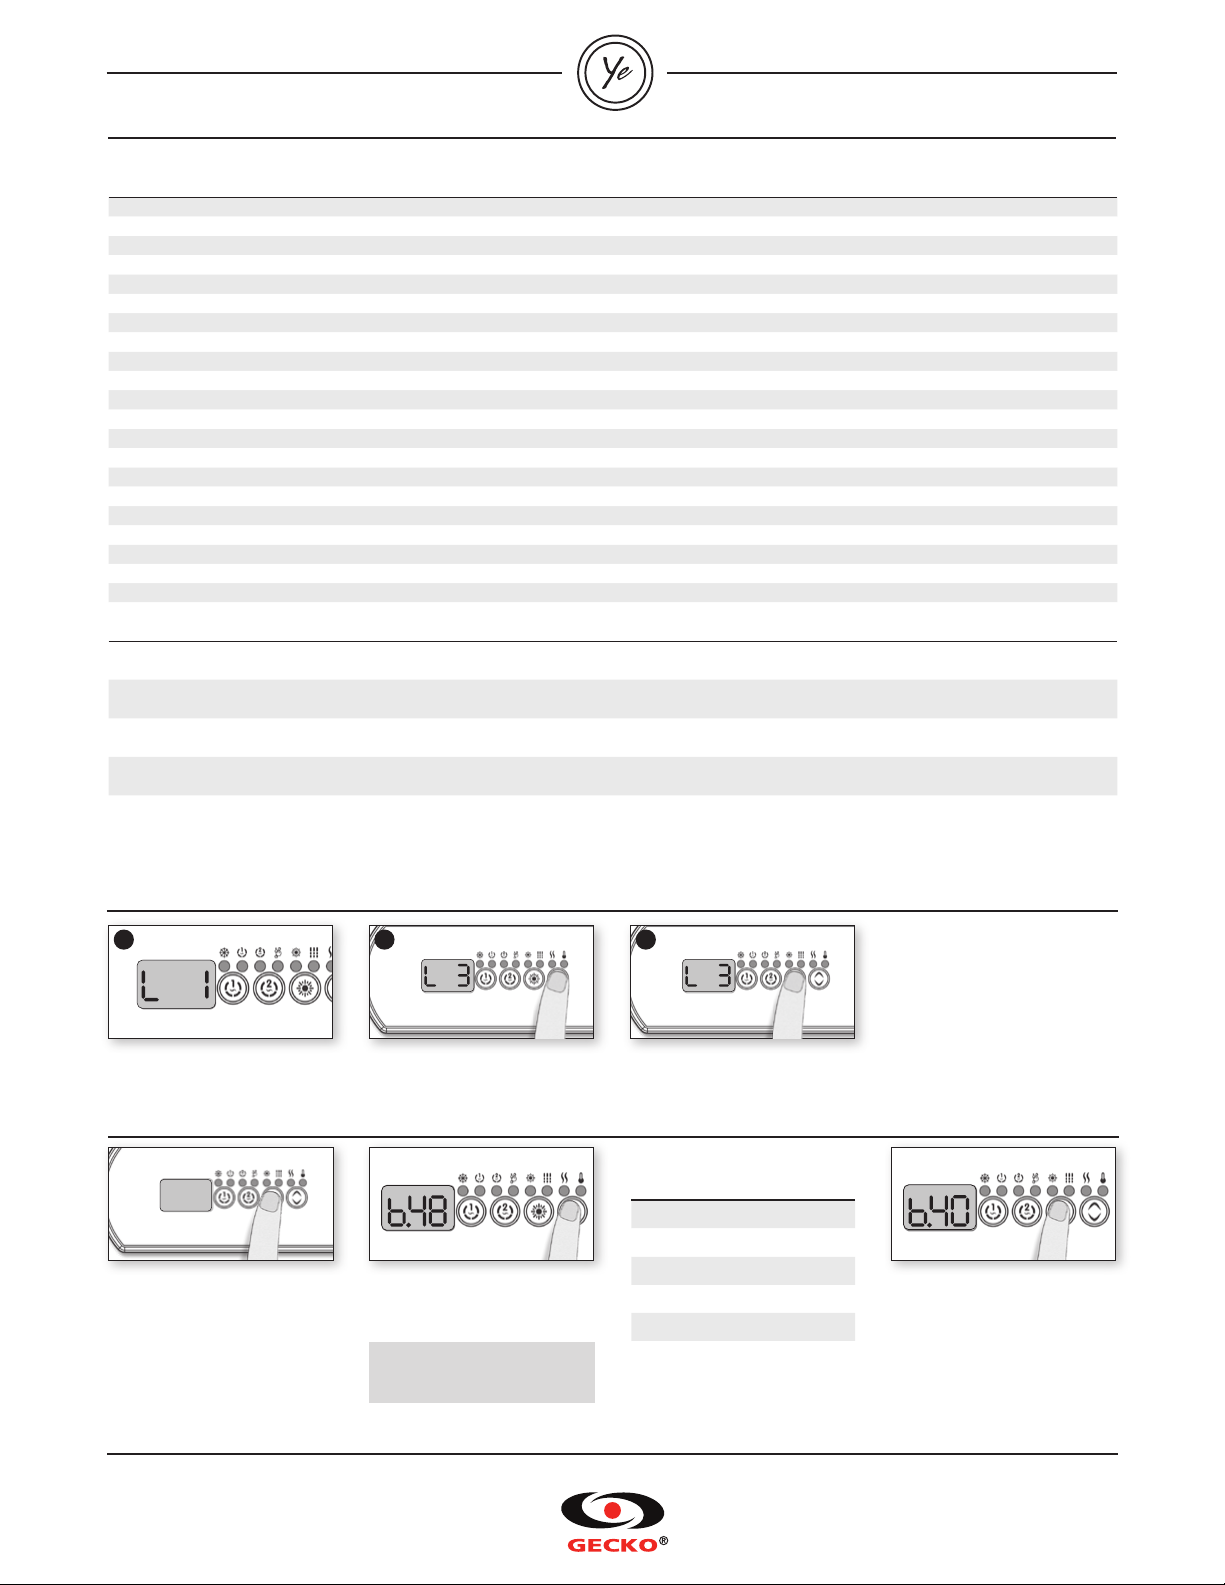
5- Select breaker
Breaker setting for GFCI used.
GFCI b
60 A 48 A
50 A 40 A
40 A 32 A
30 A 24 A
20 A 16 A
15 A 12 A
Press the Program key to set
breaker rating.
3- Select spa configuration
Information between ( ) indicates which AMP connector to use. See Step 1 for connector position.
Config. # Pump 1 Pump 2 Pump 3 Pump 4 Pump 5 Blower Circ. Pump (CP) Ozone1Filter Cycle (Daily) Heater Pump
12 sp (A3) (A1) 2 x 2 hours with P1L Pump 1
22 sp (A3) (A1) (A4) 2 x 6 hours with CP CP
32 sp (A3) 1 sp (A2) (A1) 2 x 2 hours with P1L Pump 1
42 sp (A3) 1 sp (A2) (A1) (A4) 2 x 6 hours with CP CP
52 sp (A3) (A4) (A1) 2 x 2 hours with P1L Pump 1
62 sp (A3) (A4) (A1) (A2) 2 x 6 hours with CP CP
72 sp (A3) 1 sp (A2) (A4) (A1) 2 x 2 hours with P1L Pump 1
82 sp (A3) 1 sp (A2) (A4) (A1) 2 x 6 hours with CP CP
92 sp (A3) 2 sp (A2) (A1) 2 x 2 hours with P1L Pump 1
10 2 sp (A3) 2 sp (A2) (A1) 2 x 6 hours with CP CP
11 2 sp (A3) 2 sp (A2) (A1) 2 x 2 hours with P1L Pump 1
12 2 sp (A3) 2 sp (A2) (A1) (A0)22 purges , CP always on CP
13 2 sp (A3) 1 sp (A2) 1sp (A4) (A1) 2 x 2 hours with P1L Pump 1
14 2 sp (A3) 1 sp (A2) 1sp (A4) (A1) 2 x 6 hours with CP CP
15 2 sp (A3) 1 sp (A2) 1sp (A4) (A1) 2 x 2 hours with P1L Pump 1
16 2 sp (A3) 1 sp (A2) 1sp (A4) (A1) (A0)22 purges , CP always on CP
17 2 sp (A3) 2 sp (A2) 1sp (A1) 2 x 2 hours with P1L Pump 1
18 1 sp (A3) (A1) (A4) 2 x 6 hours with CP CP
19 1 sp (A3) 1 sp (A2) (A1) (A4) 2 x 6 hours with CP CP
20 1 sp (A3) 1 sp (A2) 1 sp (A4) (A1) (P43 tab)32 x 6 hours with CP CP
21 1 sp (A3) 1 sp (A2) 1 sp (A4) 1 sp (A1) (A0)2(P43 tab)32 purges, CP always on CP
22 1 sp (A3) 1 sp (A2) 1 sp (A4) 1 sp (A1) 1 sp (P43 tab)3(A0)22 purges, CP always on CP
Swim Spa
51 (Master) 1 sp (A3) 1 sp (A2) (A4) (A1) 2 x 6 hours with CP CP
51 (Slave) 1 sp (A3) 1 sp (A2) (A4)
52 (Master) 2 sp (A3) 1 sp (A2) (A1) 2 x 2 hours with P1L Pump 1
52 (Slave) 1 sp (A3) 1 sp (A2) (A4)
53 (Master) 1 sp (A3) 1 sp (A2) (A4) (A1) 2 x 6 hours with CP CP
53 (Slave) 1 sp (A3) 1 sp (A2) 1 sp (A1) (A4)
54 (Master) 2 sp (A3) 1 sp (A2) (A1) 2 x 2 hours with P1L Pump 1
54 (Slave) 1 sp (A3) 1 sp (A2) 1 sp (A1) (A4)
Use the Up/Down key to select
the breaker value. The value can
be modified from 10 to 48 A.
At first startup the keypad display
will show L 1 or LL 1.
4- Enter selection
Note: To re-enter the low level
selection menu, hold the
Pump 1 key for 30 seconds.
Note: If the keypad in use does
not have the Program key use
the Filter or Light key instead.
Note: If the keypad in use does
not have the Program key use
the Filter or Light key instead.
Use the Up/Down key to choose
the new low level configuration
number (consult the chart above).
Press the Program key to confirm
the selection.
Default breaker value is 48 A.
Power management will make
sure never to exceed this rating.
Software #200, rev. 003
9919-101192-D
Rev. 02-2014
For complete TechBook or more information, see our website: www.geckoalliance.com
© Groupe Gecko Alliance Inc., 2014
All trademarks or registered trademarks
are the property of their respective owners.
Printed in Canada
Note 1: When the Ozonator is not controlled by a relay, it can be tied to Pump 1 Low speed or Circ. Pump using cable AMP 9920-401369.
Note 2: Circ. pump is connected to a Direct fused outlet. Pump will always be on and may overheat if oversized pump is used.
Note 3: This accessory does not have its own AMP connector. Rewire A0 if not used or order extra AMP connector 9920-401346 (Black wire to P43 tab on the board,
Green to any G tabs and white to any N tabs for 120 V accessory or any L2 tabs for 240 V.
321


