GLP YPOC CMY 700 User manual

Instruction Manual
from software version 1.53
(instruction version 1.33)
Internet: http://www.glp.de

GLP German Light Products GmbH (instruction version 1.33 / from software version 1.53) 2
Notes:

GLP German Light Products GmbH (instruction version 1.33 / from software version 1.53) 3
Table of content
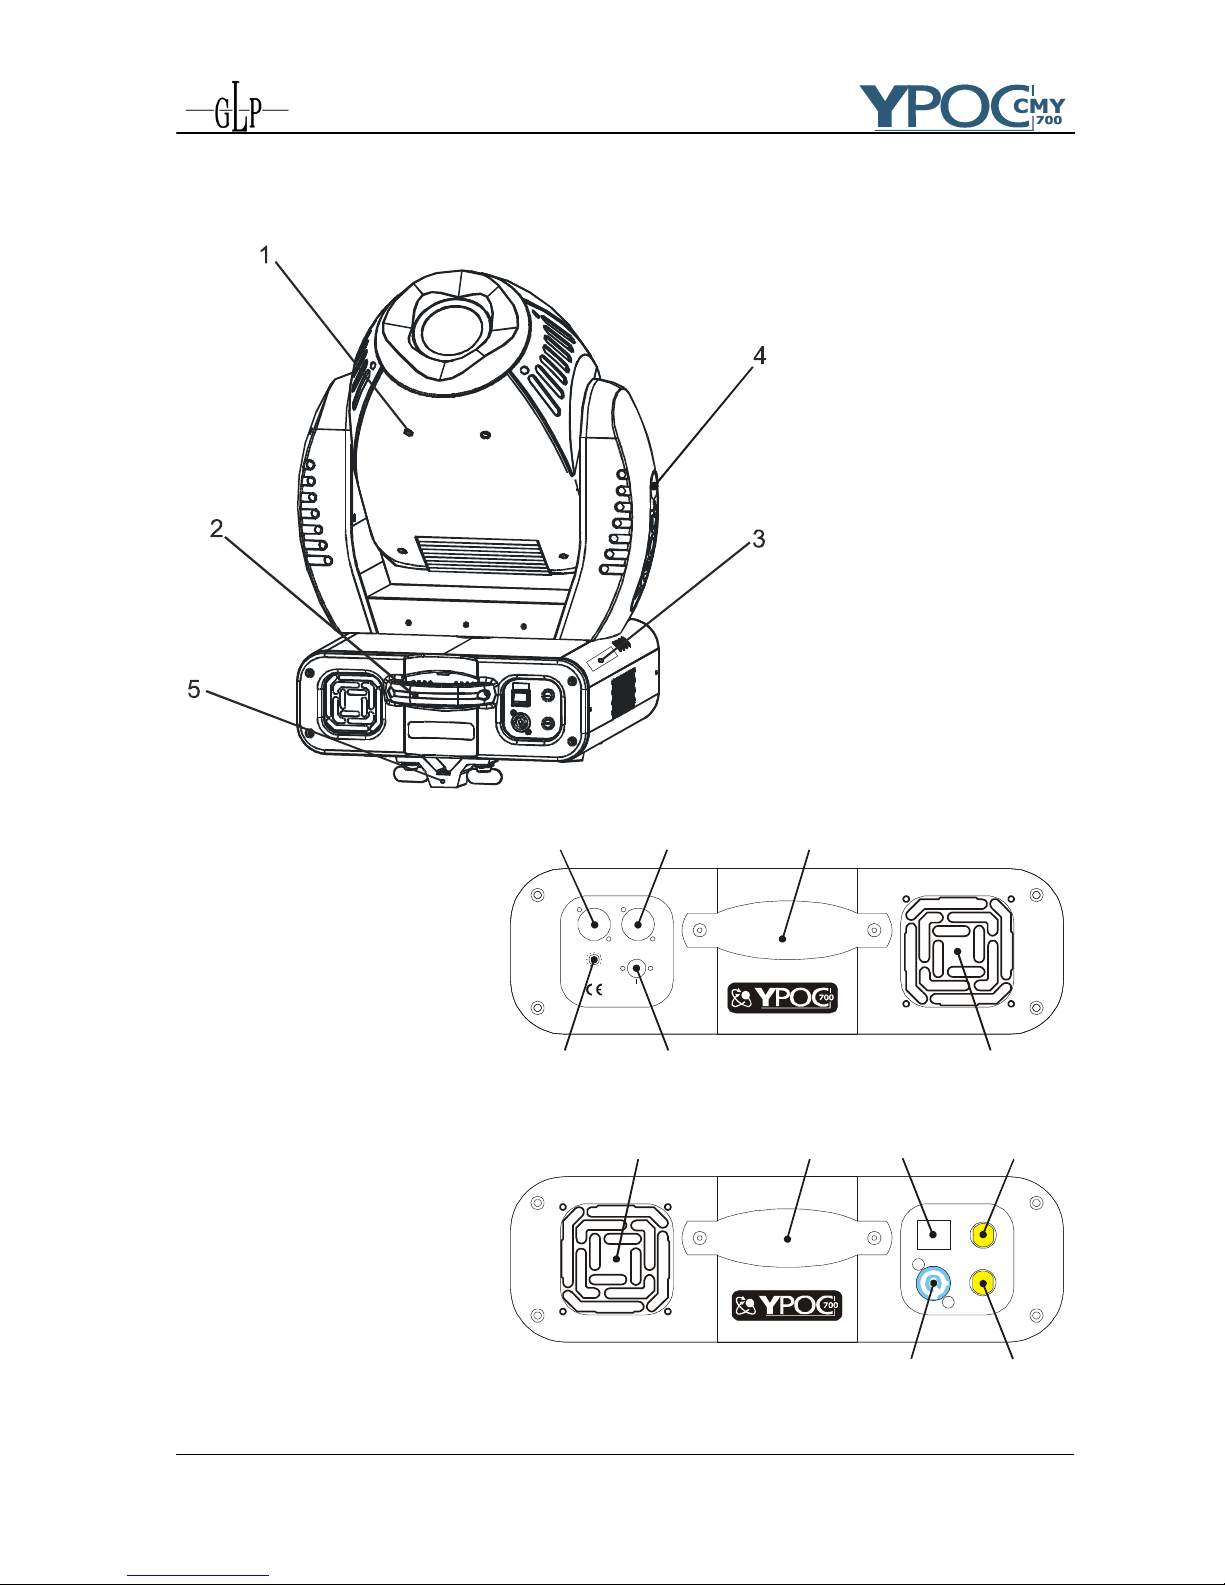
1Description of Device..............................................................................................5
1.1 Safety Instructions ............................................................................................6
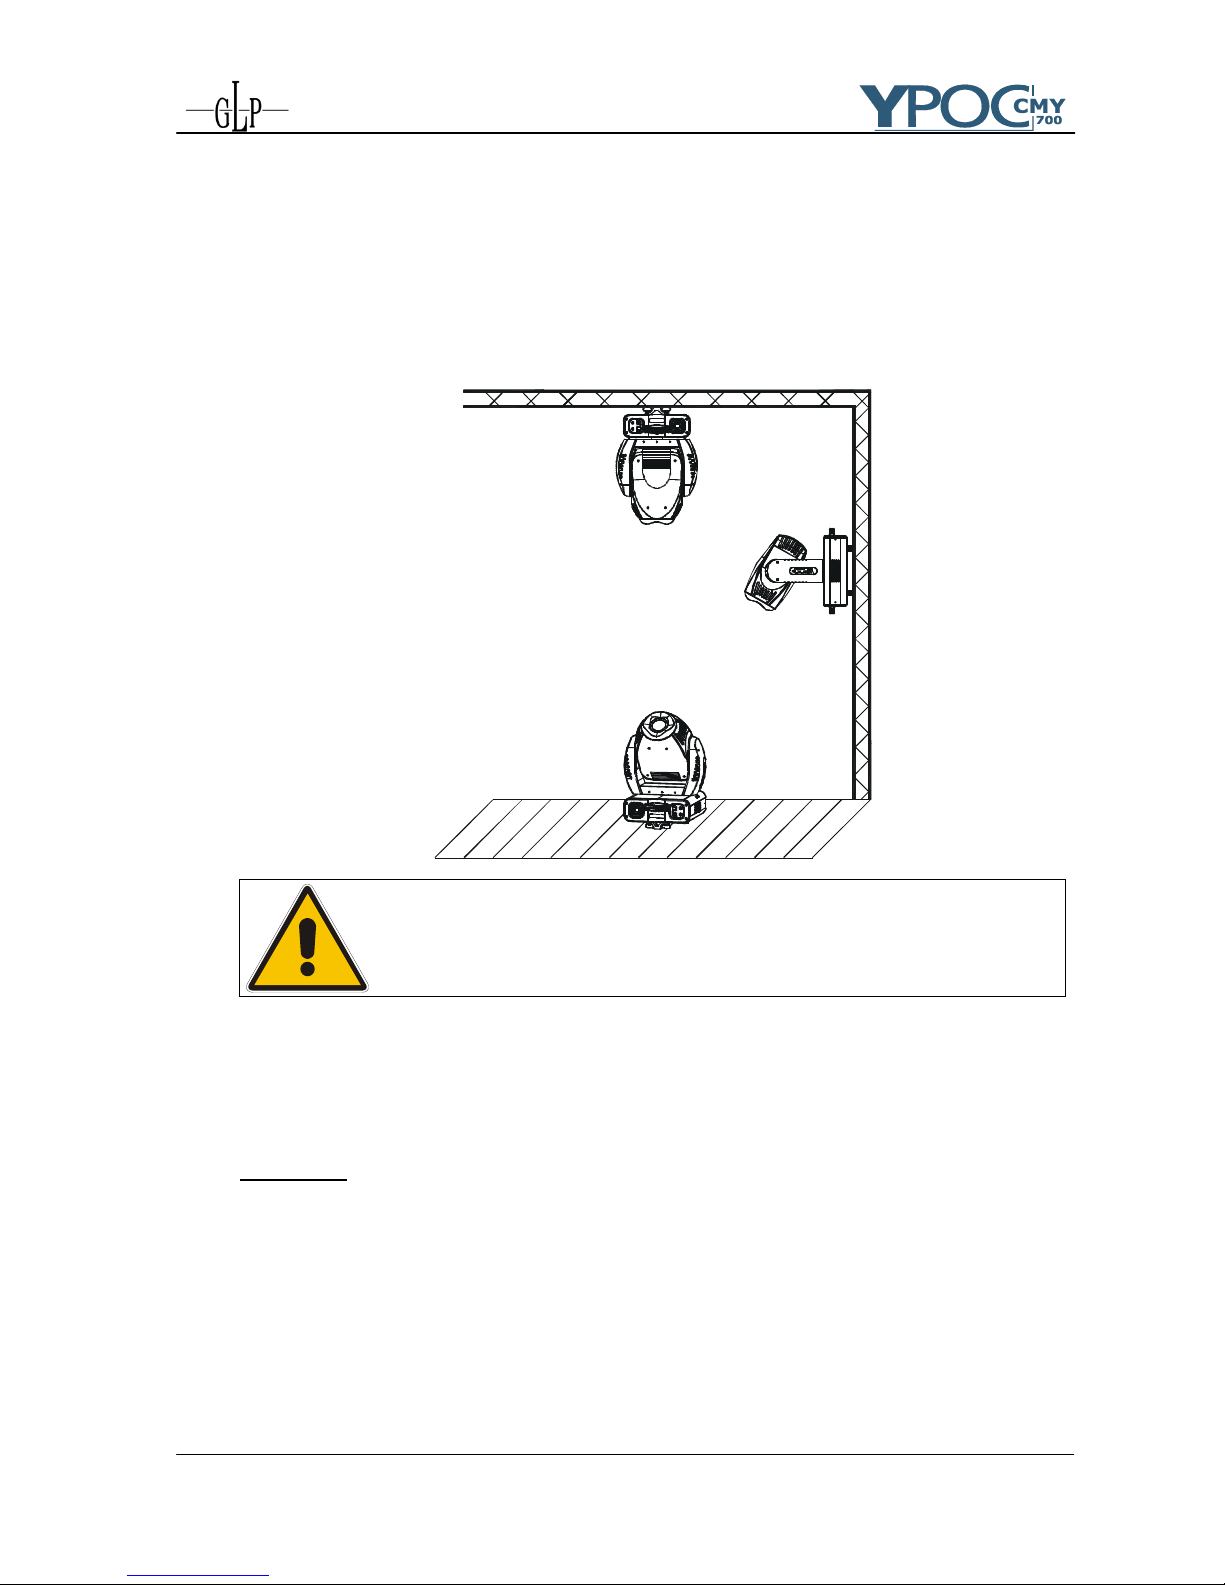
2Preparation and Installation ...................................................................................7
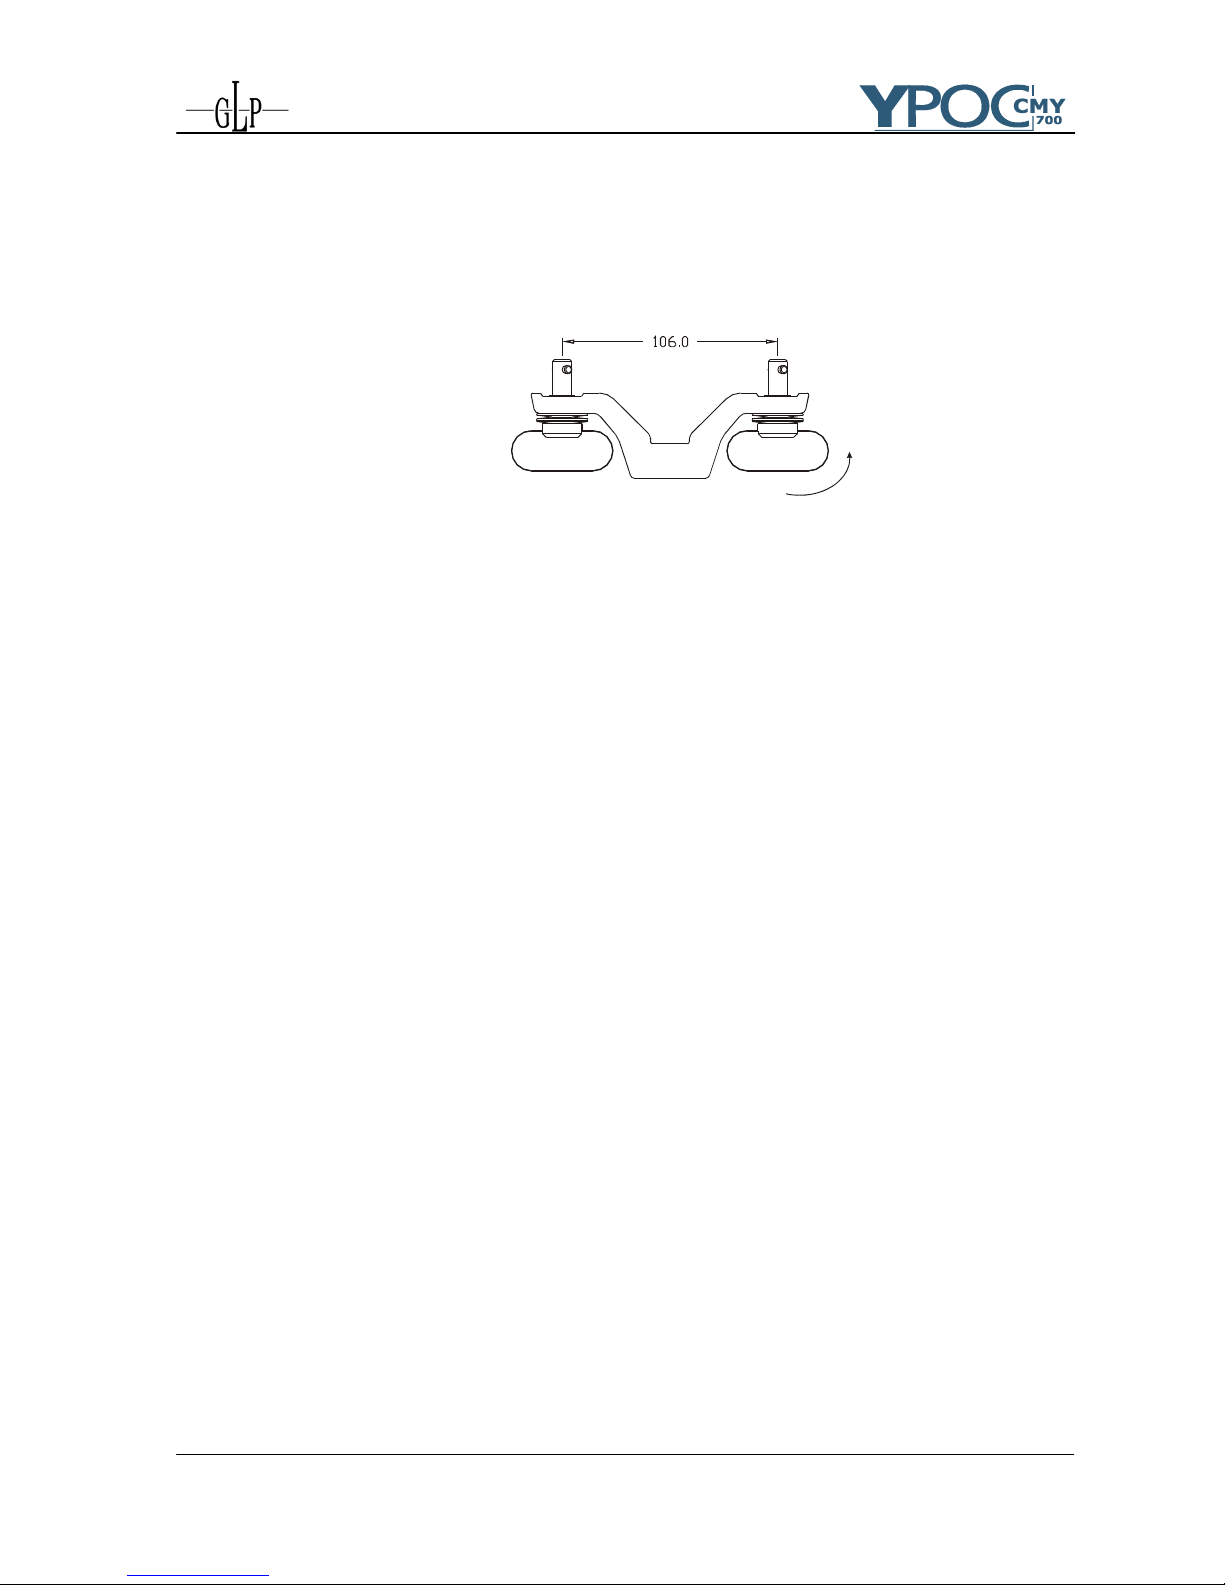
2.1 Mounting ...........................................................................................................7
2.1.1 Clamps ..................................................................................................7
2.2 Secure the Y
YP
PO
OC
C
7
70
00
0
C
CM
MY
Y .............................................................................8
2.3 Connections......................................................................................................8
2.3.1 Power supply.........................................................................................8
2.3.2 DMX ......................................................................................................8
2.4 Fuses................................................................................................................9
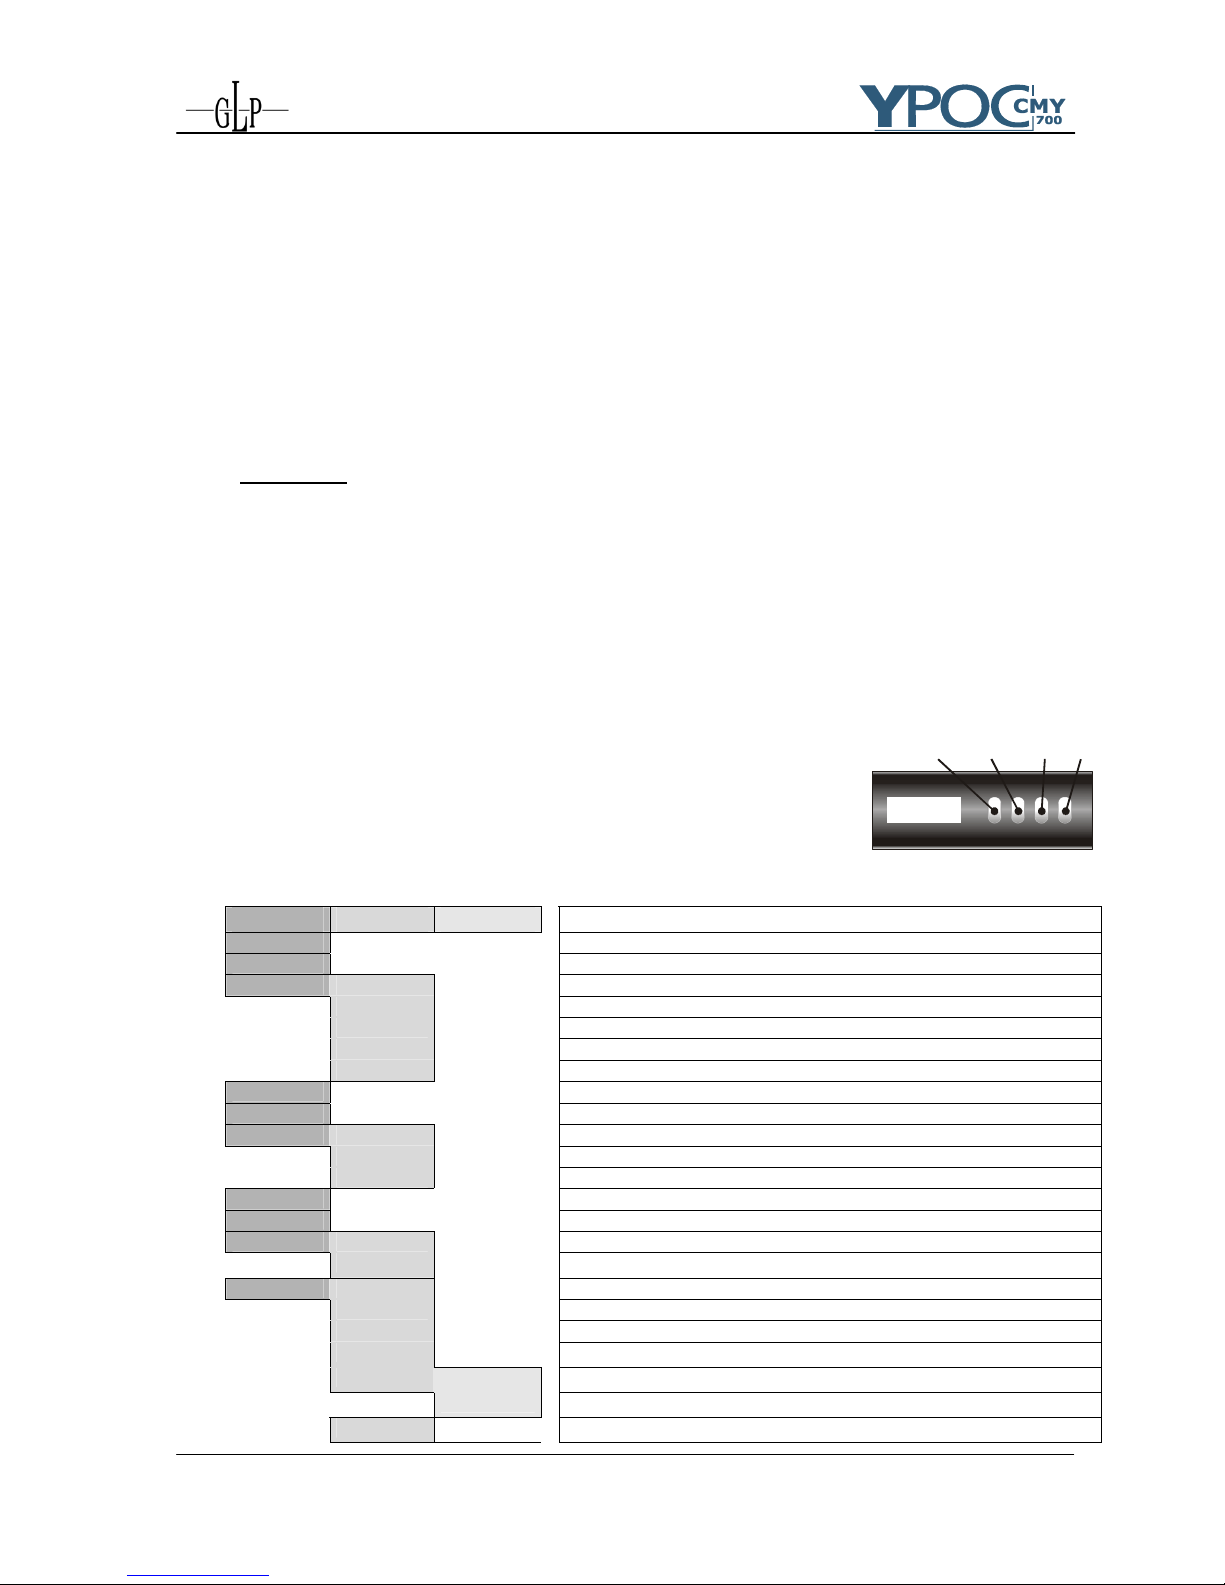
3The Menu Field ........................................................................................................9
3.1 Adjust the DMX- Address (D001) ...................................................................10
3.2 The Test Program (TEST)...............................................................................11
3.3 The Audio Program (AUDI).............................................................................11
3.4 Lamp On/Off (LAMP) .......................................................................................11
3.5 Reset (RESE) ..................................................................................................12
3.6 Running time of lamp and unit (TIME) ............................................................12
3.7 Invert Pan Movement (RPAN)..........................................................................12
3.8 Invert Tilt Movement (RTLT) ...........................................................................12
3.9 Special Functions (SPEC) ...............................................................................12
3.9.1 Manual Drive (MANU) ...........................................................................13
3.9.2 Lamp On automatically (LAAU)............................................................13
3.9.3 Lamp Off via DMX (DLOF) ...................................................................14
3.9.4 DMX Input (DMXI) ...............................................................................14
3.9.5 Display (DISP) ....................................................................................14
3.9.6 Fixture Temperature (TEMP)................................................................15
3.9.7 Fan Control (FANS) .............................................................................15
3.9.8 Adjustments and Calibrations (ADJU)..................................................16
3.9.9 Default Settings (DFSE).......................................................................16
3.9.10 Automatic position control / Feedback (FEED) ...................................17
3.9.11 Correction of faults (EFLG).................................................................17
3.10 Error and Information Messages.....................................................................17
4DMX Channel Selection (DMX Protocol) .............................................................18
5Changing the Lamp...............................................................................................27
5.1 Safety Regulations..........................................................................................27

GLP German Light Products GmbH (instruction version 1.33 / from software version 1.53) 4
5.2 Realize the Lamp Change ..............................................................................27
5.3 Adjusting the lamp position (Hotspot) .............................................................28
6Optical plug-in module (inside the fixture) .........................................................29
6.1 Safety regulations ...........................................................................................29
6.2 Taking out and opening optical plug-in ...........................................................29
6.3 Changing Gobos and Color filters...................................................................31
6.3.1 General remarks for changing Gobos and Colors ...............................31
6.3.2 Changing rotating Gobos ....................................................................32
6.3.3 Changing Color filters..........................................................................33
6.3.4 Changing the Effect wheel ..................................................................34
7Maintaining and Cleaning the Y
YP
PO
OC
C
7
70
00
0
C
CM
MY
Y ...................................................37
7.1 Safety Regulations..........................................................................................37
7.2 Circumference and Interval (rule-of-thumb) ....................................................37
7.3 Cleaning the Optical System...........................................................................38
8Technical Specification ........................................................................................38
9Index.......................................................................................................................40

GLP German Light Products GmbH (instruction version 1.33 / from software version 1.53) 5
1 Description of Device
1. Moving Head
2. Carrying handles
3. LED- Display (Data
entry)
4. Head locking system
(single-side n 45°
steps)
5. Camlock mounting
system
6. Software-Update
connector
7. Microphone- Intensity
8. DMX- Input
9. DMX- Output
10. Fan (air inlet/outlet)
11.Fuse electronics
12.Mains supply
(Powercon)
13.Power On/Off
14.Fuse lamp
15.Carrying handles
MaxMin
DMX IN DMX OUT
Software Update
1.Ground
2.Data -
3.Data +
Mic Sensitivity
6
7
8 9
10
15
PO WE R
Power Inp ut:90 - 260 VAC ,50/ 60 Hz
Lam p
Fuse
Elec troni c
Fuse
10
11
12
13 14
15
T 2A @ 11 5 V~
T 1A @ 23 0 V~
T 10 A @ 11 5 V~
T 5 A @ 230 V~
0
1

GLP German Light Products GmbH (instruction version 1.33 / from software version 1.53) 6
1.1 Safety Instructions
The
Y
YP
PO
OC
C
7
70
00
0
C
CM
MY
Y
is a High-Tech Product. To guarantee a
smooth operation, it is necessary to respect the following rules.
The manufacturer of this device will not take responsibility of
damages through disregard of the information in this manual.
Warranty claims will be cancelled.
1. Make sure before putting into operation, that the fan and the air inlets are
clean and not blocked by anything.
2. Attention: Don’t touch the device during the operation. This can cause injuries
or damages.
3. Unplug the
Y
YP
PO
OC
C
7
70
00
0
C
CM
MY
Y
from the AC outlet before any service.
4. It is necessary to wait at least 30 minutes after disconnecting the AC before
you open the Y
YP
PO
OC
C
7
70
00
0
C
CM
MY
Y. Please do not touch the bulb of the lamp if you
are not absolutely sure it is cold. -- Danger of BURNING --
5. Never look directly into the beam of the lamp. You risk injury of your retina and
blindness.
6. Pay attention of the maximum lamp operation time. You have to change it if
the lamp shows any deformations or damages. The same is with all glass
components, color filters, lenses and mirrors.
7. To allow a secure operation, follow also the Installation guide described in
chapter 2. Operating the Y
YP
PO
OC
C
7
70
00
0
C
CM
MY
Y
without suited safety aids like Safety
cables or clamps/hooks can increase the risk of an accident.
8. The installation should be done by qualified staff only. You need to pay
attention to the common rules of technology that are not explicit mentioned in
this manual.
9. Use only original spare parts. Any structural modification will cancel all
warranty claims.
10. This device is equipped with a Head locking system. Make sure that before
switching on the system is unlocked. Check also that the device can rotate
and operate in its entire movement area.

GLP German Light Products GmbH (instruction version 1.33 / from software version 1.53) 7
2 Preparation and Installation
2.1 Mounting
The Y
YP
PO
OC
C
7
70
00
0
C
CM
MY
Y
is fully operational whether it hangs or is mounted to the wall.
It can also be operated while standing on the floor. Keep a safety distance of 0.5
m towards any easily inflammable materials (decoration etc.).
Pay attention to the regulations of: BGV C1 (former VBG 70)
and DIN VDE 0711-217.
The installation should be done by qualified staff only.
For mounting and service purposes this device is equipped with a Head locking
system which allows you to lock the head in 45° steps. Push the lock button on the
side of the arm to lock and unlock the system.
Attention: Make sure that before switching on the system is unlocked. Check also
that the device can rotate and operate in his entire movement area.
2.1.1 Clamps
There are two major possibilities to mount the Y
YP
PO
OC
C
7
70
00
0
C
CM
MY
Ytogether
with clamps. Camlock system or direct mounting of clamps. In both cases
you have to regard a sufficient stability of the system. For installation
instructions please see also printing on the bottom side of the case.

GLP German Light Products GmbH (instruction version 1.33 / from software version 1.53) 8
a) Camlock system: This system allows you a fast and efficient setup of
clamps. Attach the two camlocks to designated position (C1 and C2) on
the bottom side of the case and close the locks by turning them 90°.
Verify the secure fit of the camlock system. The clamps themselves are
directly attached permanently on the camlocks.
90°
b) Use two clamps direct on the bottom side of the Y
YP
PO
OC
C
7
70
00
0
C
CM
MY
Yto
mount the unit on a truss (each two opposite threads A1 -A4 or A2 - A3,
use screws M10 max. length 50 mm). Distances, diameters and
positions can also been seen on the printing on the bottom plate of the
system.
2.2 Secure the
Y
YP
PO
OC
C
7
70
00
0
C
CM
MY
Y
Regardless of the rigging of the Y
YP
PO
OC
C
7
70
00
0
C
CM
MY
Y
you have to use a stipulated
safety wire. Therefore you have to pull the safety wire through to two provided
holes on the bottom side of the fixture and connect it with the truss-support. Pay
attention to a safe and proper fastening. Install a safety wire that can hold at least
10 times the weight of the fixture. Never use the carrying handles for this purpose.
2.3 Connections
2.3.1 Power supply
Electronic ballast with:
~90 - 260 Volt, 50 - 60 Hz, earth contact type plug - Powercon
Connected load 1000W <=> 4.5 A (blind current compensation).
Please see printing on the case for the right electronic supply!
2.3.2 DMX
USITT DMX 512 Standard input/output, 3 pole connectors.
[+] = Pin 3 / [-] = Pin 2 / [Ground] = Pin 1

GLP German Light Products GmbH (instruction version 1.33 / from software version 1.53) 9
The DMX- Addressing starts at the DMX- Address [001].
See also printing on the case for the right pin assignment.
2.4 Fuses
The Y
YP
PO
OC
C
7
70
00
0
C
CM
MY
Y
electronic system is protected by two 5x20 mm fine-wire
fuses.
Lamp: 230V / T 5A Lamp: 115V / T 10A
Electronic: 230V / T 1A Electronic: 115V / T 2A
Attention:
• Disconnect AC outlet before changing a fuse!
• Use only the original declared fuse type!
3 The Menu Field
You’ll find the control board on the side part of the base. It allows you to make
all necessary adjustments of the Y
YP
PO
OC
C
7
70
00
0
C
CM
MY
Y.
.With the Mode-key you get
into the main menu. Afterwards you can navigate through the menu with the
Up/Down-keys. Push the Enter-key to get in the next menu level or to confirm
your settings. Make them and set functions ON/OFF with the Up/Down-keys.
Confirm and save it with the Enter-key (the display shows OK). Push the Mode-
key to cancel the entry and go back to the main menu.
MOD EENTER
UP DOWN
MODE ENTER UPDOWN
UPMODE ENTER DOWN
Display
ÅMODE - ENTER Æ
Level 1 Level 2 Level 3 Remark
D001 Define the DMX start address
TEST Test program of all functions
AUDI ASLW Self-running audio program (slow)
AFST Self-running audio program (fast)
MSTR Master for the audio program
SVPT Basic position for the audio program
SIZE Size for the audio program (NORM-BIG-MIDL-SMAL)
LAMP Switch on/of the lamp direct at the Y
YP
PO
OC
C
7
70
00
0
C
CM
MY
Y
RESE Reset
TIME POWR Running time of the fixture (no destructible)
LA1 Running time of the lamp (erasable)
LA2 Running time of the lamp (no destructible)
RPAN Reverse Pan-direction
RTLT Reverse Tilt-direction
DMOD NORM DMX Mode: Defines the number of DMX channels
EXT DMX Mode NORM has to be selected at the moment.
SPEC MANU Manual drive of all device functions
LAAU Automatic lamp start at switching on the unit
ÅDOWN - UP Æ
DLOF Switch off lamp via DMX
DMXI Read out actual DMX-values
DISP D ON Display On/Off
REV Twist the display (also pushing Up/Down keys at the same time)
TEMP Read out internal temperature

GLP German Light Products GmbH (instruction version 1.33 / from software version 1.53) 10
FANS HIGH Maximum cooling fan velocity
REG Automatic cooling fan control
LOOF Low cooling fan speed Ælamp off
LOHI Low cooling fan speed ÆAutomatic
VERS VTIL Software version Tilt-board
VTR1 Software version driver board 1
VTR2 Software version driver board 2
VTR3 Software version driver board 3
DBUG Function not yet in use
ADJU CODE xxxx Use the code for entering the calibration menu (for authorized
persons only)
CL1c Coarse calibration of color wheel 1
CL1f Fine calibration of color wheel 1
GOB1 Calibration of gobo wheel 1
GOB2 Calibration of gobo wheel 2
SHSH Shutter moves pair wise parallel left and right (Shift)
SHOC Shutter moves pair wise open and close
FR T Calibration of frost filter A (top)
FR B Calibration of frost filter b (bottom)
PRIS Calibration of prism wheel
ÅDOWN - UP Æ
IRIS Calibration of iris
FOCU Calibration of focus
POFS Calibration of Pan-Offsets
TOFS Calibration of Tilt-Offsets
CLRE Settings in the internal memory (super-user only)
SPFS Speed fast - limit the max. Pan velocity to 70%
ARES Adjust Reset (all wheels stand still after a reset)
DFSE Call on the default function values
FEED Pan/Tilt feedback (error correction) On/Off
EFLG Correction of faults
3.1 Adjust the DMX- Address (D001)
A rest will be performed right after switching on the Y
YP
PO
OC
C
7
70
00
0
C
CM
MY
Y
(the display
shows the following information: GLP - Y700 - software version of the unit - YSTD
for standard module/Spot setup or YCMY for CMY module/CMY setup). The reset
can last up to 30 seconds. Afterwards the current DMX- Address is shown. If there
is no DMX- Signal the display flashes.
D001
For setting the address please follow this procedure:
1. Switch On the Y
YP
PO
OC
C
7
70
00
0
C
CM
MY
Y
and wait until the fixture reset has finished
('RESE'is flashing in the display).
2. Press the Mode-key in order to access the main menu. Browse through the
menu by pressing the Up/Down-keys until the display shows D001. Confirm by
pressing the Enter-key (the decimal point is flashing)

GLP German Light Products GmbH (instruction version 1.33 / from software version 1.53) 11
3. Use the Up/Down-keys to select the desired address. Confirm the setting by
pressing the Enter-key (the display shows OK) or press the Mode-key to
cancel.
The DMX- Address is stored also while switching off the Y
YP
PO
OC
C
7
70
00
0
C
CM
MY
Y!
3.2 The Test Program (TEST)
Test
The Test-Program allows you to run a complete self test procedure of all
functions. Press Enter to confirm or Mode to cancel.
(* not runnig with old firmware)
3.3 The Audio Program (AUDI)
The Audio-menu allows you to run a stand alone audio program. This chaser can
run either fast or slow. AFST: Every sound impulse one step of the chaser. Aslw:
Every second sound impulse one step of the chaser.
Additionally you can choose a basic position for this audio chaser. Use either the
internal manual mode or an external controller to set the desired Pan/Tilt position.
Confirm this setting in the SVPT menu by pressing the Enter-key.
You can also define the size of the audio chaser in the SIZE menu. You have the
choice between: NORM (no basic position has to bee chosen), BIG, MIDL and SMAL).
If you want to run the systems simultaneously, one of the Y
YP
PO
OC
Cs
smust be
switched as the master. All others must be "Slave" Master = OFF. Notice: The
Audio function is only working if no DMX signal is connected. This Audio program
can work on small events or as an emergency program.
3.4 Lamp On/Off (LAMP)
LAMP
Use the Up/Down-keys to select lamp On or lamp Off Press Enter to confirm or
Mode to cancel and return to the main menu. (The lamp OFF command is only
functioning if the shutter is closed at the same time. Use an external controller or
the manual drive mode, see 3.9.1).

GLP German Light Products GmbH (instruction version 1.33 / from software version 1.53) 12
3.5 Reset (RESE)
RESE
Press the Enter-key to run a reset of all fixture functions (RST is shown in the
display). Performing a Reset will last approximately 30 seconds.
3.6 Running time of lamp and unit (TIME)
TIME
With this function you can read out three different running times of the fixture.
POWR Complete running time of the fixture (non-erasable).
LA 1 Running time of the lamp (erasable). Push the Up/Down-keys at one
time to delete this running time.
LA 2 Running time of the unit with lamp on (non-erasable).
3.7 Invert Pan Movement (RPAN)
RPAN
This function allows you to invert the Pan movement. Use the Up/Down-keys to
select invert On or Off. Press Enter to confirm or Mode to cancel and return to the
main menu.
3.8 Invert Tilt Movement (RTLT)
RTLT
This function allows you to invert the Tilt movement. Use the Up/Down-keys to
select invert On or Off. Press Enter to confirm or Mode to cancel.
3.9 Special Functions (SPEC)
SPEC
This menu allows you to reach further special functions of the Y
YP
PO
OC
C
7
70
00
0
C
CM
MY
Y.
.
In detail they are:

GLP German Light Products GmbH (instruction version 1.33 / from software version 1.53) 13
3.9.1 Manual Drive (MANU)
MANU
This function allows you to drive all fixture functions manually. Select the
desired function with the Up/Down-keys and confirm with Enter. Now
choose the desired value with the Up/Down-keys and confirm again with
Enter or cancel and return to the menu with the Mode-key.
Attention: The DMX cable must be disconnected during this operation.
Function Value Remark
PAN 000 -255 Pan Position
TILT 000 -255 Tilt Position
COL1 000 -255 Color wheel 1 (fixed colors)
CYAN 000 -255 Color wheel - Cyan
MAGE 000 -255 Color wheel - Magenta
YELL 000 -255 Color wheel - Gelb (Yellow)
GOB1 000 -255 Gobo wheel 1
GRT1 000 -255 Gobo wheel 1 rotation
GOB2 000 -255 Gobo wheel 2
SHUT 000 -255 Shutter / Strobe function (the lamp strikes at
DMX 255 if dimmer is "open" = DMX 255)
DIMR 000 -255 Dimmer
FOCU 000 -255 Focus
ZOOM 000 -255 Zoom
FRST 000 -255 Frost
PRIS 000 -255 Prism (000 – 127) / Stop / Prism- rotation
IRIS 000 -255 Iris
CTO 000 -255 CTO correction wheel
EFFB 000 -255 Effect wheel
EFFR 000 -255 Effect wheel, rotation
SPEC 000 -255 Lamp Off, Reset, ...
MOVE 000 -255 Movements
SPED 000 -255 Speed for Pan/Tilt
3.9.2 Lamp On automatically (LAAU)
LAAU
This function enables to strike the lamp automatically after switching on the
fixture. Use the Up/Down-keys to select ON if you want to strike the lamp
automatically after switching on the fixture or Off if you don't want this
function. Press Enter to confirm or Mode to cancel and return to the menu.
If you have chosen off you have the possibility to strike the lamp either via
DMX or direct at the Y
YP
PO
OC
C
7
70
00
0
C
CM
MY
Yin the Lamp menu.

GLP German Light Products GmbH (instruction version 1.33 / from software version 1.53) 14
3.9.3 Lamp Off via DMX (DLOF)
DLOF
This function enables to switch off the lamp via DMX or not. Use the
Up/Down-keys to select ON if you want to switch off the lamp via DMX or
Off if you don't want this function. Press Enter to confirm or Mode to
cancel and return to the menu.
If you have chosen off you have the possibility to switch off the lamp either
direct at the Y
YP
PO
OC
C
7
70
00
0
C
CM
MY
Yin the Lamp menu or switch off the main
switch.
3.9.4 DMX Input (DMXI)
DMXI
Readout DMX values of each channel received by the fixture. Use the
Up/Down-keys to select desired channel and press Enter to read its value.
Function Value Remark
PAN 000 -255 Pan Position
TILT 000 -255 Tilt Position
COL1 000 -255 Color wheel 1 (fixed colors)
CYAN 000 -255 Color wheel - Cyan
MAGE 000 -255 Color wheel - Magenta
YELL 000 -255 Color wheel - Gelb (Yellow)
GOB1 000 -255 Gobo wheel 1
GRT1 000 -255 Gobo wheel 1 rotation
GOB2 000 -255 Gobo wheel 2
SHUT 000 -255 Shutter / Strobe function
DIMR 000 -255 Dimmer
FOCU 000 -255 Focus
ZOOM 000 -255 Zoom
FRST 000 -255 Frost
PRIS 000 -255 Prism wheel (000 - 127) / Stop / Prism- Rotation
IRIS 000 -255 Iris
CTO 000 -255 CTO correction wheel
EFFB 000 -255 Effect wheel
EFFR 000 -255 Effect wheel rotation
SPEC 000 -255 Lamp Off, Reset, ...
MOVE 000 -255 Movement
SPED 000 -255 Speed for Pan/Tilt
3.9.5 Display (DISP)
DISP

GLP German Light Products GmbH (instruction version 1.33 / from software version 1.53) 15
Use this function to choose between different display indications. Use the
Up/Down-keys to select desired function and press Enter to confirm or
Mode to cancel and return to the menu.
D ON Display On/Off (If you've chosen off, the display will go out with-
in 15 seconds after the last menu input. The next key touch will
reactivate the display).
REV Turn around the display.
Note: You can also do this by pushing the Up/Down-keys at the
same time.
3.9.6 Fixture Temperature (TEMP)
TEMP
This function allows you to read out the current temperature of the Y
YP
PO
OC
C
7
70
00
0
C
CM
MY
Y. Press Enter to confirm or Mode to cancel. Inside temperatures
below 80°C are not critical. 80°C and more lead the lamp being switched
off at a critical point. For a save operation the outside temperature should
not exceed 45°C.
3.9.7 Fan Control (FANS)
FANS
By using this function you can choose between 4 types of fan speed
operations. Use the Up/Down-keys to select desired function and press
Enter to confirm or Mode to cancel and return to the menu.
HIGH The cooling fan works continuously at max. speed.
REG The fan automatically adapts its speed in order to control inside
temperature of the fixture.
LOOF The fan keeps the adjusted low speed until the temperature
exceeds max. inside temperature, then the Y
YP
PO
OC
C
7
70
00
0
C
CM
MY
Y
automatically switch off the lamp.
LOHI The fan keeps the adjusted low speed until the temperature
exceeds max. inside temperature, then the Y
YP
PO
OC
C
7
70
00
0
C
CM
MY
Y
automatically switch from low to high fan speed.
In addition to these settings, you can set the fan speed to minimum via
DMX (Special channel, DMX value 224..229). This will last until a tempera-
ture of 90° is reached Æhigh speed fan will be activated.

GLP German Light Products GmbH (instruction version 1.33 / from software version 1.53) 16
3.9.8 Adjustments and Calibrations (ADJU)
ADJU
By this function you can adjust and calibrate the positions of the different
effects, wheels and other motors. This can be necessary after a service or
a repair work.
For this function is secured by a fixture code. This work should be done by
authorized persons only.
Use the Up/Down-keys to select desired function and press Enter to
confirm or Mode to cancel and return to the menu. Use now the Up/Down-
keys to set the adjustment values and confirm once more with the Enter-
key or cancel with the Mode-key.
Function Value Remark
ADJU CODE xxxx Adjustments in the internal setup are code protec-
ted (for authorized persons only).
CL1C -99 -+ 99 Coarse adjustment of the Color wheel 1
CL1F -99 -+ 99 Fine adjustment of the Color wheel 1
GOB1 -99 -+ 99 Adjustment of Gobo wheel 1
GOB2 -99 -+ 99 Adjustment of Gobo wheel 2
SHSH -99 -+ 99 Shutter moves pair wise parallel left and right / Shift
SHOC -99 -+ 99 Shutter moves pair wise open and close
FR T -99 -+ 99 Adjustment of Frost filter A (top)
FR B -99 -+ 99 Adjustment of Frost filter B (bottom)
PRIS -99 -+ 99 Adjustment of the Prism wheel
IRIS -99 -+ 99 Adjustment of the Iris
FOCU -99 -+ 99 Adjustment of Focus
POFS -99 -+ 99 Adjustment of the Pan-Offsets
TOFS -99 -+ 99 Adjustment of the Tilt-Offsets
CLRE Adjustments in the internal circuit.
SPFS -99 -+ 99 Speed fast - limits max. PAN speed to 70%
ARES ON -OFF Adjust Reset (wheels stand still after the reset)
3.9.9 Default Settings (DFSE)
DFSE
Press Enter to reset all fixture personalities (not the adjusted/calibrated
functions) to the factory default values. On the display ok will appear to
indicate that the defaults are now set.

GLP German Light Products GmbH (instruction version 1.33 / from software version 1.53) 17
Function Display Default Settings
DMX Address D001 D001
Pan reverse RPAN ON OFF 9
Tilt reverse RTLT ON OFF 9
Automatic lamp on LAAU ON OFF 9
Lamp on via DMX DLOF ON 9OFF
Display DISP D ON 9REV
Cooling fan FANS HIGH REG 9LOOF LOHI
Feedback FEED ON 9OFF
3.9.10 Automatic position control / Feedback (FEED)
FEED
The Y
YP
PO
OC
C
7
70
00
0
C
CM
MY
Yis equipped with a automatic position correction
(feedback) for the Pan and Tilt movement. Use the Up/Down-keys to select
ON if you want to enable the feedback function or Off if you want to disable
this function. Press Enter to confirm or Mode to cancel and return to the
menu.
3.9.11 Correction of faults (EFLG)
(Function available for authorized persons only)
3.10 Error and Information Messages
HEAt
This message appears if you try to switch on the lamp within 5 minutes
after having switched it off (lamp still too hot). The message will appear
on the display if the lamp doesn’t strikes within 20 seconds. The fixture
will store this command and automatically strike the lamp after 5
minutes.
IG E
When striking the lamp, the electronic ballast will examine whether the
lamp is on or not. If the lamp does not strike within 20 seconds, the
igniting sequence is broken off. Now approx. 2 minutes are waited until
a renewed ignition attempt is started automatically. After the 3rd
unsuccessful ignition attempt the sequence is completely stopped and
the display reads "IG E" (Ignition error).
LAER
A
s soon as the lamp ignited correctly, the lamp current is constantly
supervised by the system. If an interruption steps on (covers opened or
lamp damaged), the power is switched off immediately. The display
reads "LAER" (lamps error). Please switch off the power supply and
solve the possible problem.
EFLG

GLP German Light Products GmbH (instruction version 1.33 / from software version 1.53) 18
After the error "IG E" respectively "LAER" it is not anymore possible the start the
lamp via Shutter = 255. Nevertheless if a renewed ignition attempt is desired, first
run a Reset (at the fixture or via DMX). Afterwards you can try again to strike the
lamp.
OTMP This error message informs you that the fixture was overheating and
that the relay switches off the lamp. Pleas look for possible reasons (fan
faulty, air in/outlets blocked or very dirty, lamp broken or very old, too
high ambient temperature). Switch off the power and solve the possible
problem before switching on again.
RsER This message informs you that one of the fixture function wasn’t able to
do its reset correct (magnetic sensor, stepping motor, driver on the
PCB, cables, etc.). Repair the defect and start the fixture again.
MD E The Y
YP
PO
OC
C
7
70
00
0
C
CM
MY
Yhas an automatic detector for the optical module
(from software version 1.28). It detects whether the Y
YP
PO
OC
C
7
70
00
0
C
CM
MY
Yis
equipped with a standard Spot module (YSDT) or a CMY module (YSTD).
In case the module is not correctly mounted or has a defect, the display
will read MS E (Module Error)
4 DMX Channel Selection (DMX Protocol)
Normal Mode (24 DMX channels)
Channel Function Time and Value DMX HEX %
1) PAN-
coarse
0 .. 530° min. 2.65 s 0..255 00..FF 0..100
2) PAN-fine High- Pos ... High- Pos + 2.1° (16 Bit) 0..255 00..FF 0..100
3) Tilt-
coarse
0 .. 285° min. 1.8 s 0..255 00..FF 0..100
4) Tilt-fine High- Pos … High- Pos + 1.1° (16 Bit) 0..255 00..FF 0..100
5) Color 1 Open (fast) 0..1 00..01 0.2
(fixed) Open / Color 1 (fast) 2..3 02..03 1.0
Color 1 Red 308 (fast)
Chaser from color to
color max. 140 BPM
=> 0,43 s 4..5 04..05 1.8
Color 1 / Color 2 (fast) 6..7 06..07 2.5
Color 2 CTC 3200 - 4100 (fast) 8..9 08..09 3.3
Color 2 / Color 3 (fast) 10..11 0A..0B 4.1
Color 3 Yellow 601 (fast) 12..13 0C..0D 4.9
Color 3 / Color 4 (fast) 14..15 0E..0F 5.7
Color 4 Purple 502 (fast) 16..17 10..11 6.5
Color 4 / Color 5 (fast) 18..19 12..13 7.3
Color 5 Orange 306u (fast) 20..21 14..15 8.0
Color 5 / Color 6 (fast) 22..23 16..17 8.8
Color 6 Pink 312 (fast) 24..25 18..19 9.6

GLP German Light Products GmbH (instruction version 1.33 / from software version 1.53) 19
Channel Function Time and Value DMX HEX %
Color 6 / Color 7 (fast) 26..27 1A..1B 10.4
Color 7 Green 206 (fast) 28..29 1C..1D 11.2
Color 7 / Color 8 (fast) 30..31 1E..1F 12.0
Color 8 Purple 509 (fast) 32..33 20..21 12.7
Color 8 / Color 9 (fast) 34..35 22..23 13.5
Open (fast) 36..63 24..3F 15..25
Open (slow) 64..65 40..41 25.3
Open / Color 1 (slow) 66..67 42..43 26.1
Color 1 Red 308 (slow)
Chaser from color to
color max. 70 BPM
=> 0,86 s 68..69 44..45 26.9
Color 1 / Color 2 (slow) 70..71 46..47 27.6
Color 2. CTC 3200 - 4100 (slow) 72..73 48..49 28.4
Color 2 / Color 3 (slow) 74..75 4A..4B 29.2
Color 3 Yellow 601 (slow) 76..77 4C..4D 30.0
Color 3 / Color 4 (slow) 78..79 4E..4F 30.8
Color 4 Purple 502 (slow) 80..81 50..51 31.6
Color 4 / Color 5 (slow) 82..83 52..53 32.4
Color 5 Orange 306u (slow) 84..85 54..55 33.1
Color 5 / Color 6 (slow) 86..87 56..57 33.9
Color 6. Pink 312 (slow) 88..89 58..59 34.7
Color 6 / Color 7 (slow) 90..91 5A..5B 35.5
Color 7 Green 206 (slow) 92..93 5C..5D 36.3
Color 7 / Color 8 (slow) 94..95 5E..5F 37.1
Color 8 Purple 509 (slow) 96..97 60..61 37.8
Color 8 / Color 9 (slow) 98..99 62..63 38.6
Open (slow) 100..127 64..7F 40..50
Color Rotation STOP 128..129 80..81 50.1
color rotation, slow-fast, CW min. 1,4 turns/h 130..191 82..BF 51..75
color rotation, fast-slow, CCW max. 2,9 turns/sec. 192..253 C0..FD 76..98
Audio color chaser slow each 4th sound impulse
Ænew color
254 FE 99
Audio color chaser fast each sound impulse Æ
new color
255 FF 100
6) Cyan Color mixing system - Cyan 0 - 100% 0..255 00..FF 0..100
7) Magenta Color mixing system - Magenta 0 - 100% 0..255 00..FF 0..100
8) Yellow Color mixing system - Yellow 0 - 100% 0..255 00..FF 0..100
9) Gobo 1 Gobo 1 (open, fast) 0..7 0..7 0..2.9
(indexed) Gobo 2 (fast) 8..15 8..F 3..5.9
Gobo 3 (fast)
Chaser from gobo to
gobo max. 100 BPM
=> 0,6 s 16..23 10..17 6..8.9
Gobo 4 (fast) 24..31 18..1F 9..11.9
Gobo 5 (fast) 32..39 20..27 12..14.9
Gobo 6 (fast) 40..47 28..2F 15..17.9
Gobo 7 (fast) 48..55 30..37 18..20.9
Gobo 8 (fast) 56..63 38..3F 21..23
Gobo 1 (open, slow) 64..71 40..47 24..26.9
Gobo 2 (slow) 72..79 48..4F 27..29.9
Gobo 3 (slow)
Chaser from gobo to
gobo max. 40 BPM
=> 1,51 s 80..87 50..57 30..33.9
Gobo 4 (slow) 88..95 58..5F 34..36.9
Gobo 5 (slow) 96..103 60..67 37..39.9
Gobo 6 (slow) 104..111 68..6F 40..42.9
Gobo 7 (slow) 112..119 70..77 43..45.9
Gobo 8 (slow) 120..127 78..7F 46..49
Gobo rotation STOP 128..129 80..81 50
Gobo rotation, slow-fast, CW min. 1,4 turns/h 130..191 82..BF 51..75
Gobo rotation, fast-slow, CCW max. 1.0 turns/sec. 192..253 C0..FD 76..98

GLP German Light Products GmbH (instruction version 1.33 / from software version 1.53) 20
Channel Function Time and Value DMX HEX %
Audio gobo chase, slow each 4th sound impulse
Ænew gobo
254 FE 99
Audio gobo chase, fast each sound impulse Æ
new gobo
255 FF 100
10) Gobo 1 Gobo Position 0 ... 540° 0..127 00..7F 0..49
Posi./Rot Gobo Rotation STOP 128..129 80..81 50
Gobo Rotation, slow-fast, CW min. 2,0 turns/h 130..191 82..BF 51..75
Gobo Rotation, fast-slow, CCW max. 3,8 turns/sec. 192..253 C0..FD 76..100
Audio Gobo Rotation, slow each 4th sound impulse
Ænew position
254 FE 99
Audio Gobo Rotation, fast each sound impulse Æ
new gobo
255 FF 100
11) Gobo 2 Gobo 1 (open, fast) 0..3 00..03 0..1
(fixed) Gobo 2 (fast) 4..7 04..07 2..3
Gobo 3 (fast)
Chaser from gobo to
gobo max. 100 BPM
=> 0,6 s 8..11 08..0B 3..4
Gobo 4 (fast) 12..15 0C..0F 5..6
Gobo 5 (fast) 16..19 10..13 6..7
Gobo 6 (fast) 20..23 14..17 8..9
Gobo 7 (fast) 24..27 18..1B 9..10
Gobo 8 (fast) 28..31 1C..1F 11..12
Gobo 9 (fast) 32..35 20..23 13..14
Gobo 10 (fast) 36..39 24..27 14..15
Gobo 1 (open, slow) 64..67 41..43 25..26
Gobo 2 (slow) 68..71 44..47 27..28
Gobo 3 (slow)
Chaser from gobo to
gobo max. 40 BPM
=> 1,51 s 72..75 48..4B 28..29
Gobo 4 (slow) 76..79 4C..50 30..31
Gobo 5 (slow) 80..83 51..53 32..33
Gobo 6 (slow) 84..87 54..57 33..34
Gobo 7 (slow) 88..91 58..5B 35..36
Gobo 8 (slow) 92..95 5C..5F 36..37
Gobo 9 (slow) 96..99 60..63 38..39
Gobo 10 (slow) 100..103 64..67 39..40
Gobo rotation STOP 128..129 80..81 50
Gobo rotation, slow-fast, CW min. 1,4 turns/h 130..191 82..BF 51..75
Gobo rotation, fast-slow, CCW max. 1.0 turns/sec. 192..253 C0..FD 76..98
Audio gobo chase, slow each 4th sound impulse
Ænew gobo
254 FE 99
Audio gobo chase, fast each sound impulse Æ
new gobo
255 FF 100
12) Shutter Shutter closed 0..15 00..0F 0..6
Random Strobe (different patterns) 16..31 10..1F 7..11.9
Strobe Pulse effect, slow - fast min. frequent 0,7 Hz 32..47 20..2F 12..12.9
Audio Shutter 48..63 30..3F 13..25
Strobe effect, slow - fast max. frequent 10 Hz 64..239 40..EF 26..93
Shutter open 240..253 F0..FD 94..98
Shutter open (lamp start) 254..255 FE..FF 99..100
13) Dimmer Dimmer closed (0%) 0..3 0..3 0..1
Dimmer 1%...99% movement time 0,3 sec. 4..251 4..FB 2..98
Dimmer open (100%) 252..255 FC..FF 99..100
14) Focus In (near) - out (far) full distance 1,5 sec. 0..255 0..FF 0..100
15) Zoom Inside (near) - outside (far) full distance 1,5 sec. 0..255 0..FF 0..100
16) Frost Open (0%) - retracted (100%) full distance 1,5 sec. 0..255 0..FF 0..100
17) Prism Prism swing out 0..5 00..05 0..2
Table of contents
Other GLP Dj Equipment manuals

GLP
GLP impression x4 bar Quick start guide

GLP
GLP Highlander Wash User manual

GLP
GLP Fusion Par FP7 User manual

GLP
GLP 7687 User manual

GLP
GLP YPOC 575 COLOR User manual

GLP
GLP IMPRESSION X4L User manual

GLP
GLP JDC Line 500 User manual

GLP
GLP YPOC 250 Color User manual

GLP
GLP Fusion Stick FS20 User manual

GLP
GLP Impression E350 User manual

GLP
GLP YPOC 575 User manual

GLP
GLP JDC1 User manual

GLP
GLP KNV Series User manual

GLP
GLP Impression X5 IP Bar 1000 User manual

GLP
GLP IMPRESSION X4L User manual

GLP
GLP POCKET SCAN User manual

GLP
GLP impression X4 Bar 20 User manual

GLP
GLP impression FR1 TM User manual

GLP
GLP X4 ATOM series User manual

GLP
GLP impression FR1O BAR User manual