manuals.online logo
Brands
  1. Home
  2. •
  3. Brands
  4. •
  5. GRE
  6. •
  7. Lighting Equipment
  8. •
  9. GRE 40135 User manual

GRE 40135 User manual

COVER ROLLER FOR ABOVE-GROUND POOLS ZWIJACZ
POKRYWY DLA BASENÓW NAZIEMNYCH
Description - OPIS Qty
#1
Crank-arm support
Ramie nośne korby 1
#2
Opposite support
Wspornik przeciwległy 1
#3
Base for #1
Przystawka dla #1 2
#4 Base for #2
Przystawka dla #2
2
#5
Screw
Śruba 6
#6
Screw
Śruba 18
#7
Screw
Śruba 4
#8
Nut
Nakrętka 4
#9
Coil of female Velcro
Cewka z rzepem żeńskim 8
#10 Male Velcro
Rzep męski
8
#11
Buckle
Klamra 8
#12
Clip
Spinacz 8
#13 Tube E «large diameter»
Rura "E" Duży rozmiar
3
#14
Tube D «small diameter»
Rura "D" Mały rozmiar 4
Bag of nuts and screws
Torba śrub i nakrętek
Fixing kit
Zestaw mocujący
Hexagonal tube
Rura heksagonalna
Ref. 40135
www.gre.es
For an elevated rectangular pool
Para una piscina elevada rectangular
Pour une piscine Hors-sol rectangulaire
Für erhöhtes, rechteckiges Schwimmbad
Per una piscina fuori terra rettangolare
Voor een verhoogd rechthoekig zwembad
Para piscine Fora Solo retangular
For an elevated round or oval pool
Para una piscina elevada redonda u ovalada
Pour une piscine Hors-sol ronde ou ovale
Für erhöhtes, rundes oder ovales Schwimmabd.
Per una piscina fuori terra tonda oppure ovale
Voor een verhoogd rond of ovaal zwembad
Para piscine Fora Solo ronda ou oval
Open and close the cover
over the pool.
Tie the clips #12 at the
same distances as the
Velcro stuck on the tubes.
Make sure that the
lengths of the belts allow
the cover to remain at
over the pool in order to
impede wind entering
under the cover.
Abrir y posicionar la cubierta sobre la piscina.
Atar las pinzas #12 a las mismas distancias que los
velcros dispuestos sobre los tubos.
Asegurarse que la longitud de las correas permite
que la cubierta se mantenga plana sobre la
piscina con el n de evitar que el viento se
introduzca bajo la cubierta.
Ouvrir la bâche sur la piscine et la mettre en
position. Attacher les attaches #12 sur les mêmes
intervalles que les velcros disposés sur les tubes.
S’assurer que la longueur des courroies permet
à la bâche de se maintenir plate sur la piscine et
d’éviter que le vent ne vienne s’engourer sous
la bâche.
Abdeckung an Schwimmbad anbringen.
Klammer #12 auf gleichem Abstand wie
Klettverschluss auf Rohren anbrigen. Überprüfen,
dass die Länge der Seile für das Schwimmbad
ausreicht, sodass der Wind nicht unter die
Abdeckung kommen kann.
Aprire e posizionare la copertura sopra la piscina.
Fissare le pinze #12 alla stessa distanza del velcro
disposto sui tubi. Assicurarsi che la lunghezza
delle cinghie permetta che la copertura si
mantenga a livello, sopra la piscina al ne di
evitare che il vento passi sotto la copertura.
Doe de afscherming open en plaats die over het zwembad. Bevestig de klemmen #12 op dezelfde afstanden als de velcros die op de buizen staan
gekleefd. Wees er zeker van dat de lengte van de riemen toelaat dat de afscherming vlak over het zwembad blijft zodanig dat er geen wind onder de
afscherming kan komen.
Abrir a cobertura sobre piscine e pôr-o em posição. Unir os laços #12 sobre os mesmos intervalos que os velcros dispostos sobre os tubos. Assegurar-se de
que o comprimento das correias permite a cobertura manter-se plano sobre piscine e de evitar que o vento venha precipitar-se sob a cobertura.
Position the cover over
the pool and clip it as
shown in the drawing.
Tie the clips #12 at the
same distances as the
Velcro stuck on the tubes.
Make sure that the
lengths of the belts allow the cover to remain at
over the pool in order to impede wind entering
under the cover.
Posicionar la cubierta sobre la piscina y pinzarla
como se indica en el dibujo. Atar las pinzas #12 a
las mismas distancias que los velcros dispuestos
sobre los tubos. Asegurarse que la longitud de
las correas permite que la cubierta se mantenga
plana sobre la piscina, con el n de evitar que el
viento se introduzca bajo la cubierta.
Mettre la bâche en position sur la piscine et la
pincer comme indiqué sur le dessin. Attacher les
attaches #12 à la bâche sur les mêmes intervalles
que les velcros disposés sur les tubes. S’assurer
que la longueur des courroies permet à la bâche
de se maintenir plate sur la piscine et d’éviter que
le vent ne vienne s’engourer sous la bâche.
Abdeckung auf Schwimmbad anbringen und
wie auf der Zeichnung mit den Klammern
festmachen. Klammer #12 auf gleichem
Abstand wie Klettverschluss . auf Rohren
anbringen. Überprüfen, dass die Länge der Seile
für das Schwimmbad ausreicht, sodass der Wind
nicht unter die Abdeckung kommen kann.
Posizionare la copertura sulla piscina e pinzarla
come indicato dal disegno. Fisare le pinze #12
alla stessa distanza del velcro. Assicurarsi che
la lunghezza delle cinghie permetta che la
copertura si mantenga a livello, sopra la piscina
al ne di evitare che il vento passi sotto la
copertura.
Positioneer de afscherming over het zwembad en klem die vast zoals op De afbeelding wordt
aangegeven. Bevestig de klemmen #12 op dezelfde afstanden als de velcros die op de buizen staan
gekleefd. Wees er zeker van dat de lengte van de riemen toelaat dat de afscherming vlak over het
zwembad blijft zodanig dat er geen wind onder de afscherming kan komen.
Pôr a cobertura em posição sobre piscine e beliscar-o como indicado sobre o desenho. Unir os laços #12
à cobertura sobre os mesmos intervalos que os velcros dispostos sobre os tubos. Assegurar-se de que
o comprimento das correias permite a cobertura manter-se plano sobre piscine e de evitar que o vento
venha precipitar-se sob a cobertura.
To remove the roller
pull support #1 and the
crank-arm of its base,
around the pool.
Check that support
#2, rests on the
surrounding of the pool
or completely remove it.
Para quitar el enrollador, arrastrar el soporte #1
y la manivela fuera de su base, alrededor de la
piscina. Vericar que el soporte #2, reposa sobre
la playa de la piscina o quitarlo completamente.
Pour retirer l’enrouleur faire glisser le support
#1 et la manivelle hors de sa base autour de la
piscine. Vérier que l’autre support #2, reste sur
le rebord ou l’enlever complètement.
Um die Rolle wegzunehmen, die Halterung #1
und die Spule wegnehmen. Halterung #2 auf
Schwimmbad belassen oder wegnehmen.
Per togliere l’avvolgitore, trascinare il supporto
#1 e la manovella fuori dalla loro base intorno
alla piscina. Vericare che il supporto #2
rimanga sopra il bordo della piscina o toglierlo
completamente.
Om de haspel te verwijderen moet men de
steun #1 en de hengel uit de basis verwijderen
rond het zwembad. Controleer of de steun #2,
op de boord van het zwembad rust ofverwijder
die volledig.
Para retirar o rolo fazer deslizar o apoio #1 e a
manivela fora da sua base em redor piscine.
Vericar que o outro apoio #2, permanece sobre
o rebordo ou retirar-o completamente. DISTRIBUIDO POR: MANUFACTURAS GRE S.A. - ARITZ BIDEA Nº 57 - BELAKO INDUSTRIALDEA - 48100 MUNGIA (BIZKAIA) ESPAÑA Nº REG. IND.:48-06762 - MADE IN CHINA
HIM40135.18
EN - The telescopic tubes
of the cover roller support
a maximum weight of 15
kg.
PL - Maksymalne
obciążenie rur
teleskopowych to 15 kg.
With hexagonal tube.
Insert tube D into support
#1. Fix the set with screw
#5. Repeat the operation
with tube F and support
#2. Fix with screw #5.
Z rurą heksagonalną.
Włóż rurkę D do wspornika #
1. Skręć zestaw za pomocą
śruby # 5. Powtórz operację z
rurą F i wspornikiem # 2. Skręć
śrubą nr 5.
For an elevated rectangular pool
Dla naziemnego prostokątnego basenu
For an elevated round or oval pool
Dla naziemnego owalnego lub okrągłego
basenu
Insert tubes D into tubes E. Slide them together
until the 2 supports rest across the surrounds of
the pool. Make sure that tube E is exactly centred
and that Z1 and Z2 are equal. Also make sure that
a minimum (1-1/2”) part of the tube is covered by
the central tube.
IWłóż rurę D do rury E. Przesunąć je razem, aż 2
wsporniki oprą się wokół basenu. Upewnij się, że rura
E jest dokładnie wyśrodkowana, a Z1 i Z2 są równe.
Upewnij się także, że minimalna (1-1 / 2 ") część rurki
jest zakryta przez centralną rurkę.
Screw 3 x #6 screws into the holes at each side
of tube E to fix the set.
Przykręć 3 śruby #6 w zaznaczonych miejscach
z każdej strony
OPTION 1:WOOD/STEEL POOLS
OPCIÓN 1:PISCINAS DEACERO/MADERA
OPTION 1:PISCINES EN ACIER/BOIS
OPTION 1:STAHL- / HOLZSCHWIMMBÄDER
OPZIONE 1:PISCINE ACCIAIO/LEGNO
OPTIE 1:STALEN / HOUTEN ZWEMBADEN
OPÇÃO 1:PISCINES DE AÇO/MADEIRA
OPTION 2:TUBULAR POOLS
OPCIÓN 2:PISCINAS TUBULARES
OPTION 2:PISCINES TUBULAIRES
OPTION 2:AUFBLASBARE SCHWIMMBÄDER
OPZIONE 2:PISCINE TUBOLARI
OPTIE 2:ZWEMBADEN MET BUIZENFRAME
OPÇÃO 2: PISCINES TUBULARES
OPTION 1
OPTION 1
OPTION 2
Fazer deslizar a base #3 sobre o apoio #1 e sobre o rebordo. Repetir a mesma operação com a base #3 e o apoio #2. Sobre rebordos de plástico: Utilizar parafusos #5 para xar as bases sobre o rebordo. Sobre rebordos de aço: Utilizar um
feltro para marcar a posição dos buracos sobre os rebordos. Utilizar perceuse a m de realizar estes 4 buracos. Pendurar as bases com parafusos #7 e pernos #8 em cada buraco.
Fazer deslizar a base #4 sobre o apoio #1 e sobre o rebordo. Repetir a mesma operação com a base #4 e o apoio #2.
1. Slide base #3 over support #1 and over the surrounding of the pool. Repeat the operation with tube
F and support #2. Over plastic surroundings: Use screws #5 to x the bases to the surroundings. Over
steel surroundings: Use a felt-tip pen to mark the position of the holes on the surroundings. Use a drill
to make the 4 holes. Screw the bases with screws #7 and nuts #8 in each hole.
2. Slide base #4 over support #1 and over the surrounding of the pool. Repeat the operation with
base #4 and support #2.
1.Deslizar la base #3 sobre el soporte #1 y sobre la playa de la piscina. Repetir la misma operación con
la base #3 y el soporte #2.Sobre las playas de plástico :Utilizar los tornillos #5 para jar las bases a las
playas. Sobre las playas de acero: Utilizar un rotulador para marcar la posición de los agujeros sobre
las playas. Hacer los 4 agujeros con un taladro. Atornillar las bases con los tornillos #7 y las tuercas #8
en cada agujero.
2.Deslizar la base #4 sobre el soporte #1 y sobre la playa de la piscina. Repetir la misma operación con la base #4 y el soporte #2.
1.Faire glisser la base #3 sur le support #1 et sur le rebord. Répéter la même opération avec la base #3 et le support #2.Sur des
rebords en plastique :Utiliser des vis #5 pour xer les bases sur le rebord Sur des rebords en acier :Utiliser un feutre pour marquer
la position des trous sur les rebords. Utiliser une perceuse an de réaliser ces 4 trous.Accrocher les bases avec des vis #7 et des
boulons #8 dans chaque trou.
2.Faire glisser la base #4 sur le support #1 et sur le rebord. Répéter la même opération avec la base #4 et le support #2.
1.Sockel #3 auf Halterung #1 und auf Rand des Schwimmbades legen. Vorgang mit Sockel #3 und Halterung #2 wiederholen. Bei
Plastikrändern:Schrauben#5benutzen,umSchwimmbadränderzuxieren.BeiStahlrändern:MitFilzstiftdieLöchervormarkieren4Löcher
bohren. Sockel mit den Schrauben #7 festschrauben und mit Muttern #8 befestigen.
2.Sockel #4 auf Halterung #1 und auf Rand des Schwimmbades legen. Vorgang mit
Sockel #4 und Halterung #2 wiederholen
1. Appoggiare la base #3 sopra il supporto #1 e sopra il bordo della piscina. Ripetere
la stessa operazione con la base #3 e il supporto #2. Sul bordo di plastica: Utilizzare
le viti #5 per ssare bene la base dei bordi della piscina. Sul bordo della piscina
d’acciaio: Utilizzare un pennarello per segnare la posizione dei buchi sui bordi.
Avvitare le basi con le viti #7 e i dadi #8 in ogni foro.
2.Appoggiare la base #4 sopra il supporto #1 e sopra il bordo della piscina.
Ripetere la stessa operazione con la base #4 e il supporto #2.
1.Doe de basis #3 glijden over de steun #1 en over de boord van het zwembad.
Herhaal deze handeling voor de basis #3 en de steun #2. Voor kunststoen
boorden: gebruik de schroeven #5 om de basissen op de boorden te bevestigen.
Op stalen boorden :Gebruik een stift om de positie van de gaten op de boorden
te markeren. Maak de 4 gaten met een boormachine. Bevestig de basissen met de
bouten #7 en de moeren #8 voor elk gat.
2.Doe de basis #4 glijden over de steun #1 en over de boord van het zwembad.
Herhaal deze handeling voor de basis #4 en de steun #2.
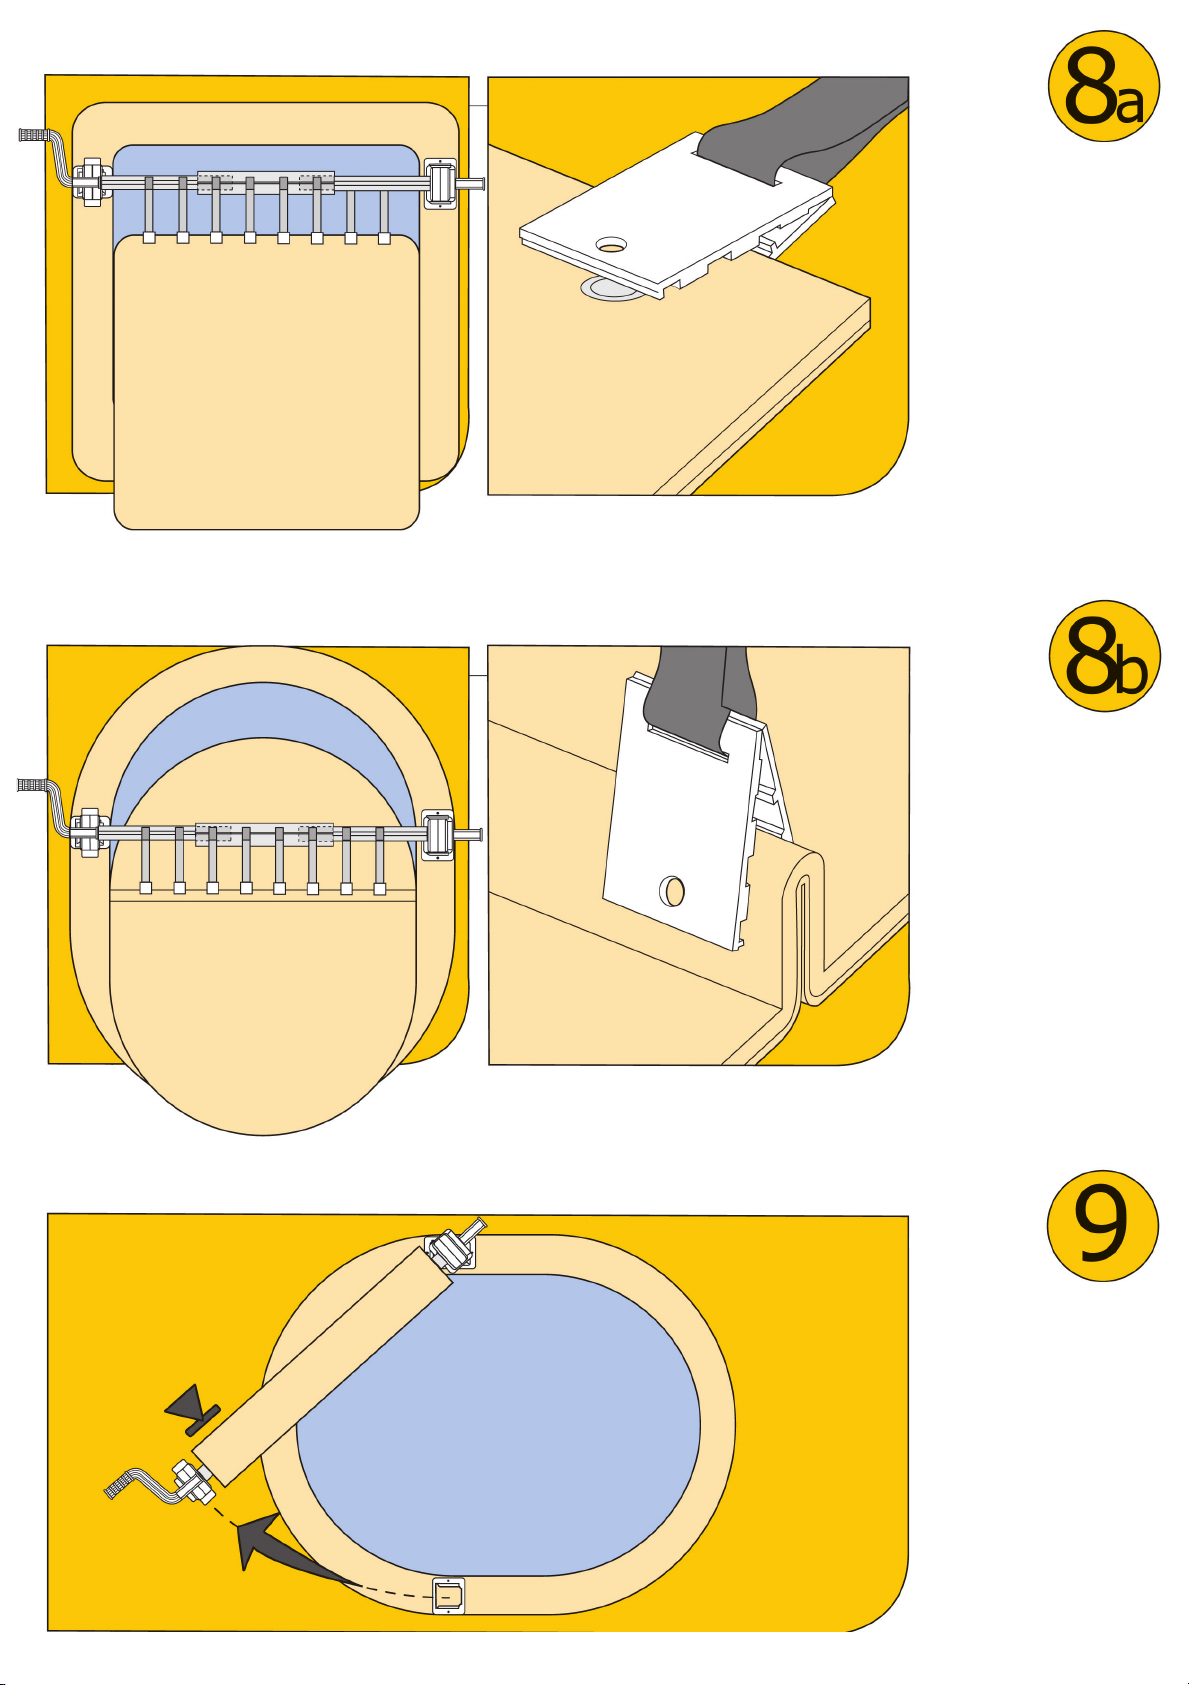
Separate the 8 male
Velcro #10 from the
coil #9, remove the
protection tape and
stick them on the tubes
in a straight line equidistant from each other
over width X, as shown in the drawing.
Separar los 8 velcros macho #10 de la bobina
#9, quitar la protección adhesiva y pegarlos
sobre los tubos en línea recta equidistantes
unos de otros sobre el ancho X, como se indica
en el dibujo.
Détacher les 8 velcro mâle #10 de la bobine
#9 en lui enlevant la protection adhésive et les
coller sur les tubes en formant une ligne droite à
distance égale sur la largeur X, comme indiqué
sur le schéma.
Klettverschluss #8 und #10 der Spule #9
auseinander nehmen und auf die Rohre in
gleichmäßigem Abstand ankleben, wie auf der
Zeichnung angegeben ist.
Dividere n° 8 pezzi di velcro maschio #10 dalla
bobina #9, togliere la protezione adesiva e
incollarle sui tubi in lines retta, equidistanti uno
dall’ altro sulla lunghezza X, come indicato dal
disegno.
Doe de 8 velcros met haakzijde #10 los van de spoel #9, en verwijder de klevende afscherming en plak ze op de buizen in een rechte lijn op gelijke afstand van elkaar over de breedte X zoals op de afbeelding wordt weergegeven.
Destacar o 8 velcro macho #10 do carrete #9 que retira-lhe na protecção adesiva e colar-o sobre os tubos formando uma linhadireita a distância igualiza sobre a amplitude X, como indicado sobre o esquema.
Assemble coils #9 and
buckles #11 with the
clips #12 as indicated
in the drawing. Do not
denitely close the clip.
Montar las bobinas #9 y las hebillas #11 con las
pinzas #12 como se indica en el dibujo.
No cerrar denitivamente la pinza.
Assembler les bandes #9 et les boucles #11 ainsi
que les attaches #12 comme indiqué sur le dessin.
Ne pas clipser dénitivement l’attache pour le
moment.
Spule #9 und Spannverschluss #11 mit Klammer
#12 gemäß Zeichnung anbringen. Klammer nicht
schließen.
Montare le bobine #9 e le bbie #11 con le pinze
#12 come indicato dal disegno. Non chiudere
denitivamente la pinza.
Monteer de spoelen #9 en de gespen #11
met Behulp van de klemmen #12 zoals op de
afbeelding wordt weergegeven. De klem niet
denief sluiten.
Montar as bandas #9 e os aneis #11 bem como os
laços #12 como indicado sobre o desenho. Não
clipser denitivamente o laço pelo momento.
With hexagonal tube.
Insert tube D into support
#1. Fix the set with screw
#5. Repeat the operation
with tube F and support
#2. Fix with screw #5.
Con un tubo hexagonal.
Insertar el tubo D dentro del
soporte #1. Asegurar el conjunto
con un tornillo #5. Repetir la operación con el
tubo F y el soporte #2. Asegurar con un tornillo #5
Avec un tube hexagonal. Insérer le tube D dans
le support #1. Sécuriser l’assemblage avec une
vis #5. Répéter l’opération avec le tube F et le
support #2. Sécuriser avec une vis #5
mit einem Sechskantrohr. D-Rohr in die
Halterung #1 anbringen Mit Schraube #5
sichern Vorgang mit F-Rohr und Halterung
#2 wiederholen Mit Schraube #5 sichern
Con un tubo esagonale. Inserire il tubo D
all’interno del supporto #1. Fissare il tutto con
una vite #5. Ripetere l’operazione con il tubo F
e il supporto #2. Assicurare con una vite #5.
Met een zeshoekige buis. Plaats de buis D
in de drager #1. Bevestig het geheel met de
schroef #5. Herhaal de handeling voor de buis
F met de steun #2. Bevestig het geheel met
een schroef #5.
Com um tubo hexagonal. Inserir o tubo D no apoio
#1. Proteger a montagem com um parafuso #5.
Repetir a operação com o tubo F e o apoio #2.
Proteger com um parafuso #5.
For an elevated rectangular pool
Para una piscina elevada rectangular
Pour une piscine Hors-sol rectangulaire
Für erhöhtes, rechteckiges Schwimmbad
Per una piscina fuori terra rettangolare
Voor een verhoogd rechthoekig zwembad
Para piscine Fora Solo retangular
For an elevated round or oval pool
Para una piscina elevada redonda u ovalada
Pour une piscine Hors-sol ronde ou ovale
Für erhöhtes, rundes oder ovales Schwimmabd.
Per una piscina fuori terra tonda oppure ovale
Voor een verhoogd rond of ovaal zwembad
Para piscine Fora Solo ronda ou oval
Inserire i tubi D nei tubi
E. Farli scorrere no a
che i due supporti
appoggino trasversalmente
sui bordi della piscina.
Assicurarsi che il tubo E sia perfettamente
centrato e che Z1 e Z2 siano uguali.Assicurarsi
anche ci sia una minima parte (1 1/2’’) di tubo
coperto da quello centrale.
Plaats de buizen D in de buizen E. Laat ze
glijden totdat De 2 steunen dwars rusten op
de boorden van het zwembad Wees er zeker
van dat de buis E juist staat gecentreerd en
dat de afstanden Z1 en Z2 identiek zijn. Wees
er ook zeker van dat minstens een deel van
de buis (1 1/2’’) door de centrale buis wordt
afgedekt.
Inserir os tubos D nos tubos E. fazer-o deslizar
até os 2 apoios descansam transversalmente
sobre os 2 rebordos piscine. Assegurar-se de
que o tubo E é centrado exactamente e Z1
e Z2são iguais. Assegurar-se igualmente de
que háuma parte mínima (1 1/2’‘) de tubo
abrangidopelo tubo central
Insert tubes D into tubes E. Slide them together
until the 2 supports rest across the surrounds of
the pool. Make sure that tube E is exactly centred
and that Z1 and Z2 are equal. Also make sure that
a minimum (1-1/2”) part of the tube is covered by
the central tube.
Insertar los tubos D en los tubos E. Deslizarlos hasta
que los 2 soportes descansen transversalmente sobre
las playas de la piscina. Asegurarse que el tubo E está
centrado exactamente y que Z1 y Z2 son iguales
Asegurarse también, que hay una parte mínima (1
1/2’’) del tubo recubierta por el tubo central.
Screw 3 x #6 screws into the holes at each side
of tube E to x the set.
Atornillar 3 tornillos #6 en los agujeros de
cada lado del tubo E con el n de asegurar
el conjunto.
Visser 3 vis #6 dans les perforations de chaque
côté du tube E an de sécuriser l’assemblage
3 Schrauben #6 auf den Seiten des E-Rohrs
anbringen und das ganze festschrauben.
Avvitare le 3 viti #6 nei fori di ogni lato del
tubo E al ne di ssare il tutto.
Draai 3 schroeven #6 vast in de gaten van
iedere zijde
van de buis E om het geheel te bevestigen.
Aparafusar 3 parafusos #6 nas perfurações de
cada lado do tubo E a m de proteger a
montagem
Insérer les tubes D dans les tubes E. Les faire glisser
jusqu’à ce que les 2 supports reposent transversalement
sur les 2 rebords de lapiscine. S’assurer que le tube E est
centré exactement et que Z1 et Z2 sont égales. S’assurer
également qu’il y a une partie minimum (1 1/2’’) de tube
recouvert par le tube central
D- und E-Rohre abringen. Verschieben bis sie auf
den beiden Halterungen liegen und so am Rand des
Schwimmbades sind. E-Rohr zentrieren und überprüfen,
dass Z1 und Z2 gleich sind. Überprüfen, ob ein kleiner
Teil (1 bis 1/2) des Rohrs mit Zentralrohr verdeckt wird.
OPTION 1:WOOD/STEEL POOLS
OPCJA 1: BASENY STALOWE/DREWNIANE
OPTION 2:TUBULAR POOLS
OPCJA 2: BASENY ROZPOROWE
OPTION 1
OPTION 1
OPTION 2
1. Slide base #3 over support #1 and over the surrounding of the pool. Repeat the operation with tube
F and support #2. Over plastic surroundings: Use screws #5 to x the bases to the surroundings. Over
steel surroundings: Use a felt-tip pen to mark the position of the holes on the surroundings. Use a drill
to make the 4 holes. Screw the bases with screws #7 and nuts #8 in each hole.
2. Slide base #4 over support #1 and over the surrounding of the pool. Repeat the operation with
base #4 and support #2.
1. Przesuń podstawkę # 3 ponad wsparcie nr 1 i brzeg basenu. Powtórz operację przy rurze F i
wsporniku # 2. Na brzegu z tworzywa sztucznego: Użyj śrub # 5, aby przymocować podstawy do
brzegu. Na brzegu stalowym: użyj pisaka, aby zaznaczyć położenie otworów w brzegu. Użyj wiertła,
aby wykonać 4 otwory. Przykręć podstawy za pomocą śrub # 7 i nakrętek # 8 w każdym otworze.
2. Przesuń podstawę nr 4 ponad wsparcie nr 1 i brzeg basenu. Powtórz operację z bazą nr 4 i
wspornikiem nr 2.
Separate the 8 male
Velcro #10 from the
coil #9, remove the
protection tape and
stick them on the tubes
in a straight line equidistant from each other
over width X, as shown in the drawing.
Oddziel 8-męski rzep # 10 od cewki # 9, usuń
taśmę ochronną i przyklej ją do rur w linii prostej
równej odległości od siebie na szerokości X, jak
pokazano na rysunku.
Assemble coils #9 and
buckles #11 with the
clips #12 as indicated
in the drawing. Do not
definitely close the clip.
Złóż cewki # 9 i klamry # 11 za pomocą zacisków
# 12 zgodnie z rysunkiem. Nie zamykaj
całkowicie zacisków.
COVER ROLLER FOR ABOVE-GROUND POOLS
ENRROLLADOR DE CUBIERTAS PARA PISCINAS ELEVADAS
ENROULEUR DE BÂCHE POUR PISCINES HORS-SOL
ROLLABDECKPLANE FÜR ERHÖHTE SCHWIMMBECKEN
AVVOVOLGITORE TELO PER PISCINE FUORI TERRA
AFGEDEKTE OPROLLER VOOR VERHOOGDE ZWEMBADEN
ROLO DE COBERTA PARA PISCINAS SOBRE SOLO
Description - Descripción
Beschreibung - Descrizione
Beschrijving - Descrição Qty
#1
Crank-arm support
Soporte con manivela
Support avec manivelle
Kurbelhalterung
Supporto con manovella
Drager met hengel
Apoio com manivela
1
#2
Opposite support
Soporte opuesto
Support opposé
Gegenhalterung
Supporto opposto
Tegenovergestelde drager
Apoio oposto
1
#3
Base for #1 - Base para #1
Base pour #1 - Sockel für #1
Base per #1 - Basis voor #1
Base para #1
2
#4
Base for #2 - Base para #2
Base pour #1 - Sockel für #2
Base per # 2 - Basis voor #2
Base para #2
2
#5
Screw - Tornillo - Vis
Schraube - Vite - Schroef
Parafuso 6
#6
Screw - Tornillo - Vis
Schraube - Vite - Schroef
Parafuso 18
#7
Screw - Tornillo - Vis
Schraube - Vite - Bout
Parafuso 4
#8
Nut - Tuerca - Boulon
Muttern - Dado - Moer
Perno 4
#9
Coil of female Velcro
Bobina con velcro-hembra
Bobine avec attache velcro-femelle
Spule mit Klettverschluss
Bobina con velcro femmina
Spoel met velcro - luszijde
Carrete com laço elcrofêmea
8
#10
Male Velcro - Velcro macho
Velcro Mâle
Klettverschluss - Velcro maschio
Velcro haakzijde
8
#11
Buckle - Hebilla - Boucle
Spannverschluss - Fibbia
Gesp - Boucle 8
#12
Clip - Pinza - Pince
Klammer - Klem
Laço“Pinça-Coberta 8
#13
Tube E «large diameter»
Tubo E «diámetro grande»
Tube E «gros diamètre»
E-Rohr mit großem Durch-
messer
Tubo E «diametro grande»
Buis E «grote diameter»
Tubo E “gordo diâmetro”
3
#14
Tube D «small diameter»
Tubo D «diámetro pequeño»
Tube D «petit diamètre»
E-Rohr mit kleinem Durchmesser
Tubo D «dimetro piccolo»
Buis D «kleine diameter»
Tubo D “pequeno diâmetro”
4
Bag of nuts and screws
Bolsa tornilleria - Sac à vis
Schraubentasche - Minuteria
Zak met schroeven
Saco à parafusos
Fixing kit - Kit de sujeción
Kit d’attache - Halterungskit
Kit di aggancio - Bevestigingskit
Conjunto de laço
Hexagonal tube - Tubo Hexagonal - Tube Hexagonal - Sechskantrohr
Tubo esagonale - Zeshoekige buis
Ref. 40135
www.gre.es
For an elevated rectangular pool
Dla naziemnych prostokątnych basenów
For an elevated round or oval pool
Dla basenów naziemnych owalnych lub
okrągłych
Open and close the cover
over the pool.
Tie the clips #12 at the
same distances as the
Velcro stuck on the tubes.
Make sure that the
lengths of the belts allow
the cover to remain at
over the pool in order to
impede wind entering
under the cover.
Otwórz i zamknij pokrywę nad basenem.
Zawiąż klipsy # 12 w tej samej odległości, co rzepy
przyklejone do tub.
Upewnij się, że długości pasów pozwalają na to,
że pokrywa będzie płasko nad basenem, aby
uniemożliwić przedostanie się wiatru pod
pokrywę.
Position the cover over
the pool and clip it as
shown in the drawing.
Tie the clips #12 at the
same distances as the
Velcro stuck on the tubes.
Make sure that the
lengths of the belts allow the cover to remain at
over the pool in order to impede wind entering
under the cover.
umieść osłonę nad basenem i przypnij ją jak na
rysunku.
Zawiąż klipsy # 12 w tej samej odległości, co
rzepy przyklejone do tub.
Upewnij się, że długości pasów pozwalają na to,
że pokrywa będzie płasko nad basenem, aby
uniemożliwić przedostanie się wiatru pod
pokrywę.
To remove the roller
pull support #1 and the
crank-arm of its base,
around the pool.
Check that support
#2, rests on the
surrounding of the pool
or completely remove it.
Aby wyjąć rolkę, pociągnij wspornik # 1 i ramię
korby podstawy, wokół basenu.
Sprawdź czy wsparcie # 2, opiera się na
otoczeniu basenu lub całkowicie je usuń.
DISTRIBUIDO POR: MANUFACTURAS GRE S.A. - ARITZ BIDEA Nº 57 - BELAKO INDUSTRIALDEA - 48100 MUNGIA (BIZKAIA) ESPAÑA Nº REG. IND.:48-06762 - MADE IN CHINA
HIM40135.18
EN - The telescopic tubes
of the cover roller support a
maximum weight of 15 kg.
ES - Los tubos telescópicos
del enrollador de cubiertas
soportan un peso máximo
de 15 kg. FR - Les tubes
télescopiques de l’enrouleur
de couvertures supportent
un poids maximum de 15
kg. DE - Die Teleskoprohre
der Aufwickelvorrichtung
für die Abdeckung tragen
maximal 15 kg. IT - I tubi
telescopici dell’avvolgitore
della copertura tollerano un
peso massimo di 15 kg. NL -
De telescopische buizen van
de dekzeilafroller kunnen
een maximum gewicht van
15 kilo dragen. PT - Os tubos
telescópicos do enrolador
de coberturas suportam um
peso máximo de 15 kg.
EN - GUARANTEE CERTIFICATE
1 GENERAL TERMS
1.1 In accordance with these provisions, the seller guarantees that the product corresponding to this guarantee (“the Product”) is in perfect condition at the time
of delivery.
1.2 The Guarantee Term for the Product is two (2) years from the time it is delivered to the purchaser.
1.3 In the event of any defect in the Product that is notified by the purchaser to the seller during the Guarantee Term, the seller will be obliged to repair or
replace the Product, at his own cost and wherever he deems suitable, unless this is impossible or unreasonable.
1.4 If it is not possible to repair or replace the Product, the purchaser may ask for a proportional reduction in the price or, if the defect is sufficiently
significant, the termination of the sales contract.
1.5 The replaced or repaired parts under this guarantee, will not extend the guarantee period of the original Product, but will have a separate guarantee. 1.6 In
order for this guarantee to come into effect, the purchaser must provide proof of the date of purchase and delivery of the Product.
1.7 If, after six months from the delivery of the Product to the purchaser, he notifies a defect in the Product, the purchaser must provide proof of the origin and
existence of the alleged defect.
1.8 This Guarantee Certificate is issued without prejudice to the rights corresponding to consumers under national regulations.
2 INDIVIDUAL TERMS
2.1 This guarantee covers the products referred to in this manual.
2.2 This Guarantee Certificate will only be applicable in European Union countries.
2.3 For this guarantee to be effective, the purchaser must strictly follow the Manufacturer’s instructions included in the documentation provided with the
Product, in cases where it is applicable according to the range and model of the Product.
2.4 When a time schedule is specified for the replacement, maintenance or cleaning of certain parts or components of the Product, the guarantee will only be
valid if this time schedule has been followed.
3 LIMITATIONS
3.1 This guarantee will only be applicable to sales made to consumers, understanding by “consumer”, a person who purchases the Product for purposes not
related to his professional activities.
3.2 The normal wear resulting from using the product is not guaranteed. With respect to expendable orconsumable parts, components and/or materials,
such as batteries, light bulbs, etc. the stipulations in the documentation provided with the Product, will apply.
3.3 The guarantee does not cover those cases when the Product; (I) has been handled incorrectly; (II) has been repaired, serviced orhandled by non-
authorised people or (III) has been repaired or serviced not using original parts. In cases where the defect of the Product is a result of incorrect installation or
start-up, this guarantee will only apply when said installation or start-up is included in the sales contract of the Product and has been conducted by the
seller or under his responsibility.
PL - CERTYFIKAT GWARANCJI
1 WARUNKI OGÓLNE
1.1 Zgodnie z tymi postanowieniami sprzedawca gwarantuje, że produkt odpowiadający tej gwarancji ("Produkt") jest w idealnym stanie w momencie dostawy.
1.2 Okres gwarancji na produkt wynosi dwa (2) lata od momentu dostarczenia go nabywcy.
1.3 W przypadku jakiejkolwiek wady Produktu, o której Kupujący poinformował sprzedającego w okresie Gwarancji, sprzedawca będzie zobowiązany do naprawy
lub
wymiany Produktu na własny koszt chyba że jest to niemożliwe lub nieuzasadnione.
1.4 Jeżeli naprawa lub wymiana Produktu nie jest możliwa, kupujący może zażądać proporcjonalnego obniżenia ceny lub, jeśli wada jest wystarczająco istotna,
rozwiązania umowy sprzedaży.
1.5 Wymienione lub naprawione części objęte niniejszą gwarancją nie przedłużą okresu gwarancji oryginalnego Produktu, ale będą miały osobną gwarancję.
1.6 Aby niniejsza gwarancja weszła w życie, nabywca musi przedstawić dowód daty zakupu i dostawy Produktu.
1.7 Jeżeli po sześciu miesiącach od dostarczenia Produktu do nabywcy powiadomi o wadzie produktu, nabywca musi przedstawić dowód pochodzenia
i istnienie rzekomej wady.
1.8 Niniejsze świadectwo gwarancji wydawane jest bez uszczerbku dla praw odpowiadających konsumentom na mocy przepisów krajowych.
2 WARUNKI INDYWIDUALNE
2.1 Niniejsza gwarancja obejmuje produkty, o których mowa w niniejszej instrukcji.
2.2 Niniejszy Certyfikat Gwarancji będzie obowiązywać wyłącznie w krajach Unii Europejskiej.
2.3 Aby ta gwarancja była skuteczna, nabywca musi ściśle przestrzegać instrukcji producenta zawartych w dokumentacji dostarczonej z Produktem, w
przypadkach, w których ma zastosowanie zgodnie z zakresem i modelem Produktu.
2.4 W przypadku określenia harmonogramu wymiany, konserwacji lub czyszczenia niektórych części lub komponentów produktu gwarancja zostanie udzielona
tylko, jeśli ten harmonogram został dotrzymany.
3 OGRANICZENIA
3.1 Niniejsza gwarancja będzie miała zastosowanie wyłącznie do sprzedaży dokonywanej na rzecz konsumentów, rozumienia przez "konsumenta", osobę, która
kupuje Produkt do celów nie
związanych z jego działalnością zawodową.
3.2 Normalne zużycie wynikające z użytkowania produktu nie jest gwarantowane. W odniesieniu do zużytych lub zużywalnych części, komponentów i / lub
materiałów,
takie jak baterie, żarówki itp. będą miały zastosowanie postanowienia zawarte w dokumentacji dostarczonej z produktem. 3.3 Gwarancja nie obejmuje
przypadków, gdy Produkt; (I) został nieprawidłowo użytkowany; (II) został naprawiony, serwisowany lub obsługiwany przez osoby nieuprawnione
osoby lub (III) zostały naprawione lub serwisowane bez użycia oryginalnych części. W przypadkach, gdy wada Produktu jest wynikiem nieprawidłowej instalacji
lub
rozruchu, ta gwarancja będzie miała zastosowanie tylko wtedy, gdy wspomniana instalacja lub uruchomienie zostanie zawarte w umowie sprzedaży produktu i
została przeprowadzona przez
producenta lub na jego odpowiedzialność.
IF YOU HAVE ANY PROBLEM, CONTACT US!
SI TIENES ALGUN PROBLEMA, ¡CONSULTENOS!
EN CAS DE PROBLEME, NOUS CONSULTER!
BEI PROBLEMEN KÖNNEN SIE SICH MIT UNS UNTER DER FOLGENDEN
DEUTSCHEN
Deutchland
PER OGNI VOSTRA EVENTUALLE OCCORRENZA, INTERPELLATECI! Italia
MOCHT U EEN PROBLEEM HEBBEN, … ¡RAADPLEEG ONS! Nederlands
Belgie
EM CASO DE PROBLEMA, ¡CONSULTAR-NOS!
-We reserve the right to change all or part of the arcles or contents of this document, without prior noce
-Zastrzegamy sobie prawo do zmiany w części lub całości niniejszego dokumentu bez uprzedniej informacji
DISTRIBUIDO POR:
MANUFACTURAS GRE. S.A.
ARITZ BIDEANº57, BELAKO INDUSTRIALDEA
48100 MUNGIA (BIZKAIA)· ESPAÑA
http://www.gre.es
Nº REG. IND.: 48-06762
0800 952 49 72
[email protected]
+31 513 62 66 66
[email protected]
www.service-gre.com
España
Portugal
www.service-gre.com
www.service-gre.com
800 781 592
www.service-gre.com
www.service-gre.com
DISTRIBUTED BY / DISTRIBUIDO POR / DISTRIBUÉ PAR / VERTRIEB DURCH / DISTRIBUITO DA / GEDISTRIBUEERD DOOR / DISTRIBUÍDO POR:
MANUFACTURAS GRE, S.A. ARITZ BIDEA Nº 57 BELAKO INDUSTRIALDEA, APARTADO 69 - 48100 MUNGUIA (VIZCAYA) ESPAÑA Nº Reg. Ind. 48-06762
MADE IN CHINA / FABRICADO EN CHINA / FABRIQUÉ AU CHINE / HERGESTELLT IN CHINA / PRODOTTO IN CHINA / GEPRODUCEERD IN CHINA / FABRICADO NA RPC

Other manuals for 40135

2

Other GRE Lighting Equipment manuals

GRE POOL ATHLETE User manual

GRE

GRE POOL ATHLETE User manual

GRE SCR55 User manual

GRE

GRE SCR55 User manual

GRE POOL EXPERT AR20693 User manual

GRE

GRE POOL EXPERT AR20693 User manual

GRE PH54 User manual

GRE

GRE PH54 User manual

GRE AR-1500 Manual

GRE

GRE AR-1500 Manual

GRE AR-20660 Manual

GRE

GRE AR-20660 Manual

GRE CV790205 User manual

GRE

GRE CV790205 User manual

GRE 90171 User manual

GRE

GRE 90171 User manual

GRE 621535 User manual

GRE

GRE 621535 User manual

GRE AR-116802 User manual

GRE

GRE AR-116802 User manual

GRE SALT OPTIMUS E4 User manual

GRE

GRE SALT OPTIMUS E4 User manual

GRE AR-110 User manual

GRE

GRE AR-110 User manual

GRE CIPROV1001 User manual

GRE

GRE CIPROV1001 User manual

GRE LEDRC User manual

GRE

GRE LEDRC User manual

GRE 48-06762 User manual

GRE

GRE 48-06762 User manual

GRE 40135 User manual

GRE

GRE 40135 User manual

GRE TRCP124 User manual

GRE

GRE TRCP124 User manual

GRE AR11680 User manual

GRE

GRE AR11680 User manual

Popular Lighting Equipment manuals by other brands

Meanwell LCM-40EO instruction manual

Meanwell

Meanwell LCM-40EO instruction manual

HAMPTON BAY 1000000000 Use and care guide

HAMPTON BAY

HAMPTON BAY 1000000000 Use and care guide

DualLite SEWL C1D2 Series Installation, Operation and Maintainance Instructions

DualLite

DualLite SEWL C1D2 Series Installation, Operation and Maintainance Instructions

HQ Power XMPL11 user manual

HQ Power

HQ Power XMPL11 user manual

ledscom LC-L-370 Assembly instructions

ledscom

ledscom LC-L-370 Assembly instructions

superbrightleds WPR Series user manual

superbrightleds

superbrightleds WPR Series user manual

SEI LT191300TX Assembly

SEI

SEI LT191300TX Assembly

Kichler Lighting elan quick start guide

Kichler Lighting

Kichler Lighting elan quick start guide

ROXX CLUSTER B2 W user manual

ROXX

ROXX CLUSTER B2 W user manual

Viessmann H0 6338 Operation manual

Viessmann

Viessmann H0 6338 Operation manual

MENU Carrie manual

MENU

MENU Carrie manual

Qlightec S80ADR quick start guide

Qlightec

Qlightec S80ADR quick start guide

Lightronics AS40D owner's manual

Lightronics

Lightronics AS40D owner's manual

Anolis ArcWash Recessed 136 RGB user manual

Anolis

Anolis ArcWash Recessed 136 RGB user manual

Bestway 58612 owner's manual

Bestway

Bestway 58612 owner's manual

SBL 125601-SBL manual

SBL

SBL 125601-SBL manual

Aervoe Flare operating instructions

Aervoe

Aervoe Flare operating instructions

NICOR NLCSPCW1WH installation instructions

NICOR

NICOR NLCSPCW1WH installation instructions

manuals.online logo
manuals.online logoBrands
  • About & Mission
  • Contact us
  • Privacy Policy
  • Terms and Conditions

Copyright 2025 Manuals.Online. All Rights Reserved.