manuals.online logo
Brands
  1. Home
  2. •
  3. Brands
  4. •
  5. Gymrex
  6. •
  7. Fitness Equipment
  8. •
  9. Gymrex GR-ATM1 User manual

Gymrex GR-ATM1 User manual

GR-ATM1
GR-ATM2
GR-ATM3
GR-ATM4
GR-ATM5
GR-ATM6
GR-ATM7
GR-ATM8
GR-ATM9
HIGH PERFORMANCE.
USER MANUAL
AIR TUMBLING MAT
expondo.de
BEDIENUNGSANLEITUNG | INSTRUKCJA OBSŁUGI
NÁVOD K POUŽITÍ | MANUEL D´UTILISATION
ISTRUZIONI PER L‘USO | MANUAL DE INSTRUCCIONES
2
18.07.2019
3
a) Reinigen Sie das Produkt regelmäßig, um eine
dauerhafte Ablagerung von Verunreinigungen zu
vermeiden.
b) Halten Sie das Produkt von Feuer- und Wärmequellen
fern.
c) Das Überschreiten des maximal zulässigen
Benutzergewichts kann zur Beschädigung des
Produkts führen.
d) Es ist verboten, das Produkt während der
Unterhaltung in der Nähe von Gewässern und als
Schwimmzubehör zu verwenden.
e) Ziehen Sie Ihre Schuhe, Brillen aus und leeren Sie
Ihre Taschen, bevor Sie das Produkt verwenden.
f) Bringen Sie keine scharfen Gegenstände auf die
Oberäche des Produkts.
g) Vor dem Transport des Produkts wird es empfohlen
Luft aus dem Inneren zu entfernen.
Die Airtrackmatte ist für allgemeine Entwicklungsübungen
im Zusammenhang mit Kampfsport, Kunstturnen und
vielen anderen Sportdisziplinen bestimmt.
Für alle Schäden bei nicht sachgemäßer Verwendung
haftet allein der Betreiber.
MONTAGE DES PRODUKTS
ACHTUNG: Stellen Sie vor der Verwendung des Produkts
sicher, dass sich keine scharfen Gegenstände in der Nähe
benden, die das Produkt beschädigen oder eine Gefahr
für den Benutzer darstellen könnten.
1. Packen Sie die Airtrack Matte aus und verteilen Sie
sie auf einer ebenen, glatten Oberäche, die weder
Wärme noch Feuer ausgesetzt ist.
2. Suchen Sie das Luftventil, önen Sie es und
entriegeln Sie es.
3. Die Pumpe an die Airtrack Matte anschließen und mit
Luft auüllen. Achten Sie auf den maximal zulässigen
Luftdruck in der Airtrack Matte.
ACHTUNG: Die Pumpe ist nicht im Set inkludiert.
4. Nach Abschluss des Pumpvorgangs das Luftventil
sichern und schließen. Die Matte ist nun einsatzbereit.
AUSBESSERUNG (FLICKEN)
1. Reinigen und entfetten Sie den beschädigten
Bereich mit einem feuchten Tuch und einem milden
Reinigungsmittel.
2. Bedecken Sie nach dem Trocknen den Bereich der
Beschädigung mit der Klebeschicht.
3. Bereiten Sie das Paster (bzw. die Latte) vor. Es ist zu
beachten, dass die Oberäche des Pasters größer
sein muss als die Oberäche des beschädigten
Bereichs.
4. Decken Sie das Paster mit einer Schicht Klebsto
ab. Warten Sie einen Moment, bis der Klebsto an
der Luft getrocknet ist.
5. Tragen Sie das Paster auf die beschädigte Stelle auf
und drücken Sie darauf, bis beide Oberächen fest
aneinander haften.
DE BEDIENUNGSANLEITUNG
Produktname
Product name
Nazwa produktu
Název výrobku
Nom du produit
Nome del prodotto
Nombre del producto
Airtrack Matte
Air tumbling mat
Mata gimnastyczna dmuchana
Nafukovací žíněnka
Piste de tumbling gonable
Tappetino gonabile
Colchoneta de gimnasia inable
Modell
Model
Model
Model
Modèle
Modello
Modelo
GR-
ATM1
GR-
ATM2
GR-
ATM3
GR-
ATM4
GR-
ATM5
GR-
ATM6
GR-
ATM7
GR-
ATM8
GR-
ATM9
Maximale Belastbarkeit
Maximum load
Maksymalne obciążenie
Maximální nosnost
Capacité de charge
maximale
Capacità di carico
massima
Carga máxima
[kg]
150 200 250 300 600
Max. Druck
Max. pressure
Maks. ciśnienie
Max. tlak
Pression maximale
Max. Pressione
Presión máxima
[PSI/bar]
10/0,7
Anzahl der Grie [Stk.]
Number of handles [pcs]
Ilość uchwytów [szt]
Počet úchytů [ks]
Nombre de poignées [pcs]
Numero di maniglie [pz.]
Cantidad de mangos
[unidades]
4
Abmessungen
Dimensions
Wymiary
Rozměry
Dimensions
Dimensioni
Dimensiones
[cm]
300x100x10 300x100
x20
400x100
x20
500x100
x20
600x100
x20
300x200
x20
600x200
x20
Gewicht
Weight
Ciężar
Hmotnost
Poids
Peso
Peso
[kg]
8,5 9,8 13 16,2 19,5 36,5
Gebrauchsanweisung beachten.
ACHTUNG!, WARNUNG! oder HINWEIS!, um
auf bestimmte Umstände aufmerksam zu
machen (allgemeines Warnzeichen).
ACHTUNG: Kleinere Schäden können repariert
werden, wenn die Airtrack Matte mit Luft gefüllt
ist. Entfernen Sie bei größeren Schäden die Luft
aus dem Inneren der Matte, bevor Sie Reparaturen
durchführen.
REINIGUNG UND WARTUNG
a) Verwenden Sie zum Reinigen der Oberäche
ausschließlich Mittel ohne ätzende Inhaltsstoe.
b) Das Produkt sollte an einem trockenen und kühlen
Ort gelagert bzw. aufbewahrt werden und vor
Feuchtigkeit und direkter Sonneneinstrahlung
geschützt sein.
c) Eine regelmäßige Wartung des Produkts sollte
hinsichtlich seiner technischen Leistungsfähigkeit
und etwaigen Schäden in regelmäßigen Intervallen
bzw. Zeiträumen durchgeführt werden.
d) Zum Reinigen ist ein weicher, feuchter Lappen zu
verwenden.
EN USER MANUAL
a) Regularly clean the product to prevent permanent
deposit of impurities.
b) Keep the product away from sources of re and heat.
c) Exceeding the maximum permissible user weight
may cause damage to the product.
d) Do not use the product as a fun object in water
reservoirs or as a swimming accessory.
e) Before using the product, remove your shoes,
glasses and empty your pockets.
f) Do not place sharp objects to the surface of the
product.
g) Deate the product before transport.
The exercise mat is designed for general development
exercises, practicing martial arts, artistic gymnastics and
various other sports.
The user is liable for any damage resulting from
unintended use of the device.
PREPARING THE PRODUCT FOR USE
PLEASE NOTE: Before you begin to using the product,
make sure that there are no sharp objects in the vicinity
which could damage the product or be hazardous to the
user.
1. Unpack the mat and spread it on a at, smooth
surface, away from sources of heat and re.
2. Locate the air valve, open and unlock it.
3. Connect the pump to the mat and start inating it.
Pay attention to the maximum allowable air pressure
in the mat.
PLEASE NOTE: The pump is not included in the kit.
4. When you nish pumping, secure and close the air
valve. The mat is ready for use.
PATCHING
1. Clean and degrease the area of damage using a wet
cloth and a mild detergent.
Read instructions before use.
WARNING! or CAUTION! or REMEMBER!
Applicable to the given situation. (general
warning sign).
TECHNISCHE DATEN | TECHNICAL DATA | DANE TECHNICZNE | TECHNICKÉ ÚDAJE | DÉTAILS TECHNIQUES
DATI TECNICI | DATOS TÉCNICOS
PL INSTRUKCJA OBSŁUGI
4 5
2. When the area of the damage is dry, cover with a
layer of adhesive.
3. Prepare the patch. Remember that the surface of
the patch must be larger than the surface of the
damaged area.
4. Cover the patch with a layer of adhesive. Wait a
moment for the adhesive to start drying in the open
air.
5. Apply the patch to the damaged area and press it
until you are sure that both surfaces adhere tightly.
NOTE: Minor damage can be repaired when the mat
is lled with air. In case of major damage, deate the
mat before carrying out repairs.
CLEANING AND MAINTENANCE
a) Use only non-corrosive cleaners to clean the surface.
b) The product should be stored in a dry and cool place
protected from moisture and direct sunlight.
c) Remember to regularly inspect the product for
technical performance or damage.
d) Use a soft, damp cloth for cleaning
a) Należy regularnie czyścić produkt, aby nie dopuścić
do trwałego osadzenia się zanieczyszczeń.
b) Trzymać produkt z dala od źródeł ognia i ciepła.
c) Przekroczenie maksymalnej dopuszczalnej wagi
użytkownika może spowodować uszkodzenie
produktu.
d) Zabrania się użytkowania produktu podczas
rozrywek w zbiornikach wodnych i jako akcesorium
pływackie.
e) Przed rozpoczęciem użytkowania produktu należy
zdjąć obuwie, okulary a także opróżnić kieszenie.
f) Nie wnosić ostrych przedmiotów na powierzchnię
produktu.
g) Przed transportem produktu należy usunąć z jego
wnętrza powietrze.
Mata gimnastyczna dmuchana przeznaczona jest do
ćwiczeń ogólnorozwojowych, związanych ze sztukami
walki, gimnastyką artystyczną oraz wielu innych.
Odpowiedzialność za wszelkie szkody powstałe w
wyniku użytkowania niezgodnego z przeznaczeniem
ponosi użytkownik.
MONTAŻ PRODUKTU
UWAGA: Przed rozpoczęciem korzystania z produktu
należy upewnić się, czy w pobliżu nie znajdują się
ostre przedmioty grożące uszkodzeniem produktu lub
stwarzające zagrożenia dla użytkownika.
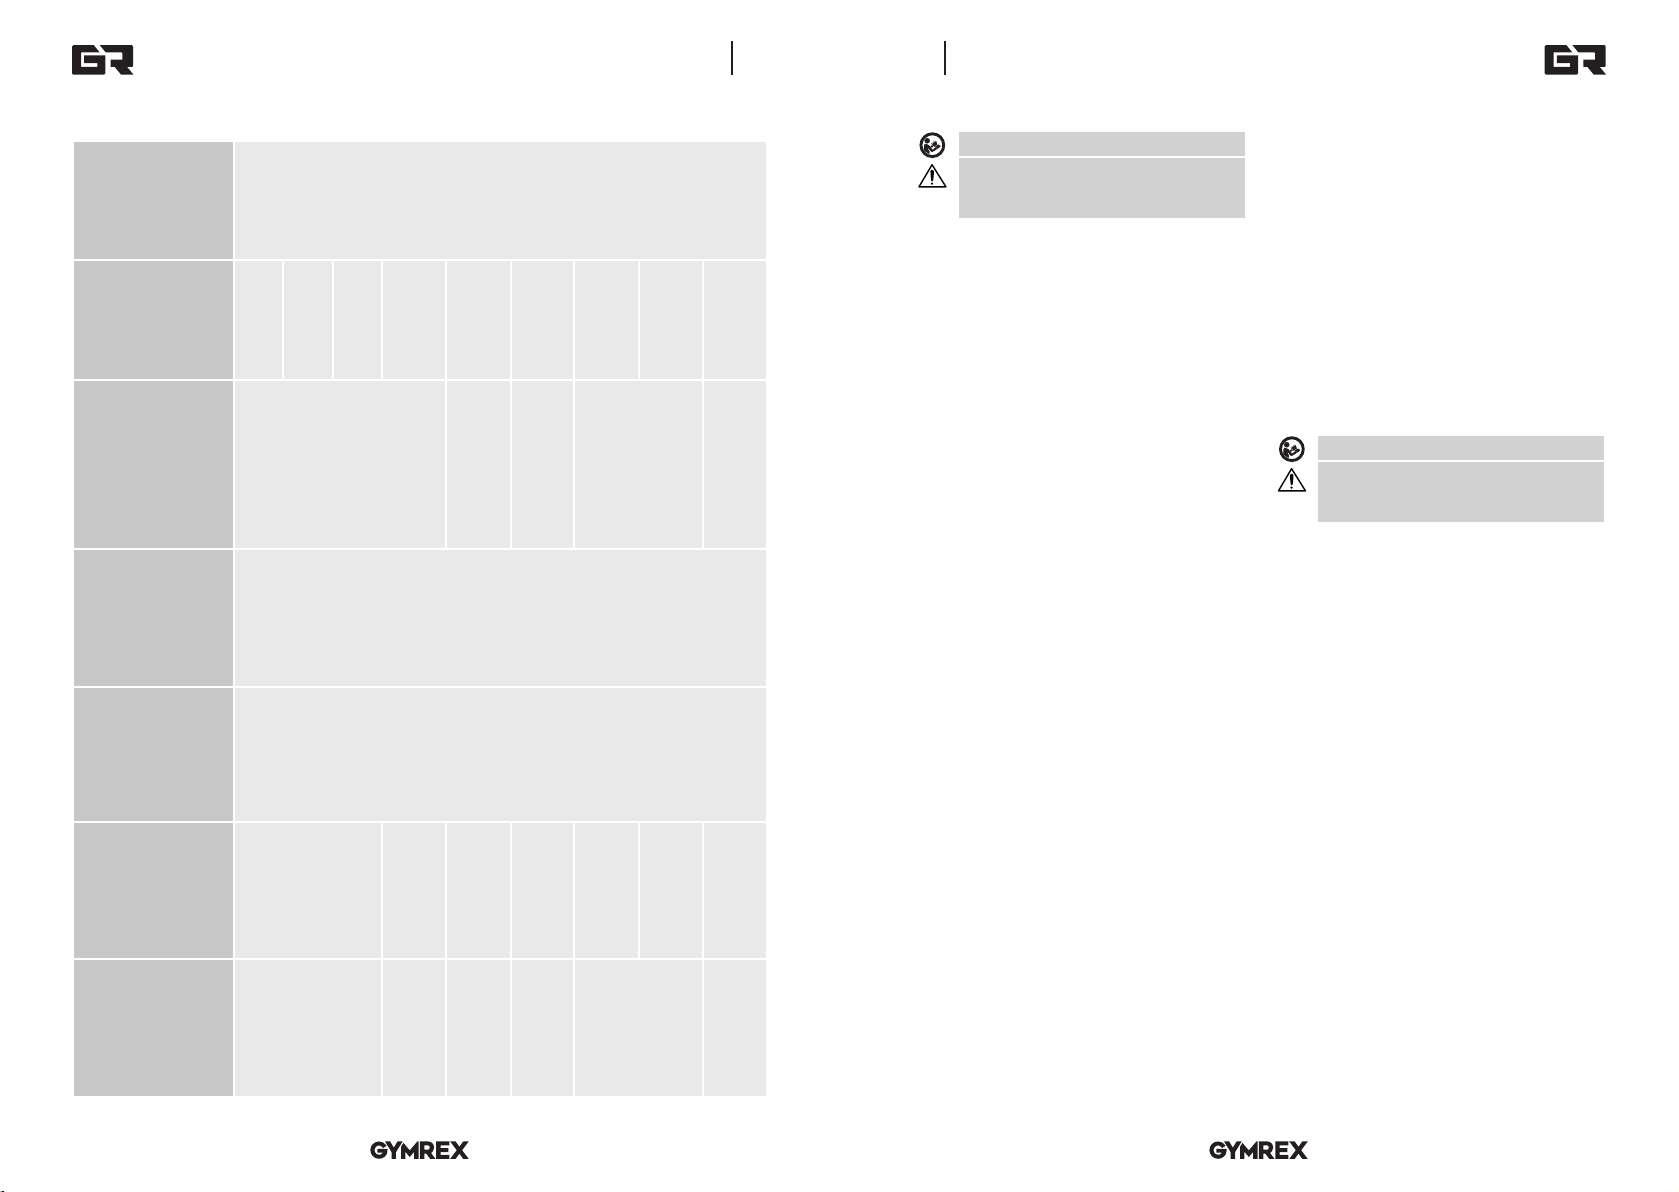
1. Wypakować matę, a następnie rozłożyć ją na płaskiej,
gładkiej powierzchni z dala od źródeł ciepła i ognia.
2. Zlokalizować zawór powietrza, otworzyć go a
następnie odbezpieczyć.
3. Podłączyć pompkę do maty i rozpocząć napełnianie
powietrzem. Należy zwrócić uwagę na maksymalne
dopuszczalne ciśnienie powietrza wewnątrz maty.
UWAGA: Pompka nie wchodzi w skład zestawu.
Przed użyciem należy zapoznać się z instrukcją.
UWAGA! lub OSTRZEŻENIE! lub PAMIĘTAJ!
opisująca daną sytuację (ogólny znak
ostrzegawczy).
4. Po zakończeniu pompowania należy zabezpieczyć
i zamknąć zawór powietrza. Mata jest gotowa do
użytku.
ŁATANIE
1. Oczyścić i odtłuścić miejsce uszkodzenia przy pomocy
wilgotnej ściereczki oraz łagodnego detergentu.
2. Po wysuszeniu pokryć okolice miejsca uszkodzenia
warstwą kleju.
3. Przygotować łatę. Należy pamiętać o tym, że
powierzchnia łaty musi być większa niż powierzchnia
uszkodzonego miejsca.
4. Pokryć łatę warstwą kleju. Odczekać chwilę, aż klej
zacznie przesychać na wolnym powietrzu.
5. Przyłożyć łatę do miejsca uszkodzenia i dociskać do
czasu, aż obie powierzchnie zaczną do siebie ściśle
przylegać.
UWAGA: Niewielkie uszkodzenia mogą być
naprawiane gdy mata jest wypełniona powietrzem. W
przypadku większych uszkodzeń przed dokonywaniem
napraw należy usunąć z wnętrza maty powietrze.
CZYSZCZENIE I KONSERWACJA
a) Do czyszczenia powierzchni należy stosować
wyłącznie środki niezawierające substancji żrących.
b) Produkt należy przechowywać w suchym i chłodnym
miejscu chronionym przed wilgocią i bezpośrednim
promieniowaniem słonecznym.
c) Należy wykonywać regularne przeglądy produktu
pod kątem jego sprawności technicznej oraz
wszelkich uszkodzeń.
d) Do czyszczenia należy używać miękkiej, wilgotnej
ściereczki.
CZ NÁVOD K OBSLUZE
Před použitím výrobku se seznamte s návodem
UPOZORNĚNÍ! nebo VAROVÁNÍ! nebo
PAMATUJTE! popisující danou situaci.
(všeobecná výstražná značka).
a) Tento výrobek je třeba pravidelně čistit a nedopustit,
aby se na výrobku trvale usazovaly nečistoty.
b) Uchovávejte výrobek mimo dosah zdroje tepla a
ohně.
c) Překročení maximální přípustné hmotnosti uživatele
může výrobek poškodit.
d) Je zakázáno používat výrobek během hrátek ve
vodních nádržích a jako plavecké příslušenství.
e) Před použitím výrobku je třeba sundat boty, brýle a
také vyprázdnit kapsy.
f) Nepokládejte ostré předměty na povrchu výrobku.
g) Před přepravou výrobku je třeba odstranit vzduch z
jeho vnitřku.
Nafukovací gymnastická žíněnka je určena pro všeobecná
vývojová cvičení, cvičení spojená s bojovým uměním a
uměleckou gymnastikou a pro jiná podobná cvičení.
Odpovědnost za veškeré škody vzniklé v důsledku
použití zařízení v rozporu s určením nese uživatel.
MONTÁŽ VÝROBKU
UPOZORNĚNÍ: Před zahájením provozování výrobku je
třeba se ujistit, zda se poblíž nenacházejí ostré předměty,
které by mohly výrobek poškodit nebo ohrozit uživatele.
1. Vybalte žíněnku a rozložte ji na plochém, hladkém
povrchu mimo dosah zdrojů ohně a tepla.
2. Najděte vzduchový ventil, otevřete jej a odjistěte.
3. Připojte k žíněnce pumpu a začněte žíněnku
nafukovat vzduchem.
Věnujte pozornost maximálnímu přípustnému tlaku
vzduchu uvnitř žíněnky.
UPOZORNĚNÍ: Pumpa není součástí dodávky.
4. Po skončení pumpování je třeba zajistit a uzamknout
vzduchový ventil. Žíněnka je připravena k použití.
ZÁPLATOVÁNÍ
1. Poškozené místo očistěte a odmastěte pomocí
vlhkého hadříku a jemného saponátu.
2. Po osušení naneste na místo kolem poškození vrstvu
lepidla.
3. Připravte záplatu. Je třeba mít na paměti, že plocha
záplaty musí být větší než plocha poškozeného
místa.
4. Naneste na záplatu vrstvu lepidla. Počkejte chvíli, až
lepidlo začne schnout na vzduchu.
5. Přiložte záplatu na poškozené místo a zatlačte ji tak,
aby oba povrchy pevně přilnuly k sobě.
UPOZORNĚNÍ: Menší poškození můžete opravovat,
i když je žíněnka nafouknutá. V případě, že poškození
žíněnky je větší, žíněnku před opravou vyfoukněte.
ČIŠTĚNÍ A ÚDRŽBA
a) K čištění povrchu zařízení používejte výhradně
prostředky neobsahující žíravé látky.
b) Skladujte výrobek na suchém a chladném místě.
Chraňte jej před vlhkostí a přímým slunečním
světlem.
c) Výrobek je třeba pravidelně kontrolovat z hlediska
možných technických vad a poškození
d) K čištění používejte měkký, vlhký hadřík.
FR MANUEL D‘UTILISATION
Respectez les consignes du manuel.
ATTENTION ! , AVERTISSEMENT ! et REMARQUE
attirent l‘attention sur des circonstances
spéciques (symboles d‘avertissement
généraux).
a) Nettoyez régulièrement le produit pour éviter le
dépôt permanent d‘impuretés.
b) Tenez le produit à l‘écart des sources de feu et de
chaleur.
c) Si le poids maximal autorisé est dépassé, vous
risquez d‘endommager le produit.
d) Il est interdit d‘utiliser le produit pendant les
divertissements dans des réservoirs d‘eau et comme
accessoire de natation.
e) Avant d‘utiliser le produit, enlevez vos chaussures,
vos lunettes et videz vos poches.
f) N‘emportez pas d‘objets tranchants sur la surface du
produit.
g) Évacuez l‘air de l‘intérieur du produit avant le
transport.
Le tapis de gymnastique gonable est destiné aux exercices
de développement général liés aux arts martiaux, à la
gymnastique artistique et bien d‘autres.
L’utilisateur porte l’entière responsabilité pour
l’ensemble des dommages attribuables à un usage
inapproprié.
ASSEMBLAGE DU PRODUIT
ATTENTION: Avant d‘utiliser le produit, assurez-vous qu‘il
n‘y a pas d‘objets tranchants à proximité qui pourraient
l‘endommager ou constituer un danger pour l‘utilisateur.
1. Déballez le tapis, puis placez-le sur une surface plane
et lisse, loin des sources de chaleur et de feu.
2. Localisez la vanne d‘air, ouvrez-la puis déverrouillez-la.
3. Raccordez la pompe au tapis et commencez à le
remplir d‘air. Faites attention à la pression d‘air
maximale admissible à l‘intérieur du tapis.
ATTENTION: La pompe n‘est pas incluse dans le kit.
4. Une fois le pompage terminé, verrouillez et fermez la
vanne d‘air. Le tapis est prêt à être utilisé.
RÉPARATION
1. Nettoyez et dégraissez la zone endommagée avec
un chion humide et un détergent doux.
2. Après séchage, couvrez la zone endommagée avec
une couche de colle.
3. Préparez le patch. Rappelez-vous que la surface du
patch doit être plus grande que la surface de la zone
endommagée.
4. Couvrir le patch avec une couche de colle. Attendez
un instant que la colle commence à sécher à l‘air
libre.
5. Appliquez le patch sur la zone endommagée et
appuyez dessus jusqu‘à ce que les deux surfaces
adhèrent étroitement l‘une à l‘autre.
ATTENTIon: Les dommages mineurs peuvent être
réparés lorsque le tapis est rempli d‘air. En cas de
dommages importants, évacuez l‘air de l‘intérieur du
tapis avant de procéder aux réparations.
NETTOYAGE ET ENTRETIEN
a) Pour nettoyer les diérentes surfaces, n‘utilisez que
des produits sans agents corrosifs.
b) Le produit doit être conservé dans un endroit sec et
frais, à l‘abri de l‘humidité et la lumière directe du
soleil.
c) Inspectez régulièrement le produit pour vous
assurer qu’il est en bon état technique et fonctionne
correctement.
d) Il est conseillé de laver l’appareil uniquement avec un
chion mou et humide.
IT ISTRUZIONI PER L’USO
Leggere attentamente le istruzioni.
ATTENZIONE o AVVERTENZA! o NOTA!
per richiamare l‘attenzione su determinate
circostanze (indicazioni generali di avvertenza).
a) Pulire regolarmente il prodotto per evitare il deposito
permanente di impurità.
b) Tenere il prodotto lontano da fonti di fuoco e calore.
c) Qualora venga superato il peso massimo ammissibile
dell‘utente, il prodotto può essere danneggiato.
d) È vietato utilizzare il prodotto durante intrattenimenti
in serbatoi d‘acqua e come strumento di supporto al
nuoto.
18.07.2019
6 7
e) Prima di utilizzare il prodotto, rimuovere scarpe,
occhiali e svuotare le tasche.
f) Non portare oggetti appuntiti sulla supercie del
prodotto.
g) Il prodotto deve essere sgonato prima di
trasportarlo.
Il tappeto da allenamento gonabile è progettato per
esercizi di sviluppo generale relativi alle arti marziali, alla
ginnastica artistica e molti altri.
L‘operatore è responsabile di tutti i danni derivanti da
un uso improprio.
ASSEMBLAGGIO DEL PRODOTTO
ATTENZIONE: prima di utilizzare il prodotto, assicurarsi
che non vi siano oggetti appuntiti nelle vicinanze che
potrebbero danneggiare il prodotto o rappresentare un
pericolo per l‘utente.
1. Disimballare il tappetino e quindi stenderlo su una
supercie piana e liscia, lontano da fonti di calore e
fuoco.
2. Individuare la valvola dell‘aria, aprirla e quindi
sbloccarla.
3. Collegare la pompa al tappetino e iniziare a riempirlo
d‘aria. Prestare attenzione alla massima pressione
dell‘aria consentita all‘interno del tappetino.
NOTA: la pompa non è inclusa nel kit.
4. Dopo aver completato il pompaggio, assicurare e
chiudere la valvola dell‘aria. Il tappeto è pronto per
l‘uso.
RATTOPPO DEI BUCHI
1. Pulire e sgrassare l‘area danneggiata con un panno
umido e un detergente delicato.
2. Dopo l‘asciugatura, coprire l‘area danneggiata con lo
strato di colla.
3. Preparare la toppa. Va ricordato che la supercie
della patch deve essere più grande della supercie
dell‘area danneggiata.
4. Coprire la toppa con uno strato di colla. Aspettare
che la colla cominci a seccare all‘aria aperta.
5. Applicare la toppa sull‘area danneggiata e premerla
no a quando entrambe le superci aderiscono
fortemente l‘una all‘altra.
NOTA: danni minori possono essere riparati quando
il tappetino è pieno d‘aria. In caso di danni gravi,
rimuovere l‘aria dall‘interno del tappetino prima di
eettuare riparazioni.
PULIZIA E MANUTENZIONE
a) Per pulire la supercie utilizzare solo detergenti
senza ingredienti corrosivi.
b) Conservare il prodotto in un luogo fresco e asciutto,
al riparo dall‘umidità e dai raggi diretti del sole.
c) Controllare regolarmente il prodotto per vericarne
le prestazioni tecniche e gli eventuali danni.
d) Per la pulizia utilizzare un panno morbido e umido.
a) Limpie el producto con frecuencia para evitar que se
sedimente la suciedad de manera permanente.
b) Mantenga el producto alejado de las llamas y las
fuentes de calor.
c) Exceder el peso máximo permitido puede provocar
daños en el producto.
d) Se prohíbe usar el producto durante juegos o
deportes acuáticos y como accesorio para piscinas.
e) Antes de empezar a usar el producto, quítese los
zapatos y las gafas y vacíe sus bolsillos.
f) No coloque objetos alados en la supercie del
producto.
g) Antes de transportar el producto, vacíelo de aire.
La esterilla hinchable está indicada para realizar ejercicios
de artes marciales, gimnasia artística y muchos más.
El usuario es responsable de los daños derivados de un
uso inadecuado del aparato.
INSTALACIÓN DEL PRODUCTO
ATENCIÓN: Antes de empezar a usar el producto,
asegúrese de que no haya ningún objeto alado en las
cercanías que pueda dañarlo o suponer un peligro para
el usuario.
1. Desempaquete la esterilla y extiéndala sobre una
supercie lisa y plana, lejos de llamas y fuentes de
calor.
2. Localice la válvula de aire, ábrala y quítele el seguro.
3. Conecte la bomba a la esterilla y empiece a inarla.
Preste atención a la presión de aire máxima dentro
de la esterilla.
ATENCIÓN: La bomba no está incluida en el equipo.
4. Al acabar de inar, cierre la válvula de aire. La
esterilla está lista para usar.
PARCHEADO
1. Limpie y desengrase el lugar dañado con un paño
húmedo y un detergente suave.
2. Cuando se seque, cubra el lugar dañado con una
capa de pegamento.
3. Prepare el parche. Recuerde que la supercie del
parche debe ser mayor a la del lugar dañado.
4. Cubra el parche con una capa de pegamento. Espere
un rato hasta que el pegamento se seque al aire
libre.
5. Coloque el parche sobre el lugar dañado y espere
hasta que ambas supercies se adhieran.
ATENCIÓN: Los daños pequeños se pueden reparar
con la esterilla hinchada. Cuando los daños sean
más grandes, antes de repararlos saque todo el aire
de la esterilla.
LIMPIEZA Y MANTENIMIENTO
a) Para limpiar la supercie, utilice solo productos que
no contengan sustancias corrosivas.
b) El producto debe almacenarse en un lugar seco y
fresco, protegido de la humedad y de la luz directa
del sol.
c) Se debe realizar una inspección regular del producto
para comprobar su estado técnico y detectar daños.
d) Para su limpieza utilizar un paño húmedo y suave.
ES MANUAL DE INSTRUCCIONES
Respetar las instrucciones de uso.
¡ATENCIÓN!, ¡ADVERTENCIA! o ¡NOTA! para
llamar la atención sobre ciertas circunstancias
(señal general de advertencia).
18.07.2019
PRODUKTZEICHNUNGEN | PRODUCT’S VIEW | RYSUNKI PRODUKTU | NÁKRESY PRODUKTU SCHÉMAS DU PRODUIT
LE ILLUSTRAZIONI DI PRODOTTO | LAS ILUSTRACIONES DE PRODUCTO
1 2 3
DE Produktname Modell Produktionsjahr
EN Product Name Model Production Year
PL Nazwa produktu Model Rok produkcji
CZ Název výrobku Model Rok výroby
FR Nom du produit Modèle Année de production
IT Nome del prodotto Modello Anno di produzione
ES Nombre del producto Modelo Año de producción
4 5 6 7
DE Ordnungsnummer Verwenden Sie dieses Produkt nicht in Wasser Max. Druck Importeur
EN Serial No. Do not use this product in water Max. pressure Importer
PL Numer serii Nie używaj tego produktu w wodzie Maks. ciśnienie Importer
CZ Sériové číslo Nepoužívejte tento produkt ve vodě Max. tlak Dovozce
FR Numéro de serie Ne pas utiliser ce produit dans l‘eau Pression maximale Importateur
IT Numero di serie Non usare questo prodotto in acqua Max. Pressione Importatore
ES Número de serie No use este producto en agua. Presión máxima Importador
1
2
3
4
7
5
6
NAMEPLATES TRANSLATIONS
1. Luftventil
2. Transportgri
3. Aufblasbare Matte
DE
1. Zawór powietrza
2. Uchwyt transportowy
3. Mata dmuchana
1. Air valve
2. Transport handle
3. Inatable mat
1. Vzduchový ventil
2. Přepravní úchyt
3. Nafukovací žíněnka
1. Valvola dell‘aria
2. Maniglia di trasporto
3. Tappetino gonabile
1. Válvula de aire
2. Mango de transporte
3. Esterilla hinchable
EN
PL
CZ
1. Vanne d‘air
2. Poignée de transport
3. Tapis gonable
FR
IT
ES
12
3
CONTACT
expondo Polska sp. z o.o. sp. k.
ul. Nowy Kisielin-Innowacyjna 7
66-002 Zielona Góra | Poland, EU
e-mail: [email protected]
UNSER HAUPTZIEL IST DIE ZUFRIEDENHEIT UNSERER KUNDEN!
BEI FRAGEN KONTAKTIEREN SIE UNS BITTE UNTER:
OUR CUSTOMERS‘ SATISFACTION IS OUR MAIN GOAL!
PLEASE CONTACT US WITH QUESTIONS AT:
NASZYM GŁÓWNYM CELEM JEST SATYSFAKCJA KLIENTÓW
W PRZYPADKU PYTAŃ PROSIMY O KONTAKT Z PRZEDSTAWICIELEM
W DANYM KRAJU:
NAŠÍM HLAVNÍM CÍLEM JE SPOKOJENOST NAŠICH ZÁKAZNÍKŮ! V PŘÍPADĚ OTÁZEK
NÁS PROSÍM KONTAKTUJTE NA:
NOTRE BUT PREMIER EST VOTRE SATISFACTION!
POUR TOUTE QUESTION, CONTACTEZ NOUS SUR:
NUESTRO OBJETIVO PRINCIPAL ES LA SATISFACCIÓN DE NUESTROS CLIENTES!
SI TIENE PREGUNTAS, POR FAVOR PÓNGANSE EN CONTACTO CON NOSTROS EN:
I NOSTRO PRINCIPALE OBIETTIVO È LA SODDISFAZIONE DEI NOSTRI CLIENTI!
PER EVENTUALI DOMANDE PER FAVORE, CI CONTATTINO SOTTO:

This manual suits for next models

8

Other Gymrex Fitness Equipment manuals

Gymrex GR-BE 150 User manual

Gymrex

Gymrex GR-BE 150 User manual

Gymrex GR-MG66 User manual

Gymrex

Gymrex GR-MG66 User manual

Gymrex GR-PL350 User manual

Gymrex

Gymrex GR-PL350 User manual

Gymrex GR-TB 53 User manual

Gymrex

Gymrex GR-TB 53 User manual

Gymrex GR-PU 120 User manual

Gymrex

Gymrex GR-PU 120 User manual

Gymrex GR-MG33 User manual

Gymrex

Gymrex GR-MG33 User manual

Gymrex GR-FB 400 User manual

Gymrex

Gymrex GR-FB 400 User manual

Gymrex GR-CB 200 User manual

Gymrex

Gymrex GR-CB 200 User manual

Gymrex GR-MG80 User manual

Gymrex

Gymrex GR-MG80 User manual

Gymrex POWER TOWER GR-PT50 User manual

Gymrex

Gymrex POWER TOWER GR-PT50 User manual

Gymrex GR-MG70 User manual

Gymrex

Gymrex GR-MG70 User manual

Gymrex GR-MG68 User manual

Gymrex

Gymrex GR-MG68 User manual

Gymrex GR-LP11 User manual

Gymrex

Gymrex GR-LP11 User manual

Gymrex HOME GYM GR-HG10 User manual

Gymrex

Gymrex HOME GYM GR-HG10 User manual

Gymrex GR-MG111 User manual

Gymrex

Gymrex GR-MG111 User manual

Gymrex GR-MG 53 User manual

Gymrex

Gymrex GR-MG 53 User manual

Gymrex GR-BS12 User manual

Gymrex

Gymrex GR-BS12 User manual

Gymrex GR-MG 50 User manual

Gymrex

Gymrex GR-MG 50 User manual

Gymrex GR-SB-01 User manual

Gymrex

Gymrex GR-SB-01 User manual

Gymrex GR-PU110B User manual

Gymrex

Gymrex GR-PU110B User manual

Gymrex GR-RC50 User manual

Gymrex

Gymrex GR-RC50 User manual

Gymrex GR-MG 63 User manual

Gymrex

Gymrex GR-MG 63 User manual

Gymrex GR-MG 64 User manual

Gymrex

Gymrex GR-MG 64 User manual

Gymrex GR-MG 58 User manual

Gymrex

Gymrex GR-MG 58 User manual

Popular Fitness Equipment manuals by other brands

Sears 831.159231 owner's manual

Sears

Sears 831.159231 owner's manual

Nautilus F2LROW owner's manual

Nautilus

Nautilus F2LROW owner's manual

Dunlop 20110 Assembly instruction

Dunlop

Dunlop 20110 Assembly instruction

Keys Fitness KF-PTO owner's manual

Keys Fitness

Keys Fitness KF-PTO owner's manual

Force USA F-G9 owner's manual

Force USA

Force USA F-G9 owner's manual

gorilla sports 101178 manual

gorilla sports

gorilla sports 101178 manual

Nautilus VKR STRENGTH SYSTEM 1160 owner's manual

Nautilus

Nautilus VKR STRENGTH SYSTEM 1160 owner's manual

Aerofit IF9318 owner's manual

Aerofit

Aerofit IF9318 owner's manual

CYBEX Plate Loaded 16120 Smith Press owner's manual

CYBEX

CYBEX Plate Loaded 16120 Smith Press owner's manual

Weider WEBE35560 manual

Weider

Weider WEBE35560 manual

Impex MARCY VORTEX user manual

Impex

Impex MARCY VORTEX user manual

Weider Pro 550 Bench user manual

Weider

Weider Pro 550 Bench user manual

Hoist Fitness CL-2406 owner's manual

Hoist Fitness

Hoist Fitness CL-2406 owner's manual

First Degree Fitness Pacific PLUS user guide

First Degree Fitness

First Degree Fitness Pacific PLUS user guide

WaterRower S4 M1 Assembly manual

WaterRower

WaterRower S4 M1 Assembly manual

Keysight Technologies STRENGTH TRAINER 250 user manual

Keysight Technologies

Keysight Technologies STRENGTH TRAINER 250 user manual

CARE FITNESS 50511 manual

CARE FITNESS

CARE FITNESS 50511 manual

Master Speed user manual

Master

Master Speed user manual

manuals.online logo
manuals.online logoBrands
  • About & Mission
  • Contact us
  • Privacy Policy
  • Terms and Conditions

Copyright 2025 Manuals.Online. All Rights Reserved.