manuals.online logo
Brands
  1. Home
  2. •
  3. Brands
  4. •
  5. Gymrex
  6. •
  7. Fitness Equipment
  8. •
  9. Gymrex POWER TOWER GR-PT50 User manual

Gymrex POWER TOWER GR-PT50 User manual

GR-PT50
HIGH PERFORMANCE. GERMAN DESIGN.
USER MANUAL
POWER TOWER
expondo.de
BEDIENUNGSANLEITUNG | INSTRUKCJA OBSŁUGI
NÁVOD K POUŽITÍ | MANUEL D´UTILISATION
ISTRUZIONI PER L‘USO | MANUAL DE INSTRUCCIONES
INHALT | CONTENT | TREŚĆ | OBSAH | CONTENU | CONTENUTO | CONTENIDO
3
5
7
9
11
13
15
DEUTSCH
ENGLISH
POLSKI
ČESKY
FRANÇAIS
ITALIANO
ESPAÑOL
PRODUKTNAME KRAFTSTATION KLIMMZUG STANGE DIPSTATION
PRODUCT NAME POWER TOWER
NAZWA PRODUKTU PORĘCZ WIELOFUNKCYJNA
NÁZEV VÝROBKU MULTIFUNKČNÍ HRAZDA
NOM DU PRODUIT STATION DE TRACTION
NOME DEL PRODOTTO STAZIONE PER TRAZIONI
NOMBRE DEL PRODUCTO ESTACIÓN CON BARRA PARA EJERCICIOS
MODELL
GR-PT50
PRODUCT MODEL
MODEL PRODUKTU
MODEL VÝROBKU
MODÈLE
MODELLO
MODELO
NAME DES HERSTELLERS
EXPONDO POLSKA SP. Z O.O. SP. K.
MANUFACTURER NAME
NAZWA PRODUCENTA
NÁZEV VÝROBCE
NOM DU FABRICANT
NOME DEL PRODUTTORE
NOMBRE DEL FABRICANTE
ANSCHRIFT DES HERSTELLERS
UL. NOWY KISIELIN-INNOWACYJNA 7, 66-002 ZIELONA GÓRA | POLAND, EU
MANUFACTURER ADDRESS
ADRES PRODUCENTA
ADRESA VÝROBCE
ADRESSE DU FABRICANT
INDIRIZZO DEL FORNITORE
DIRECCIÓN DEL FABRICANTE
1. ALLGEMEINE BESCHREIBUNG
Diese Anleitung ist als Hilfe für eine sichere und zuverlässige
Nutzung gedacht. Das Produkt wurde strikt nach den
technischen Vorgaben und unter Verwendung modernster
Technologien und Komponenten sowie unter Wahrung der
höchsten Qualitätsstandards entworfen und angefertigt.
DE BEDIENUNGSANLEITUNG
Parameter – Beschreibung Parameter – Wert
Produktname Kraftstation
Klimmzug Stange
Dipstation
Modell GR-PT50
Maximales Gewicht des
Benutzers [kg]
110
Abmessungen [mm] 140x121x215
Gewicht [kg] 32,3
TECHNISCHE DATEN
VOR INBETRIEBNAHME MUSS DIE ANLEITUNG
GENAU DURCHGELESEN UND VERSTANDEN
WERDEN.
Für einen langen und zuverlässigen Betrieb des Produkts
muss auf die richtige Handhabung und Wartung
entsprechend den in dieser Anleitung angeführten
Vorgaben geachtet werden. Die in dieser Anleitung
angegebenen technischen Daten und die Spezikation sind
aktuell. Der Hersteller behält sich das Recht vor, im Rahmen
der Verbesserung der Qualität Änderungen vorzunehmen.
Gebrauchsanweisung beachten.
HINWEIS! In der vorliegenden Anleitung
sind Beispielbilder vorhanden, die von dem
tatsächlichen Aussehen der Maschine abweichen
können.
Die originale Anweisung ist die deutschsprachige Fassung.
Sonstige Sprachfassungen sind Übersetzungen aus der
deutschen Sprache.
2. NUTZUNGSSICHERHEIT
ACHTUNG! Lesen Sie alle Sicherheitshinweise und
alle Anweisungen durch. Die Nichtbeachtung der
Warnungen und Anweisungen kann zu schweren
Verletzungen bis hin zum Tod führen.
4. Halten Sie das Produkt im guten technischen
Zustand. Prüfen Sie vor jedem Einsatz auf allgemeine
Schäden oder Schäden, die mit der Befestigung von
Bauteilen zusammenhängen (Risse in Bauteilen,
Durchhang oder andere Umstände, die den sicheren
Betrieb des Produkts beeinträchtigen können).
Lassen Sie das Produkt im Schadensfall vor Gebrauch
reparieren.
5. Halten Sie das Produkt von Kindern und Tieren fern.
6. Bevor Sie mit Übungen beginnen, konsultieren
Sie einen Arzt, um festzustellen, dass es keine
gesundheitlichen Bedenken gibt.
7. Vor der Verwendung des Produktes immer
Aufwärmübungen durchführen.
8. Wenn Sie während des Trainings störende Symptome
verspüren, z. B. Schmerzen in der Brust, Schwindel,
Atemnot usw., beenden Sie sofort das Training und
suchen Sie einen Arzt auf.
9. Stellen Sie das Produkt auf eine stabile, trockene und
ebene Oberäche, wobei darauf zu achten ist, dass
ein Freiraum von mindestens 0,5 m um das Produkt
eingehalten wird.
10. Es kann nicht als therapeutisches Produkt verwendet
werden.
3. NUTZUNGSBEDINGUNGEN
Kraftstation Klimmzug Stange Dipstation ist für das Training
der Körpermuskulatur mit entsprechenden Übungen
konzipiert. Das Produkt ist nur für den Heimgebrauch
bestimmt!
Für alle Schäden bei nicht sachgemäßer Verwendung
haftet allein der Betreiber.
ERLÄUTERUNG DER SYMBOLE
Der Begri „Gerät“ oder „Produkt“ in den Warnungen
und Beschreibung des Handbuchs bezieht sich auf die
Kraftstation Klimmzug Stange Dipstation.
1. Bei Zweifeln, ob das Produkt ordnungsgemäß
funktioniert oder wenn Schäden festgestellt werden,
wenden Sie sich bitte an den Kundendienst des
Herstellers.
2. Das Produkt darf nur vom Hersteller repariert
werden. Reparieren Sie es nicht selbst!
3. Überlasten Sie das Produkt nicht. Ein Überschreiten
des maximal zulässigen Benutzergewichts kann zu
Schäden am Produkt führen.
3.1. PRODUKTBESCHREIBUNG
1. Einzugstange
2. Unterstützung
3. Ellbogenpolsterung
4. Vertikaler Gri
5. Horizontaler Gri
6. Unterer Gri
1
2
3
4
5
6
04.04.2019
2 3
Nr. Teil Beschreibung Anzahl/Stck.
AGrundrohr 2
BVertikales Rohr 2
COberes Rohr 2
DGrirahmen 2
EStab 1
FStärkung des Rahmens 2
GVerbindungsrohr 1
H Rückenlehnenrahmen 1
IEllbogenpolsterung 2
JLehne 1
KVerstärkungsplatte 8
1Flachrundschraube M10X70 14
2Linsenschrauben mit
Innensechskant M10X40
2
3Linsenschrauben mit
Innensechskant M10X20
4
4SechskantschraubeM8X20 2
5Sechskantschraube M8X65 4
6 M8 Scheibe 6
7M10 Scheibe 26
8M10 Mutter 22
Die Verbindung mit Verstärkungsplatte (K),
Sechskantschraube (1), Scheibe (6) und Mutter (7)
sichern.
b) Verbinden Sie den Rückenrahmen (H) mit den
oberen Rohren (C). Sichern Sie die Verbindung mit
den Verstärkungsplatten (K), Sechskantschrauben
(1), Scheiben (6) und Muttern (7).
c) Stange (E) mit den oberen Rohren (C)
verbinden. Sichern Sie die Verbindung mit der
Innensechskantschraube (2) und der Scheibe (6).
d) Befestigen Sie die Rückenlehne (J) am
Rückenlehnenrahmen (H). Sichern Sie die Verbindung
mit der Innensechskantschraube (3) und der Scheibe
(5).
e) Montieren Sie die Polsterung unter dem Ellbogen
(I) am Rückenlehnenrahmen (D). Sichern Sie die
Verbindung mit der Innensechskantschraube (4) und
der Scheibe (5).
3.3. REINIGUNG UND WARTUNG
• Reinigen Sie das Produkt nach jedem Gebrauch.
• Verwenden Sie zum Reinigen der Oberäche
ausschließlich Mittel ohne ätzende Inhaltsstoe.
• Zum Reinigen nutzen Sie bitte einen weichen Lappen.
• Bewahren Sie das Produkt an einem trockenen,
kühlen, vor Feuchtigkeit und direkter
Sonneneinstrahlung geschütztem Ort auf.
Zusammenbauen des Produkts:
I. Montage des Produktrahmens:
a) Verbinden Sie die Basisrohre (A) mit den vertikalen
Rohren (B) mit Unterlegscheiben (6) und Muttern (7).
b) Verbinden Sie die vertikalen Rohre (B) mit dem
Anschlussrohr (G). Sichern Sie die Verbindung mit der
Verstärkungsplatte (K), Innensechskantschrauben (1),
Unterlegscheiben auf beiden Seiten der Verbindung
(6) und Muttern (7).
c) Montieren Sie die Rahmenverstärkung (F) am
Grundrohr (B) und am Vertikalrohr (A). Verbindung
mit Verstärkungsplatte (K), Sechskantschraube (1),
Scheibe (6) und Mutter (8) am Vertikalrohr (B) sichern
und Verbindung am Grundrohr mit Scheibe (6) und
Mutter (7) sichern.
II. Montage von Rückenlehnen – und Grirahmen:
a) Setzen Sie die oberen Rohre (C) in die vertikalen
Rohre (B) ein und verbinden Sie die Halterahmen (D)
mit diesen.
3.2. VORBEREITUNG FÜR DIE NUTZUNG
Verzeichnis des Bestandteile:
1. GENERAL DESCRIPTION
The user manual is designed to assist in the safe and
trouble-free use of the product. The product is designed
and manufactured in accordance with strict technical
guidelines, using state-of-the-art technologies and
components. Additionally, it is produced in compliance
with the most stringent quality standards.
EN USER MANUAL
Parameter description Parameter value
Product name Power tower
Model GR-PT50
Maximum user weight [kg] 110
Dimensions [mm] 140x121x215
Weight [kg] 32,3
TECHNICAL DATA
DO NOT USE THE PRODUCT UNLESS YOU HAVE
THOROUGHLY READ AND UNDERSTOOD THIS
USER MANUAL.
To increase the service life of the product and to ensure
trouble-free operation, care must be taken to ensure that
it is operated and maintained correctly in accordance
with the instructions in this manual. The technical data
and specications in this user manual are up to date.
The manufacturer reserves the right to make changes
associated with quality improvement.
Read the instructions before use.
PLEASE NOTE! Drawings in this manual are for
illustration purposes only and in some details may
dier from the actual machine.
The original operation manual is in German. Other
language versions are translations from German.
2. USAGE SAFETY
ATTENTION! Read all safety warnings and all
instructions. Failure to follow the warnings and
instructions may result in serious injury or even
death.
that may aect the safe operation of the product).
In the event of damage, have the product repaired
before use.
5. Keep the product away from children and animals.
6. Before you start training, consult a doctor in
order to clarify whether there are any health
counterindications.
7. Always do a warm up before you start using the
product.
8. In case you feel distressing symptoms such as chest
pain, dizziness, short breath, etc. during training, you
should immediately stop the training and consult the
doctor.
9. Place the product on a stable, dry and at surface,
making sure to keep a minimum space of 0.5 m
around it.
10. The product may not be used as therapeutic
equipment.
3. USE GUIDELINES
The power tower is designed to train muscles with the use
of appropriate exercises. The product is intended for home
use only.
The user is liable for any damage resulting from misuse
of the product.
LEGEND
Whenever „device“ or „product“ are used in the warnings
and instructions, it shall mean Power tower.
1. In case of doubt whether the product operates
correctly, or in case damage is discovered, please
contact the service centre of the manufacturer.
2. Only the service centre of the manufacturer can
make product repairs. Do not attempt to make any
repairs yourself!
3. Do not overload the product. Exceeding the
maximum permissible user weight can damage the
product.
4. Keep the product in good working condition.
Before each use check whether there is any general
damage, or damage related to the attachment of
parts (broken parts, slack or any other conditions
3.1. PRODUCT DESCRIPTION
1. Pull-up bar
2. Support
3. Cushion for elbow
4. Vertical handle
5. Horizontal handle
6. Lower handle
1
2
3
4
5
6
3.2. PREPARATION FOR USE
List of elements:
4 5
ACHTUNG! Die Zeichnung von diesem
Produkt bendet sich auf der letzte Seite der
Bedienungsanleitung S. 17.
ACHTUNG: Die Explosionszeichnungen von
diesem Produkt benden sich auf den letzten
Seiten der Bedienungsanleitung S. 18-19.
ATTENTION! This product‘s view can be found on
the last pages of the operating instructions (pp.
17).
04.04.2019
Part
Number
Description Number
of pieces
ABase Pipe 2
BVertical pipe 2
CUpper pipe 2
DHandle Frame 2
EBar 1
FFrame reinforcement 2
GConnecting pipe 1
H Backrest frame 1
ICushion for the elbow 2
JBackrest 1
KReinforcement plate 8
1Threaded Coach Bolt M10X70 14
2Hexagon socket button head
screws M10X40
2
3Hexagon socket button head
screws M10X20
4
4Hexagon head screw M8X20 2
5Hexagon head screw M8X65 4
6 Washer M8 6
7Washer M10 26
8Nut M10 22
c) Connect the bar (E) with the upper pipes (C). Secure
the connection by means of he hexagon head screw
(2) and the washer (6)
d) Connect the backrest (J) with the backrest frame (H).
Secure the connection by means of the hexagon
head screw (3) and the washer (5)
e) Mount the cushion for the elbow (I) on the backrest
frame (D). Secure the connection by means of the
hexagon head screw (4) and the washer (5).
3.3. CLEANING AND MAINTENANCE
• Clean the product after each use.
• Use cleaners without corrosive substances to clean
each surface.
• Use a soft cloth for cleaning.
• Store the unit in a dry, cool place, free from moisture
and direct exposure to sunlight.
Assembling the equipment:
I. Assembling the product frame:
a) Connect the base pipes (A) with the vertical pipes (B)
by means of washers (6) and nuts (7).
b) Connect the vertical pipes (B) by means of the
connecting pipe (G). Secure the connection by
means of the reinforcement plate (K), hexagon head
screw (1), washers on both sides of the connection
(6) and nuts (7).
c) Mount the frame reinforcement (F) to the pipe of
the base (B) and the vertical pipe (A). Secure the
connection by means of the reinforcement plate (K),
hexagon head screw (1), the washer (6) and the nut
(8) at the vertical pipe (B) and secure the connection
at the pipe of the base by means of the washer (6)
and the nut (7).
II. Assembly of the backrest and the frame of handles:
a) Insert the upper pipes (C) into the vertical pipes (B)
and attach the handle frames (D) to them. Secure
the connection with the reinforcement plate (K), the
hexagon head screw (1), the washer (6) and the nut (7).
b) Connect the backrest frame (H) to the upper
pipes (C). Secure the connection by means of the
reinforcement plate (K), the hexagon head screws
(1), the washers (6) and the nuts (7).
PL INSTRUKCJA OBSŁUGI
Opis parametru Wartość parametru
Nazwa produktu Poręcz wielofunkcyjna
Model GR-PT50
Maksymalna waga
użytkownika [kg]
110
Wymiary [cm] 140x121x215
Ciężar [kg] 32,3
DANE TECHNICZNE
4. Utrzymywać produkt w dobrym stanie technicznym.
Sprawdzać przed każdym użyciem czy nie posiada
uszkodzeń ogólnych lub związanych z mocowaniem
części (pęknięcia części, luzy lub wszelkie inne
warunki, które mogą mieć wpływ na bezpieczne
działanie produktu). W przypadku uszkodzenia,
oddać produkt do naprawy przed użyciem.
5. Produkt trzymać z dala od dzieci i zwierząt.
6. Przed rozpoczęciem ćwiczeń należy skonsultować się
z lekarzem w celu ustalenia, czy nie ma przeciwskazań
zdrowotnych.
7. Zawsze należy wykonać rozgrzewkę przed
rozpoczęciem korzystania z produktu.
8. W przypadku odczuwania podczas ćwiczeń
niepokojących symptomów np. bólu w klatce
piersiowej, zawrotów głowy, braku tchu itp. należy
bezzwłocznie przerwać trening oraz skonsultować
się z lekarzem.
9. Produkt ustawić na stabilnej, suchej i płaskiej
powierzchni, dbając o zachowanie minimalnego
odstępu 0,5m wolnej przestrzeni wokół.
10. Produkt nie może być używany jako sprzęt
terapeutyczny.
3. ZASADY UŻYTKOWANIA
Poręcz wielofunkcyjna przeznaczona jest do treningu
mięśni ciała przy zastosowaniu odpowiednich ćwiczeń.
Produkt jest przeznaczony tylko do użytku domowego!
Odpowiedzialność za wszelkie szkody powstałe
w wyniku użytkowania niezgodnego z przeznaczeniem
ponosi użytkownik.
Termin „urządzenie” lub „produkt” w ostrzeżeniach
i w opisie instrukcji odnosi się do Poręcz wielofunkcyjna.
1. W razie wątpliwości, czy produkt działa poprawnie
lub stwierdzenia uszkodzenia należy skontaktować
się z serwisem producenta.
2. Naprawę produktu może wykonać wyłącznie
serwis producenta. Nie wolno dokonywać napraw
samodzielnie!
3. Nie należy przeciążać produktu. Przekroczenie
maksymalnej dopuszczalnej wagi użytkownika może
spowodować uszkodzenie produktu.
3.1. OPIS PRODUKTU
1. Drążek do podciągania
2. Podparcie
3. Poduszka na łokieć
4. Uchwyt pionowy
5. Uchwyt poziomy
6. Uchwyt dolny
1
2
3
4
5
6
1. OGÓLNY OPIS
Instrukcja przeznaczona jest do pomocy w bezpiecznym
i niezawodnym użytkowaniu. Produkt jest zaprojektowany
i wykonany ściśle według wskazań technicznych przy
użyciu najnowszych technologii i komponentów oraz przy
zachowaniu najwyższych standardów jakości.
PRZED PRZYSTĄPIENIEM DO PRACY NALEŻY
DOKŁADNIE PRZECZYTAĆ I ZROZUMIEĆ
NINIEJSZĄ INSTRUKCJĘ.
Dla zapewnienia długiej i niezawodnej pracy produktu
należy dbać o jego prawidłową obsługę oraz konserwację
zgodnie ze wskazówkami zawartymi w tej instrukcji. Dane
techniczne i specykacje zawarte w tej instrukcji obsługi są
aktualne. Producent zastrzega sobie prawo dokonywania
zmian związanych z podwyższeniem jakości.
Przed użyciem należy zapoznać się z instrukcją.
OBJAŚNIENIE SYMBOLI
Instrukcją oryginalną jest niemiecka wersja instrukcji.
Pozostałe wersje językowe są tłumaczeniami z języka
niemieckiego.
2. BEZPIECZEŃSTWO UŻYTKOWANIA
UWAGA! Przeczytaj wszystkie ostrzeżenia
dotyczące bezpieczeństwa oraz wszystkie
instrukcje. Niezastosowanie się do ostrzeżeń
i instrukcji może spowodować ciężkie obrażenia
ciała lub śmierć.
UWAGA! Ilustracje w niniejszej instrukcji obsługi
mają charakter poglądowy i w niektórych
szczegółach mogą różnić się od rzeczywistego
wyglądu produktu.
6 7
ATTENTION! This product’s exploded view can
be found on the last pages of the operating
instructions (pp. 18-19).
04.04.2019
Numer
części
Opis Ilość sztuk
ARura podstawy 2
BRura pionowa 2
CGórna rura 2
DRama uchwytu 2
EDrążek 1
FWzmocnienie ramy 2
GRura łącząca 1
H Rama oparcia 1
IPoduszka pod łokieć 2
JOpacie 1
KPłytka wzmacniająca 8
1Śruba z łbem grzybkowym
M10X70
14
2Śruba z łbem grzybkowym
imbusowa M10X40
2
3Śruba z łbem grzybkowym
imbusowa M10X20
4
4Śruba z łbem sześciokątnym
M8X20
2
5Śruba z łbem sześciokątnym
M8X65
4
6 Podkładka M8 6
7Podkładka M10 26
8Nakrętka M10 22
II. Montaż oparcia oraz ramy uchwytów:
a) Włożyć górne rury (C) w rury pionowe (B) oraz
podłączyć do nich ramy uchwytu (D). Zabezpieczyć
połączenie płytką wzmacniającą (K), śrubą z łbem
sześciokątnym (1), podkładką (6) oraz nakrętką (7).
b) Połączyć ramę oparcia (H) do górnych rur (C).
Zabezpieczyć połączenie płytkami wzmacniającą (K),
śrubami z łbem sześciokątnym (1), podkładkami (6)
oraz nakrętkami (7).
c) Połączyć drążek (E) z górnymi rurami (C).
Zabezpieczyć połączenie śrubą z łbem sześciokątnym
(2) oraz podkładką (6)
d) Połączyć oparcie (J) z ramą oparcia (H). Zabezpieczyć
połączenie śrubą z łbem sześciokątnym (3) oraz
podkładką (5)
e) Zamontować poduszkę pod łokieć (I) na ramie
oparcia (D). Zabezpieczyć połączenie śrubą z łbem
sześciokątnym (4) oraz podkładką (5)
3.3. CZYSZCZENIE I KONSERWACJA
• Czyścić produkt po każdym użyciu.
• Do czyszczenia powierzchni należy stosować
wyłącznie środki niezawierające substancji żrących.
• Do czyszczenia należy używać miękkiej ściereczki.
• Produkt należy przechowywać w suchym i chłodnym
miejscu chronionym przed wilgocią i bezpośrednim
promieniowaniem słonecznym.
I. Montaż ramy produktu:
a) Połączyć rury podstawy (A) z rurami pionowymi (B)
za pomocą podkładek (6) oraz nakrętek (7).
b) Połączyć rury pionowe (B) za pomocą rury łączącej
(G). Zabezpieczyć połączenie za pomocą płytki
wzmacniającej (K), śruby z łbem sześciokątnym (1),
podkładek po obu stronach połączenia (6) oraz
nakrętek (7).
c) Zamontować wzmocnienie ramy (F) do rury podstawy
(B) oraz rury pionowej (A). Zabezpieczyć połączenie
za pomocą płytki wzmacniającej (K), śruby z łbem
sześciokątnym (1), podkładki (6) oraz nakrętki (8)
przy rurze pionowej (B), a połączenie przy rurze
podstawy zabezpieczyć za pomocą podkładki (6)
oraz nakrętki (7).
Składanie sprzętu:
UWAGA: Rysunki złożeniowe produktu znajdują
się na końcu instrukcji na stronach: 18-19.
CZ NÁVOD K OBSLUZE
Popis parametru Hodnota parametru
Název výrobku Multifunkční hrazda
Model GR-PT50
Maximální hmotnost
uživatele [kg]
110
Rozměry [cm] 140x121x215
Hmotnost [kg] 32,3
TECHNICKÉ ÚDAJE
5. Zařízení mějte v dostatečné vzdálenosti od dětí
a zvířat.
6. Před zahájením cvičení se zeptejte lékaře, zda nejsou
kontraindikace.
7. Před zahájením cvičení vždy proveďte rozcvičku.
8. Pokud se při cvičení objeví zneklidňující příznaky,
např. bolest na hrudníku, závratě, dušnost atp., ihned
přerušte cvičení a poraďte se s lékařem.
9. Zařízení postavte na pevný, suchý a rovný povrch,
a zajistěte minimálně 0,5 m volného prostoru kolem
zařízení.
10. Hrazdu nepoužívejte jako terapeutické zařízení.
3. ZÁSADY POUŽÍVÁNÍ
Multifunkční hrazda je určena k trénování různých svalových
partií pomocí vhodného cvičení. Zařízení je určeno pouze
pro domácí použití!
Odpovědnost za veškeré škody vzniklé v důsledku
použití zařízení v rozporu s určením nese uživatel.
1. Budete-li mít pochybnosti, zda výrobek funguje
správně, nebo zjistíte-li poškození, kontaktujte
zákaznický servis výrobce.
2. Výrobek může opravovat pouze výrobce. Opravy
neprovádějte sami!
3. Zařízení nepřetěžujte. Překročení maximální
přípustné hmotnosti uživatele může výrobek
poškodit.
4. Zařízení udržujte v dobrém technickém stavu. Před
každým použitím zkontrolujte, zda nemá celkové
poškození nebo poškození upevnění (prasklé
součásti, uvolnění nebo veškeré jiné závady, které
mohou mít vliv na bezpečné používání zařízení).
V případě poškození odevzdejte před použitím
zařízení k opravě.
3.1. POPIS ZAŘÍZENÍ
1. Přitahovací tyč
2. Vzpěra
3. Podložka na lokty
4. Svislé držadlo
5. Vodorovné držadlo
6. Spodní držadlo
1
2
3
4
5
6
Pojem „zařízení“ nebo „výrobek“ v bezpečnostních
pokynech a návodu se vztahuje na Multifunkční hrazdu.
1. VŠEOBECNÝ POPIS
Návod slouží jako nápověda pro bezpečné a spolehlivé
používání. Výrobek je navržen a vyroben přesně podle
technických údajů s použitím nejnovějších technologií
a komponentů a se zachováním nejvyšších jakostních
standardů.
PŘED ZAHÁJENÍM PRÁCE SI DŮKLADNĚ PŘEČTĚTE
TENTO NÁVOD A SNAŽTE SE JEJ POCHOPIT.
Pro zajištění dlouhého a spolehlivého fungování zařízení
provádějte pravidelný servis a údržbu v souladu s pokyny
uvedenými v tomto návodu. Technické údaje a specikace
uvedené v návodu k obsluze jsou aktuální. Výrobce si
vyhrazuje právo provádět změny pro zvýšení kvality.
Před použitím se seznamte s návodem.
VYSVĚTLENÍ SYMBOLŮ
Originálním návodem je německá verze návodu. Ostatní
jazykové verze jsou překladem z německého jazyka.
2. BEZPEČNOST POUŽÍVÁNÍ
POZNÁMKA! Přečtěte si tento návod včetně všech
bezpečnostních pokynů. Nedodržování návodu
a výstrah může způsobit těžký úraz nebo smrt.
POZOR! Obrázky v tomto návodu jsou ilustrační.
V některých detailech se od skutečného vzhledu
stroje mohou lišit.
3.2. PRZYGOTOWANIE DO UŻYTKOWANIA
Lista elementów:
UWAGA: Rysunek produktu znajduje się na końcu
instrukcji na stronie: 17.
3.2. PŘÍPRAVA K POUŽÍVÁNÍ
Seznam dílů:
Číslo
dílu
Popis Počet
kusů
ATrubka základny 2
BSvislá trubka 2
CHorní trubka 2
8 9
POZNÁMKA! Nákres tohoto produktu naleznete
na konci návodu na str. 17.
04.04.2019
Číslo dílu Popis Počet
kusů
DRám držadla 2
EPřitahovací tyč 1
FVyztužení rámu 2
GSpojovací trubka 1
H Rám vzpěry 1
IPodložka na lokty 2
JVzpěra 1
KVyztužovací destička 8
1Šroub s hlavicí M10X70 14
2Imbusový šroub M10X40 2
3Imbusový šroub M10X20 4
4Šroub se šestihrannou hlavou
M8X20
2
5Šroub se šestihrannou hlavou
M8X65
4
6 Podložka M8 6
7Podložka M10 26
8Matice M10 22
e) Namontujte podložku na lokty (I) na rám vzpěry (D).
Spoj zajistěte pomocí šroubu se šestihrannou hlavou
(4) a podložky (5).
3.3. ČIŠTĚNÍ A ÚDRŽBA
• Zařízení čistěte po každém použití.
• K čištění povrchu používejte výhradně prostředky
neobsahující žíravé látky.
• K čištění používejte měkký hadřík.
• Zařízení skladujte na suchém a chladném místě,
chráněném proti vlhkosti a přímému slunečnímu
záření.
I. Montáž rámu zařízení:
a) Spojte trubky základny (A) se svislými trubkami (B)
pomocí podložek (6) a matice (7).
b) Spojte svislé trubky (B) pomocí spojovací trubky
(G). Zajistěte spoj pomocí vyztužovací destičky (K),
šroubu se šestihrannou hlavou (1), podložek na obou
stranách spoje (6) a matic (7).
c) Namontujte vyztužení rámu (F) do trubky základny
(B) a svislé trubky (A). Spoj zajistěte pomocí
vyztužovací destičky (K), šroubu se šestihrannou
hlavou (1), podložky (6) a matice (8) u svislé trubky
(B) a spoj u trubky základny zajistěte pomocí
podložky (6) a matice (7).
II. Montáž vzpěry a rámu držadla:
a) Vložte horní trubky (C) do svislých trubek (B)
a připojte k nim rám držadla (D). Spoj zajistěte
pomocí vyztužovací destičky (K), šroubu se
šestihrannou hlavou (1), podložky (6) a matice (7).
b) Rám vzpěry (H) vložte do horních trubek (C). Spoj
zajistěte pomocí vyztužovacích destiček (K), šroubů
se šestihrannou hlavou (1), podložek (6) a matic (7).
c) Spojte tyč (E) se horními trubkami (C). Spoj zajistěte
pomocí šroubu se šestihrannou hlavou (2) a podložky
(6).
d) Vzpěru (J) spojte s rámem vzpěry (H). Spoj zajistěte
pomocí šroubu se šestihrannou hlavou (3) a podložky
(5).
Sestavení zařízení:
FR MANUEL D‘UTILISATION
Description des
paramètres
Valeur des paramètres
Nom du produit Appareil de musculation avec
barres doubles et de traction
Modèle GR-PT50
Poids maximal de
l’utilisateur [kg]
110
Dimensions [mm] 140x121x215
Poids [kg] 32,3
DÉTAILS TECHNIQUES
3. Ne surchargez pas le produit. Le dépassement de
la charge maximale admissible pour le poids de
l’utilisateur peut endommager le produit.
4. Tenez votre produit en bon état technique. Avant
chaque utilisation, vériez l’absence de dommages
généraux et de dommages liés à la xation des
composants (ssures dans les composants, manque
de tension ou toute autre circonstance qui pourrait
compromettre le fonctionnement sécuritaire du
produit). En cas de dommages, envoyez le produit
en réparation avant de le réutiliser.
5. Tenez le produit hors de portée des enfants et des
animaux.
6. Avant de commencer à vous entraîner, consultez un
médecin an vous assurer que cela ne pose aucun
risque pour votre santé.
7. Avant d’utiliser le produit, faites toujours des
échauements..
8. Si vous éprouvez des symptômes inquiétants durant
l’entraînement, p. ex. des douleurs à la poitrine, des
étourdissements ou de l’insusance respiratoire,
interrompez la séance sans plus attendre et consultez
immédiatement un médecin.
9. Placez le produit sur une surface stable, sèche et
plane en veillant à ce qu’au moins 0,5 m d’espace
soit libre de chaque côté.
10. La barre de traction ne doit pas être utilisée comme
appareil thérapeutique.
3. CONDITIONS D’UTILISATION
L’appareil de musculation avec barres doubles et de
traction a été conçu pour permettre le développement
des muscles à l’aide d’exercices appropriés. Le produit est
destiné uniquement à l’utilisation privée!
Seul l’utilisateur est responsable en cas de dommages
attribuables à un usage inapproprié.
Les notions d’« appareil » et de « produit » présentes dans
les descriptions et les consignes du manuel se rapportent
à l’appareil de musculation avec barres doubles et de
traction.
1. En cas de doute quant au bon fonctionnement du
produit ou si vous constatez des dommages sur
celui-ci, veuillez communiquer avec le service client
du fabricant.
2. Seul le fabricant doit réparer le produit. Ne tentez
pas de le réparer le produit par vous-même!
3.1. DESCRIPTION DU PRODUIT
1
2
3
4
5
6
1. DESCRIPTION GÉNÉRALE
L‘objectif du présent manuel est de favoriser une utilisation
sécuritaire et able du produit. Le produit a été conçu
et fabriqué en respectant étroitement les directives
techniques applicables et en utilisant les technologies et
composants les plus modernes. Il est conforme aux normes
de qualité les plus élevées.
LIRE ATTENTIVEMENT LE PRÉSENT MANUEL ET
S‘ASSURER DE BIEN LE COMPRENDRE AVANT LA
PREMIÈRE UTILISATION.
An de garantir le fonctionnement able et durable
du produit, il est nécessaire d‘utiliser et d‘entretenir ce
dernier conformément aux consignes gurant dans le
présent manuel. Les caractéristiques et les spécications
contenues dans ce document sont à jour. Le fabricant se
réserve le droit de procéder à des modications à des ns
d’amélioration du produit.
SYMBOLES
Respectez les consignes du manuel.
REMARQUE! Les illustrations contenues dans le
présent manuel sont fournies à titre explicatif.
Votre machine peut ne pas être identique.
La version originale de ce manuel a été rédigée en
allemand. Toutes les autres versions sont des traductions
de l‘allemand.
2. CONSIGNES DE SÉCURITÉ
ATTENTION! Veuillez lire attentivement toutes les
consignes de sécurité et toutes les instructions. Le
non-respect des instructions et des consignes de
sécurité peut entraîner des blessures graves ou la
mort.
10 11
POZNÁMKA! Nákres tohoto produktu naleznete
na konci návodu na str. 18-19.
04.04.2019
No de
pièce
Description Nombre/
pièces
ATube de base 2
BTube vertical 2
CTube supérieur 2
DCadre de poignée 2
EBarre 1
FRenforcement de cadre 2
GTube médian supérieur 1
H Cadre du dossier 1
IGarniture pour les coudes 2
JDossier 1
KPlaque de renforcement 8
1Vis à tête ronde M10X70 14
2Vis hexagonale à tête ronde à
six pans creux M10X40
2
3Vis hexagonale à tête ronde à
six pans creux M10X20
4
4Vis à tête hexagonale M8 x 20 2
5Vis à tête hexagonale M8 x 65 4
6 Rondelle M8 6
7Rondelle M10 26
8Écrou M10 22
hexagonale (1), une rondelle (6) et un écrou (8) au
niveau du tube de base. Fixez l’assemblage au niveau
du tube de base à l’aide d’une vis et d’un écrou.
II. Montage du cadre du dossier et du cadre des
poignées:
a) Insérez les tubes supérieurs (C) dans les tubes
verticaux (B) et raccordez-les aux cadres de support
(D). Solidiez l’assemblage à l’aide d’une plaque de
renforcement (K), d’une vis à tête hexagonale (1),
d’une rondelle (6) et d’un écrou (7).
b) Raccordez le cadre du dossier (H) aux tubes
supérieurs (C). Solidiez l’assemblage à l’aide de
plaques de renforcement (K), de vis à tête hexagonale
(1), de rondelles (6) et d’écrous (7).
c) Raccordez la barre (E) aux tubes supérieurs (C).
Solidiez l’assemblage à l’aide d’une vis à six pans
creux (2) et d’une rondelle (6).
d) Fixez le dossier (J) au cadre du dossier (H). Solidiez
l’assemblage à l’aide d’une vis à six pans creux (3) et
d’une rondelle (5).
e) Posez la garniture pour les coudes (I) sur le cadre de
dossier (D). Solidiez l’assemblage à l’aide d’une vis
à six pans creux (4) et d’une rondelle (5).
3.3. NETTOYAGE ET ENTRETIEN
• Nettoyez le produit après chaque utilisation.
• Pour nettoyer les diérentes surfaces, n’utilisez que
des produits sans agents corrosifs.
• Utilisez un chion doux lors du nettoyage.
• Conservez le produit dans un endroit frais et sec, à
l’abri de l’humidité et des rayons du soleil.
I. Montage du cadre du produit:
a) Assemblez les tubes de base (A) et les tubes verticaux
(B) à l’aide de rondelles (6) et d’écrous (7).
b) Raccordez les tubes verticaux (B) et le tube médian
supérieur (G). Solidiez l’assemblage à l’aide d’une
plaque de renforcement (K), de vis à six pans creux
(1), de rondelles des deux côtés de l’assemblage (6)
et d’écrous (7).
c) Posez le renforcement de cadre (F) sur le tube de
base (B) et sur le tube vertical (A). Fixez l’assemblage
avec une plaque de renforcement (K), une vis à tête
Assemblage du produit:
3.2. PRÉPARATION À L‘UTILISATION
Nomenclature:
1. Barre de traction
2. Support
3. Garniture pour les coudes
4. Poignée verticale
5. Poignée horizontale
6. Poignée inférieure
IT ISTRUZIONI PER L’USO
Parametro | Descrizione Parametro | Valore |
Nome del prodotto Stazione per trazioni
Modello GR-PT50
Peso massimo
dell'utente [kg]
110
Dimensioni [mm] 140x121x215
Peso [kg] 32,3
DETTAGLI TECNICI
4. Mantenere il prodotto in buone condizioni. Prima
dell´utilizzo vericare sempre che non siano
presenti danni generali o legati al ssaggio dei
suoi componenti (rottura, parti allentate o altri
danneggiamenti che possono compromettere un
utilizzo sicuro del prodotto). In caso di danni, far
riparare il prodotto prima dell´uso.
5. Tenere il prodotto fuori dalla portata dei bambini e
degli animali.
6. Prima di iniziare gli esercizi, consultare un medico
per accertarsi sulle proprie condizioni di salute.
7. Prima di utilizzare il prodotto, eseguire esercizi di
riscaldamento.
8. Se durante l´allenamento si avvertono sintomi
allarmanti, come dolore al petto, vertigini, aanno,
ecc., interrompere immediatamente l´allenamento e
consultare un medico.
9. Posizionare il prodotto su una supercie stabile,
asciutta e piana, assicurandosi di garantire una
distanza di almeno 0,5 m attorno ad esso.
10. Non utilizzare il prodotto come strumento
terapeutico.
3. MODALITÀ D‘USO
La stazione per trazioni è un dispositivo concepito per
eseguire diverse sessioni di allenamento svolgendo
determinati esercizi appropriati. Questo prodotto è
destinato esclusivamente all´uso domestico!
L‘utente è il solo e unico responsabile dei danni causati
da un utilizzo improprio del prodotto.
Il termine „dispositivo“ o „prodotto“ riportato nelle
avvertenze e nella descrizione del manuale si riferisce alla
stazione per trazioni.
1. Se non si è sicuri del corretto funzionamento del
prodotto rivolgersi al Servizio Clienti del produttore.
2. Soltanto i tecnici del Servizio Clienti del produttore
sono autorizzati a riparare il prodotto. Non riparare
il dispositivo autonomamente!
3. Non sovraccaricare il prodotto. Superare il peso
dell‘utente massimo consentito può danneggiare il
prodotto.
3.1. DESCRIZIONE DEL PRODOTTO
1
2
3
4
5
6
1. DESCRIZIONE GENERALE
Questo manuale è stato pensato per consentire di utilizzare
il prodotto in tutta sicurezza. Il prodotto è stato progettato
e fabbricato seguendo rigorose speciche tecniche e
ricorrendo alle più recenti tecnologie.Tutte le fasi del
processo produttivo sono state eseguite nel pieno rispetto
di elevati standard qualitativi.
PRIMA DELL´UTILIZZO LEGGERE ATTENTAMENTE
E COMPRENDERE LE ISTRUZIONI RIPORTATE IN
QUESTO MANUALE.
Anchè questo prodotto rimanga adabile e duri nel
tempo, leggere accuratamente le seguenti istruzioni d‘uso
e di manutenzione: le speciche e i dettagli tecnici riportati
in questo manuale sono il risultato di costanti veriche e
aggiornamenti. Il produttore si riserva il diritto di apportare
eventuali modiche al ne di migliorare la qualità del
prodotto.
DEFINIZIONE SIMBOLI
Leggere attentamente le seguenti avvertenze.
IMPORTANTE! Le immagini contenute in questo
manuale sono puramente indicative e potrebbero
dierire dal prodotto.
La versione originale di questo manuale è in lingua tedesca.
Ulteriori versioni sono traduzioni dal tedesco.
2. NORME DI SICUREZZA
ATTENZIONE! Leggere attentamente tutte le
istruzioni di sicurezza. La mancata osservanza delle
seguenti avvertenze può provocare lesioni gravi
o condurre alla morte.
1. Barra di trazione
2. Sostegno
3. Poggiagomito con imbottitura
4. Impugnatura verticale
5. Impugnatura orizzontale
6. Impugnatura inferiore
12 13
ATTENTION! Le plan de ce produit se trouve à la
dernière page du manuel d‘utilisation, p. 17.
ATTENTION! Les vues éclatées de ce produit
se trouvent aux dernières pages du manuel
d‘utilisation p. 18-19.
04.04.2019
Nr. Descrizione Quantità/
pz.
ABase tubolare 2
BProlo tubolare verticale 2
CProlo tubolare superiore 2
DTelaio impugnatura 2
EBarra 1
FRinforzo telaio 2
GTubo di raccordo 1
H Telaio schienale 1
IPoggiagomito con
imbottitura
2
JBracciolo 1
KPiastra di rinforzo 8
1Vite a testa piatta rotonda
M10X70
14
2Vite con testa ad esagono
interno M10X40
2
3Vite con testa ad esagono
interno M10X20
4
4Vite con testa esagonale
M8X20
2
5Vite con testa esagonale
M8x65
4
6 Disco M8 6
7Disco M10 26
8Dado madre M10 22
e ssare l´assemblaggio alla base tubolare con il
disco (6) e il dado madre (7).
II. Montaggio schienale e telaio impugnature:
a) Posizionare i proli tubolari superiori (C) nei proli
tubolari verticali (B) e assemblarli con i telai di
sostegno (D). Fissare l´assemblaggio con la piastra di
rinforzo (K), la vite con testa esagonale (1), il disco (6)
e il dado madre (7).
b) Assemblare il telaio dello schienale (H) con il prolo
tubolare superiore (C). Fissare l´assemblaggio con la
piastra di rinforzo (K), la vite con testa esagonale (1),
i dischi (6) e i dadi madre (7).
c) Assemblare la barra (E) con il prolo tubolare
superiore (C). Fissare l´assemblaggio con le viti con
testa esagonale interne (2) e i dischi (6).
d) Fissare lo schienale (J) nell´apposito telaio (H). Fissare
l´assemblaggio con le viti con testa esagonale
interne (3) e i dischi (5).
e) Montare l´imbottitura sotto i poggiagomiti (I) nei
telai dello schienale (D). Fissare l´assemblaggio con
le viti con testa esagonale interne (4) e i dischi (5).
3.3.PULIZIA E MANUTENZIONE
• Pulire il prodotto dopo ogni utilizzo.
• Per la pulizia delle superci impiegare solo sostanze
non corrosive.
• Utilizzare un panno morbido.
• Conservare il prodotto in un luogo asciutto, fresco e
protetto dall‘umidità e dai raggi del sole diretti.
I. Montaggio del telaio del prodotto
a) Assemblare la base tubolare (A) con il prolo
tubolare verticale (B) con la rondella (6) e il dado
madre (7).
b) Assemblare il prolo tubolare verticale (B) con il tubo
di raccordo (G). Fissare l´assemblaggio con la piastra
di rinforzo (K), le viti con testa esagonale interne (1),
le rondelle su entrambe le parti del collegamento (6)
e i dadi madre (7).
c) Montare il rinforzo del telaio (F) nella base tubolare
(B) e nel prolo tubolare verticale (A). Fissare
l´assemblaggio con la piastra di rinforzo (K), la vite
con testa esagonale (1), il disco (6) e il dado madre
(8) al prolo tubolare verticale (B);
Montaggio del prodotto:
3.2. PREPARAZIONE ALL´USO
Elenco dei componenti: ES MANUAL DE INSTRUCCIONES
Parámetro – Descripción Parámetro – Valor
Nombre del producto Estación con barra para
ejercicios
Modelo GR-PT50
Peso máximo del
usuario [kg]
110
Dimensiones [mm] 140x121x215
Peso [kg] 32,3
DATOS TÉCNICOS
4. Mantener el producto en buenas condiciones
técnicas. Antes de cada uso, compruebe si hay
daños generales o daños relacionados con la jación
de los componentes (grietas en los componentes,
torceduras u otras circunstancias que puedan afectar
al funcionamiento seguro del producto). En caso de
daños, haga reparar el producto antes de usarlo.
5. Mantenga el producto alejado de niños y animales.
6. Antes de comenzar con los ejercicios consulte a un
médico para asegurarse de que no tenga problemas
de salud.
7. Siempre haga ejercicios de calentamiento antes de
usar el banco multifunción.
8. Si experimenta síntomas o molestias durante
el entrenamiento, por ejemplo, dolor torácico,
mareos, falta de aire, etc., detenga el entrenamiento
inmediatamente y busque atención médica.
9. Coloque el producto sobre una supercie estable,
seca y nivelada, asegurándose de que haya un
espacio libre de al menos 0,5 m alrededor del banco
de entrenamiento multifunción.
10. La barra de ejercicios no se puede utilizar como
producto terapéutico
3. INSTRUCCIONES DE USO
La estación con barra para ejercicios ha sido diseñada para
entrenar músculos del cuerpo con ejercicios adecuados. ¡El
producto solamente puede utilizarse de forma privada!
El usuario es responsable de los daños derivados de un
uso inadecuado del producto.
Conceptos como „aparato“ o „producto“ en las advertencias
y descripciones de este manual se reeren a la estación con
barra para ejercicios.
1. En caso de duda sobre si el producto funciona
correctamente o si detectara daños, póngase en
contacto con el servicio de atención al cliente del
fabricante.
2. El producto solamente puede ser reparado por el
fabricante. ¡No intente repararlo usted mismo!
3. No permita que el producto se sobrecargue. Si se
excediera el peso máximo indicado para el usuario
podría provocar daños en el producto.
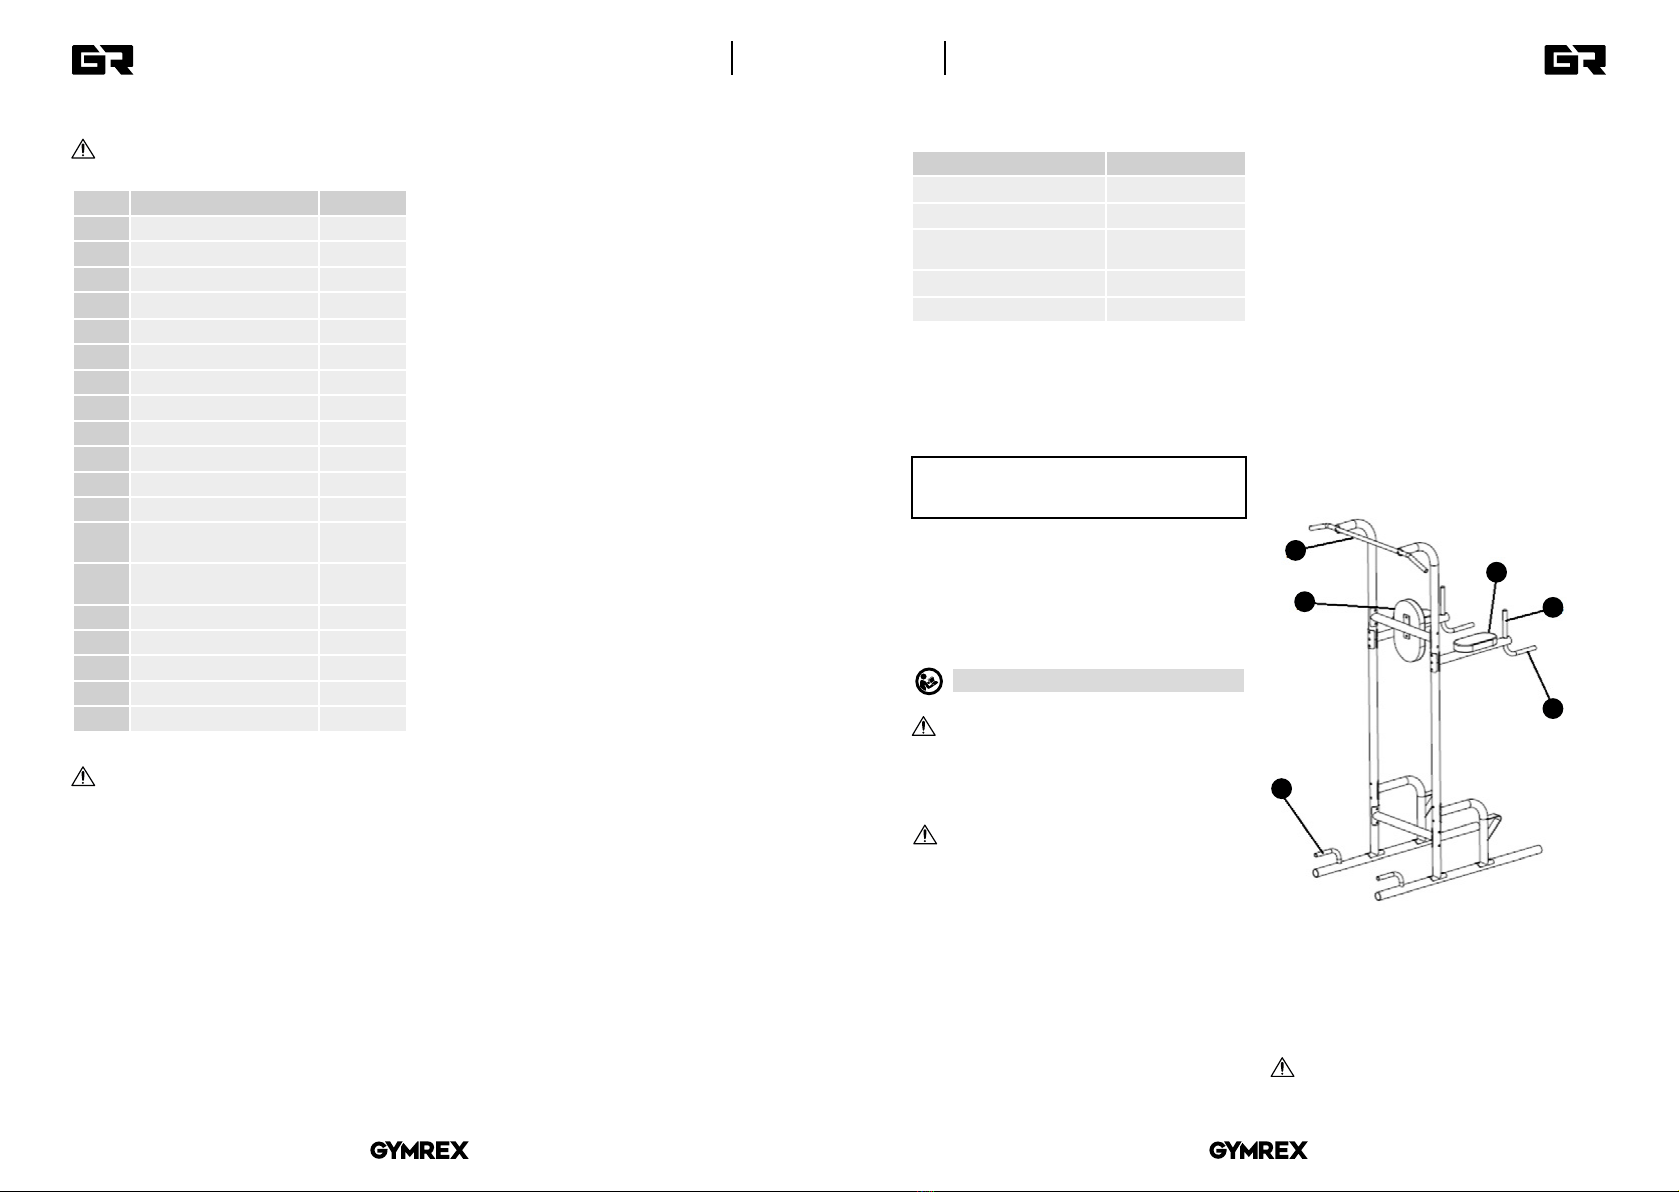
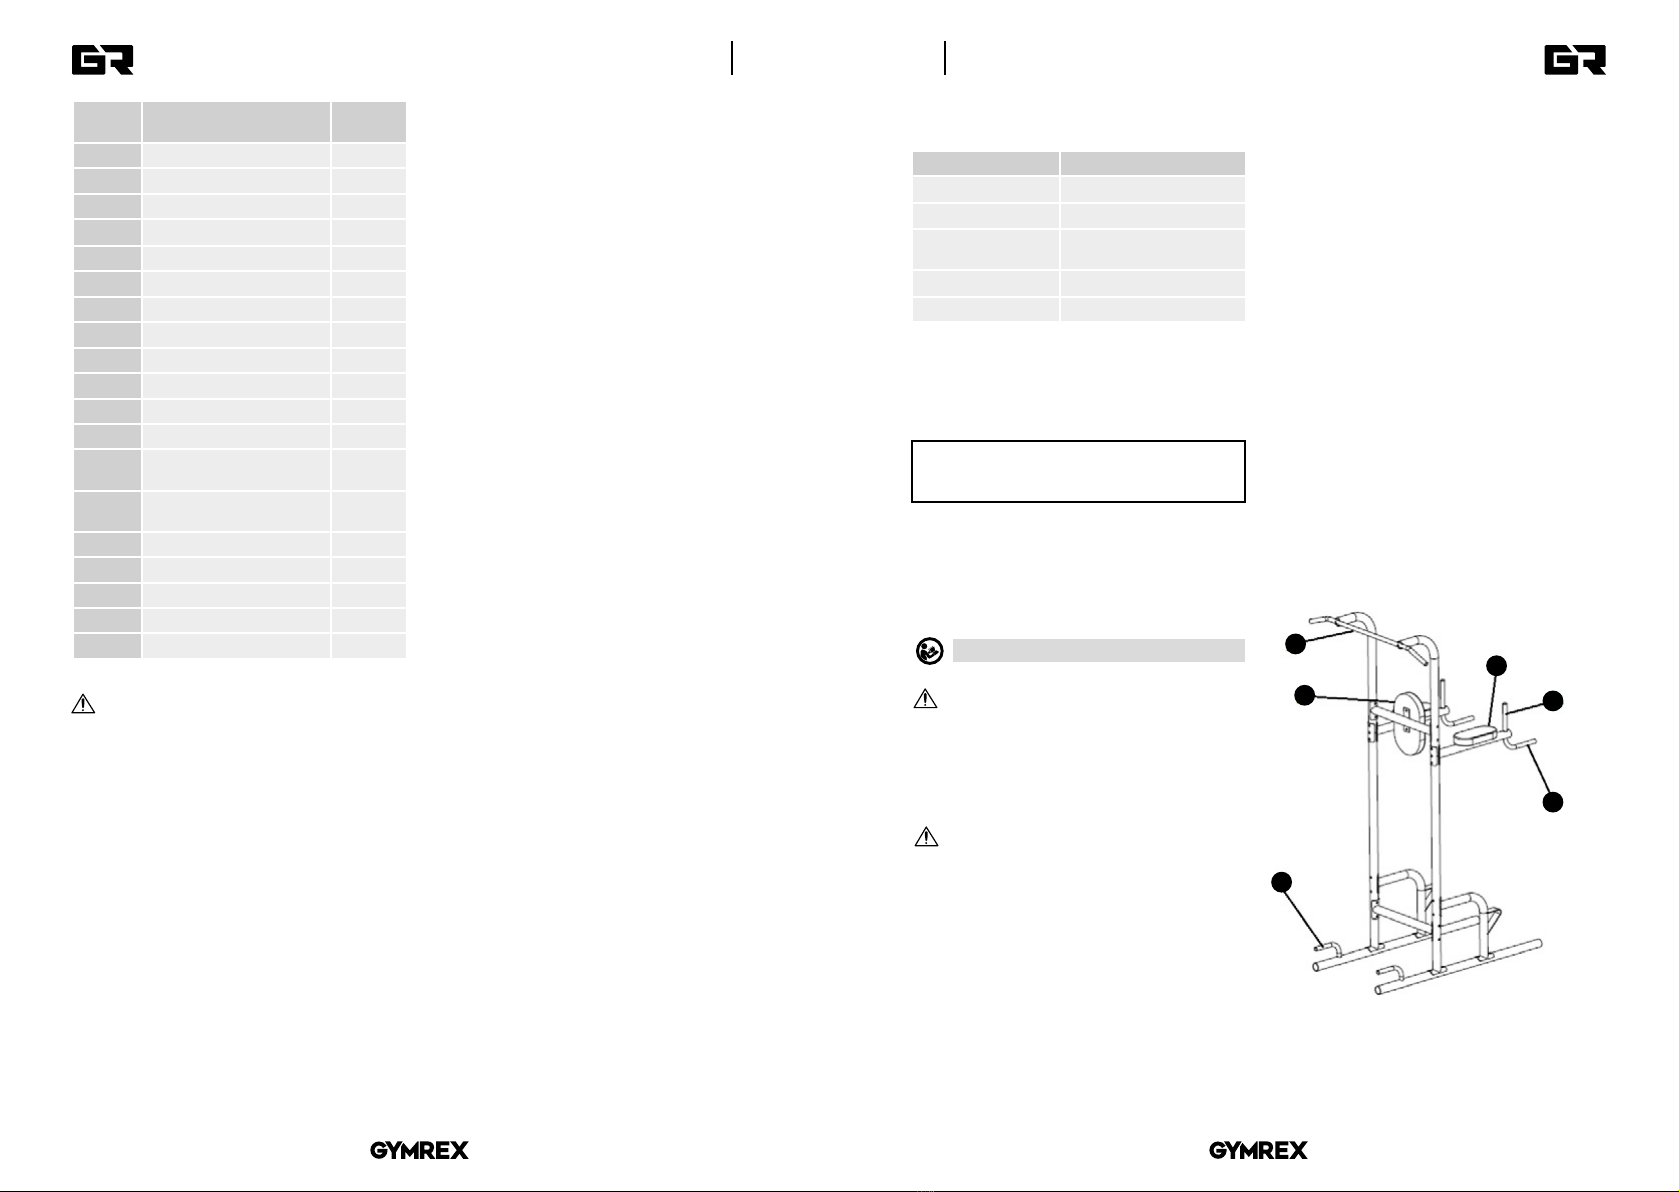
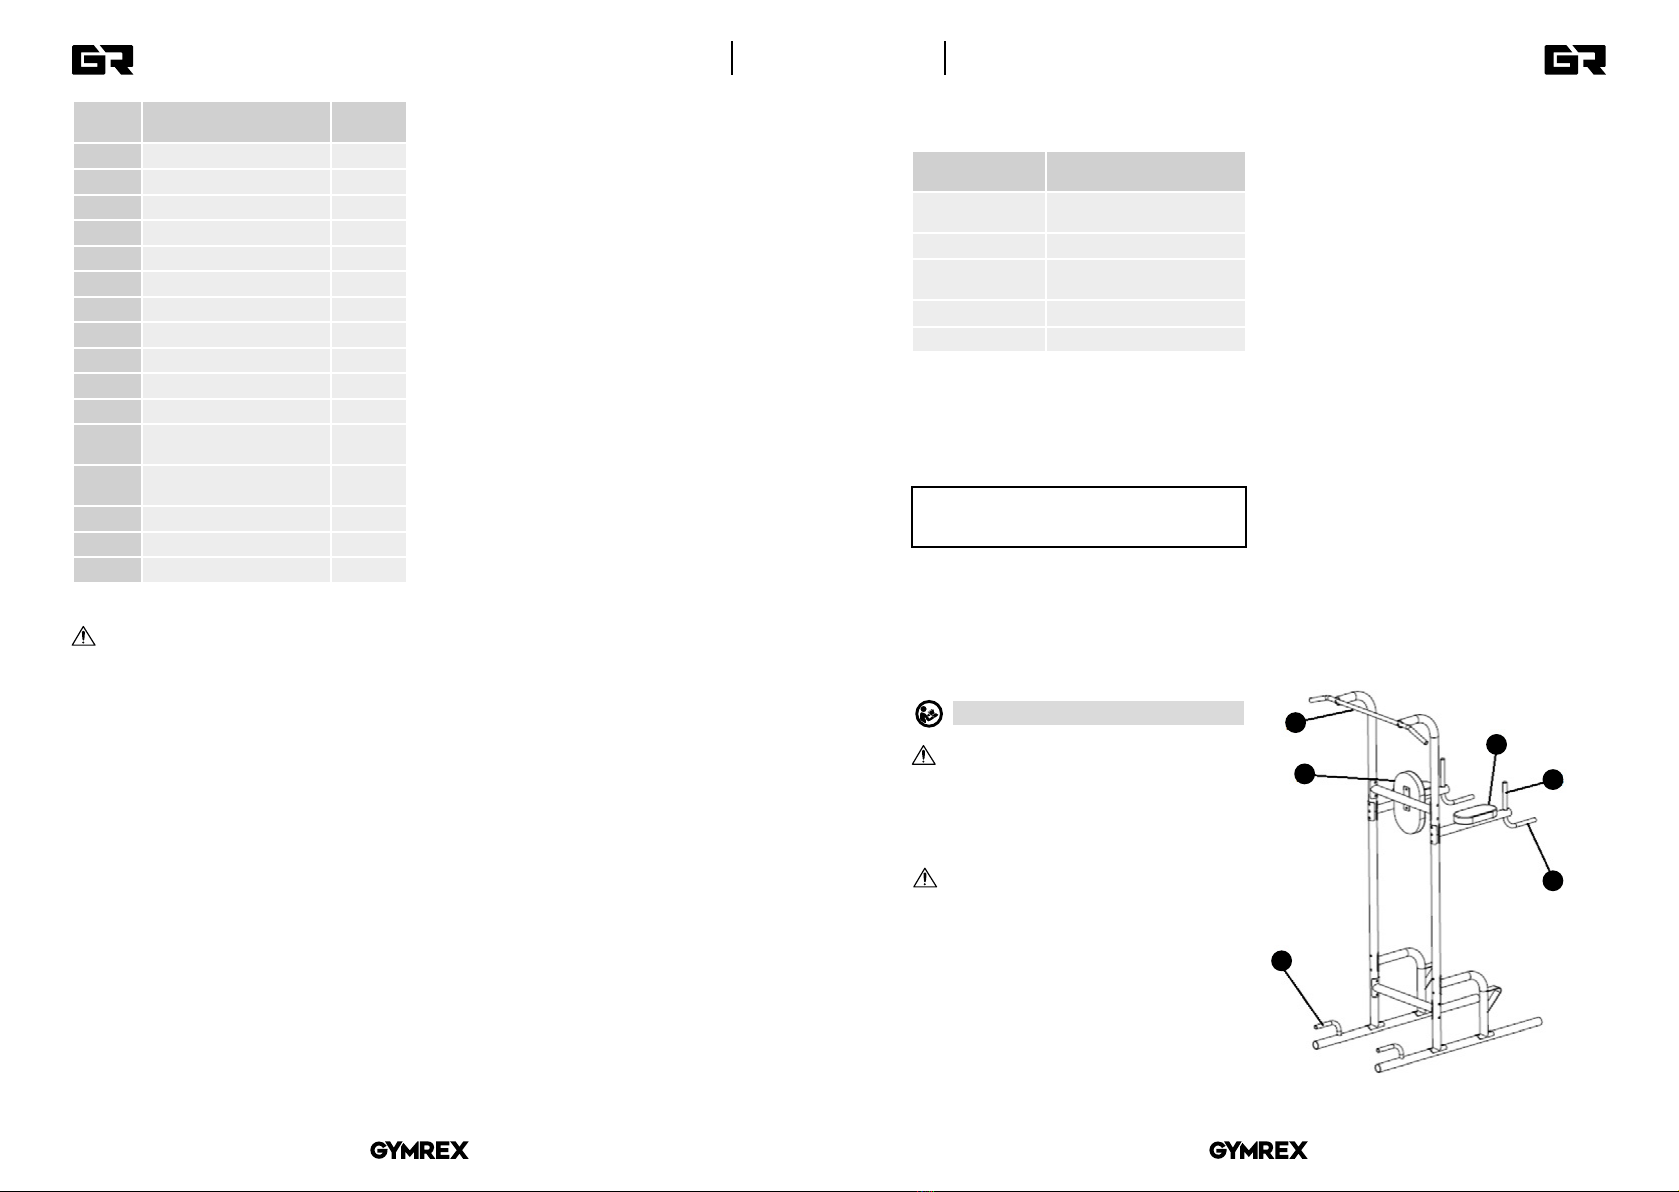
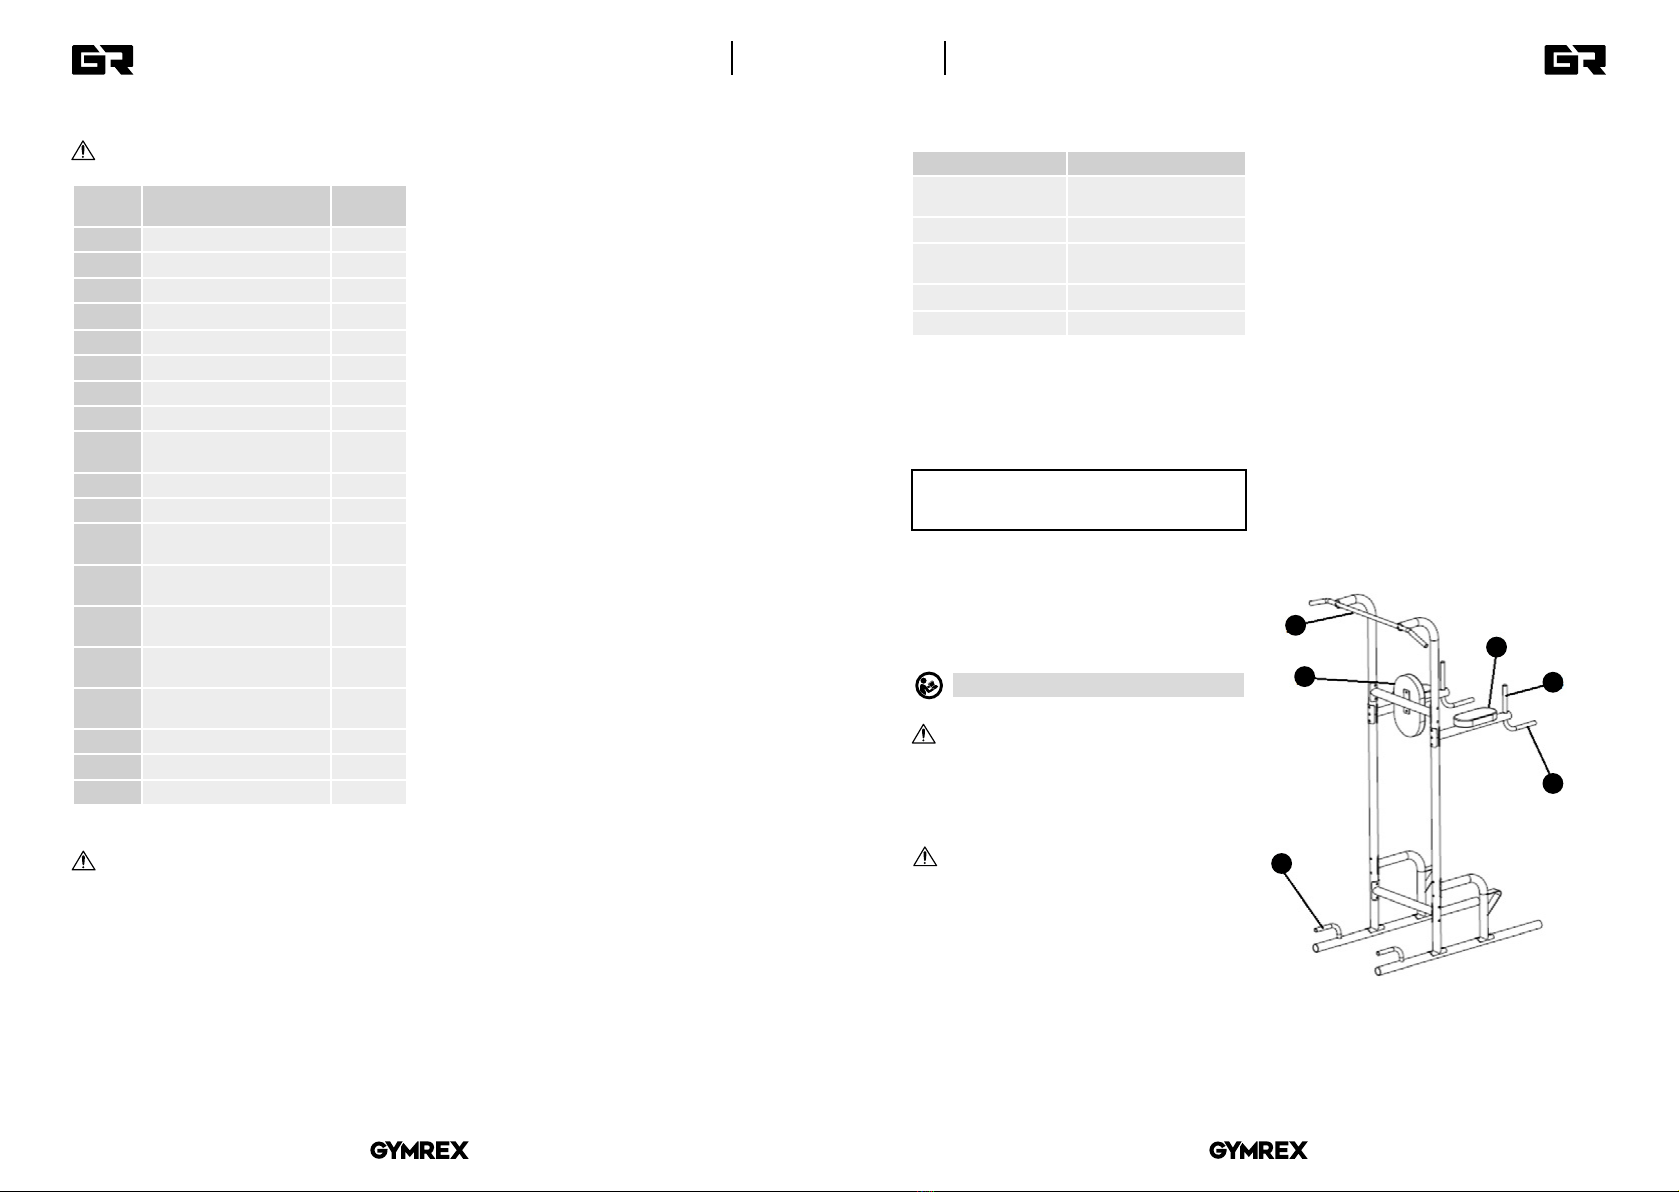
3.1. DESCRIPCIÓN DEL PRODUCTO
1
2
3
4
5
6
1. Barra para pull ups
2. Ayuda
3. Acolchado para el codo
4. Agarre vertical
5. Agarre horizontal
6. Agarre inferior
1. DESCRIPCIÓN GENERAL
Este manual ha sido elaborado para favorecer un empleo
seguro y able. El producto ha sido estrictamente diseñado
y fabricado conforme a las especicaciones técnicas
y para ello se han utilizando las últimas tecnologías y
componentes, manteniendo los más altos estándares de
calidad.
ANTES DE LA PUESTA EN FUNCIONAMIENTO,
LEA LAS INSTRUCCIONES MINUCIOSAMENTE Y
ASEGÚRESE DE COMPRENDERLAS.
Para garantizar un funcionamiento duradero y able del
producto, el manejo y mantenimiento deben llevarse a
cabo de acuerdo con las instrucciones de este manual. Los
datos técnicos y las especicaciones de este manual están
actualizados. El fabricante se reserva el derecho de realizar
modicaciones para mejorar la calidad.
EXPLICACIÓN DE LOS SÍMBOLOS
Respetar las instrucciones de uso.
¡ADVERTENCIA! En este manual se incluyen fotos
ilustrativas, que podrían no coincidir exactamente
con la apariencia real del prodotto.
El texto en alemán corresponde a la versión original. Los
textos en otras lenguas son traducciones del original en
alemán.
2. SEGURIDAD
¡ATENCIÓN! Lea todas las instrucciones e
indicaciones de seguridad. La inobservancia de
las advertencias e instrucciones al respecto puede
provocar lesiones graves o incluso la muerte.
14 15
ATTENZIONE: L´esploso di questo prodotto si
trova nell´ultima pagina del manuale d´uso, p. 17.
ATTENZIONE! L´esploso di questo prodotto lo
trovi nelle ultime pagine (18-19) del manuale
d´uso.
04.04.2019
VORBEREITUNG FÜR DIE NUTZUNG | PREPARATION FOR USE | PRZYGOTOWANIE DO UŻYTKOWANIA
PŘÍPRAVA K POUŽÍVÁNÍ | PRÉPARATION À L‘UTILISATION | PREPARAZIONE ALL´USO | PREPARACIÓN PARA EL USO
N° de
pieza
Descripción Cantidad
de piezas
ABarra base 2
BBarra vertical 2
CBarra superior 2
DEstructura de agarre 2
EBarra de pull ups 1
FRefuerzo de la estructura 2
GConexión 1
H Estructura del respaldo 1
IAcolchado para el codo 2
JRespaldo 1
KPlaca de refuerzo 8
1Tornillo de cabeza redonda
M10X70
14
2Tornillo alomado con
hexágono interior M10X40
2
3Tornillo alomado con
hexágono interior M10X20
4
4Tornillo hexagonal M8X20 2
5Tornillo hexagonal M8x65 4
6 Arandela M8 6
7Arandela M10 26
8Tuerca M10 22
Asegurar las conexiones con las placas de refuerzo
(K), el tornillo hexagonal (1), la arandela (6) y la
tuerca (7).
b) Conecte la estructura del respaldo (H) a las barras
superiores (C). Asegure las conexiones con las placas
de refuerzo (K), tornillos hexagonales (1), arandelas
(6) y tuercas (7).
c) Unir la barra de pull ups (E) a la barra superior (C).
Asegurar la conexión con el tornillo de hexágono
interior (2) y la arandela (6).
d) Fijar el respaldo (J) en la estructura del respaldo (H).
Asegurar la conexión con el tornillo de hexágono
interior (3) y la arandela (5).
e) Monte el acolchado para el codo (I) a la estructura
de agarre (D). Asegurar la conexión con el tornillo de
hexágono interior (4) y la arandela (5).
3.3. LIMPIEZA Y MANTENIMIENTO
• Limpie el producto en profundidad después de cada
uso
• Para limpiar la supercie, utilice solo productos que
no contengan sustancias corrosivas.
• Para la limpieza utilice por favor un paño suave.
• Guarde el producto en un lugar seco, fresco y
protegido de la humedad y la radiación solar directa.
I. Montaje de la estructura del producto:
a) Conecte las barras base (A) a las barras verticales (B)
con la ayuda de arandelas (6) y tuercas (7).
b) Una las barras verticales (b) a la conexión (G).
Asegure la unión con la placa de refuerzo (K),
tornillos de hexágono interior (1), arandelas a ambos
lados de la conexión (6) y tuercas (7).
c) Fije refuerzo de la estructura (F) a las barras bases
(A) y a las barras verticales (B). Asegurar la conexión
a la barra vertical (B) con la placa de refuerzo (K), el
tornillo hexagonal (1), la arandela (6) y la tuerca (8);
y la conexión a la barra base con la arandela (6) y la
tuerca (7).
II. Montaje de las estructuras para respaldo y agarres:
a) Inserte las barras superiores (C) en las barras
verticales (B) y conéctelos a los agarres (D).
Montaje del producto:
3.2. PREPARACIÓN PARA EL USO
Listado de componentes:
16 17
¡ATENCIÓN! La ilustración de este producto se
encuentra en la última página de las instrucciones
p. 17.
¡ATENCIÓN! El despiece de este producto
se encuentra en las últimas páginas de las
instrucciones p. 18-19.
36
C
E
C
DI
D
7
5
8
K
6
2
6
8
7
4
J
1
H
3
8
6
2
6K
B
B
6
1
F
8
6
1
1
8
F
8
1
8
6
A
A
G
1
04.04.2019
I
B
B
6
1
F
8
F
7
1
7
A
A
6
7
6
G
1
1
ZUSAMMENBAUEN DES PRODUKTS | ASSEMBLING THE EQUIPMENT | SKŁADANIE SPRZĘTU | SKLÁDÁNÍ ZAŘÍZENÍ
ASSEMBLAGE DU PRODUIT | MONTAGGIO DEL PRODOTTO | MONTAJE DEL PRODUCTO
18 19
26
C
E
C
2
7
6
1
6K
H1
J
DI
D
5
4
7
K
6
1
76
II
1
04.04.2019
CONTACT
expondo Polska sp. z o.o. sp. k.
ul. Nowy Kisielin-Innowacyjna 7
66-002 Zielona Góra | Poland, EU
e-mail: info@expondo.de
UNSER HAUPTZIEL IST DIE ZUFRIEDENHEIT UNSERER KUNDEN!
BEI FRAGEN KONTAKTIEREN SIE UNS BITTE UNTER:
OUR CUSTOMERS‘ SATISFACTION IS OUR MAIN GOAL!
PLEASE CONTACT US WITH QUESTIONS AT:
NASZYM GŁÓWNYM CELEM JEST SATYSFAKCJA KLIENTÓW
W PRZYPADKU PYTAŃ PROSIMY O KONTAKT Z PRZEDSTAWICIELEM
W DANYM KRAJU:
NOTRE BUT PREMIER EST VOTRE SATISFACTION!
POUR TOUTE QUESTION, CONTACTEZ NOUS SUR:
NUESTRO OBJETIVO PRINCIPAL ES LA SATISFACCIÓN DE NUESTROS CLIENTES!
SI TIENE PREGUNTAS, POR FAVOR PÓNGANSE EN CONTACTO CON NOSTROS EN:
I NOSTRO PRINCIPALE OBIETTIVO È LA SODDISFAZIONE DEI NOSTRI CLIENTI!
PER EVENTUALI DOMANDE PER FAVORE, CI CONTATTINO SOTTO:
NAŠÍM HLAVNÍM CÍLEM JE SPOKOJENOST NAŠICH ZÁKAZNÍKŮ! V PŘÍPADĚ OTÁZEK
NÁS PROSÍM KONTAKTUJTE NA:

Other Gymrex Fitness Equipment manuals

Gymrex GR-RC50 User manual

Gymrex

Gymrex GR-RC50 User manual

Gymrex GR-SB-01 User manual

Gymrex

Gymrex GR-SB-01 User manual

Gymrex GR-MG 57 User manual

Gymrex

Gymrex GR-MG 57 User manual

Gymrex GR-MG66 User manual

Gymrex

Gymrex GR-MG66 User manual

Gymrex GR-MG76 User manual

Gymrex

Gymrex GR-MG76 User manual

Gymrex GR-MG 61 User manual

Gymrex

Gymrex GR-MG 61 User manual

Gymrex GR-VP-200S User manual

Gymrex

Gymrex GR-VP-200S User manual

Gymrex GR-MG65 User manual

Gymrex

Gymrex GR-MG65 User manual

Gymrex GR-PU110B User manual

Gymrex

Gymrex GR-PU110B User manual

Gymrex GR-SI50 User manual

Gymrex

Gymrex GR-SI50 User manual

Gymrex GR-LP11 User manual

Gymrex

Gymrex GR-LP11 User manual

Gymrex GR-MG 60 User manual

Gymrex

Gymrex GR-MG 60 User manual

Gymrex GR-BH60 User manual

Gymrex

Gymrex GR-BH60 User manual

Gymrex GR-MG 64 User manual

Gymrex

Gymrex GR-MG 64 User manual

Gymrex GR-MG 56 User manual

Gymrex

Gymrex GR-MG 56 User manual

Gymrex GR-PT 100 User manual

Gymrex

Gymrex GR-PT 100 User manual

Gymrex GR-MG 55 User manual

Gymrex

Gymrex GR-MG 55 User manual

Gymrex GR-CB 200 User manual

Gymrex

Gymrex GR-CB 200 User manual

Gymrex GR-MG68 User manual

Gymrex

Gymrex GR-MG68 User manual

Gymrex GR-MG70 User manual

Gymrex

Gymrex GR-MG70 User manual

Gymrex GR-MG111 User manual

Gymrex

Gymrex GR-MG111 User manual

Gymrex GR-MG13 User manual

Gymrex

Gymrex GR-MG13 User manual

Gymrex GR-MG 50 User manual

Gymrex

Gymrex GR-MG 50 User manual

Gymrex GR-MG 53 User manual

Gymrex

Gymrex GR-MG 53 User manual

Popular Fitness Equipment manuals by other brands

BH FITNESS SUB1150 owner's manual

BH FITNESS

BH FITNESS SUB1150 owner's manual

Huffy 211657B owner's manual

Huffy

Huffy 211657B owner's manual

Matrix G3-MS80 (MS80) Service manual

Matrix

Matrix G3-MS80 (MS80) Service manual

NordicTrack NTBE01701 user manual

NordicTrack

NordicTrack NTBE01701 user manual

BH FITNESS YF30 instruction manual

BH FITNESS

BH FITNESS YF30 instruction manual

EarthPulse E-Stim user guide

EarthPulse

EarthPulse E-Stim user guide

ParaBody 807 BODYSYSTEM user guide

ParaBody

ParaBody 807 BODYSYSTEM user guide

First Degree Fitness E520A user guide

First Degree Fitness

First Degree Fitness E520A user guide

CARE FITNESS Striale SE-401 manual

CARE FITNESS

CARE FITNESS Striale SE-401 manual

Daiwa RODEO CORE instruction manual

Daiwa

Daiwa RODEO CORE instruction manual

Body Solid GPR400 owner's manual

Body Solid

Body Solid GPR400 owner's manual

SPALDING M7900412 owner's manual

SPALDING

SPALDING M7900412 owner's manual

Enraf Nonius BIKE REHA Instructions for use

Enraf Nonius

Enraf Nonius BIKE REHA Instructions for use

NordicTrack NTMC29931 user manual

NordicTrack

NordicTrack NTMC29931 user manual

Weider 120 manual

Weider

Weider 120 manual

BH FITNESS PL400 Instructions for assembly and use

BH FITNESS

BH FITNESS PL400 Instructions for assembly and use

WeiderPro 125 user manual

WeiderPro

WeiderPro 125 user manual

XMark Fitness XM-4429 owner's manual

XMark Fitness

XMark Fitness XM-4429 owner's manual

manuals.online logo
manuals.online logoBrands
  • About & Mission
  • Contact us
  • Privacy Policy
  • Terms and Conditions

Copyright 2025 Manuals.Online. All Rights Reserved.