Gymrex GR-WB5 User manual

GR-WB5
HIGH PERFORMANCE. GERMAN DESIGN.
USER MANUAL
WEIGHT BENCH
expondo.de
BEDIENUNGSANLEITUNG | MANUEL D´UTILISATION
ISTRUZIONI PER L‘USO | MANUAL DE INSTRUCCIONES
INSTRUKCJA OBSŁUGI | NÁVOD K POUŽITÍ

INHALT | CONTENU | CONTENT | CONTENUTO | CONTENIDO | TREŚĆ | OBSAH
3
5
7
9
11
13
15
DEUTSCH
ENGLISH
POLSKI
ČESKY
FRANÇAIS
ITALIANO
ESPAÑOL
NAZWA PRODUKTU ŁAWKA POD SZTANGĘ
PRODUKTNAME HANTELBANK
PRODUCT NAME WEIGHT BENCH
NOM DU PRODUIT BANC DE MUSCULATION
NOME DEL PRODOTTO PANCA PER SOLLEVAMENTO PESI
NOMBRE DEL PRODUCTO BANCO DE PESAS
NÁZEV VÝROBKU LÁVKA POD ČINKU
MODEL PRODUKTU
GR-WB5
MODELL
PRODUCT MODEL
MODÈLE
MODELLO
MODELO
MODEL VÝROBKU
NAZWA PRODUCENTA
EXPONDO POLSKA SP. Z O.O. SP. K.
NAME DES HERSTELLERS
MANUFACTURER NAME
NOM DU FABRICANT
NOME DEL PRODUTTORE
NOMBRE DEL FABRICANTE
NÁZEV VÝROBCE
ADRES PRODUCENTA
UL. DEKORACYJNA 3, 65-155 ZIELONA GÓRA | POLAND, EU
ANSCHRIFT DES HERSTELLERS
MANUFACTURER ADDRESS
ADRESSE DU FABRICANT
INDIRIZZO DEL FORNITORE
DIRECCIÓN DEL FABRICANTE
ADRESA VÝROBCE
1. Allgemeine Beschreibung
Diese Anleitung ist als Hilfe für eine sichere und zuverlässige
Nutzung gedacht. Das Produkt wurde strikt nach den
technischen Vorgaben und unter Verwendung modernster
Technologien und Komponenten sowie unter Wahrung der
höchsten Qualitätsstandards entworfen und angefertigt.
Parameter – Beschreibung Parameter – Wert
Produktname Hantelbank
Modell GR-WB5
Maximales Gewicht des
Benutzers [kg]
110
Abmessungen der Bank [mm] 1100x245
Einstellung der Höhe des Gris
für die Hantelstange [mm]
840-1160
Maximales Gewicht für die
Auage der Hantelstange [kg]
100
Gewicht [kg] 15,5
TECHNISCHE DATEN
VOR INBETRIEBNAHME MUSS DIE ANLEITUNG
GENAU DURCHGELESEN UND VERSTANDEN
WERDEN.
Für einen langen und zuverlässigen Betrieb des Geräts muss
auf die richtige Handhabung und Wartung entsprechend
den in dieser Anleitung angeführten Vorgaben geachtet
werden. Die in dieser Anleitung angegebenen technischen
Daten und die Spezikation sind aktuell. Der Hersteller
behält sich das Recht vor, im Rahmen der Verbesserung der
Qualität Änderungen vorzunehmen.
Gebrauchsanweisung beachten.
HINWEIS! In der vorliegenden Anleitung
sind Beispielbilder vorhanden, die von dem
tatsächlichen Aussehen der Maschine abweichen
können.
Die originale Anweisung ist die deutschsprachige Fassung.
Sonstige Sprachfassungen sind Übersetzungen aus der
deutschen Sprache.
2. Nutzungssicherheit
ACHTUNG! Lesen Sie alle Sicherheitshinweise und
alle Anweisungen durch. Die Nichtbeachtung der
Warnungen und Anweisungen kann zu schweren
Verletzungen bis hin zum Tod führen.
3. Überlasten Sie das Gerät nicht. Ein Überschreiten
des maximal zulässigen Benutzergewichts kann zu
Schäden am Produkt führen.
4. Halten Sie das Gerät im einwandfreien Zustand.
Überprüfen Sie vor jeder Arbeit, ob allgemeine
Schäden vorliegen oder Schäden an beweglichen
Teilen (Bruch von Teilen und Komponenten oder
andere Bedingungen, die den sicheren Betrieb der
Maschine beeinträchtigen könnten). Im Falle eines
Schadens muss das Gerät vor Gebrauch in Reparatur
gegeben werden.
5. Halten Sie das Gerät von Kindern und Tieren fern.
6. Bevor Sie mit Übungen beginnen, konsultieren
Sie einen Arzt, um festzustellen, dass es keine
gesundheitliche Bedenken gibt.
7. Vor der Verwendung des Multifunktionsbank-
Bauchtrainers immer Aufwärmübungen einlegen.
8. Wenn Sie während des Trainings störende Symptome
verspüren, z. B. Schmerzen in der Brust, Schwindel,
Atemnot usw., hören Sie sofort mit dem Training auf
und suchen Sie einen Arzt auf.
9. Stellen Sie das Gerät auf eine stabile, trockene
und ebene Oberäche, wobei darauf zu achten ist,
dass ein Freiraum von mindestens 0,5 m um den
Multifunktionsbank-Bauchtrainer eingehalten wird.
3. Nutzungsbedingungen
Eine Hantelbank ist ein Gerät, das entwickelt wurde, um
verschiedene Muskeltrainingseinheiten mit geeigneten
Übungen durchzuführen. Das Produkt ist nur für den
Heimgebrauch bestimmt!
Für alle Schäden bei nicht sachgemäßer Verwendung
haftet allein der Betreiber.
Erläuterung der Symbole
Der Begri „Gerät“ oder „Produkt“ in den Warnungen
und Beschreibung des Handbuchs bezieht sich auf die
Hantelbank.
1. Bei Zweifeln, ob das Produkt ordnungsgemäß
funktioniert oder wenn Schäden festgestellt werden,
wenden Sie sich bitte an den Kundendienst des
Herstellers.
2. Das Produkt darf nur vom Hersteller repariert
werden. Reparieren Sie es nicht selbst!
3.1. Gerätebeschreibung
1. Bein
2. Bank
3. Auage für die Hantelstange
4. Gri
5. Unterbau
6. Verbindungsstück
3 4
34
5
5
6
2
1
DE BEDIENUNGSANLEITUNG
2 3
15.05.2018

3.2. Vorbereitung für die Nutzung
Liste von Elementen:
Teil-Nr. Beschreibung Stückzahl
1. Rahmen 1
2. Querstab 1
3. Vorderer Unterbau 1
4. Splint 2
5. Linker hinterer Unterbau 1
6. Rechter hinterer Unterbau 1
7. Verbindungsstück für den
Unterbau
1
8. Verstellbare Grie der
Hantelstange
2
9. Gri 2
10. Verstellbare Platte 2
11. Polster 1
12. Sechskantschraube M10x75 1
13. Sechskantschraube M10x70 4
14. Sechskantschraube M10x65 2
15. Sechskantschraube M10x45 1
16. Sechskantschraube M10x20 2
17. Sechskantschraube M8x65 3
18. Splint 4
19. Schraube M8x55 2
20. Unterlegscheibe M10 14
21. Unterlegscheibe M8 5
22. Nylonmutter M10 5
23. Mutter M8 2
24. Blende 1
25. Fuß 4
26. Verbindungsstück 2
27. Gri 2
28. Blende 1
29. Fuß 2
30. Bein 1
3.3. Reinigung und Wartung
• Reinigen Sie das Gerät nach jedem Gebrauch.
Schweißspuren mit einer Säurereaktion verursachen
Schäden an der Polsterung.
• Verwenden Sie zum Reinigen der Oberäche
ausschließlich Mittel ohne ätzende Inhaltsstoe.
• Zum Reinigen nutzen Sie bitte einen weichen Lappen.
• Bewahren Sie das Gerät an einem trockenen, kühlen,
vor Feuchtigkeit und direkter Sonneneinstrahlung
geschütztem Ort auf.
Zusammenbauen des Gerätes:
ACHTUNG: Die Explosionszeichnungen von
diesem Produkt benden sich auf der letzte Seite
der Bedienungsanleitung S. 18.
I. Montage des Rahmens mit dem Unterbau:
1. Das Bein (30) mit dem vorderen Unterbau (3) mithilfe
von Schrauben (19), den Unterlegscheiben (21) und
den Muttern (23) zusammenschrauben.
2. Das Bein (30) an den Rahmen (1) mithilfe von
Sechskantschraube (12), den Unterlegscheiben
(20) der Nylonmutter (22) und dem Splint (18)
anschrauben.
3. Den Querstab (2) an den Rahmen (1) mithilfe von
Sechskantschraube (15) anschrauben.
II. Montage von hinterem Unterbau:
1. Das Verbindungsstück für den Unterbau (7) mit
dem hinteren Unterbau (5 und 6) mithilfe von
Sechskantschrauben (13), den Unterlegscheiben (20)
und den Nylonmuttern (22) zusammenschrauben.
2. Den Querstab (2) an dem hinteren Unterbau (5
und 6) mithilfe von Sechskantschrauben (14) und
Unterlegscheiben (20) zusammenschrauben.
III. Montage von verstellbaren Armen:
1. Die Verbindungsstücke (26) auf hinterem Unterbau
(5 und 6) platzieren, auf die Verbindungsstücke
(26) die verstellbaren Grie der Hantelstange (8)
aufsetzen, den Splint (4) einsetzen.
2. Die verstellbaren Platten (10) auf den hinteren
Unterbau (5 und 6) aufsetzen und mithilfe des
Splintes (18) absichern.
3. Die Grie (9) an die Grie der Hantelstange
(8) mithilfe von Sechskantschrauben (16) und
Unterlegscheiben (20) anschrauben.
IV. Montage von Polster:
1. Polster (11) auf dem Rahmen (1) platzieren
und mithilfe von Sechskantschrauben (17) und
Unterlegscheiben (21) anschrauben.
V. Zusammenklappen des Gerätes:
1. Die Rückenlehne der Bank in die vertikale Position
stellen.
2. Die Rückenlehne sperren, indem der Splint (18) in
der Önung des Plättchens der Rückenlehne und
dem Verbindungsstück des Unterbaus platziert wird.
3. Den Splint aus dem Bein (1) herausnehmen, das Bein
zusammenklappen, den Splint einlegen und das Bein
vor Bewegung absichern.
ACHTUNG! Die Zeichnung von diesem
Produkt bendet sich auf der letzte Seite der
Bedienungsanleitung S.17. Parameter description Parameter value
Product name Weight bench
Model GR-WB5
Max. user weight [kg] 110
Bench dimensions [mm] 1100x245
Barbell rack height adjustment
[mm]
840-1160
Maximum weight for barbell
rack [kg]
100
Weight [kg] 15,5
TECHNICAL DATA
4. Maintain the device in a good technical state. Before
each use check for general damage and especially
check for cracked parts or elements and for any other
conditions which may impact the safe operation of
the device. If damage is discovered, hand over the
device for repair before use.
5. Keep the device away from children and animals.
6. Before you start training, consult a doctor to clarify
whether there are any health counterindications.
7. Always do a warm up before you start using the
device.
8. In case you feel distressing symptoms such as chest
pain, dizziness, short breath, etc. during training, you
should immediately stop the training and consult the
doctor.
9. Put the device on a stable, dry and at surface, taking
care to keep a minimum space of 0,5 m of around it.
3. Use guidelines
The weight bench is a device designed for training dierent
muscle parts using the appropriate exercises. The product
is intended for home use only!
The user is liable for any damage resulting from non-
intended use of the device.
Whenever „device“ or „product“ are used in the warnings
and instructions, it shall mean weight bench.
1. In case of doubt whether the product operates
correctly, or in case damage is discovered, please
contact the service centre of the manufacturer.
2. Only the service centre of the manufacturer can
make product repairs. Do not attempt to make any
repairs yourself!
3. Do not overload the device. Exceeding the maximum
permissible weight of user can damage the product.
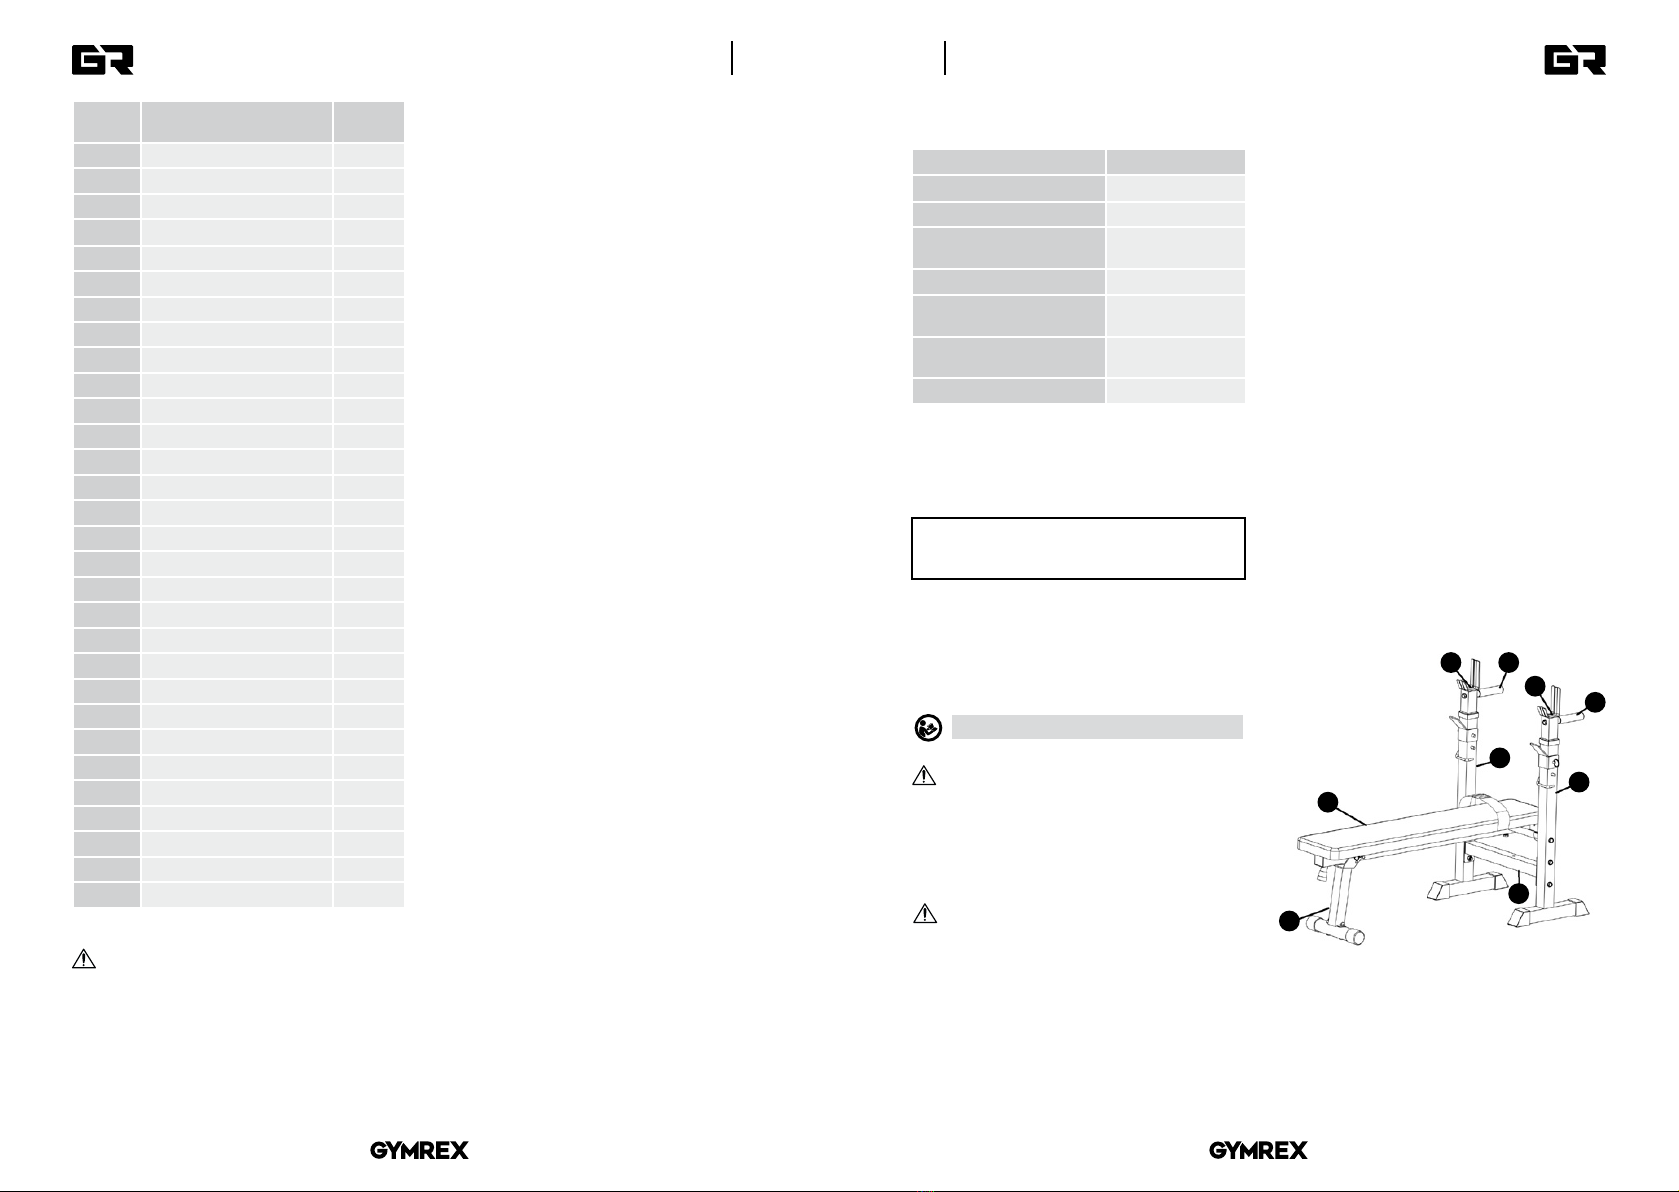
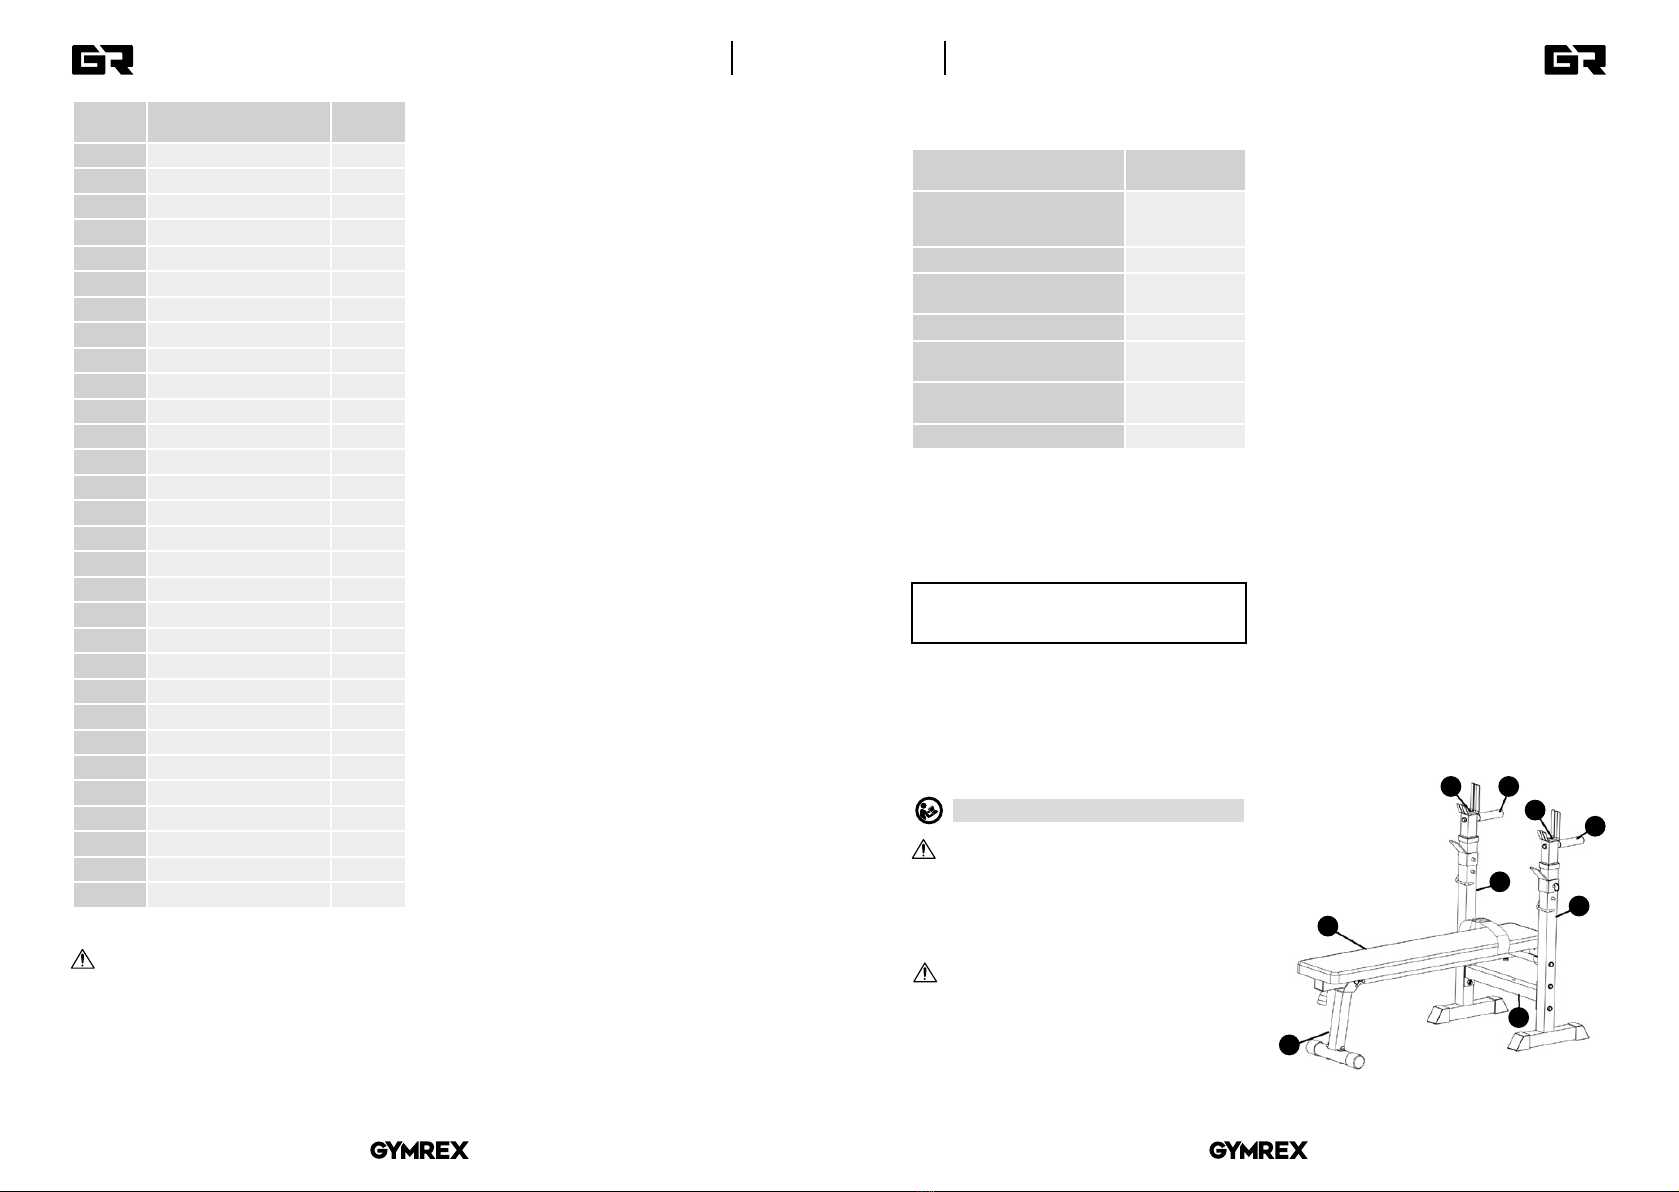
3.1. Device description
1. Leg
2. Bench
3. Barbell bracket
4. Holder
5. Rack
6. Cross beam
3 4
34
5
5
6
2
1
1. General description
The user manual is designed to assist in the safe and
trouble-free use of the device. The product is designed
and manufactured in accordance with strict technical
guidelines, using state-of-the-art technologies and
components. Additionally, it is produced in compliance
with the most stringent quality standards.
DO NOT USE THE DEVICE UNLESS YOU HAVE
THOROUGHLY READ AND UNDERSTOOD THIS
USER MANUAL.
To increase the product life of the device and to ensure
a trouble-free operation, use it in accordance with this user
manual and regularly perform the maintenance tasks. The
technical data and specications in this user manual are
up to date. The manufacturer reserves the right to make
changes associated with quality improvement.
Legend
Read the instructions before use.
PLEASE NOTE! Drawings in this manual are for
illustration purposes only and in some details may
dier from the actual machine.
The original operation manual is in German. Other language
versions are translations from German.
2. Usage safety
ATTENTION! Read all safety warnings and all
instructions. Failure to follow the warnings and
instructions may result in serious injury or even
death. 3.2. Preparation for use
List of elements:
ATTENTION! This product‘s view can be found on
the last pages of the operating instructions (pp.
17).
4 5
15.05.2018
EN USER MANUAL

PL INSTRUKCJA OBSŁUGI
Opis parametru Wartość parametru
Nazwa produktu Ławka pod sztangę
Model produktu GR-WB5
Maksymalna waga
użytkownika [kg]
110
Wymiary ławki [mm] 1100x245
Regulacja wysokości uchwytu
do sztangi [mm]
840-1160
Maksymalna waga uchwytu
sztangi [kg]
100
Waga [kg] 15,5
DANE TECHNICZNE
3. Nie należy przeciążać urządzenia. Przekroczenie
maksymalnej dopuszczalnej wagi użytkownika może
spowodować uszkodzenie produktu.
4. Utrzymywać urządzenie w dobrym stanie
technicznym. Sprawdzać przed każdą pracą czy
nie posiada uszkodzeń ogólnych lub związanych
z elementami ruchomymi (pęknięcia części
i elementów lub wszelkie inne warunki, które mogą
mieć wpływ na bezpieczne działanie urządzenia).
W przypadku uszkodzenia, oddać urządzenie do
naprawy przed użyciem.
5. Urządzenie trzymać z dala od dzieci i zwierząt.
6. Przed rozpoczęciem ćwiczeń należy skonsultować się
z lekarzem w celu ustalenia, czy nie ma przeciwskazań
zdrowotnych.
7. Zawsze należy wykonać rozgrzewkę przed
rozpoczęciem korzystania z urządzenia.
8. W przypadku odczuwania podczas ćwiczeń
niepokojących symptomów np. bólu w klatce
piersiowej, zawrotów głowy, braku tchu itp. należy
bezzwłocznie przerwać trening oraz skonsultować
się z lekarzem.
9. Urządzenie ustawić na stabilnej, suchej i płaskiej
powierzchni, dbając o zachowanie minimalnego
odstępu 0,5m wolnej przestrzeni wokół.
3. Zasady użytkowania
Ławka pod sztangę jest przyrządem zaprojektowanym
do wykonywania treningów różnych partii mięśniowych
przy zastosowaniu odpowiednich ćwiczeń. Produkt jest
przeznaczony tylko do użytku domowego!
Odpowiedzialność za wszelkie szkody powstałe
w wyniku użytkowania niezgodnego z przeznaczeniem
ponosi użytkownik.
Termin „urządzenie” lub „produkt” w ostrzeżeniach
i w opisie instrukcji odnosi się do ławki pod sztangę.
1. W razie wątpliwości, czy produkt działa poprawnie
lub stwierdzenia uszkodzenia należy skontaktować
się z serwisem producenta.
2. Naprawę produktu może wykonać wyłącznie
serwis producenta. Nie wolno dokonywać napraw
samodzielnie!
3.1. Opis urządzenia
1. Noga
2. Ławka
3. Uchwyt na sztangę
4. Uchwyt
5. Podstawa
6. Łącznik
3 4
34
5
5
6
2
1
1. Ogólny opis
Instrukcja przeznaczona jest do pomocy w bezpiecznym
i niezawodnym użytkowaniu. Produkt jest zaprojektowany
i wykonany ściśle według wskazań technicznych przy
użyciu najnowszych technologii i komponentów oraz przy
zachowaniu najwyższych standardów jakości.
PRZED PRZYSTĄPIENIEM DO PRACY NALEŻY
DOKŁADNIE PRZECZYTAĆ I ZROZUMIEĆ
NINIEJSZĄ INSTRUKCJĘ.
Dla zapewnienia długiej i niezawodnej pracy urządzenia
należy dbać o jego prawidłową obsługę oraz konserwację
zgodnie ze wskazówkami zawartymi w tej instrukcji. Dane
techniczne i specykacje zawarte w tej instrukcji obsługi są
aktualne. Producent zastrzega sobie prawo dokonywania
zmian związanych z podwyższeniem jakości.
Przed użyciem należy zapoznać się z instrukcją.
Objaśnienie symboli
Instrukcją oryginalną jest niemiecka wersja instrukcji.
Pozostałe wersje językowe są tłumaczeniami z języka
niemieckiego.
2. Bezpieczeństwo użytkowania
UWAGA! Przeczytaj wszystkie ostrzeżenia
dotyczące bezpieczeństwa oraz wszystkie
instrukcje. Niezastosowanie się do ostrzeżeń
i instrukcji może spowodować ciężkie obrażenia
ciała lub śmierć.
UWAGA! Ilustracje w niniejszej instrukcji obsługi
mają charakter poglądowy i w niektórych
szczegółach mogą różnić się od rzeczywistego
wyglądu produktu.
Item no. Description Quantity
(pcs.)
1. Main frame 1
2. Crossbar 1
3. Front support 1
4. Retaining pin 2
5. Left upright frame 1
6. Right upright frame 1
7. Frame crossbeam 1
8. Adjustable weight support 2
9. Holder peg 2
10. Adjustable plate 2
11. Bench pad 1
12. Hex bolt M10x75 1
13. Hex bolt M10x70 4
14. Hex bolt M10x65 2
15. Hex bolt M10x45 1
16. Hex bolt M10x20 2
17. Hex bolt M8x65 3
18. Lock pin 4
19. Bolt M8x55 2
20. Washer M10 14
21. Washer M8 5
22. Nylon locknut M10 5
23. Locknut M8 2
24. End cap 1
25. Footer cap 4
26. Adapter 2
27. Holder 2
28. Cap 1
29. Front support cap 2
30. Leg frame 1
3. Attach the crossbar (2) to the main frame (1) with the
hex bolt (15).
II. Upright frames:
1. Attach the frame crossbeam (7) to the upright frames
(5 and 6) using hex bolts (13), washers (20) and nylon
locknuts (22).
2. Attach the crossbar (2) to the upright frames (5 and
6) using hex bolts (14) and washers (20).
III. Adjustable supports:
1. Install the adapters (26) onto upright frames (5
and 6), insert the weight supports (8) through the
adapters (26) into the upright frames, and secure
with the retaining pin (4).
2. Attach the adjustable plates (10) to the rear bases (5
and 6) and secure them with a cotter pin (18).
3. Screw the handles (9) to the bar holders (8) using the
hex bolts (16) and washers (20).
IV. Mounting the bench pad:
1. Position the bench pad (11) on the main frame (1)
and fasten using the hex bolts (17) and washers (21).
V. Folding the weight bench:
1. Raise the bench to a vertical position.
2. Lock the bench by inserting the lock pin (18) through
the main frame back plate to the main frame
crossbeam.
3. Remove the leg lock pin, fold the leg, reinstall the leg
lock pin to secure the leg against moving.
3.3. Cleaning and maintenance
• Clean the device after each use. Traces of sweat with
acid reaction damage upholstery.
• Use cleaners without corrosive substances to clean
each surface.
• Use a soft cloth for cleaning.
• Store the unit in a dry, cool place, free from moisture
and direct exposure to sunlight.
Assembly:
ATTENTION! This product’s exploded view can
be found on the last page of the operating
instructions (pp. 18).
I. Main frame and front support:
1. Attach the leg frame (30) to the front support (3)
using the bolts (19), washers (21) and nylon locknuts
(23).
2. Attach the leg (30) to the main frame (1) using the
hex bolt (12), washers (20), nylon locknut (22) and
lock pin (18).
6 7
15.05.2018

Popis parametru Hodnota parametru
Název výrobku Lavice pod činku
Model GR-WB5
Maximální váha uživatele [kg] 110
Velikost lavice [mm] 1100x245
Regulace výšky držáku
na činku [mm]
840-1160
Maximální hmotnost držáku
na činku [kg]
100
Hmotnost [kg] 15,5
TECHNICKÉ ÚDAJE
4. Zařízení udržujte v dobrém technickém stavu.
Kontrolujte před každou prací jeho celkový stav
i jednotlivé díly a ujistěte se, že je vše v dobrém stavu,
a nehrozí tak uživateli při práci se zařízením žádné
nebezpečí. V případě zjištění poškození nechte
zařízení opravit.
5. Zařízení mějte v dostatečné vzdálenosti od dětí
a zvířat.
6. Před zahájením cvičení se zeptejte lékaře, zda nejsou
kontraindikace.
7. Před zahájením cvičení vždy proveďte rozcvičku.
8. Pokud se při cvičení objeví zneklidňující příznaky,
např. bolest na hrudníku, závratě, dušnost atp., ihned
přerušte cvičení a poraďte se s lékařem.
9. Zařízení postavte na pevný, suchý a rovný povrch,
zajistěte minimálně 0,5 m volného prostoru kolem
zařízení.
3. Zásady používání
Lavice pod činku je přístroj navržený pro trénování různých
svalových partií pomocí vhodných cviků. Zařízení je určeno
pouze pro domácí použití!
Odpovědnost za veškeré škody vzniklé v důsledku
použití zařízení v rozporu s pokyny nese uživatel.
Pojem „zařízení“ nebo „výrobek“ v bezpečnostních
pokynech a návodu se vztahuje na Lavice pod činku.
1. Budete-li mít pochybnosti, zda výrobek funguje
správně, nebo zjistíte poškození, kontaktujte servis
výrobce.
2. Výrobek může opravovat pouze servis výrobce.
Opravy neprovádějte sami!
3. Zařízení nepřetěžujte. Překročení maximální
přípustné hmotnosti uživatele může poškodit
výrobek.
3.1. Popis zařízení
1. Noha
2. Lavice
3. Držák na činku
4. Držák
5. Podstavec
6. Spojník
3 4
34
5
5
6
2
1
1. Všeobecný popis
Návod slouží jako nápověda pro bezpečné a spolehlivé
používání. Výrobek je navržen a vyroben přesně podle
technických údajů s použitím nejnovějších technologií
a komponentů a se zachováním nejvyšších jakostních
standardů.
PŘED ZAHÁJENÍM PRÁCE SI DŮKLADNĚ PŘEČTĚTE
TENTO NÁVOD A SNAŽTE SE JEJ POCHOPIT.
Pro zajištění dlouhého a spolehlivého fungování zařízení
provádějte pravidelný servis a údržbu v souladu s pokyny
uvedenými v tomto návodu. Technické údaje a specikace
uvedené v návodu k obsluze jsou aktuální. Výrobce si
vyhrazuje právo provádět změny pro zvýšení kvality.
Před použitím se seznamte s návodem.
Vysvětlení symbolů
Originálním návodem je německá verze návodu. Ostatní
jazykové verze jsou překladem z německého jazyka.
2. Bezpečnost používání
POZNÁMKA! Přečtěte si tento návod včetně všech
bezpečnostních pokynů. Nedodržování návodu
a výstrah může způsobit těžký úraz nebo smrt.
POZOR! Obrázky v tomto návodu jsou ilustrační.
V některých detailech se od skutečného vzhledu
stroje mohou lišit.
3.2. Przygotowanie do użytkowania
Lista elementów:
Numer
części
Opis Ilość sztuk
1. Rama 1
2. Poprzeczka 1
3. Przednia podstawa 1
4. Zawleczka 2
5. Lewa tylna podstawa 1
6. Prawa tylna podstawa 1
7. Łącznik podstawy 1
8. Regulowane uchwyty sztangi 2
9. Uchwyt 2
10. Regulowana płyta 2
11. Poduszka 1
12. Śruba sześciokątna M10x75 1
13. Śruba sześciokątna M10x70 4
14. Śruba sześciokątna M10x65 2
15. Śruba sześciokątna M10x45 1
16. Śruba sześciokątna M10x20 2
17. Śruba sześciokątna M8x65 3
18. Zawleczka 4
19. Śruba M8x55 2
20. Podkładka M10 14
21. Podkładka M8 5
22. Nylonowa nakrętka M10 5
23. Nakrętka M8 2
24. Zaślepka 1
25. Stopka 4
26. Łącznik 2
27. Uchwyt 2
28. Zaślepka 1
29. Stopka 2
30. Noga 1
Składanie sprzętu:
UWAGA: Rysunki złożeniowe produktu znajdują
się na końcu instrukcji na stronie 18.
I. Montaż ramy z podstawą:
1. Skręcić nogę (30) z przednią podstawą (3) za pomocą
śrub (19), podkładek (21) i nylonowych nakrętek (23).
2. Przykręcić nogę (30) do ramy (1) za pomocą
śruby sześciokątnej (12), podkładek (20), nakrętki
nylonowej (22) i zawleczki (18).
3. Przykręcić poprzeczkę (2) do ramy (1) śrubą
sześciokątną (15).
II. Montaż tylnych podstaw:
1. Skręcić łącznik podstawy (7) z tylnymi podstawami (5
i 6) za pomocą śrub sześciokątnych (13), podkładek
(20) i nakrętek nylonowych (22).
2. Skręcić poprzeczkę (2) do tylnych podstaw (5 i 6) za
pomocą śrub sześciokątnych (14) i podkładek (20).
III. Montaż regulowanych ramion:
1. Umieścić łączniki (26) na tylnych podstawach (5 i 6),
na łączniki (26) nałożyć regulowane uchwyty sztangi
(8), założyć zawleczkę (4).
2. Założyć regulowane płytki (10) na tylne podstawy (5
i 6) i zabezpieczyć je zawleczką (18).
3. Przykręcić uchwyty (9) do uchwytów sztangi (8) za
pomocą śrub sześciokątnych (16) i podkładek (20).
IV. Montaż poduszki:
1. Umieścić poduszkę (11) na ramie (1) i przykręcić ją za
pomocą śrub sześciokątnych (17) i podkładek (21).
V. Składanie urządzenia:
1. Podnieść oparcie ławeczki do pozycji pionowej.
2. Zablokować oparcie umieszczając zawleczkę (18)
w otworze blaszki oparcia i łączniku podstawy.
3. Wyciągnąć zawleczkę z nogi (1), złożyć nogę,
umieścić zawleczkę zabezpieczając nogę przed
poruszaniem się.
3.3. Czyszczenie i konserwacja
• Czyścić urządzenie po każdym użyciu. Ślady potu
o kwasowym odczynie powodują uszkodzenie
tapicerki.
• Do czyszczenia powierzchni należy stosować
wyłącznie środki niezawierające substancji żrących.
• Do czyszczenia należy używać miękkiej ściereczki.
• Urządzenie należy przechowywać w suchym
i chłodnym miejscu chronionym przed wilgocią
i bezpośrednim promieniowaniem słonecznym.
UWAGA: Rysunek produktu znajduje się na końcu
instrukcji na stronie: 17.
3.2. Příprava k použití
Přehled součástek:
POZNÁMKA! Nákres tohoto produktu naleznete
na konci návodu na str. 17.
8 9
15.05.2018
CZ NÁVOD K OBSLUZE

La version originale de ce manuel a été rédigée en
allemand. Toutes les autres versions sont des traductions
de l‘allemand.
Číslo
součástky
Popis Počet
kusů
1. Rám 1
2. Příčka 1
3. Přední podstavec 1
4. Závlačka 2
5. Levý zadní podstavec 1
6. Pravý zadní podstavec 1
7. Spojník podstavce 1
8. Nastavitelné držáky na činku 2
9. Držák 2
10. Nastavitelná deska 2
11. Polštář 1
12. Šestihranný šroub M10x75 1
13. Šestihranný šroub M10x70 4
14. Šestihranný šroub M10x65 2
15. Šestihranný šroub M10x45 1
16. Šestihranný šroub M10x20 2
17. Šestihranný šroub M8x65 3
18. Závlačka 4
19. Šroub M8x55 2
20. Podložka M10 14
21. Podložka M8 5
22. Nylonová matice M10 5
23. Matice M8 2
24. Záslepka 1
25. Patka 4
26. Spojník 2
27. Držák 2
28. Záslepka 1
29. Patka 2
30. Noha 1
3. Šestihranným šroubem (15) přišroubujte příčku (2)
k rámu (1).
II. Montáž zadních podstavců:
1. Pomocí šestihranných šroubů (13), podložek (20)
a nylonových matic (22) spojte spojník podstavce (7)
se zadními podstavci (5 a 6).
2. Pomocí šestihranných šroubů (14) a podložek (20)
přišroubujte příčku (2) k zadním podstavcům (5 a 6).
III. Montáž nastavitelných ramen:
1. Na zadních podstavcích (5 a 6) umístěte spojníky
(26), na spojníky (26) nasaďte nastavitelné držáky na
činku (8), nasaďte závlačku (4).
2. Nasaďte nastavitelné desky (10) na zadní podstavce
(5 a 6) a zajistěte je závlačkou (18).
3. Pomocí šestihranných šroubů (16) a podložek (20)
přišroubujte držáky (9) k držákům na činku (8).
IV. Montáž polštáře:
1. Umístěte polštář (11) na rámu (1) a přišroubujte jej
šestihrannými šrouby (17) a podložkami (21).
V. Sestavení zařízení:
1. Zvedněte opěradlo lavičky do svislé polohy.
2. Zajistěte opěradlo umístěním závlačky (18) v otvoru
v plíšku opěradla a spojníku podstavce.
3. Vytáhněte závlačku z nohy (1), složte nohu
a umístěním závlačky zajistěte nohu proti pohybu.
3.3. Čištění a údržba
• Zařízení čistěte po každém použití. Stopy potu
s kyselým pH poškozují čalounění.
• K čištění povrchu používejte výhradně prostředky
neobsahující žíravé látky.
• K čištění používejte měkký hadřík.
• Zařízení skladujte na suchém a chladném místě,
chráněném proti vlhkosti a přímému slunečnímu
záření.
Sestavení zařízení:
POZNÁMKA! Nákresy rozloženého stroje se
nacházejí na konci tohoto návodu, tj. na str. 18.
I. Montáž rámu a podstavce:
1. Pomocí šroubů (19), podložek (21) a nylonových
matic (23) sešroubujte nohu (30) s předním
podstavcem (3).
2. Pomocí šestihranného šroubu (12), podložek (20),
nylonové matice (22) a závlačky (18) přišroubujte
nohu (30) k rámu (1).
Description des paramètres Valeur des
paramètres
Nom du produit Banc de
musculation avec
support de barre
Modèle GR-WB5
Poids maximal de l’utilisateur [kg] 110
Dimensions du banc [mm] 1100x245
Réglage de hauteur du support
pour barre d’haltère [mm]
840-1160
Poids maximal pour le support de
barre d’haltère [kg]
100
Poids [kg] 15,5
DÉTAILS TECHNIQUES
3. En cas de doute quant au bon fonctionnement de
l’appareil ou si vous constatez des dommages sur
celui-ci, veuillez communiquer avec le service client
du fabricant.
2. Seul le fabricant doit réparer le produit. Ne tentez
pas de le réparer le produit par vous-même!
3. Ne surchargez pas l’appareil. Le dépassement de
la charge maximale admissible pour le poids de
l’utilisateur peut endommager le produit.
4. Maintenez l’appareil en parfait état de marche. Avant
chaque utilisation, vériez l’absence de dommages
en général et au niveau des pièces mobiles (assurez-
vous qu’aucune pièce ni composant n’est cassé et
vériez que rien ne compromet le fonctionnement
sécuritaire de l’appareil). En cas de dommages,
l’appareil doit impérativement être réparé avant
d’être utilisé.
5. Tenez l’appareil hors de portée des enfants et des
animaux.
6. Avant de commencer à vous entraîner, consultez un
médecin an vous assurer que cela ne pose aucun
risque pour votre santé.
7. Avant d’utiliser l’équipement, faites toujours des
échauements.
8. Si vous éprouvez des symptômes inquiétants durant
l’entraînement, p. ex. des douleurs à la poitrine, des
étourdissements ou de l’insusance respiratoire,
interrompez la séance sans plus attendre et consultez
immédiatement un médecin.
9. Placez le banc multifonction pour abdominaux sur
une surface stable, sèche et plane en veillant à ce
qu’au moins 0,5 m d’espace soit libre de chaque
côté.
3. Conditions d’utilisation
Un banc de musculation avec support de barre est un
appareil conçu pour permettre à l’utilisateur de compléter
diérentes unités d’entraînement composées d’exercices
appropriés. Le produit est destiné uniquement à l’utilisation
privée!
Seul l’utilisateur est responsable en cas de dommages
attribuables à un usage inapproprié.
3.1. Description de l’appareil
1. Patte
2. Banc
3. Support pour barre d’haltère
3 4
34
5
5
6
2
1
1. Description générale
L‘objectif du présent manuel est de favoriser une utilisation
sécuritaire et able de l‘appareil. Le produit a été conçu
et fabriqué en respectant étroitement les directives
techniques applicables et en utilisant les technologies et
composants les plus modernes. Il est conforme aux normes
de qualité les plus élevées.
LIRE ATTENTIVEMENT LE PRÉSENT MANUEL ET
S‘ASSURER DE BIEN LE COMPRENDRE AVANT LA
PREMIÈRE UTILISATION.
An de garantir le fonctionnement able et durable de
l‘appareil, il est nécessaire d‘utiliser et d‘entretenir ce
dernier conformément aux consignes gurant dans le
présent manuel. Les caractéristiques et les spécications
contenues dans ce document sont à jour. Le fabricant se
réserve le droit de procéder à des modications à des ns
d’amélioration du produit.
Symboles
Respectez les consignes du manuel.
REMARQUE! Les illustrations contenues dans le
présent manuel sont fournies à titre explicatif.
Votre machine peut ne pas être identique.
2. Consignes de sécurité
ATTENTION! Veuillez lire attentivement toutes les
consignes de sécurité et toutes les instructions. Le
non-respect des instructions et des consignes de
sécurité peut entraîner des blessures graves ou la
mort.
Les notions d’« appareil » et de produit présentes dans les
descriptions et les consignes du manuel se rapportent au
banc de musculation avec support de barre.
10 11
15.05.2018
FR MANUEL D‘UTILISATION

3.2. Préparation à l’utilisation
Nomenclature:
No de
pièce
Description Nombre
des pièces
1. Cadre 1
2. Barre transversale 1
3. Base avant 1
4. Goupille 2
5. Base arrière gauche 1
6. Base arrière droite 1
7. Pièce de raccordement de la
base
1
8. Supports réglables pour barre
d’haltère
2
9. Poignée 2
10. Plaque réglable 2
11. Garniture 1
12. Vis à tête hexagonale M10 x75 1
13. Vis à tête hexagonale M10x70 4
14. Vis à tête hexagonale M10x65 2
15. Vis à tête hexagonale M10x45 1
16. Vis à tête hexagonale M10x20 2
17. Vis à tête hexagonale M8x65 3
18. Goupille 4
19. Vis M8 x 55 2
20. Rondelle M10 14
21. Rondelle M8 5
22. Écrou en nylon M10 5
23. Écrou M8 2
24. Obturateur 1
25. Patte 4
26. Pièce de raccordement 2
27. Poignée 2
28. Obturateur 1
29. Embout de patte 2
30. Patte 1
3.3. Nettoyage et entretien
• Nettoyez l’appareil après chaque utilisation. La
transpiration peut causer une réaction acide et
endommager la garniture.
• Pour nettoyer les diérentes surfaces, n’utilisez que
des produits sans agents corrosifs.
• Utilisez un chion doux lors du nettoyage.
• Conservez l’appareil dans un endroit frais et sec,
à l’abri de l’humidité et des rayons du soleil.
Assemblage de l’appareil:
ATTENTION! Les vues éclatées de ce produit se
trouve à la dernière page du manuel d‘utilisation
p. 18.
I. Assemblage du cadre et de la base:
1. Assemblez la patte (30) et la base avant (3) à l’aide de
vis (19), de rondelles (21) et d’écrous (23).
2. Fixez la patte (30) au cadre (1) à l’aide d’une vis à tête
hexagonale (12), de rondelles (20), d’un écrou en
nylon (22) et de la goupille (18).
3. Fixez la barre transversale (2) au cadre (1) à l’aide
d’une vis à tête hexagonale (15).
II. Montage de la base arrière:
1. Assemblez la pièce de raccordement pour la base
(7) et la base arrière (5 et 6) à l’aide de vis à tête
hexagonale (13), de rondelles (20) et d’écrous en
nylon (22).
2. Assemblez la barre transversale (2) et la base arrière
(5 et 6) à l’aide de vis à tête hexagonale (14) et de
rondelles (20).
III. Montage des bras réglables:
1. Placez les pièces de raccordement (26) sur la base
arrière (5 et 6), posez les supports réglables pour
barre d’haltère sur les pièces de raccordement (26),
puis insérez la goupille (4).
2. Posez les plaques réglables (10) sur la base arrière (5
et 6), puis xez-les à l’aide d’une goupille (8).
3. Vissez les poignées (9) sur les supports pour barre
d’haltère (8) à l’aide de vis à tête hexagonale (16) et
de rondelles (20).
IV. Montage de la garniture:
1. Placez la garniture (11) sur le cadre (1) et xez-la
à l’aide de vis à tête hexagonale (17) et de rondelles
(21).
V. Repliage de l’appareil:
1. Placez le dossier du banc en position verticale.
2. Verrouillez le dossier en insérant la goupille (18) dans
l’orice de la plaque située sous le dossier et dans
celui de la pièce de raccordement de la base.
3. Retirez la goupille de la patte (1), repliez la patte,
insérez la goupille et immobilisez la patte.
ATTENTION! Le plan de ce produit se trouve à la
dernière page du manuel d‘utilisation, p.17.
4. Poignée
5. Base
6. Pièce de raccordement
Parametro | Descrizione Parametro | Valore
Nome del prodotto Panca per
sollevamento pesi
Modello GR-WB5
Peso massimo dell'utente [kg] 110
Dimensioni panca [mm] 1100x245
Regolazione altezza maniglia
del bilanciere [mm]
840-1160
Capacità di carico massima
supporto bilanciere [kg]
100
Peso [kg] 15,5
DETTAGLI TECNICI
3. Non sovraccaricare il dispositivo. Il superamento del
peso massimo consentito potrebbe danneggiare il
dispositivo.
4. Mantenere il dispositivo in perfette condizioni. Prima
dell´utilizzo assicurarsi che il dispositivo non presenti
componenti danneggiate e che le parti mobili
funzionino correttamente (qualsiasi guasto o difetto
potrebbe compromettere la sicurezza dell´utente).
Se il dispositivo è danneggiato è necessario ripararlo
prima dell´utilizzo.
5. Tenere il dispositivo fuori dalla portata dei bambini
e degli animali.
6. Prima di iniziare gli esercizi, consultare un medico
per accertarsi sulle proprie condizioni di salute.
7. Prima di utilizzare la panca per sollevamento pesi,
eseguire esercizi di riscaldamento.
8. Se durante l´allenamento si avvertono sintomi
allarmanti, come dolore al petto, vertigini, aanno,
ecc., interrompere immediatamente l´allenamento
e consultare un medico.
9. Posizionare il dispositivo su una supercie stabile,
asciutta e piana, assicurandosi di garantire una
distanza di almeno 0,5 m attorno alla panca.
3. Modalità d‘uso
La panca per sollevamento pesi è un´attrezzatura concepita
per eseguire diverse sessioni di allenamento svolgendo
determinati esercizi appropriati. Questo prodotto
è destinato esclusivamente all´uso domestico!
L‘utente è il solo e unico responsabile dei danni causati
da un utilizzo improprio del dispositivo.
1. Se non si è sicuri del corretto funzionamento
del dispositivo rivolgersi al Servizio Clienti del
produttore.
2. Soltanto i tecnici del Servizio Clienti del produttore
sono autorizzati a riparare il dispositivo. Non riparare
il dispositivo autonomamente!
3.1. Descrizione del dispositivo
1. Gambe
2. Panca
3. Supporto bilanciere
4. Impugnatura
5. Struttura inferiore
6. Raccordo
3 4
34
5
5
6
2
1
1. Descrizione generale
Questo manuale è stato pensato per consentire di
utilizzare il dispositivo in tutta sicurezza. Il prodotto è stato
progettato e fabbricato seguendo rigorose speciche
tecniche e ricorrendo alle più recenti tecnologie.Tutte le
fasi del processo produttivo sono state eseguite nel pieno
rispetto di elevati standard qualitativi.
PRIMA DELL´UTILIZZO LEGGERE ATTENTAMENTE
E COMPRENDERE LE ISTRUZIONI RIPORTATE IN
QUESTO MANUALE.
Anchè questo dispositivo sia un prodotto adabile
che duri nel tempo leggere accuratamente le seguenti
istruzioni d´uso e di manutenzione: le speciche e i dettagli
tecnici riportati in questo manuale sono il risultato di
costanti veriche e aggiornamenti. Il produttore si riserva il
diritto di apportare eventuali modiche al ne di migliorare
la qualità del prodotto.
Denizione simboli
Leggere attentamente le seguenti avvertenze.
IMPORTANTE! Le immagini contenute in questo
manuale sono puramente indicative e potrebbero
dierire dal prodotto.
La versione originale di questo manuale è in lingua tedesca.
Ulteriori versioni sono traduzioni dal tedesco.
2. Norme di sicurezza
ATTENZIONE! Leggere attentamente tutte le
istruzioni di sicurezza. La mancata osservanza delle
seguenti avvertenze può provocare lesioni gravi
o condurre alla morte.
Il termine „dispositivo“ o „prodotto“ riportato nelle
avvertenze e nella descrizione del manuale si riferisce alla
panca per sollevamento pesi.
12 13
15.05.2018
IT ISTRUZIONI PER L’USO

3.2. Preparazione all´uso
Elenco dei componenti:
Parte
Nr.
Descrizione Quantità
1. Telaio 1
2. Barra trasversale 1
3. Base anteriore 1
4. Copiglia 2
5. Base posteriore sinistra 1
6. Base posteriore destra 1
7. Raccordo per la base inferiore 1
8. Maniglie regolabili bilanciere 2
9. Impugnatura 2
10. Piastra regolabile 2
11. Imbottitura 1
12. Vite con testa esagonale M10X75 1
13. Vite con testa esagonale M10X70 4
14. Vite con testa esagonale M10X65 2
15. Vite con testa esagonale M10X45 1
16. Vite con testa esagonale M10X20 2
17. Vite con testa esagonale M8x65 3
18. Copiglia 4
19. Vite M8x55 2
20. Rondella M10 14
21. Rondella M8 5
22. Dado madre in nylon M10 5
23. Dado madre M8 2
24. Raccordo 1
25. Piede 4
26. Raccordo 2
27. Impugnatura 2
28. Raccordo 1
29. Piede 2
30. Gambe 1
Montaggio del dispositivo:
ATTENZIONE! L´esploso di questo prodotto lo
trovi nell´ultima pagina (18) del manuale d´uso.
I. Assemblaggio del telaio con la base:
1. Avvitare la gamba (30) con la base anteriore (3) con
l´ausilio delle viti (19), le rondelle (21) e i dadi madre
(23).
2. Avvitare la gamba (30) al telaio (1) con l´ausilio della
vite esagonale (12), la rondella (20), il dado in nylon
(22) e la copiglia (18).
3. Avvitare la traversa (2) al telaio (1) con l´ausilio della
vite esagonale (15).
II. Assemblaggio base posteriore:
1. Avvitare il connettore per la base (7) con la base
posteriore (5 e 6) con l´ausilio delle viti esagonali
(13), le rondelle (20) e i dadi in Nylon (22).
2. Avvitare la sbarra (2) alla base posteriore (5 e 6) con
l´ausilio delle viti esagonali (14) e le rondelle (20).
III. Assemblaggio bracci regolabili:
1. Posizionare i connettori (26) sulla base posteriore (5
e 6); quindi posizionare le impugnature regolabili del
bilanciere (8) sui connettori (26), e inserire la copiglia
(4).
2. Posizionare le piastre regolabili (10) sulla base
posteriore (5 e 6). Quindi ssarle con l´ausilio della
copiglia (18).
3. Avvitare le impugnature (9) sulle maniglie del
bilanciere (8) con l´ausilio delle viti esagonali (16)
e delle rondelle (20).
IV. Montaggio imbottitura:
1. Posizionare l´imbottitura (11) sul telaio (1) e avvitarla
con l´ausilio delle viti esagonali (17) e delle rondelle
(21).
V. Come piegare il dispositivo:
1. Portare lo schienale della panca in posizione
verticale.
2. Bloccare lo schienale posizionando la copiglia
(18) nell´apertura della piastra dello schienale e il
connettore sulla base.
3. Rimuovere la copiglia dalla gamba (1). Piegare
adesso la gamba e inserire la copiglia. Quindi
bloccare la gamba.
3.3. PULIZIA E MANUTENZIONE
• Pulire il dispositivo dopo ogni utilizzo. Le tracce di
sudore acido danneggiano il rivestimento.
• Per la pulizia delle superci impiegare solo sostanze
non corrosive.
• Utilizzare un panno morbido.
• Conservare il dispositivo in un luogo fresco e asciutto
e lontano dall‘esposizione diretta ai raggi solari.
ATTENZIONE: L´esploso di questo prodotto si
trova nell´ultima pagina del manuale d´uso, p. 17. Parámetro – Descripción Parámetro – Valor
Nombre del producto Banco de pesas
Modelo GR-WB5
Peso máximo del usuario [kg] 110
Dimensiones del banco [mm] 1100x245
Ajuste de la altura del apoyo
para la barra de levantamiento
[mm]
840-1160
Peso máximo del soporte para
la barra de levantamiento [kg]
100
Peso [kg] 15,5
DATOS TÉCNICOS
3. No permita que el aparato se sobrecargue. Si se
excediera el peso máximo indicado para el usuario
podría provocar daños en el producto.
4. Mantenga el aparato en perfecto estado. Antes
de cada uso, compruébelo en busca de daños
generales o de piezas móviles (fractura de piezas
y componentes u otras condiciones que puedan
perjudicar el funcionamiento seguro de la máquina).
En caso de daños, el aparato debe ser reparado antes
de volver a utilizarse.
5. Mantenga el equipo alejado de niños y animales.
6. Antes de comenzar con los ejercicios, consulte a un
médico para asegurarse de que no tenga problemas
de salud.
7. Haga siempre ejercicios de calentamiento antes de
usar el aparato.
8. Si experimenta síntomas o molestias durante
el entrenamiento, por ejemplo, dolor torácico,
mareos, falta de aire, etc., detenga el entrenamiento
inmediatamente y busque atención médica.
9. Coloque el aparato sobre una supercie estable, seca
y nivelada, asegurándose de que haya un espacio
libre de al menos 0,5 m alrededor del banco de
entrenamiento.
3. Modalità d‘uso
Instrucciones de uso
El banco para pesas es un aparato concebido para ejercitar
distintos de grupos de músculos. ¡El producto solamente
puede utilizarse de forma privada!
El usuario es responsable de los daños derivados de un
uso inadecuado del aparato.
3.1. Descripción del artículo
1. Pie
2. Asiento
3. Soporte para la barra de levantamiento
4. Agarre
5. Base
6. Travesaño
3 4
34
5
5
6
2
1
1. Descripción general
Este manual ha sido elaborado para favorecer un empleo
seguro y able. El producto ha sido estrictamente diseñado
y fabricado conforme a las especicaciones técnicas
y para ello se han utilizando las últimas tecnologías
y componentes, manteniendo los más altos estándares de
calidad.
ANTES DE LA PUESTA EN FUNCIONAMIENTO,
LEA LAS INSTRUCCIONES MINUCIOSAMENTE Y
ASEGÚRESE DE COMPRENDERLAS.
Para garantizar un funcionamiento duradero y able del
aparato, el manejo y mantenimiento deben llevarse a cabo
de acuerdo con las instrucciones de este manual. Los
datos técnicos y las especicaciones de este manual están
actualizados. El fabricante se reserva el derecho de realizar
modicaciones para mejorar la calidad.
Explicación de los símbolos
Respetar las instrucciones de uso.
¡ADVERTENCIA! En este manual se incluyen fotos
ilustrativas, que podrían no coincidir exactamente
con la apariencia real del dispositivo.
El texto en alemán corresponde a la versión original. Los
textos en otras lenguas son traducciones del original en
alemán.
2. Seguridad
¡ATENCIÓN! Lea todas las instrucciones
e indicaciones de seguridad. La inobservancia de
las advertencias e instrucciones al respecto puede
provocar lesiones graves o incluso la muerte.
Conceptos como „aparato“ o „producto“ en las advertencias
y descripciones de este manual se reeren al banco para
pesas.
1. En caso de duda sobre si el producto funciona
correctamente o si detectara daños, póngase en
contacto con el servicio de atención al cliente del
fabricante.
2. El producto solamente puede ser reparado por el
fabricante. ¡No intente repararlo usted mismo!
14 15
15.05.2018
ES MANUAL DE INSTRUCCIONES

21
17 21
17
11
24
28
18
12
23
21
3
29
19
19
30 20
25
29
13
13
14
25
722
18
20
13
13
15
14
20
5
4
18
26
8
27
9
16
20
9
2
10
26
8
20
16
16
Vorbereitung für die Nutzung | Preparation for use | Przygotowanie do użytkowania | Příprava k používání
Préparation à l‘utilisation | Preparazione all´uso | Preparación para el uso
3.2. Preparación para el uso
Lista de elementos:
N° de
pieza
Descripción Unidades
1. Bastidor 1
2. Barra transversal 1
3. Base delantera 1
4. Tope 2
5. Estructura inferior trasera
izquierda
1
6. Estructura inferior trasera
derecha
1
7. Unión para las estructuras
inferiores traseras
1
8. Soporte ajustable para la barra
de levantamiento
2
9. Agarre 2
10. Placa ajustable 2
11. Asiento acolchado 1
12. Tornillo hexagonal M10X75 1
13. Tornillo hexagonal M10X70 4
14. Tornillo hexagonal M10X65 2
15. Tornillo hexagonal M10X45 1
16. Tornillo hexagonal M10X20 2
17. Tornillo hexagonal M8x65 3
18. Tope 4
19. Tornillo M8x55 2
20. Arandela M10 14
21. Arandela Ø8 5
22. Tuerca de nailon M10 5
23. Tuerca M8 2
24. Placa 1
25. Pie 4
26. Pieza de unión 2
27. Agarre 2
28. Placa 1
29. Pie 2
30. Pie delantero 1
Montaje del equipo:
¡ATENCIÓN! El despiece de este producto se
encuentra en la última página de las instrucciones
p. 18.
I. Montaje de la estructura con la base:
1. Atornillar el pie (30) a la base delantera (3) con ayuda
de los tornillos (19), las arandelas (21) y las tuercas
(23).
2. Atornillar el pie (30) al bastidor (1) con ayuda del
tornillo hexagonal (12), las arandelas (20), la tuerca
de nailon (22) y el tope (18).
3. Atornillar la barra transversal (2) al bastidor (1) con
ayuda del tornillo hexagonal (15).
II. Montaje de la estructura trasera:
1. Fijar la pieza de unión (7) a las estructuras traseras (5
y 6), con ayuda de los tornillos hexagonales (13), las
arandelas (20) y las tuercas de nailon (22).
2. Atornillar la barra transversal (2) a las estructuras
traseras (5 y 6), con ayuda de los tornillos
hexagonales (14) y las arandelas (20).
III. Montaje de los brazos regulables:
1. Colocar las piezas de unión (26) sobre las estructuras
traseras (5 y 6). Colocar los soportes ajustables (8)
sobre las piezas de unión (26) y asegurar con el tope
(4).
2. Colocar las placas ajustables (10) en las estructuras
inferiores (5 y 6) y asegurar con ayuda del tope (18).
3. Atornillar los agarres (9) a los soportes ajustables
(8) con ayuda de los tornillos hexagonales (16) y las
arandelas (20).
IV. Montaje del asiento acolchado:
1. Colocar el asiento (11) sobre el bastidor (1)
y atornillar con ayuda de los tornillos hexagonales
(17) y las arandelas (21).
V. Plegar el banco:
1. Colocar el asiento en posición vertical.
2. Bloquee el respaldo introduciendo el tope (18)
a través de la abertura de la placa del asiento, así
como a través del travesaño de la estructura inferior.
3. Retire el bloqueo del pie (1), pliegue el pie y vuelva
a colocar el bloqueo para evitar que la pieza se
mueva.
3.3. Limpieza y mantenimiento
• Limpie el equipo en profundidad después de cada
uso. Las marcas de sudor con reacción ácida causan
daños en la tapicería.
• Para limpiar la supercie, utilice solo productos que
no contengan sustancias corrosivas.
• Para la limpieza utilice por favor un paño suave.
• Guarde el aparato en un lugar seco, fresco
y protegido de la humedad y la radiación solar
directa.
¡ATENCIÓN! La ilustración de este producto se
encuentra en la última página de las instrucciones
p. 17.
16 17
15.05.2018

III
III V
IV
115 2
2220 20
12
18
23
21
3
29
19
19
29
30
28
24
62
14
13
13
25
25
22
7
5
22
20
14
13
13
20
16 20
927
8
26
18
4
5
6
10
21
7121
17
11
18
Zusammensetzen des Geräts | Folding the equipment | Składanie sprzętu | Skládání zařízení
Assemblage de l‘appareil | Montaggio del dispositivo | Montaje del equipo
NOTES/NOTIZEN
18 19
15.05.2018

CONTACT
expondo Polska sp. z o.o. sp. k.
ul. Dekoracyjna 3
65-155 Zielona Góra | Poland, EU
e-mail: [email protected]
UNSER HAUPTZIEL IST DIE ZUFRIEDENHEIT UNSERER KUNDEN!
BEI FRAGEN KONTAKTIEREN SIE UNS BITTE UNTER:
OUR CUSTOMERS‘ SATISFACTION IS OUR MAIN GOAL!
PLEASE CONTACT US WITH QUESTIONS AT:
NASZYM GŁÓWNYM CELEM JEST SATYSFAKCJA KLIENTÓW
W PRZYPADKU PYTAŃ PROSIMY O KONTAKT Z PRZEDSTAWICIELEM
W DANYM KRAJU:
NOTRE BUT PREMIER EST VOTRE SATISFACTION!
POUR TOUTE QUESTION, CONTACTEZ NOUS SUR:
NUESTRO OBJETIVO PRINCIPAL ES LA SATISFACCIÓN DE NUESTROS CLIENTES!
SI TIENE PREGUNTAS, POR FAVOR PÓNGANSE EN CONTACTO CON NOSTROS EN:
I NOSTRO PRINCIPALE OBIETTIVO È LA SODDISFAZIONE DEI NOSTRI CLIENTI!
PER EVENTUALI DOMANDE PER FAVORE, CI CONTATTINO SOTTO:
NAŠÍM HLAVNÍM CÍLEM JE SPOKOJENOST NAŠICH ZÁKAZNÍKŮ! V PŘÍPADĚ OTÁZEK
NÁS PROSÍM KONTAKTUJTE NA:
Table of contents
Other Gymrex Fitness Equipment manuals

Gymrex
Gymrex GR-MG68 User manual

Gymrex
Gymrex GR-MG 58 User manual

Gymrex
Gymrex POWER TOWER GR-PT50 User manual

Gymrex
Gymrex GR-MG39 User manual

Gymrex
Gymrex GR-PU 120 User manual

Gymrex
Gymrex HOME GYM GR-HG10 User manual

Gymrex
Gymrex GR-TB 53 User manual

Gymrex
Gymrex GR-MG65 User manual

Gymrex
Gymrex GR-BH60 User manual

Gymrex
Gymrex GR-WS30 User manual

Gymrex
Gymrex GR-MG112 User manual

Gymrex
Gymrex GR-FB 400 User manual

Gymrex
Gymrex GR-MG 63 User manual

Gymrex
Gymrex GR-MG 60 User manual

Gymrex
Gymrex GR-PL350 User manual

Gymrex
Gymrex GR-RC50 User manual

Gymrex
Gymrex GR-MG 64 User manual

Gymrex
Gymrex GR-MG 56 User manual

Gymrex
Gymrex GR-SI50 User manual

Gymrex
Gymrex GR-MG 59 User manual