manuals.online logo
Brands
  1. Home
  2. •
  3. Brands
  4. •
  5. H3C
  6. •
  7. Computer Hardware
  8. •
  9. H3C SecPath FAN-120B-2-A16 User manual

H3C SecPath FAN-120B-2-A16 User manual

The fan tray is hot swappable. Follow these guidelines when you hot-swap the fan tray:
Ensure electrical safety.
Youcanremove a fan tray only when a sufficient number of fan trays are operating
correctly on the device. Do not remove multiple fan trays simultaneously. Remove
fan trays one by one and make sure you finish replacing a fan tray within 3 minutes.
To prevent dust from entering the chassis, keep the failed fan tray in position before
the replacement.
When you hot-swap a fan tray, the remaining fan trays automatically increase the
fan rotation speed and make louder noises. Take protection measures such as
wearing an earmuff or earplug. In addition, make good preparation before hot-
swapping a fan tray to minimize the operation time.
风扇框支持热插拔,在设备运行状态下进行风扇框的更换时,需要注意的是:
请注意用电安全。
只有在保证有足够数量的风扇框正常运行的情况下,才可以插拔其中某一个风扇框。
更换风扇模块过程中禁止同时拔出多个风扇模块,应按照拔出一个立即更换一个的方
式进行,且单个风扇模块的更换时间不要超过3分钟。
建议在新风扇框到位后再启动更换操作,在此之前请将旧风扇框保留在机框中,避免
灰尘进入设备。
在设备运行状态下插拔风扇框时,智能调速风扇会自动增加转速,可能会造成噪音增
大。请做好防护措施(如佩戴降噪耳罩、耳塞等劳保设施),并事先做好准备工作,
尽可能缩短操作时间。
1
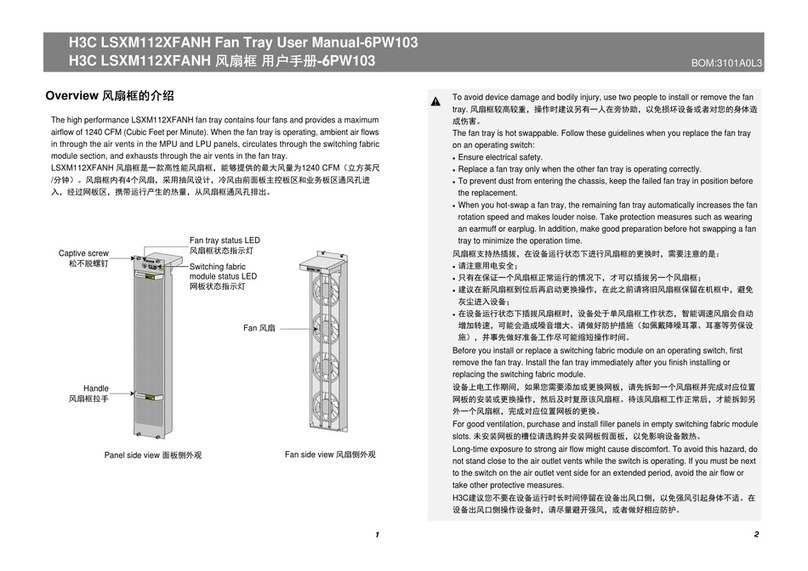
The H3C SecPath FAN-120B-2-A16 fan tray contains two fans and provides a maximum
airflow of 240 cubic feet per minute (CFM). The fan tray draws ambient air into the chassis
through the air vents in the supervisor engine module (MPU), service module, and switching
fabric module panels, pulls the air through the chassis, and exhausts the air carrying heat
through the air vents in the fan tray panel.
H3C Secpath FAN-120B-2-A16风扇框内有2个风扇,能够提供的最大风量为240 CFM(立方
英尺/分钟)。该风扇框采用抽风设计,冷风由前面板主控板区、业务板区和网板区通风孔进
入,经过设备机箱,携带运行产生的热量,从风扇框通风孔排出。
Overview !
2
H3C SecPath FAN-120B-2-A16 Fan Tray Manual-AW101
H3C SecPath FAN-120B-2-A16 -AW101
!For good ventilation, purchase and install filler panels in empty fan tray slots.
未安装风扇框的槽位请选购并安装风扇框假面板,以免影响设备散热。
Long-time exposure to strong air flow might cause discomfort. As a best practice,
do not stand close to the air outlet vents when the device is operating. If you must
be next to the device on the air outlet vent side for an extended period, avoid the
air flow or take other protective measures.
建议您不要在设备运行时长时间停留在设备出风口侧,以免强风引起身体不适。
在设备出风口侧操作设备时,请尽量避开强风,或者做好相应防护。
拉手
状态指示灯
松不脱螺钉
通风孔
4
3
Tools required
To install the fan tray in an odd-numbered slot FAN1, FAN3, or FAN5, orient the fan tray
with the LED at the bottom. To install the fan tray in an even-numbered slot FAN2, FAN4,
or FAN6, orient the fan tray with the LED at the top.
将风扇框安装到单数编号槽位和双数编号槽位时,安装方向不同。插入FAN1、FAN3和
FAN5槽位时,请将风扇框上指示灯部分朝向下侧,插入FAN2、FAN4、FAN6槽位时,
请将风扇框上指示灯部分朝向上侧。如果安装方向错误,风扇框将无法完成安装。
Installing the fan tray
1. Wear an ESD wrist strap and make sure it makes good skin contact and is reliably grounded.
佩戴防静电腕带,确保防静电腕与皮肤良好接触,并确认防静电腕带已经良好接地。
2. Unpack the fan tray.
将风扇框从包装袋中取出。
3. Correctly orient the fan tray. To install the fan tray in an odd-numbered slot, make sure the
LED is at the bottom. To install the fan tray in an even-numbered slot, make sure the LED
is at the top.
确定安装方向,安装单数编号槽位风扇框时将指示灯部分朝向下侧,安装双数编号槽位风扇
框时将指示灯部分朝向上侧,然后紧靠设备边框或已安装好的风扇框确定安装位置。
4. Hold the fan tray handle to insert the fan tray into the slot. Keep the fan tray as straight and
stable as possible when inserting it into the slot.
紧握风扇框把手,将风扇框插入机箱中,插入时尽量保持平稳。
!
The M9000-AI-E16 multiservice security gateway has six fan tray slots: FAN1 to FAN6.
Installing six fan trays (in 5+1 redundancy) meets the heat dissipation requirements of
the device.
M9000-AI-E16 多业务安全网关有六个风扇框槽位:FAN1~FAN6,设备上安装六个风扇
框可满足散热需求并实现5+1冗余备份。
Phillips screwdriver
十字螺丝刀
ESD wrist strap
防静电腕带
F
A
N
1
F
A
N
3
F
A
N
5
F
A
N
6
F
A
N
4
F
A
N
2
Orient the fan tray with the LED at the bottom
for an odd-numbered slot.
安装单数编号槽位风扇框时指示灯朝向下侧
Fan tray slots arrangement
风扇框槽位编号示意图
Orient the fan tray with
the LED at the top for
an even-numbered slot.
安装双数编号槽位风扇
框时指示灯朝向上侧
1
22
2
Removing the fan tray
To avoid bodily injury, do not touch rotating fans when you replace the fan tray.
风扇框更换时,请不要接触转动中的风扇,以免受到伤害。
!
5. Fasten the captive screws on the fan tray.
使用螺丝刀拧紧风扇框的松不脱螺钉。
5
1. Prepare an anti-static mat.
准备一个防静电垫子,用于放置拆卸下来的风扇框。
2. Wear an ESD wrist strap and make sure it makes good skin contact and is reliably grounded.
佩戴防静电腕带确保防静电腕带与皮肤良好接触,并确认防静电腕带已经良好接地。
3. Loosen the captive screws on the fan tray.
使用螺丝刀松开风扇框上方和下方的松不脱螺钉。
4. Holding the fan tray handle, pull the fan tray outwards to disengage it from the chassis.
Remove the fan tray after the fans stop rotating.
握住风扇框上的把手,将风扇框缓慢拉出机箱一些,使风扇框与设备脱离连接,待风扇停
转后,再将风扇框完全取出。
5. Place the fan tray on the anti-static mat.
将风扇框放置到防静电垫子上。
2
11
1
Copyright © 2019, New H3C Technologies Co., Ltd.
The information in this document is subject to change without notice.
Copyright © 2019 新华三技术有限公司 版权所有,保留一切权利
本文档中的信息如有更改,恕不另行通知
如需了解产品及安装方面的更多信息,请登录H3C网站 www.h3c.com

Other H3C Computer Hardware manuals

H3C LSXM112XFANH User manual

H3C

H3C LSXM112XFANH User manual

H3C SecPath M9000 NSQM1ADEDFGA0 Instruction Manual

H3C

H3C SecPath M9000 NSQM1ADEDFGA0 Instruction Manual

H3C LSPM6QP2PS User manual

H3C

H3C LSPM6QP2PS User manual

H3C LSPM1FAN User manual

H3C

H3C LSPM1FAN User manual

H3C LSXM1SFF08B1 Instruction Manual

H3C

H3C LSXM1SFF08B1 Instruction Manual

H3C LSWM124XG2QFC User manual

H3C

H3C LSWM124XG2QFC User manual

H3C LSWM116Q User manual

H3C

H3C LSWM116Q User manual

H3C LSPM6G4T6 User manual

H3C

H3C LSPM6G4T6 User manual

H3C LSXM1SFF16C1 Instruction Manual

H3C

H3C LSXM1SFF16C1 Instruction Manual

H3C LSVM1FANSC User manual

H3C

H3C LSVM1FANSC User manual

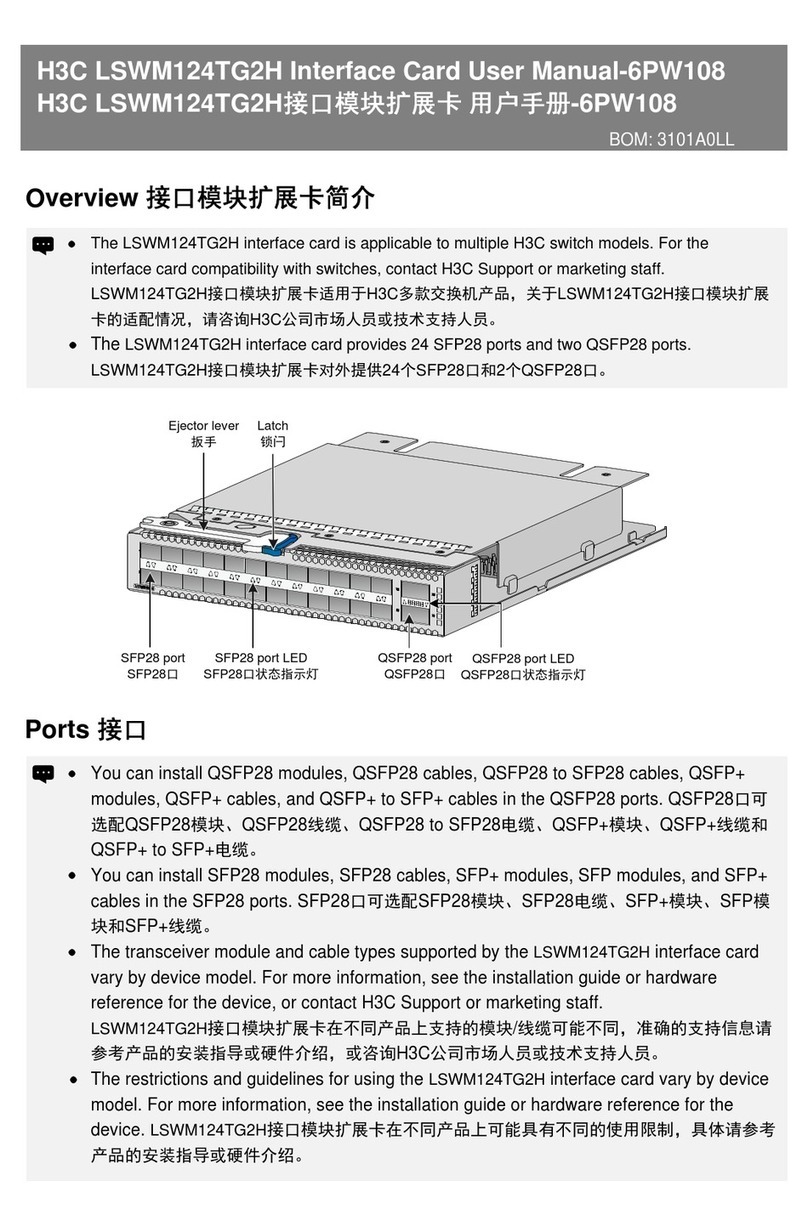
H3C LSWM124TG2H User manual

H3C

H3C LSWM124TG2H User manual

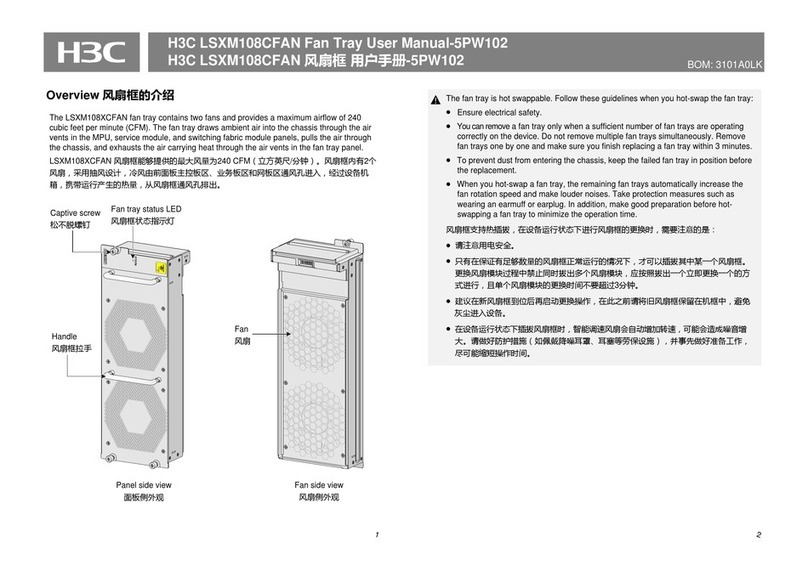
H3C LSXM108CFAN User manual

H3C

H3C LSXM108CFAN User manual

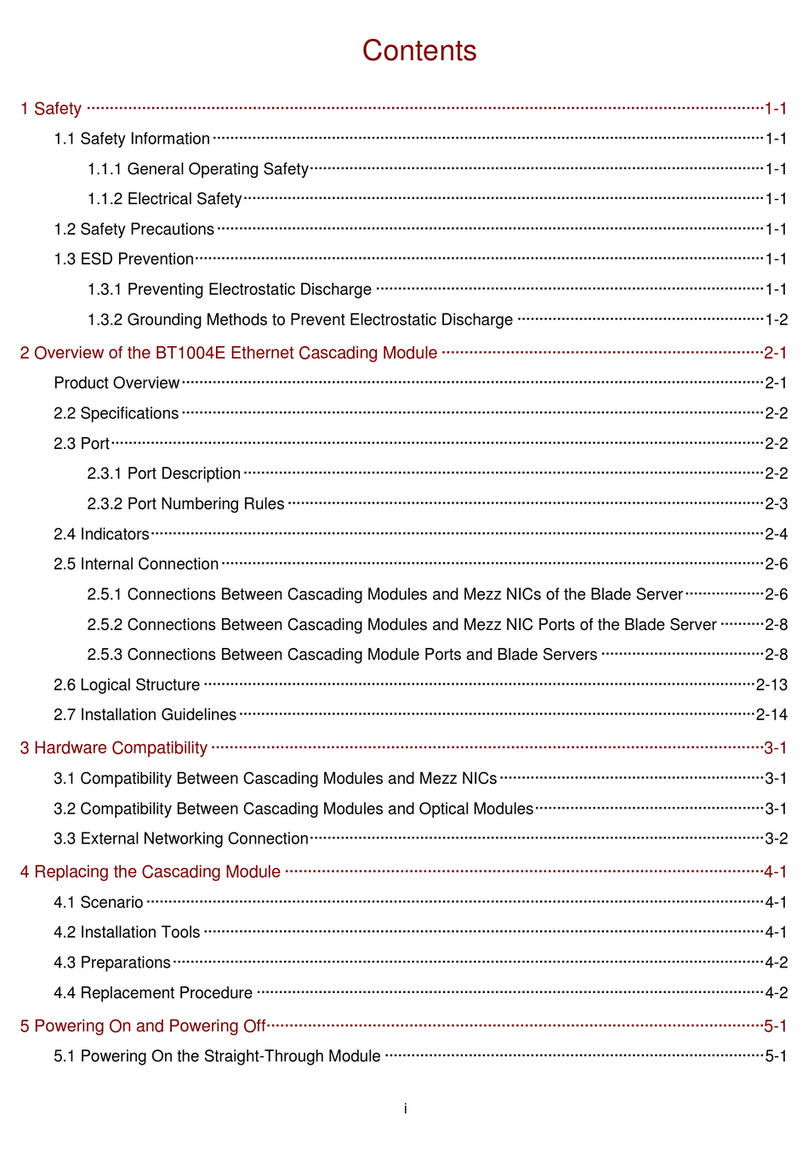
H3C BT1004E User manual

H3C

H3C BT1004E User manual

H3C LSWM116FC User manual

H3C

H3C LSWM116FC User manual

H3C SecPath F5000-A5 NSQ1MPUA0 User manual

H3C

H3C SecPath F5000-A5 NSQ1MPUA0 User manual

H3C NIC-FC730i-Mb-2-32G User manual

H3C

H3C NIC-FC730i-Mb-2-32G User manual

H3C FAN-40-5-A User manual

H3C

H3C FAN-40-5-A User manual

H3C H3C S7500E-X User manual

H3C

H3C H3C S7500E-X User manual

Popular Computer Hardware manuals by other brands

Renesas Single-Chip Microcomputer H8SX/1622 quick start guide

Renesas

Renesas Single-Chip Microcomputer H8SX/1622 quick start guide

Leviton 17A00-9 Installation instructions and user guide

Leviton

Leviton 17A00-9 Installation instructions and user guide

Advantech UNO-3300G Series user manual

Advantech

Advantech UNO-3300G Series user manual

IEI Technology TANK-XM811 user manual

IEI Technology

IEI Technology TANK-XM811 user manual

ekwb EK-Quantum Reflection2 PC-O11D EVO D5 PWM... user guide

ekwb

ekwb EK-Quantum Reflection2 PC-O11D EVO D5 PWM... user guide

Renesas RZ/A1H Series Application note

Renesas

Renesas RZ/A1H Series Application note

EK-Quantum Momentum2 ROG Strix X570-i Gaming D-RGB manual

EK-Quantum

EK-Quantum Momentum2 ROG Strix X570-i Gaming D-RGB manual

VIA Technologies VAB-820 quick start guide

VIA Technologies

VIA Technologies VAB-820 quick start guide

AkitikA STEREO 400 quick start guide

AkitikA

AkitikA STEREO 400 quick start guide

Renesas H8/3864 Series user manual

Renesas

Renesas H8/3864 Series user manual

Sri PeakSimple 202 Quick start installation guide

Sri

Sri PeakSimple 202 Quick start installation guide

THOMSON SPEEDTOUCH 110G Setup and user guide

THOMSON

THOMSON SPEEDTOUCH 110G Setup and user guide

FONESTAR XO-324 instruction manual

FONESTAR

FONESTAR XO-324 instruction manual

Cypress Semiconductor CY7C1347G specification

Cypress Semiconductor

Cypress Semiconductor CY7C1347G specification

Whadda RFM69HCW user manual

Whadda

Whadda RFM69HCW user manual

Navitar 1-62525 Dimensional drawing

Navitar

Navitar 1-62525 Dimensional drawing

Swyx SX2 SinglePRI quick start

Swyx

Swyx SX2 SinglePRI quick start

Gefen EXT-GAVA user manual

Gefen

Gefen EXT-GAVA user manual

manuals.online logo
manuals.online logoBrands
  • About & Mission
  • Contact us
  • Privacy Policy
  • Terms and Conditions

Copyright 2025 Manuals.Online. All Rights Reserved.