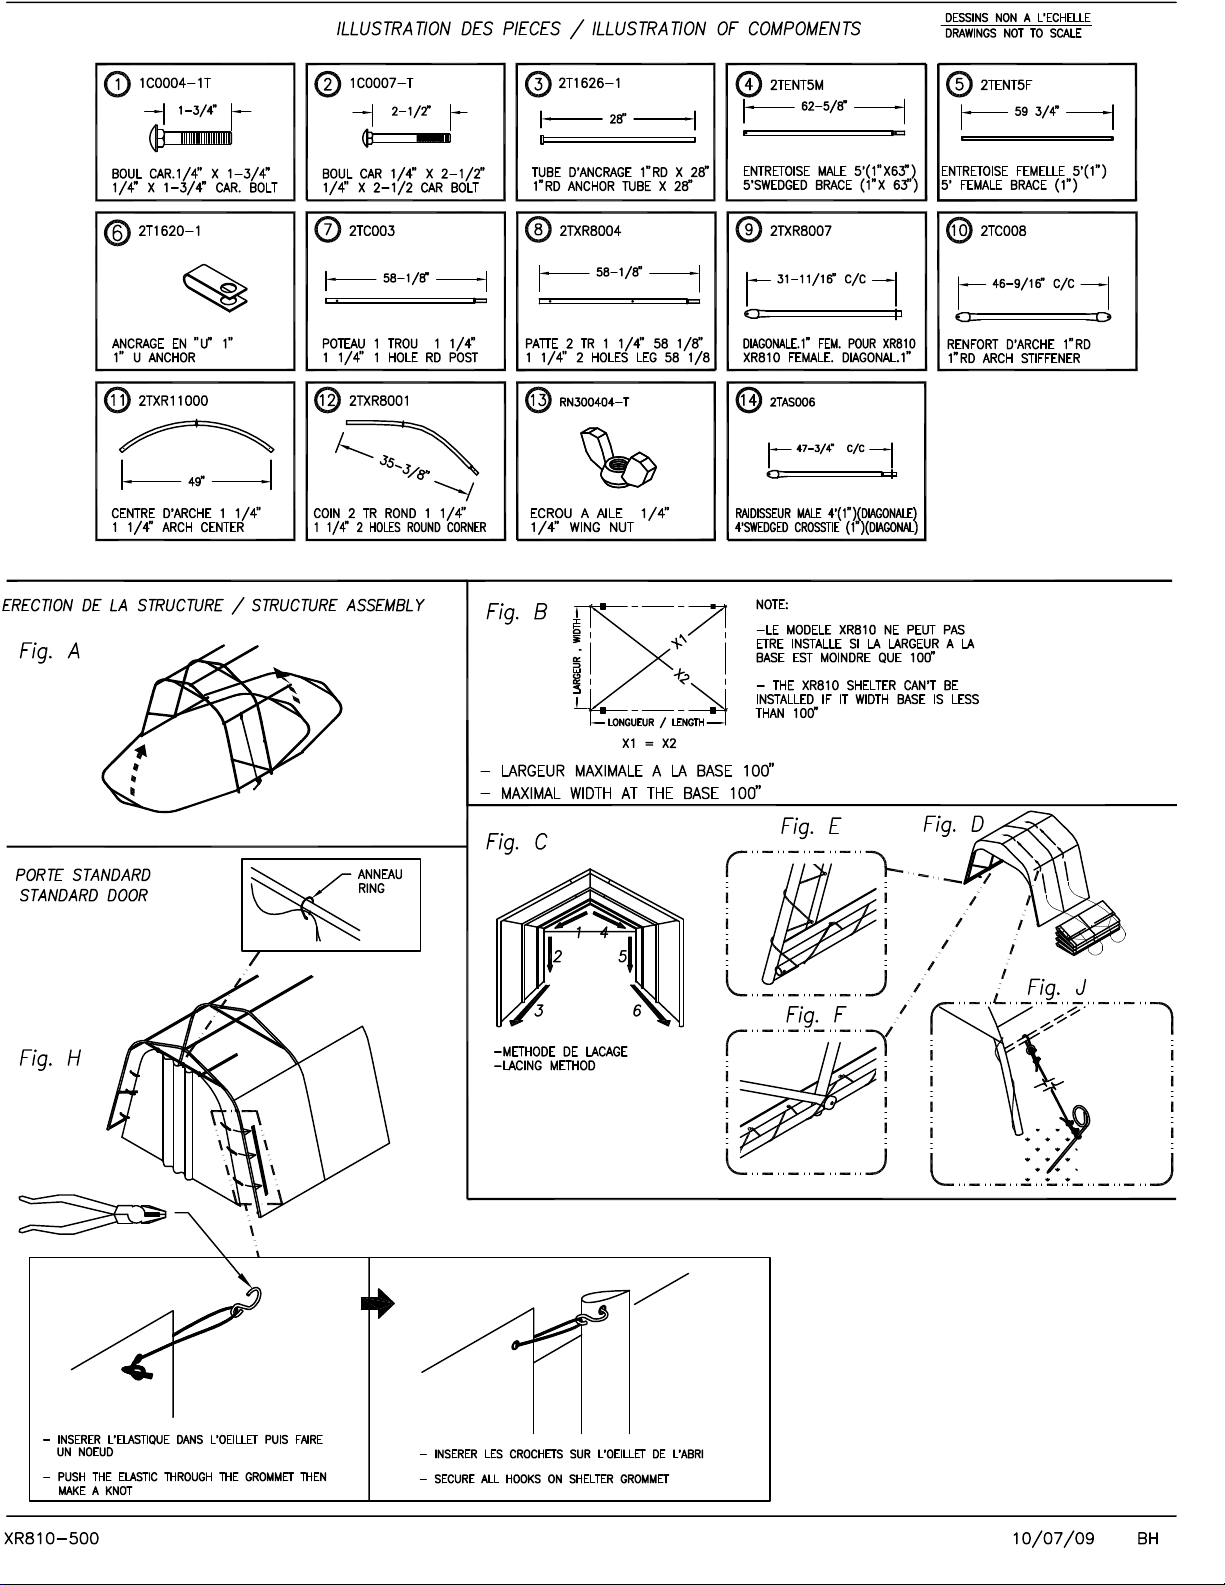
INSTRUCTIONS POUR L’ASSEMBLAGE DE L’ABRI UTILITAIRE XR-810
507, route 158, Saint-Thomas, Québec J0K 3L0 T(450)755-6608 sans frais | toll free 1-866-661-6646 F(450)755-6878
1. Assembler toutes les arches au sol avec les poteaux en respectant la position de chacune des pièces illustrées (Fig. A).
Attention : Assembler la première arche avec deux poteaux 2 trous #8, pour l’installation des diagonales # 9 et #14.
2. Relier le bas des poteaux de la première arche avec le bas des poteaux de la deuxième arche à l’aide de deux
entretoises mâles #4, du même coup fixer les diagonales #9 et #14 au bas des poteaux de la deuxième arche.
3. Soulever la première arche et boulonner les diagonales aux poteaux de la première arche.
4. Soulever la deuxième arche et sécuriser les deux arches en reliant les coins et les centres avec des entretoises mâles #4.
5. Pour assembler l’autre arche, relier le bas des poteaux de la dernière arche soulevée avec le bas des poteaux de
l’arche suivante, soulever l’arche et sécuriser celle-ci en reliant les coins et les centres avec des entretoises.
Attention : Toujours installer les entretoises femelles #5 entre la deuxième et la troisième arche. Important: Tous les
écrous à ailes doivent être bien serrés et placés vers l’intérieur de façon à ce qu’ils ne touchent pas la toile.
6. Avant l’installation de la toile, positionner la structure au bon endroit, ajuster la largeur à la base de la structure et
mettre celle-ci à l’équerre en prenant la mesure en croisé de coin à coin (Fig. B). Les deux mesures doivent être égales.
Attention : Si la structure n’est pas parfaitement à l’équerre, la toile sera difficile à installer et risque de s’endommager.
7. Glisser la toile sur la structure avec précaution à l’aide de cordes en tirant celle-ci de coté (Fig. D).
8. Attacher la toile à la structure avec la corde (Fig. C, D, E et F), en débutant le laçage aux extrémités au centre, à
l’intérieur des chapeaux. Lacer vers le sol de chaque coté de l’abri et rendu au sol, lacer la toile aux entretoises du bas.
Important : Assurez-vous que la toile est bien centrée sur la structure. Important: la toile doit être très bien tendue en tout
temps pour éviter une usure prématurée ou accélérée.
9. Lorsque la toile est installée, ancrer l’abri à l’aide des ancrages #3 +#6 (Fig. E, page 2) Des œillets sont fixés à chaque
coin de la toile pour insérer un câble guide de la structure à un piquet au sol, pour une protection accrue lors de
grands vents. (Fig J, page 3)
10. Installer les portes aux extrémités de l’abri en suivant les instructions (Fig. H).
TRÈS IMPORTANT. NE JAMAIS LAISSER UN ABRI INSTALLÉ SANS ANCRAGE
SETTING UP YOUR XR-810 UTILITY SHELTER
1. Assemble all arches on the ground making sure that you follow the positions shown (Fig. A). Caution: Set the first arch
with two #8 post 2 holes to secure the #9 and #14 diagonals.
2. Connect the base of the posts of the first arch with the base of the posts of the second arch with two #4 swedge brace
and secure the #9 and #14 diagonals at the base of the posts of the second arch.
3. Lift the first arch and bolt the diagonals to the posts of the first arch.
4. Lift the second arch and secure it to the first one by putting in place the #4 swedge braces.
5. To assemble the other arch, secure the base of the post of the last arch lifted with the base of the post of the next arch.
Lift it and secure them by putting in place the proper brace. Caution: Always place the #5 female braces between the
second and third arch. Important: All the wing nuts must be tighten and placed inside the shelter in order not to touch
the cover.
6. Before putting the cover on, set the frame where you want it, adjust the base width and set the frame square
measuring as shown (Fig. B). The two measurements must be the same. Caution: If the structure is not perfectly square,
the cover will be difficult to install and it could be damaged during the installation.
7. Carefully slide the cover on top of the frame using ropes as shown (Fig. D).
8. Tie the cover to the frame with the supplied rope (Fig. C, D, E and F). Start at the center of both ends moving towards
the sides. At the bottom, tie the cover to the base braces. Important: Make sure that the cover is centered on the
frame. Important: The tarp must always be securely tied in order to avoid premature wear and tear.
9. Once the tarp is installed, anchor the shelter using the #3 and #6 items. (Fig. E, page 2) Install the stakes with cables or
wire running through the grommets already in place at each corner of the tarp (Fig J, page 3)
10. Install the doors (Fig. H).
WARNING: NEVER INSTALL A SHELTER WITHOUT USING THE APPROPRIATE ANCHORS
4