Harvia Virta Pro HL200E User manual

20032023 / Y05-0933 B
HL200E
Instructions for Installation and Use of Electric Sauna Heater

CONTENTS
1. INSTRUCTIONS FOR USE.............................................. 3
1.1. Piling of the Sauna Stones.....................................3
1.1.1. Maintenance ............................................... 3
1.2. Heating of the Sauna ............................................ 3
1.2.1. Using the Heater.......................................... 3
1.2.2. Throwing Water on Heated Stones................. 3
1.3. Instructions for Bathing ........................................ 4
1.4. Warnings ............................................................ 4
1.4.1. Symbols descriptions.................................... 4
1.5. Troubleshooting ................................................... 4
2. SAUNA ROOM............................................................. 5
2.1. Sauna Room Structure .......................................... 5
2.1.1. Blackening of the Sauna Walls .......................5
2.2. Sauna Room Ventilation ........................................ 6
2.3. Heater Output...................................................... 6
2.4. Sauna Room Hygiene............................................ 6
3. INSTRUCTIONS FOR INSTALLATION .............................. 7
3.1. Before Installation ................................................ 7
3.2. Place and Safety Distances ...................................7
3.3. Safety Railing ...................................................... 7
3.4. Installation of the Control Unit and Sensor...............7
3.4.1. Suitable control units.................................... 7
3.5. Electrical Connections...........................................9
3.5.1. Electric Heater Insulation Resistance...............9
3.6. Installing the Heater .............................................9
3.7. Replacing the Heating Elements ............................. 9
4. SPARE PARTS ........................................................... 10
These instructions for installation and use are in-
tended for the owner or the person in charge of the
sauna, as well as for the electrician in charge of the
electrical installation of the heater. After completing
the installation, the person in charge of the installa-
tion should give these instructions to the owner of
the sauna or to the person in charge of its operation.
Please read the instructions for use carefully before
using the heater.
The heater is designed for the heating of a sauna
room to bathing temperature. It is not to be used
for any other purpose.
Congratulations on your choice!
Guarantee:
• The guarantee period for heaters and control
equipment used in saunas by families is two
(2) years.
• The guarantee period for heaters and control
equipment used in saunas by building residents
is one (1) year.
• The guarantee does not cover any faults result-
ing from failure to comply with installation, use
or maintenance instructions.
• The guarantee does not cover any faults result-
ing from the use of stones not recommended by
the heater manufacturer.

EN
3
1. INSTRUCTIONS FOR USE
Figure 1. Piling of the sauna stones
1.1. Piling of the Sauna Stones
The piling of the sauna stones has a great effect on
the functioning of the heater (figure 1).
Important information on sauna stones:
• The stones should be 10–15 cm in diameter.
• Use solely angular split-face sauna stones that
are intended for use in a heater. Peridotite,
olivine-dolerite and olivine are suitable stone
types.
• Neither light, porous ceramic “stones“ nor soft
soapstones should be used in the heater. They
do not absorb enough heat when warmed up.
This can result in damage in heating elements.
• Wash off dust from the stones before piling
them into the heater.
Please note when placing the stones:
• Do not drop stones into the heater.
• Place the stones sparsely to ensure that air can
circulate between them.
• Do not form a high pile of stones on top of the
heater.
• No such objects or devices should be placed
inside the heater stone space or near the heater
that could change the amount or direction of
the air flowing through the heater.
1.1.1. Maintenance
Due to large variation in temperature, the sauna
stones disintegrate in use. Rearrange the stones at
least once a year or even more often if the sauna
is in frequent use. At the same time, remove any
pieces of stones from the bottom of the heater and
replace any disintegrated stones with new ones. By
doing this, the heating capability of the heater stays
optimal and the risk of overheating is avoided.
1.2. Heating of the Sauna
When operating the heater for the first time, both the
heater and the stones emit smell. To remove the smell,
the sauna room needs to be efficiently ventilated.
If the heater output is suitable for the sauna room,
it will take about an hour for a properly insulated
sauna to reach the required bathing temperature (
2.3.). The sauna stones normally reach the bathing
temperature at the same time as the sauna room.
A suitable temperature for the sauna room is about
65–80 °C.
Before switching the heater on always check
that there isn’t anything on top of the heater
or inside the given safety distance. 1.4.
1.2.1. Using the Heater
Heater is controlled from a separate control unit.
See the instructions for use of the selected control
unit model.
1.2.2. Throwing Water on Heated Stones
The air in the sauna room becomes dry when warmed
up. Therefore, it is necessary to throw water on the
heated stones to reach a suitable level of humidity in
the sauna. The effect of heat and steam on people
varies – by experimenting, you can find the levels of
temperature and humidity that suit you best.
The maximum volume of the ladle is 0.2 litres. If
an excessive amount of water is poured on the
stones, only part of it will evaporate and the rest
may splash as boiling hot water on the bathers.
Never throw water on the stones when there
are people near the heater, because hot steam
may burn their skin.
The water to be thrown on the heated stones
should meet the requirements of clean
household water (table 1). Only special aromas
designed for sauna water may be used. Follow
the instructions given on the package.

EN
4
1.3. Instructions for Bathing
• Begin by washing yourself.
• Stay in the sauna for as long as you feel
comfortable.
• Forget all your troubles and relax.
• According to established sauna conventions,
you must not disturb other bathers by speaking
in a loud voice.
• Do not force other bathers from the sauna by
throwing excessive amounts of water on the
stones.
• Cool your skin down as necessary. If you
are in good health, you can have a swim if a
swimming place or pool is available.
• Wash yourself after bathing.
• Rest for a while and let your pulse go back to
normal. Have a drink of fresh water or a soft
drink to bring your fluid balance back to normal.
1.4. Warnings
• Staying in the hot sauna for long periods of
time makes the body temperature rise, which
may be dangerous.
• Keep away from the heater when it is hot. The
stones and outer surface of the heater may
burn your skin.
• Keep children away from the heater.
• Do not let young, handicapped or ill people
bathe in the sauna on their own.
• Consult your doctor about any health-related
limitations to bathing.
• Consult your child welfare clinic about taking
little babies to the sauna.
• Be very careful when moving in the sauna, as
the platform and floors may be slippery.
• Never go to a hot sauna if you have taken
alcohol, strong medicines or narcotics.
• Never sleep in a hot sauna.
• Sea air and a humid climate may corrode the
metal surfaces of the heater.
• Do not hang clothes to dry in the sauna, as this may
cause a risk of fire. Excessive moisture content may
also cause damage to the electrical equipment.
1.4.1. Symbols descriptions
Read operators manual.
Do not cover.
1.5. Troubleshooting
All service operations must be done by
professional maintenance personnel.
The heater does not heat.
• Check that the fuses to the heater are in good
condition.
• Check that the connection cable is connected.
• Check that the control panel shows a higher
figure than the temperature of the sauna.
• Check that the overheat protector has not gone
off.
The sauna room heats slowly. The water thrown
on the sauna stones cools down the stones
quickly.
• Check that the fuses to the heater are in good
condition.
• Check that all heating elements glow when the
heater is on.
• Turn the temperature to a higher setting.
• Check that the heater output is sufficient
( 2.3.).
• Check that the sauna room ventilation has been
arranged correctly ( 2.2.).
The sauna room heats quickly, but the
temperature of the stones remain insufficient.
Water thrown on the stones runs through.
• Check that the heater output is not too high
( 2.3.).
• Check that the sauna room ventilation has been
arranged correctly ( 2.2.).
Panel or other material near the heater blackens
quickly.
• Check that the requirements for safety
distances are fulfilled ( 3.1.).
• Check that no heating elements can be seen
behind the stones. If heating elements can be
seen, rearrange the stones so that the heating
elements are covered completely ( 1.1.).
• Also see section 2.1.1.
The heater emits smell.
• See section 1.2.
• The hot heater may emphasize odours mixed
in the air that are not, however, caused by the
sauna or the heater. Examples: paint, glue, oil,
seasoning.
The heater makes noise.
• Occasional bangs are most likely caused by
stones cracking due to heat.
• The thermal expansion of heater parts can
cause noises when the heater warms up.
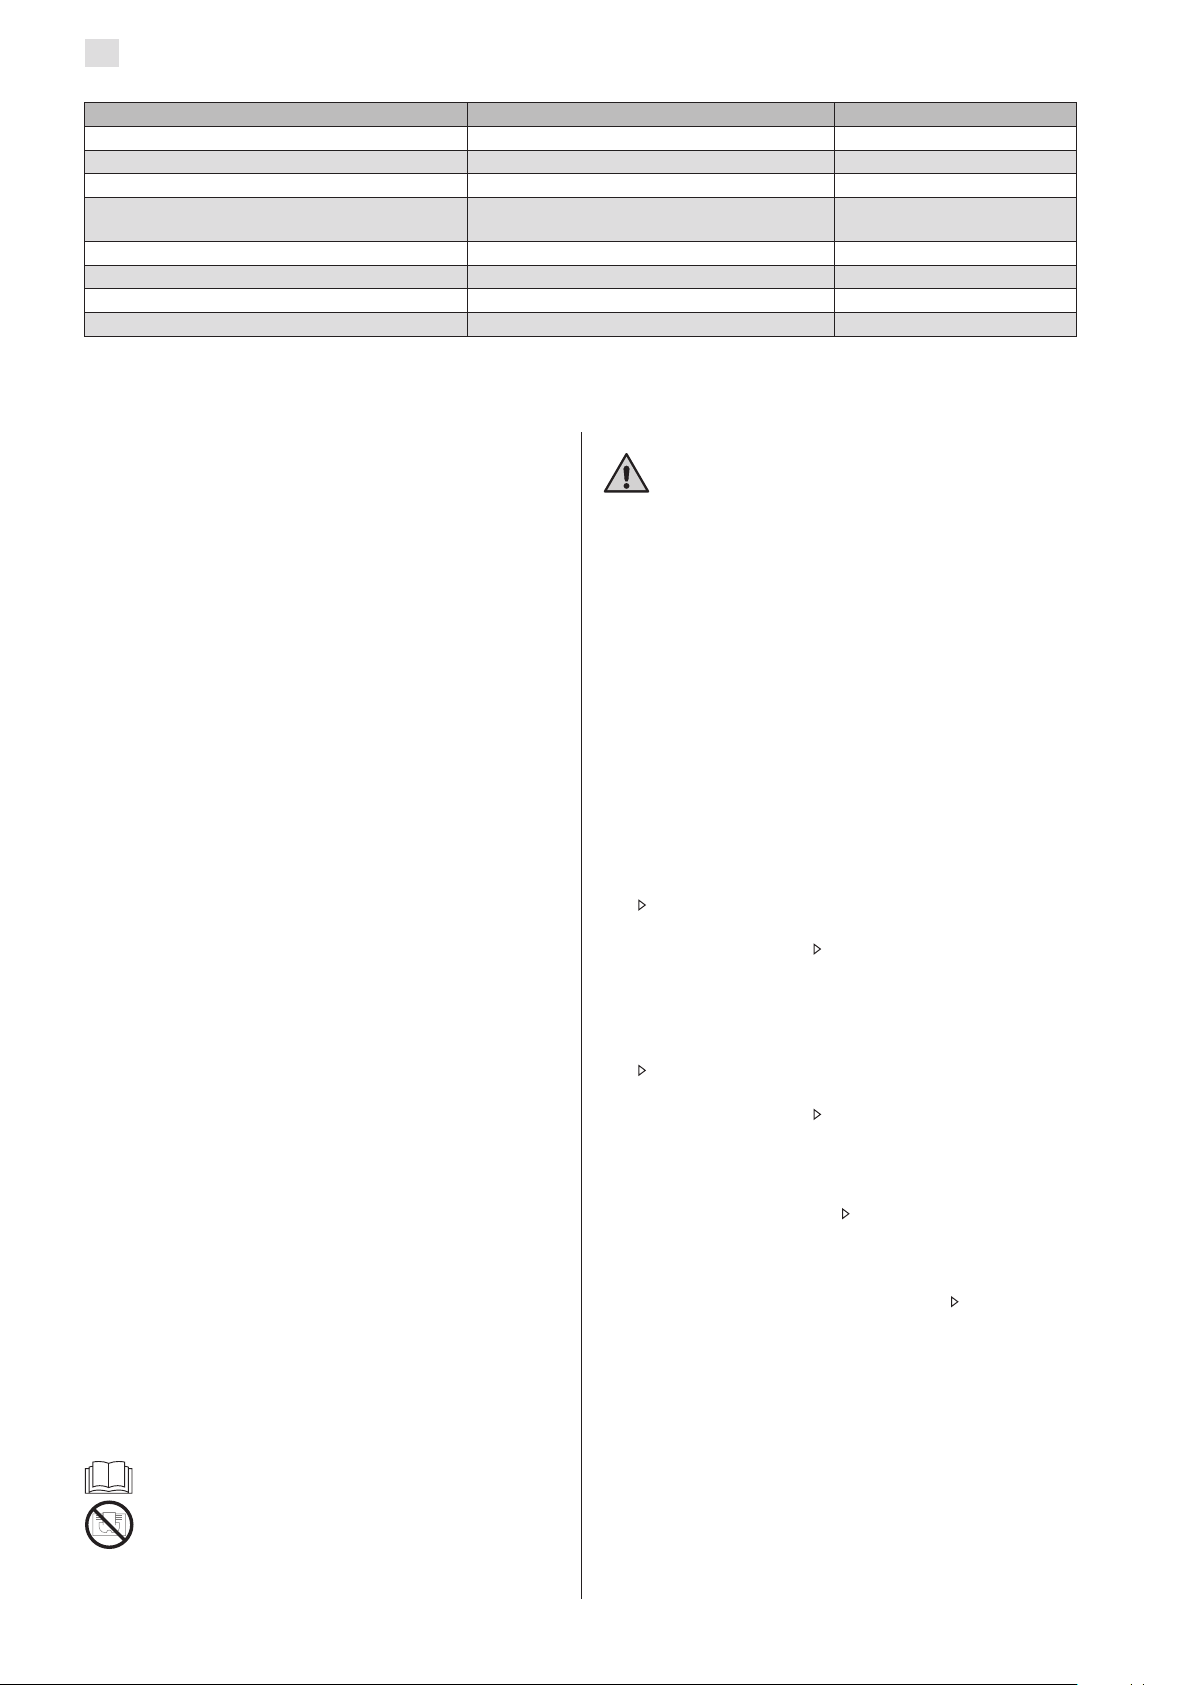
Water properties Effect Recommendation
Humus concentration Colour, taste, precipitates <12 mg/l
Iron concentration Colour, odour, taste, precipitates <0,2 mg/l
Manganese (Mn) concentration Colour, odour, taste, precipitates <0,10 mg/l
Hardness: most important substances are
magnesium (Mg) and lime, i.e. calcium (Ca)
Precipitates Mg: <100 mg/l
Ca: <100 mg/l
Chloride-containing water Corrosion Cl: <100 mg/l
Chlorinated water Health risk Forbidden to use
Seawater Rapid corrosion Forbidden to use
Arsenic and radon concentration Health risk Forbidden to use
Table 2. Water properties

EN
5
2. SAUNA ROOM
2.1. Sauna Room Structure
A. Insulation wool, thickness 50–100 mm. The
sauna room must be insulated carefully so that
the heater output can be kept moderately low.
B. Moisture protection, e.g. aluminium paper.
Place the glossy side of the paper towards the
sauna. Tape the seams with aluminium tape.
C. Vent gap of about 10 mm between
the moisture protection and panel
(recommendation).
D. Low mass 12–16 mm thick panel board. Before
starting the panelling, check the electric wiring
and the reinforcements in the walls required by
the heater and benches.
E. Vent gap of about 3 mm between the wall and
ceiling panel.
F. The height of the sauna is usually 2100–
2300 mm. The minimum height depends on
the heater (see table 2). The space between
the upper bench and ceiling should not exceed
1200 mm.
G. Use floor coverings made of ceramic materials
and dark joint grouts. Particles disintegrating
from the sauna stones and impurities in the
sauna water may stain and/or damage sensitive
floor coverings.
A
GC
E
F
D
A
B
Figure 2.
NOTE! Check from the fire authorities which parts
of the firewall can be insulated. Flues which are in
use must not be insulated.
NOTE! Light protective covers which are installed
directly to the wall or ceiling may be a fire risk.
NOTE! Make sure that the water dripping onto the
sauna floor enters the floor drain.
2.1.1. Blackening of the Sauna Walls
It is perfectly normal for the wooden surfaces of the
sauna room to blacken in time. The blackening may
be accelerated by
• sunlight
• heat from the heater
• protective agents on the walls (protective
agents have a poor heat resistance level)
• fine particles disintegrating from the sauna
stones which rise with the air flow.

EN
6
D
B
min.
500 mm
min.
500 mm
min. 1000 mm
360°
180°
Figure 3.
2.2. Sauna Room Ventilation
The air in the sauna room should change six times
per hour. Figure 3 illustrates different sauna room
ventilation options.
A. Supply air vent location. If mechanical exhaust
ventilation is used, place the supply air vent
above the heater. If gravity exhaust ventilation
is used, place the supply air vent below or
next to the heater. The diameter of the supply
air pipe must be 50–100 mm. Do not place
the supply air vent so that the air flow cools
the temperature sensor (see the temperature
sensor installation instructions in the control
unit installation instructions)!
B. Exhaust air vent. Place the exhaust air vent near
the floor, as far away from the heater as possible.
The diameter of the exhaust air pipe should be
twice the diameter of the supply air pipe.
C. Optional vent for drying (closed during heating
and bathing). The sauna can also be dried by
leaving the door open after bathing.
D. If the exhaust air vent is in the washroom, the
gap underneath the sauna door must be at
least 100 mm. Mechanical exhaust ventilation
is mandatory.
2.3. Heater Output
When the walls and ceiling are covered with panels
and insulation behind the panels is adequate, the
heater output is defined according to the volume of
the sauna. Non-insulated walls (brick, glass block,
glass, concrete, tile, etc.) increase the need for
heater output. Add 1,2 m³ to the volume of the
sauna for each non-insulated wall square meter. For
example, a 10 m³ sauna room with a glass door
equals the output requirement of about a 12 m³
sauna room. If the sauna room has log walls,
multiply the sauna's volume by 1,5. Choose the
correct heater output from Table 2.
2.4. Sauna Room Hygiene
Bench towels should be used during bathing to
prevent sweat from getting onto the benches.
The benches, walls and floor of the sauna should
be washed thoroughly at least every six months.
Use a scrubbing brush and sauna detergent.
Wipe dust and dirt from the heater with a damp
cloth. Remove lime stains from the heater using a
10% citric acid solution and rinse.

EN
7
3. INSTRUCTIONS FOR INSTALLATION
3.1. Before Installation
Before installing the heater, study the instructions
for installation. Check the following points:
• Is the output and type of the heater suitable for
the sauna room? The cubic volumes given in
table 2 should be followed.
• Is the supply voltage suitable for the heater?
• The location of the heater fulfils the minimum
requirements concerning safety distances given
in fig. 4 and table 2.
Note! Only one electrical heater may be installed in
the sauna room. The heater should be installed so
that the warning texts can also be read without dif-
ficulty after the installation.
3.2. Place and Safety Distances
The minimum safety distances are described in
figure 4. It is absolutely necessary to install the
heater according to these values. Neglecting them
causes a risk of fire.
Heater Output Dimensions Stones Sauna room
Width/Depth/Height Weight Cubic vol. Height
kW mm kg max. kg
2.3.!
min. m³ max. m³ min. mm
HL200E 20,0 780/410/810 47 140 22 32 2100
Table 2. Installation details of the heater
Figure 4. Minimum safety distances (all dimensions in millimeters)
A
A A
A A
1290
A
min. mm
A
HL200E 80
3.3. Safety Railing
If a safety railing is built around the heater, the
minimum distances given in fig. 4 or in the railing's
instructions for installation must be observed.
3.4. Installation of the Control Unit and Sensor
• The control unit includes detailed instructions
for fastening the unit on the wall.
• Install the temperature sensor as shown in
figure 6. If the heater is installed further than
150 mm from wall, the sensor must be instal-
led on the ceiling.
Do not place the supply air vent so that the air
flow cools the temperature sensor. Figure 3.
3.4.1. Suitable control units
• Harvia Xenio CX45J + LTY45J

EN
8
Opening the cover of the service hatch
Replacing the Heating Elements
Connections of the heater
1. Connection box
2. Connection cable
3. Junction box HL200E I circuit
4. Junction box HL200E II circuit
Figure 5.
1
2
4
3
max. 500 mm
Figure 6. Installing the sensor (all dimensions in millimeters)
<15 0 >150
50-150
100

EN
9
3.5. Electrical Connections
The heater may only be connected to the
electrical network in accordance with the cur-
rent regulations by an authorised, professional
electrician.
• The heater is semi-stationarily connected to
the junction box (figure 5:3) on the sauna wall.
The junction box must be splash-proof, and
its maximum height from the floor must not
exceed 500 mm.
• The connecting cable (figure 5:2) must be of
rubber cable type H07RN-F or its equivalent.
NOTE! Due to thermal embrittlement, the use
of PVC-insulated wire as the connecting cable
of the heater is forbidden.
• If the connecting and installation cables are
higher than 1000 mm from the floor in the sauna
or inside the sauna room walls, they must be able
to endure a minimum temperature of 170 °C
when loaded (for example, SSJ). Electrical
equipment installed higher than 1000 mm from
the sauna floor must be approved for use in a
temperature of 125 °C (marking T125).
3.5.1. Electric Heater Insulation Resistance
When performing the final inspection of the electrical
installations, a “leakage” may be detected when
measuring the heater’s insulation resistance. The
reason for this is that the insulating material of the
heating elements has absorbed moisture from the
air (storage, transport). After operating the heater
for a few times, the moisture will be removed from
the heating elements.
Do not connect the power feed for the heater
through the RCD (residual current device)!
3.6. Installing the Heater
See figure 5.
1. Connect cables to the heater ( 3.5.).
2. Place the heater and adjust the heater vertically
straight using the adjustable legs. The heater
is fixed to the floor at its two legs, at the legs’
fixing points.
3.7. Replacing the Heating Elements
See figure 5.
Figure 7. Electrical connections of heater HL200E
R1R1R1
L3L2L1
Y05-0644
200-208 V 3-Phase heater
I
R1R1R1
L3L2L1
Y05-0644
200-208 V 3-Phase heater
II
Model Output
(kW)
Output (kW)
Circuit I
Output (kW)
Circuit II
Fuses
Circuit I
Fuses
Circuit II
HL200E 20,0 10,0 10,0 3 x 30 3 x 30

EN
10
4. SPARE PARTS
I
II
We recommend to use only the manufacturer’s spare parts.
HL200E Y10-0006I (3500W / 208V) x 6


GLOBAL: P.O.Box 12 | Teollisuustie 1-7 | 40951 Muurame | FINLAND | +358 207 464 000 | [email protected] | www.harvia.com
CENTRAL EUROPE: Sentiotec GmbH | Division of Harvia Group | Wartenburger Straße 31, A-4840 Vöcklabruck
Table of contents
Other Harvia Electric Heater manuals

Harvia
Harvia PC90XW User manual

Harvia
Harvia PC110EE User manual

Harvia
Harvia HPOE704 User manual

Harvia
Harvia GL70 User manual

Harvia
Harvia BC60 User manual

Harvia
Harvia JM-17 Instructions for and use User manual

Harvia
Harvia Moderna User manual

Harvia
Harvia Delta D23EE User manual

Harvia
Harvia BC60SEA User manual

Harvia
Harvia Type KIP45 User manual

Harvia
Harvia BC45 User manual

Harvia
Harvia K10.5GS User manual

Harvia
Harvia TRT70EE User manual

Harvia
Harvia FG70 User manual

Harvia
Harvia PC70XE User manual

Harvia
Harvia FU60 User manual

Harvia
Harvia MDA165/200G User manual

Harvia
Harvia Spirit HSPE604M User manual

Harvia
Harvia PC70HE User manual

Harvia
Harvia TRENDI 90 User manual