manuals.online logo
Brands
  1. Home
  2. •
  3. Brands
  4. •
  5. VOLYA
  6. •
  7. Greenhouse Kit
  8. •
  9. VOLYA 2017 User manual

VOLYA 2017 User manual

Other VOLYA Greenhouse Kit manuals

VOLYA ORBITA Programming manual

VOLYA

VOLYA ORBITA Programming manual

VOLYA VENT User manual

VOLYA

VOLYA VENT User manual

VOLYA Dachnaya Tryoshka Programming manual

VOLYA

VOLYA Dachnaya Tryoshka Programming manual

VOLYA PRIMA 3 2022 User manual

VOLYA

VOLYA PRIMA 3 2022 User manual

VOLYA SIGMA EURO User manual

VOLYA

VOLYA SIGMA EURO User manual

VOLYA Alfa User manual

VOLYA

VOLYA Alfa User manual

VOLYA SIGMA 2020 User manual

VOLYA

VOLYA SIGMA 2020 User manual

VOLYA PRIMA 4 User manual

VOLYA

VOLYA PRIMA 4 User manual

VOLYA FERMER-5 User manual

VOLYA

VOLYA FERMER-5 User manual

VOLYA DACHNAYA DVUSHKA User manual

VOLYA

VOLYA DACHNAYA DVUSHKA User manual

VOLYA DACHNAYA-STRELKA 2011 User manual

VOLYA

VOLYA DACHNAYA-STRELKA 2011 User manual

VOLYA FERMER-3,5 User manual

VOLYA

VOLYA FERMER-3,5 User manual

VOLYA FERMER-5.0 User manual

VOLYA

VOLYA FERMER-5.0 User manual

VOLYA DACHNAYA DVUSHKA Programming manual

VOLYA

VOLYA DACHNAYA DVUSHKA Programming manual

VOLYA Sigma 2021 Euro Programming manual

VOLYA

VOLYA Sigma 2021 Euro Programming manual

VOLYA DACHNAYA STRELKA-3 Programming manual

VOLYA

VOLYA DACHNAYA STRELKA-3 Programming manual

VOLYA SIGMA 2021 User manual

VOLYA

VOLYA SIGMA 2021 User manual

VOLYA ORBITA Programming manual

VOLYA

VOLYA ORBITA Programming manual

VOLYA DACHNAYA STRELKA 2020 User manual

VOLYA

VOLYA DACHNAYA STRELKA 2020 User manual

VOLYA FERMER-4,2 User manual

VOLYA

VOLYA FERMER-4,2 User manual

Popular Greenhouse Kit manuals by other brands

Dancover TITAN Arch 196 manual

Dancover

Dancover TITAN Arch 196 manual

ACD PRESTIGE MR3 H manual

ACD PRESTIGE

ACD PRESTIGE MR3 H manual

Vitavia VA0040-TRP Assembly instructions

Vitavia

Vitavia VA0040-TRP Assembly instructions

VegTrug Nursery manual

VegTrug

VegTrug Nursery manual

Riverstone Networks Monticello 041315V Assembly instructions

Riverstone Networks

Riverstone Networks Monticello 041315V Assembly instructions

CLIMA POD Spirit V7 Series Assembly instructions

CLIMA POD

CLIMA POD Spirit V7 Series Assembly instructions

Vitavia GAIA JUMBO Assembly instructions

Vitavia

Vitavia GAIA JUMBO Assembly instructions

Palram Harmony 6'x4' Assembly instructions

Palram

Palram Harmony 6'x4' Assembly instructions

ClearSpan Storage Master 104598 instruction manual

ClearSpan

ClearSpan Storage Master 104598 instruction manual

Sproutwell GRANGE - 5 Assembly instructions

Sproutwell

Sproutwell GRANGE - 5 Assembly instructions

STC Easy Grow 6x12 Greenhouse Assembly instructions

STC

STC Easy Grow 6x12 Greenhouse Assembly instructions

Growhouse Lean To 6 x 8 Erection and Glazing Instructions

Growhouse

Growhouse Lean To 6 x 8 Erection and Glazing Instructions

Riverstone Networks Grower's 181010V Assembly instructions

Riverstone Networks

Riverstone Networks Grower's 181010V Assembly instructions

GrowSpan 500 Series manual

GrowSpan

GrowSpan 500 Series manual

Stocker 9641/2 manual

Stocker

Stocker 9641/2 manual

Outsunny 845-421V02 manual

Outsunny

Outsunny 845-421V02 manual

ACD Piccolo 03 manual

ACD

ACD Piccolo 03 manual

Riverstone Networks MONT-8 Assembly instructions

Riverstone Networks

Riverstone Networks MONT-8 Assembly instructions

manuals.online logo
manuals.online logoBrands
  • About & Mission
  • Contact us
  • Privacy Policy
  • Terms and Conditions

Copyright 2025 Manuals.Online. All Rights Reserved.

для теплицы «ДАЧНАЯ-СТРЕЛКА»
for the greenhouse «DACHNAYA-STRELKA»
Quality management system (QMS)
of LLC «Volya» is certied
for compliance with
standard of
ISO 9001:2008
Certied by
Russian Registry
стр./page
2-3
стр./page
4-7
Технический паспорт
Technical certificate
Инструкция по сборке
Assembly manual
RU
EN
ФОРТОЧКА
SMALL WINDOW
модель 2017
design 2017
32
Technical certificate
Предприятие - изготовитель: 000 «Воля»
141983, г. Дубна Московской области, пер. Северный д.8.
Предприятие - изготовитель несёт ответственность за качество продукции в соответствии с ГК РФ.
Предприятие оставляет за собой право на внесение изменений в конструкцию форточки.
Дата изготовления:
Гарантийные обязательства
Срок предъявления претензий – 12 месяцев со дня покупки.
Гарантийные обязательства не распространяются на случаи:
1. установка форточки с нарушением требований инструкции
2. нарушение правил эксплуатации
3. ураганы, другие стихийные бедствия.
Описание
Форточка предназначена для проветривания теплиц. Устанавливается только
в теплицу «Дачная-Стрелка». Каркас форточки изготовлен из оцинкованной ста-
ли и собирается с помощью винтов и гаек. Покрытие форточки обеспечивается
вырезанным из теплицы поликарбонатом. В комплект форточки входят все не-
обходимые элементы крепления.
Сборку и эксплуатацию форточки следует осуществлять строго в соот-
ветствии с инструкцией и правилами эксплуатации, изложенными в
техническом паспорте. Технический паспорт обязательно сохранить.
Description
Perform assembling and operation of the small window in strict accordance
with the manual and operating rules stated in the technical certificate.
Please keep this technical certificate for further reference.
The small window is designed to ventilate greenhouses. It is installed only in the
greenhouse «Dachnaya-Strelka». The frame of the small window is made of galvanized
steel and is to be assembled with screws and nuts. The covering of the small window
is provided by polycarbonate, remaining from the greenhouse covering. The small
window kit includes all the necessary fastening elements.
Warranty liabilities
Claim presentation period is 12 months from the date of purchase.
Warranty liabilities do not apply to cases of:
1. the small window installation with violation
of requirements of the manual.
2. violation of the rules of operation.
3. floods, hurricanes and other natural disasters.
Manufacturer: VOLYA LLC
per. Severny, 8, Dubna, Moscow region, 141983, Russia.
The manufacturer bears responsibility for quality of products in accordance with RF CC.
The manufacturer reserves the right for the small window engineering design changes.
Правила эксплуатации
Перед началом эксплуатации форточка должна быть собрана и установлена в
теплице в соответствии с инструкцией.
Форточка не должна подвергаться воздействиям, которые могут создать оста-
точные деформации каркаса и покрытия.
Date of manufacture:
Operating rules
Before operating the small window must be assembled and installed in the
greenhouse in accordance with the manual. The small window should not be exposed
to effects that can create permanent deformation of the frame and coating.
Технический паспорт
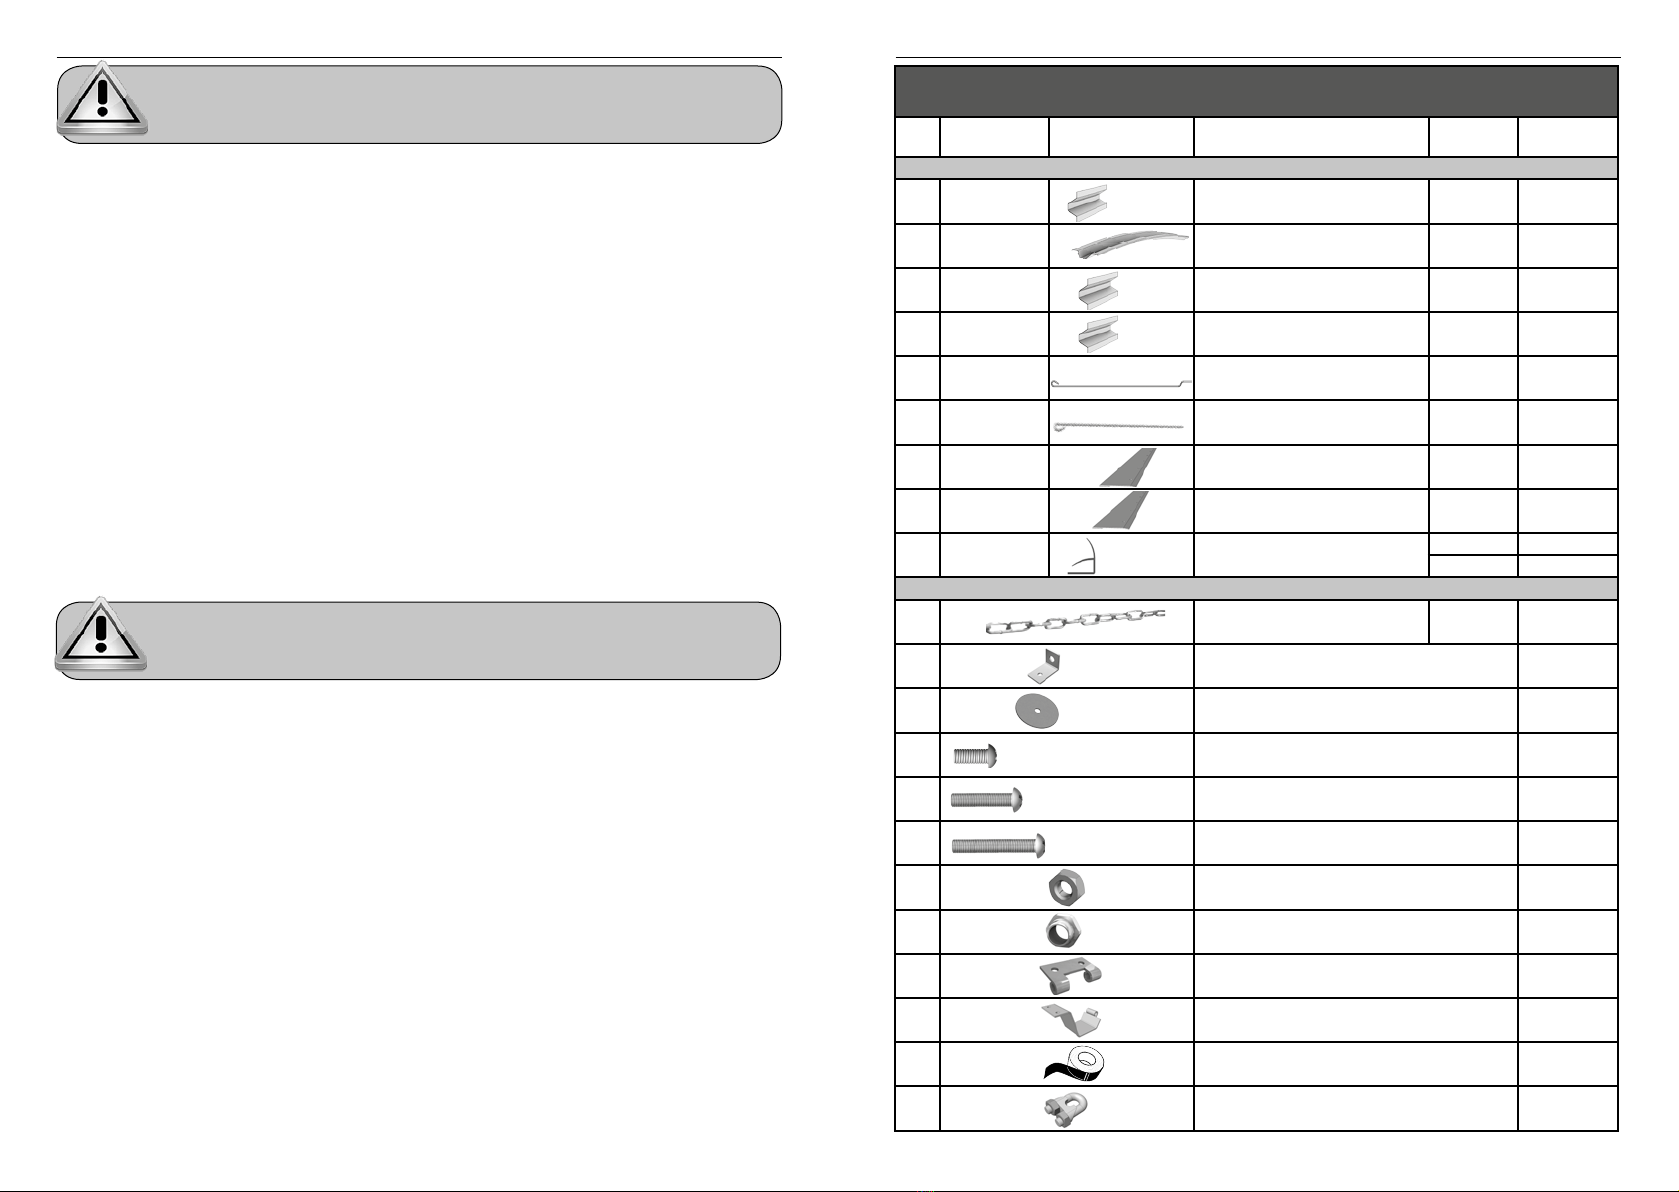
Комплектация детальная
Detailed parts list
№маркировка
marking
вид
view
наименование
denomination
длина, м
length, m
кол-во, шт.
q-ty, pcs
1-й пакет/ 1-st package
11Горизонталь
Horizontal 0,91 2
22Дуга
Arc 0,27 2
33Диагональ малая
Small diagonal 0,82 1
44Диагональ большая
Big diagonal 0,88 1
5-Проволочный упор
Wire stop 0,4 1
6-Проволочный удлинитель
Wire extender 0,31 1
7-Планка вертикальная
Vertical cleat 0,33 2
8-Планка горизонтальная
Horizontal cleat 0,97 2
9-Уплотнитель проёма
Opening seal
0,39 2
0,94 2
2-й пакет / 2-nd package
10 Цепочка
Chain 0,5 1
11 Уголок
Angle 1
12 Шайба
Washer 6
13 Винт М5х10
Screw М5х10 46
14 Винт М5х35
Screw М5х35 6
15 Винт М5х45
Screw М5х45 2
16 Гайка М5
Nut М5 37
17 Гайка М5 стопорная
Lock nut М5 2
18 Петля верхняя
Top hinge 2
19 Петля нижняя
Botton hinge 2
20 Скотч
Scotch tape 1
21 Зажим
Fixture 2
5
1. Соберите каркас форточки из деталей 1, 2, 3, 4 и установите на каркасе
нижнюю петлю (2 шт.) и уголок рис.1.
Assemble the window frame from the parts of 1, 2, 3, 4 and place the bottom hinge
(2 pcs.) and the angle on the frame fig.1.
2. Вырежьте изнутри теплицы в поликарбонате прямоугольное окно, контур
которого проходит по кромкам деталей 2 и 4в (рис.2). Форточки устанавливают-
ся в коньковой части бокового проёма каркаса.
Cut from inside the greenhouse a rectangular window in the polycarbonate, the
contour of which passes through the edges of parts 2 and 4в (fig.2). Small windows
are installed in the ridge part of the lateral opening of the frame.
Рис.1
Fig.1
ф1
ф1
ф2 ф4
ф2 ф3
ф1
ф3
ф4 ф1
ф1
ф3
ф2
ф1
ф4
ф2
2
2
4в
4
4. Обрежьте поликарбонат по контуру форточки, соблюдая отступы (рис.4).
Cut polycarbonate along the contour of the window, keeping the indentation (fig.4).
3. На детали 2 (коньковая) установите верхнюю петлю (потребуется отогнуть
поликарбонат) (рис. 3).
On the part 2 (ridge) install the top hinge (it is needed to unbend polycarbonate)
(fig. 3).
2
10мм
10мм
10мм
10мм
Закрепите на каркасе форточки поликарбонат с помощью планок по рис.5.
При закреплении поликарбоната соблюдайте правило ориентации поликарбо-
ната. Поверхность с защищённым слоем должна быть обращена наружу (к солн-
цу).
Fasten polycarbonate on the frame of the small window with the help of cleats in
accordance with fig. 5. While fastening the polycarbonate, observe the polycarbonate
orientation rule. The surface with the protected layer should be facing outward
(towards the sun).
петля нижняя
bottom hinge
уголок
angle
Рис.2
Fig.2
контур
countour
петля верхняя
top hinge
Рис.3
Fig.3
Рис.4
Fig.4
Рис.5
Fig.5
планка горизонтальная
horizontal cleat планка вертикальная
vertical cleat
76
7.
Для установки ручного устройства открывания и фиксации форточки состыкуйте
зажимами проволочные детали, установите их на форточку посредством уголка
(рис. 8).
For installation of a manual opening and fixation device of the small window joint
wire parts with fixtures and install them on the small window with the help of the
angle (fig. 8).
6. Установите форточку, соединив обе части петель винтами с гайками сто-
порными М5 (рис. 7).
Install the small window by connecting both parts of the hinges with screws with
lock nuts М5 (fig. 7).
2
проволочный упор
wire stop
проволочный удлинитель
wire extender
8. Ограничительная цепочка крепится винтами (рис. 9).
The limiting chain is fastened with screws (fig. 9).
уплотнитель
seal
2
5. Установите по контуру выреза уплотнитель, надевая
его на срез поликарбоната. Края верхнего уплотнителя
нужно выпустить за контур выреза, для отвода дождевой
воды. Для этого срезать часть уплотнителя с обоих концов
(рис.6).
Place the seal on the contour of the cut, putting it on a cut of polycarbonate. The
edges of the top seal need to be released outside the cut-out contour to drain the rain
water. To do this, cut off the part of the seal from both ends (fig.6).
2
4в
4в
Поверх кромок уплотнителя, прилегающих к поликарбонату снаружи, наклеить
скотч.
On top of the seal edges, adjoining to the polycarbonate outside, stick the scotch
tape.
скотч
scotch tape
шайба
washer
винт М5х35
screw М5х35
Рис.6
Fig.6
винт М5х45
screw М5х45
2
Рис.7
Fig.7
Рис.8
Fig.8
уголок
angle
Рис.9
Fig.9
зажим
fixture
Предприятие-изготовитель:
ООО «Воля», г. Дубна Московской области.
тел/факс: (495) 598-5-999
www.perchina.ru
e-mail: [email protected]
Manufacturer:
Volya LLC, Dubna, Moscow Oblast
Phone/fax: 8 (495) 598-5-999
www.perchina.ru
e-mail: [email protected]
Данное руководство не может быть воспроизведено в любой форме целиком
или частично без письменного разрешения компании «Воля»
This manual may not be reproduced in any form in full or partially without written
permission of Volya Company
EN
RU