HBK CA80 User manual
CA80
ENGLISH DEUTSCH FRANÇAIS
Instructions for use
Gebrauchsanweisung
Instructions d'emploi

Hottinger Brüel & Kjaer GmbH
Im Tiefen See 45
D-64293 Darmstadt
Tel. +49 6151 803-0
Fax +49 6151 803-9100
www.hbkworld.com
Mat.: 7-0104.0036
DVS: A05903 01 Y00 00
10.2022
EHottinger Brüel & Kjaer GmbH
Subject to modifications.
All product descriptions are for general information
only. They are not to be understood as a guarantee of
quality or durability.
Änderungen vorbehalten.
Alle Angaben beschreiben unsere Produkte in allge
meiner Form. Sie stellen keine Beschaffenheits- oder
Haltbarkeitsgarantie dar.
Sous réserve de modifications.
Les caractéristiques indiquées ne décrivent nos
produits que sous une forme générale. Elles
n'impliquent aucune garantie de qualité ou de
durabilité.

CA80
ENGLISH DEUTSCH FRANÇAIS
Instructions for use

CA80
TABLE OF CONTENTS
2
TABLE OF CONTENTS
1 Safety instructions 3................................................
2 General information 3...............................................
2.1 Scope of delivery 3..................................................
2.2 Field of application 3................................................
3 Preparing the SG 4..................................................
4 Preparing the adhesive surfaces 5....................................
4.1 General information 5...............................................
4.2 Coarse cleaning 5...................................................
4.3 Degreasing 5.......................................................
4.4 Roughening 5......................................................
4.5 Fine cleaning 6.....................................................
4.6 Preparing non-metallic bonding surfaces 6..............................
5 Preparing the SG installation 6.......................................
6 Applying the CA80 adhesive 8........................................
7 SG installation 9....................................................
7.1 Applying the adhesive 9..............................................
7.2 Curing 9...........................................................
8 Storage 10..........................................................
9 Specifications 10....................................................

3
CA80
SAFETY INSTRUCTIONS
1 SAFETY INSTRUCTIONS
It is essential to note the details given in the Material Safety Data Sheet of the product.
You can download the safety data sheet via the HBM website: http://www.hbm.com/
sds/.
2 GENERAL INFORMATION
CA80 is a cold curing single-component adhesive.
2.1 Scope of delivery
SCA80 superglue, bottle with drop nozzle, 10ml (for 250 to 500 SG)
SFluoropolymer tape
SFluoropolymer strip
S2 dosing tips
SUsage instructions
2.2 Field of application
The solvent-free cyanoacrylate group-based superglue CA80 is intended for the
installation of strain gages (SG). It is suitable for SG in the series:
Y, C, LD, E and residual stress SG (optimal suitability)
G (good suitability)
CA80 is not suitable for bonding porous materials, such as wood, concrete or foam. The
customer must qualify and assess the quality of the adhesive bond.
With cyanoacrylate adhesives, curing is initiated by the catalytic effect of the humidity
absorbed from the air. Relative humidity between 40% and 70% provides the best
conditions. If the relative humidity is less than 30%, the reaction is noticeably delayed and
in extreme cases, may not occur at all. If the relative humidity is greater than 80%, impact
curing will result. CA80 will only cure in thin layers in the given time. Thick layers of
adhesive will not cure completely or even at all. Heavily scratched or rough surfaces are
therefore unsuitable.
The curing rate depends on the chemical state of the components to be bonded. Basic
surfaces speed up the hardening process, acidic surfaces can not only delay curing, they
may also prevent it. In this case, use the accelerator BCY01, which is available separately.
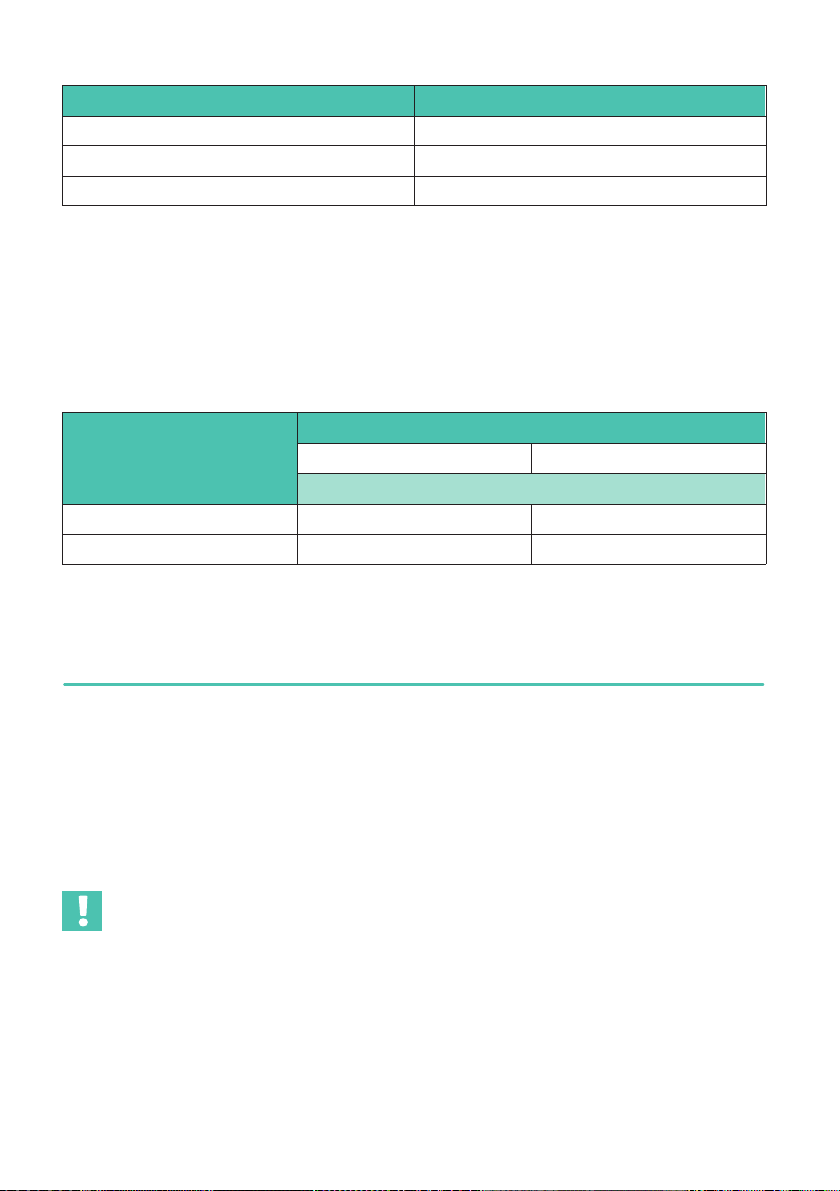
Table Tab. 2.1 shows the recommended values for the hardening time, subject to the
material to be bonded, at a temperature of 20°C and a relative humidity of 65%.
CA80
PREPARING THE SG
4
Component material Curing time in seconds
Steel 60 …120
Aluminum 50 …100
Plastics 10 …60
Tab. 2.1 Curing times for the various materials
At temperatures below room temperature, you must expect the curing time to be
extended and full curing (final hardness) to take longer.
Once the time specified in Tab. 2.1 has expired, the adhesive will have bonded sufficiently
so that you can start connecting the cable. Final hardness takes about 24 hours.
However, measurements can be taken after the times stated in Tab. 2.2.
Method of measurement
Bonding temperature in 5C
5 20
Minimum curing time in minutes
dynamic 90 10
static 120 15
Tab. 2.2 Minimum curing times
3 PREPARING THE SG
Strain gages supplied ex factory are in working condition and may only be handled with
tweezers.
If the SG is contaminated during handling:
uCarefully clean the adhesive side of the SG with a cotton bud soaked in solvent (such
as RMS1 or RMS-SPRAY).
uCarefully allow any remaining solvent to evaporate.
Important
If the SG has an installation aid (adhesive tape), make sure that the adhesive film of the
tape is not dissolved by the cotton bud and transferred to the SG.

5
CA80
PREPARING THE ADHESIVE SURFACES
4 PREPARING THE ADHESIVE SURFACES
4.1 General information
The installation quality basically depends on the preparation of the measuring point. The
aim is to create a surface that is even and oxide-free so that it can be easily wetted.
The condition of the measurement object will determine which of the following steps are
necessary.
4.2 Coarse cleaning
uRemove films of oxide and Eloxal, paint and other contamination from a generous
area around the measuring point.
4.3 Degreasing
The choice of cleaning agent will depend on the type of impurity and the sensitivity of the
material used in the workpiece being measured. Recommended for most applications is
the cleaning agent RMS1 (HBM order no.: 1-RMS1 or 1-RMS1-SPRAY), a mixture of
acetone and isopropanol. Powerful grease-dissolvers, such as methylethylketone or
acetone, are also commonly used. Toluene is suitable for removing wax-like substances.
When larger areas are contaminated, it is advisable to first clean them with water and an
abrasive agent.
uWash over the surface to be cleaned with a piece of non-woven fabric soaked in
solvent. First, clean a larger area around the measuring point, then clean ever smaller
areas, so that dirt and impurities are not rubbed into the measuring point from the
edges.
Important
You should never use a solvent that is technically pure; chemical purity is essential. The
solvent must never be taken directly from the storage container, it is better to pour some
solvent into a small, clean dish first, where you can then soak up the amount of solvent
required with the non-woven fabric. On no account should any remaining liquid be poured
back into the storage container as this would contaminate the contents.
4.4 Roughening
A slightly roughened surface provides a larger surface for the adhesive and therefore
improves adhesion. You can obtain this kind of surface by sandblasting, etching or sand
ing with medium-coarse emery cloth.
u320 grain corundum, which must be completely clean and should only be
used once, is suitable for sandblasting. When using emery cloth (recommendation:
220 to 300 grain), please roughen in a circular motion.

CA80
PREPARING THE SG INSTALLATION
6
CA80 can also be applied to smooth or polished areas if the surface of the
measurement object must not be damaged.
The steps described below should be taken immediately after roughening to prevent the
formation of new oxide films.
4.5 Fine cleaning
Carefully remove all dirt particles and dust.
uTo do this, dip a pad of non-woven material using clean tweezers into one of the
solvents mentioned above and then clean the measuring point.
uOnly ever make a single stroke with each non-woven pad.
uContinue cleaning until there is no discoloration (contamination) on the non-woven
pad. Make sure that the solvent has evaporated completely before taking any of the
following steps.
4.6 Preparing non-metallic bonding surfaces
Non-metallic materials are basically treated in the same way as metals. The bonding sur
faces must be free from grease and, if possible, slightly roughened. Polyethylene and
untreated fluoropolymer cannot be bonded.
We generally recommend carrying out tests beforehand to check bonding capability. You
do not need to roughen the surfaces of glass, porcelain or enamel.
Important
Do not use your breath to blow away any fluff that remains or touch the measuring point
with your fingers after cleaning under any circumstances!
5 PREPARING THE SG INSTALLATION
Important
Because CA80 adhesive has such a short reaction time, the strain gage can no longer be
aligned once the bonding process has been started. Therefore, be sure to follow the
instructions below.
When the SG has a lead, the solder terminal can be attached with the SG to the workpiece
in a single operation.
uFirst, remove residual oxide from the soldering eyelets using an eraser pencil or
similar.
uThen slide the solder terminal between the lead and the carrier of the SG.

7
CA80
PREPARING THE SG INSTALLATION
uShorten the lead (see Fig. 5.1a and Fig. 5.1b) and fix the solder terminal in position
with adhesive tape.
a) b)
Covering foil of
the measuring
grid carrier
Heat-resistant
adhesive tape
Lead
Solder terminalMeasuring
grid
Carrier foil of the
measuring grid carrier
Fig. 5.1 Shorten the lead and connect to the SG
uAttach another piece of adhesive tape on top of the SG so that it overlaps on both
sides.
uPlace the SG on the measuring point and carefully align it. Now use the tweezers to
press down firmly on one end of the adhesive strip, as far as the SG.
uGently pull the adhesive tape on the opposite side of the SG up a little creating a hinge
to lift up the SG without changing its position.
Any excess adhesive can escape via the sides of the SG that are not covered with an
adhesive strip (Fig. 5.2).
Adhesive tape for folding
the SG back
(heat resistant adhesive
tape)
Leave approx. 1 mm free along the edges (no adhesive tape)
Fig. 5.2 Fixing the adhesive tape
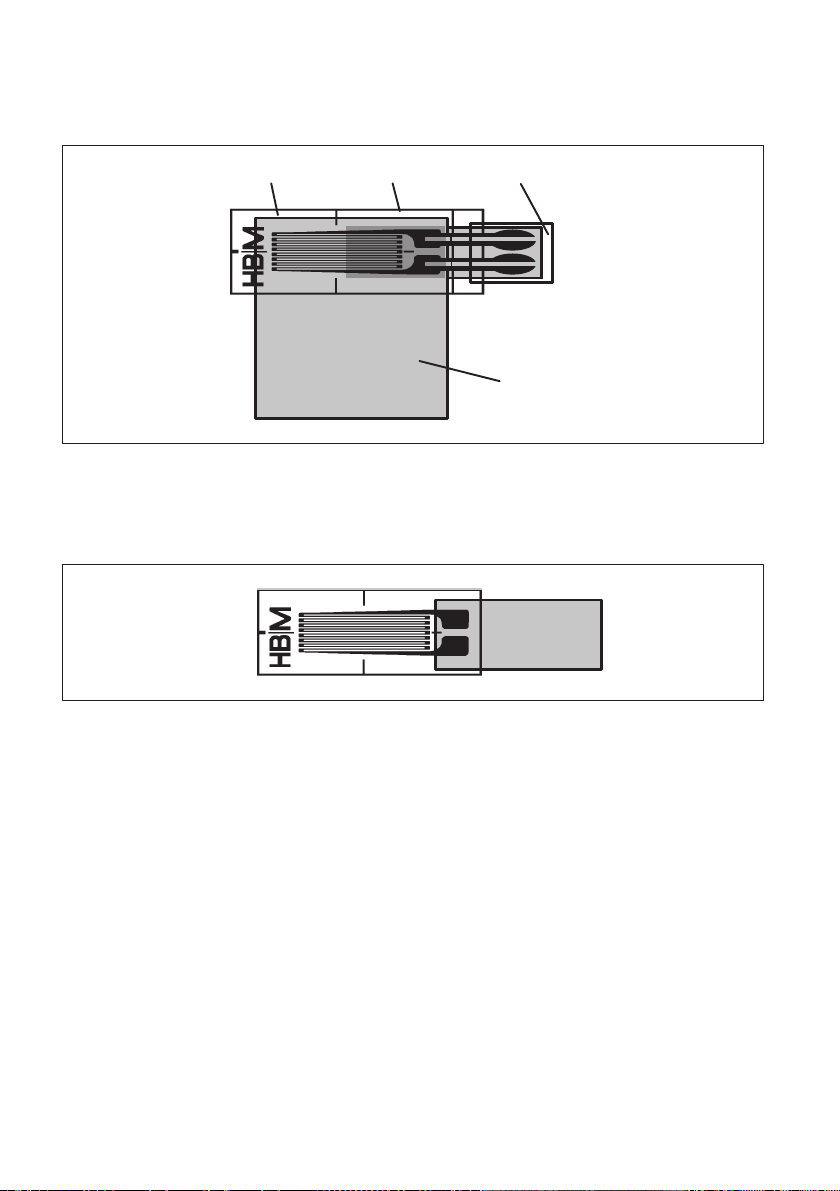
uIn SG without leads, create a hinge-like connection as shown in Fig. 5.3 (without
additional solder terminals).
Fig. 5.3 Hinge-like connection for SG without lead

CA80
APPLYING THE CA80 ADHESIVE
8
Unnecessary distribution of adhesive on the measurement object can be prevented by
using a "mask".
uApply adhesive tape around the installation area at a distance of approx. 5 to 10mm
(see Fig. 5.4).
Mask, adhesive tape around the
measuring point with approx. 5 to 10 mm
distance
Adhesive tape for folding the SG back
Fig. 5.4 Preparing the SG installation point
6 APPLYING THE CA80 ADHESIVE
uUnscrew the cap.
uCarefully cut off the tip of the dropper. After use, close it again by replacing the cap.
uFirmly push the plastic tip onto the drop nozzle. The dosing tip dispenses very fine
drops of CA80 and also allows adhesive to be applied to places that are difficult to
access.
If the adhesive is not used for a long time, it will harden and seal the tip. Clean the dosing
tip or cut it down so that it can be used again.
Important
Please note the following points after using the adhesive:
uRemove the dosing tip immediately from the drop nozzle.
uRemove adhesive residues from the drop nozzle with a lint-free cloth. This will prevent
the cap becoming bonded to the drop nozzle.
uPut the cap back on the bottle immediately to close it. This will stop any moisture get
ting into the bottle and rendering the adhesive unusable.
uTap the end of the dosing tip against an absorbent base to remove any residual
adhesive.
uEject any residual adhesive from the capillary tube with a disposable syringe or by
gently tapping it against an edge.
To reduce the risk of the drop nozzle drying out, you can additionally seal it with a pin
after use. Then put the cap back on for secure storage.

9
CA80
SG INSTALLATION
7 SG INSTALLATION
uTo prepare for installation, prepare a piece of the supplied fluoropolymer tape and a
section of the fluoropolymer strip.
7.1 Applying the adhesive
uThe adhesive must be at room temperature before you open the bottle to prevent
moisture getting into the adhesive.
uApply a drop of the adhesive to the workpiece.
uUse the piece of the fluoropolymer strip that you have just prepared to carefully
spread the drop of adhesive without applying any pressure and without touching the
measurement object. This may otherwise lead to partial hardening of the adhesive.
uNext, immediately fold the strain gage down onto the layer of adhesive. You must use
the supplied fluoropolymer tape to prevent adhesive from getting onto other objects
(Caution: Also sticks to skin).
uApplying even pressure with your thumb, press the SG (covered by the piece of fluo
ropolymer tape) onto the workpiece for approx. 1 minute.
Adhesive tape
SG
Installation area
Fluoropolymer strip
Adhesive
Solder terminals
Fig. 7.1 Spreading the adhesive onto the application area
7.2 Curing
The adhesive cures within several minutes at a relative humidity of approx. 65%. At lower
humidities, initial strength will be reached after a correspondingly longer waiting time.
uOnly remove the adhesive tape from the SG after the adhesive has reached a
sufficient initial strength. The excess adhesive on and around the SG should be fully
dry.
uCarefully remove the adhesive tape at a low angle - starting from the SG - towards the
outside to reduce the danger of pulling off the SG as the adhesive will not be fully
cured yet.
Under unfavorable ambient conditions, you can use the accelerator BCY01 to reduce the
curing time. Treat one of the two surfaces to be bonded with BCY01 and the adhesive will
cure immediately.
CA80
STORAGE
10
The use of BCY01 accelerator is recommended under the following conditions:
SHumidity is too low (rel. humidity t30 to 40%)
SSurfaces react acidically
STemperatures are too low
Important
Only use the BCY01 accelerator when one of the above-mentioned conditions is present.
Improper application can lead to shock curing. The stresses then present in the adhesive
layer will lead to unstable measuring points and will reduce the maximum elongation of the
joint.
Tip
Practical experience with CA80 shows that curing difficulties are mainly caused by
applying the adhesive too thickly.
8 STORAGE
Store the bottles standing where possible.
Protect the superglue CA80 against heat, sunlight and moisture, store it cool and dry.
When stored correctly, usable at least until the best-before date indicated on the packag
ing.
9 SPECIFICATIONS
Temperature limits
For zero-point related measurements -55 °C … +100 °C
For non zero-point related measurements -70 °C … +120 °C
Solubility Dimethyl sulphoxide, alkali, boiling water
Swelling If stored for long periods in esters
(ethylacetate) and ketones (acetone,
methylethylketone)

CA80
ENGLISH DEUTSCH FRANÇAIS
Gebrauchsanweisung

CA80
INHALTSVERZEICHNIS
2
INHALTSVERZEICHNIS
1 Sicherheitshinweise 3...............................................
2 Allgemeines 3......................................................
2.1 Lieferumfang 3.....................................................
2.2 Anwendungsbereich 3...............................................
3 Vorbereitung der DMS 5.............................................
4 Klebeflächenvorbereitung 5..........................................
4.1 Allgemeines 5......................................................
4.2 Grobreinigung 5....................................................
4.3 Entfetten 5.........................................................
4.4 Aufrauen 6.........................................................
4.5 Feinreinigung 6.....................................................
4.6 Vorbereiten nichtmetallischer Klebeflächen 6...........................
5 Vorbereiten der DMS‐Installation 7...................................
6 Anwenden des Klebstoffs CA80 9.....................................
7 Installation der DMS 10...............................................
7.1 Auftragen des Klebstoffs 10...........................................
7.2 Aushärtung 10.......................................................
8 Lagerung 11........................................................
9 Technische Daten 12.................................................

3
CA80
SICHERHEITSHINWEISE
1 SICHERHEITSHINWEISE
Beachten Sie unbedingt die Angaben im Sicherheitsdatenblatt zum Produkt. Sie können
das Sicherheitsdatenblatt über die Website von HBM herunterladen:
http://www.hbm.com/sds/.
2 ALLGEMEINES
CA80 ist ein kalthärtender Einkomponentenklebstoff.
2.1 Lieferumfang
SSchnellklebstoff CA80, Flasche mit Tropfdüse, 10ml (für 250 bis 500 DMS)
SFluorpolymerband
SFluorpolymerstreifen
S2 Dosierspitzen
SGebrauchsanweisung
2.2 Anwendungsbereich
Der Schnellklebstoff CA80 aus der Gruppe der lösungsmittelfreien Cyanacrylat‐Klebstoffe
ist zum Installieren von Dehnungsmessstreifen (DMS) bestimmt. Er ist geeignet für DMS
der Serien:
Y, C, LD, E und Eigenspannungs‐DMS (optimale Eignung)
G (gute Eignung)
CA80 ist nicht geeignet zum Kleben auf porösen Stoffen, wie z.B. Holz, Beton oder
Schaumstoff. Die Güte der Klebeverbindung muss vom Kunden qualifiziert und bewertet
werden.
Die Aushärtung wird bei Cyanacrylat‐Klebstoffen durch die katalytische Wirkung der aus
der Luft absorbierten Feuchtigkeit eingeleitet. Die günstigsten Bedingungen liegen bei
einer relativen Luftfeuchte zwischen 40% und 70%. Bei einer relativen Luftfeuchte unter
30% wird die Reaktion spürbar verzögert, in extremen Fällen kann sie ausbleiben. Bei
mehr als 80% relativer Luftfeuchte kommt es zur Schockhärtung. CA80 härtet nur in
dünnen Schichten in der angegebenen Zeit aus. Dicke Klebstoffschichten härten unvoll
ständig oder gar nicht. Deshalb sind stark aufgeraute Oberflächen ungeeignet.
Die Aushärtegeschwindigkeit hängt vom chemischen Zustand der zu verbindenden Teile
ab. Basische Oberflächen beschleunigen das Abbinden, saure Oberflächen können das
Aushärten nicht nur verzögern, sondern auch verhindern. Verwenden Sie in solchen Fällen
den separat lieferbaren Beschleuniger BCY01. Die Tabelle Tab. 2.1 gibt Richtwerte für die
CA80
ALLGEMEINES
4
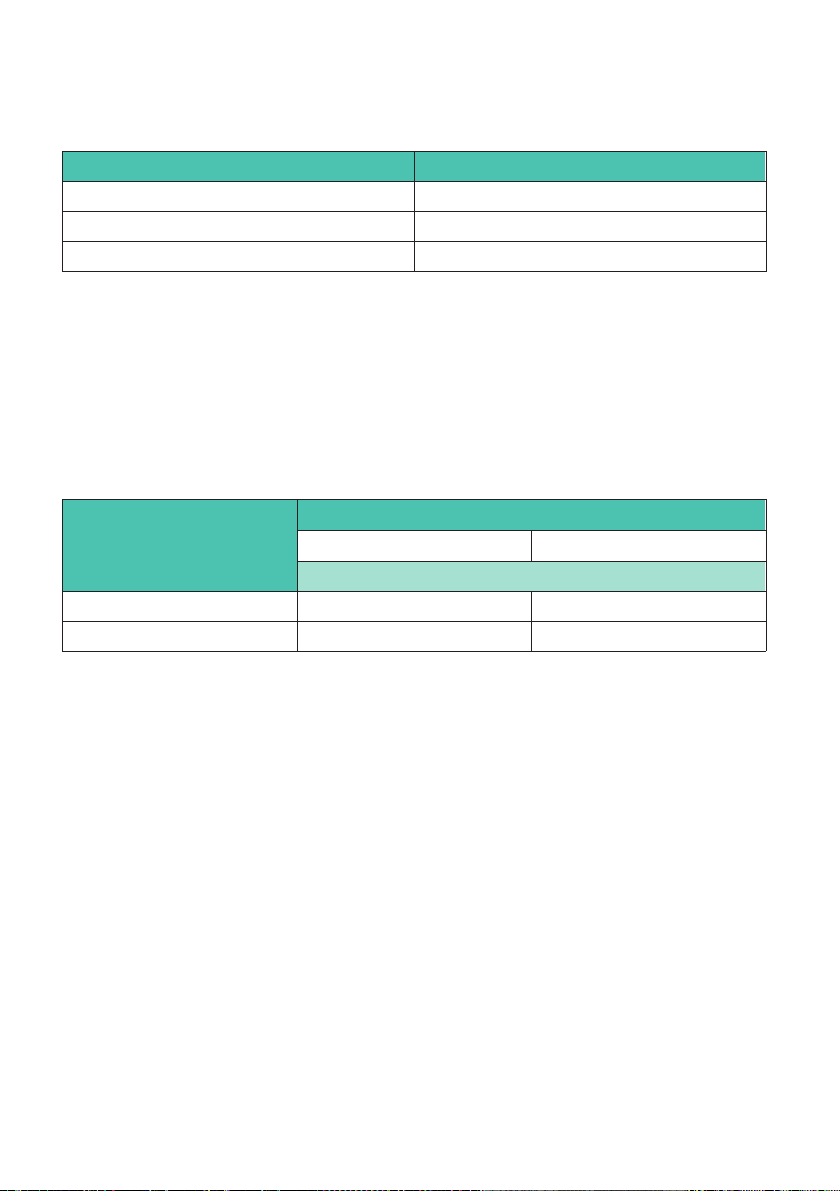
Abbindezeit in Abhängigkeit von dem zu verklebenden Material bei einer Temperatur von
20°C und einer relativen Luftfeuchte von 65%.
Bauteilwerkstoff Härtezeit in Sekunden
Stahl 60 …120
Aluminium 50 …100
Kunststoffe 10 …60
Tab. 2.1 Härtezeit für verschiedene Werkstoffe
Bei Temperaturen unterhalb der Raumtemperatur müssen Sie mit einer Verlängerung der
Härtezeit und der vollständigen Aushärtung (Endhärte) rechnen.
Nach Ablauf der in Tab. 2.1 angegebenen Zeit hat der Klebstoff soweit abgebunden, dass
Sie mit dem Anschließen der Kabel beginnen können. Die Endhärte wird erst nach ca. 24
Stunden erreicht. Messungen sind jedoch bereits nach den in der Tab. 2.2 angegebenen
Zeiten möglich.
Art der Messung
Klebetemperatur in °C
5 20
Mindestaushärtezeit in Minuten
dynamisch 90 10
statisch 120 15
Tab. 2.2 Mindestaushärtezeiten

5
CA80
VORBEREITUNG DER DMS
3 VORBEREITUNG DER DMS
Die ab Werk gelieferten DMS sind gebrauchsfähig und dürfen nur noch mit einer Pinzette
berührt werden.
Falls die DMS bei der Handhabung verschmutzt wurden:
uReinigen Sie die Klebeseite der DMS vorsichtig mit einem in Lösungsmittel (z.B.
RMS1 bzw. RMS1-SPRAY) getränkten Wattestäbchen.
uLassen Sie Lösungsmittelreste sorgfältig ablüften.
Wichtig
Achten Sie bei DMS mit Installationshilfe (Klebeband) darauf, dass der Klebefilm des Kle
bebands nicht mit den Wattestäbchen angelöst und auf den DMS übertragen wird.
4 KLEBEFLÄCHENVORBEREITUNG
4.1 Allgemeines
Die Qualität der Installation hängt wesentlich von der Vorbereitung der Messstelle ab. Ziel
ist es, eine gleichmäßige, oxidfreie und gut benetzbare Oberfläche zu schaffen.
Welche der nachfolgend beschriebenen Schritte notwendig sind, hängt vom Zustand des
Messobjekts ab.
4.2 Grobreinigung
uEntfernen Sie Oxidschichten, Eloxalschichten, Farbanstriche und andere Verunreini
gungen in einem großzügig bemessenen Umkreis um die Messstelle herum.
4.3 Entfetten
Die Wahl des Reinigungsmittels richtet sich nach Art der Verschmutzung und nach der
Empfindlichkeit des Materials des zu messenden Werkstückes. Für die meisten
Anwendungsfälle empfiehlt sich das Reinigungsmittel RMS1 (HBM‐Bestell‐Nr.: 1-RMS1
oder 1-RMS1-SPRAY), ein Gemisch aus Aceton und Isopropanol. Außerdem sind stark
fettlösende Stoffe wie z.B. Methylethylketon oder Aceton gebräuchlich. Toluol eignet
sich zum Entfernen wachsähnlicher Stoffe.
Wir empfehlen, bei starker Verschmutzung größere Flächen zunächst mit Wasser und
Scheuermittel zu reinigen.
uWaschen Sie die zu reinigende Fläche mit einem lösungsmittelgetränkten Vliesstoff
ab. Reinigen Sie zunächst eine größere Fläche um die Messstelle herum, dann immer

CA80
KLEBEFLÄCHENVORBEREITUNG
6
kleinere Flächen, um nicht von den Rändern her Schmutz in die Messstelle einzu
bringen.
Wichtig
Verwenden Sie niemals ein Lösungsmittel von nur technischer Reinheit; chemische Rein
heit ist unbedingt erforderlich. Schütten Sie das Lösungsmittel zunächst in eine kleine
saubere Schale, aus der Sie dann mit dem Vliesstoff das Lösungsmittel aufsaugen,
verwenden Sie es nicht direkt aus dem Vorratsbehälter. Auf keinen Fall dürfen Reste in den
Vorratsbehälter zurückgeschüttet werden, da dann der gesamte Inhalt des Vorratsbehälters
verschmutzt wird.
4.4 Aufrauen
Eine leicht aufgeraute Oberfläche bietet dem Klebstoff eine vergrößerte Oberfläche für
eine verbesserte Haftung. Sie erreichen eine solche Oberfläche durch Sandstrahlen, Bei
zen oder durch Schleifen mit mittelgrobem Schmirgelleinen.
uZum Sandstrahlen eignet sich Stahlkorund der Körnung 320, der absolut sauber sein
muss und nur einmal verwendet werden sollte. Bei der Verwendung von Schmir
gelleinen (Empfehlung: Körnung 220 bis 300) sollten Sie mit kreisenden Bewegungen
aufrauen.
Wenn die Oberfläche des Messobjekts nicht verletzt werden darf, können Sie CA80
auch an glatten oder polierten Flächen anwenden.
Die nachfolgenden Arbeitsvorgänge sollten unmittelbar nach dem Aufrauen erfolgen, um
zu verhindern, dass sich erneut Oxidschichten bilden.
4.5 Feinreinigung
Entfernen Sie sorgfältig alle Schmutzpartikel und Staub.
uTauchen Sie dazu mit einer sauberen Pinzette ein Vliesstoffpad in eines der oben ge
nannten Lösungsmittel und reinigen Sie damit die Messstelle.
uFühren Sie jeweils nur einen Strich mit einem Vliesstoffpad aus.
uWiederholen Sie die Reinigung so lange, bis der Vliesstoff keine Verfärbung (Verun
reinigung) mehr zeigt. Achten Sie darauf, dass das Lösungsmittel vollständig ver
dampft, bevor Sie mit den nachfolgenden Arbeitsschritten beginnen.
4.6 Vorbereiten nichtmetallischer Klebeflächen
Nichtmetallische Werkstoffe werden prinzipiell in der gleichen Weise behandelt wie
Metalle. Die Klebeflächen müssen fettfrei und nach Möglichkeit etwas aufgeraut sein.
Nicht beklebbar sind Polyethylen und unbehandeltes Fluorpolymer.
Generell empfehlen wir, die Bindefähigkeit durch Vorversuche zu testen. Bei Glas, Porzel
lan und Emaille können Sie auf das Aufrauen verzichten.

7
CA80
VORBEREITEN DER DMS‐INSTALLATION
Wichtig
Blasen Sie zurückgebliebene Fussel auf keinen Fall mit Atemluft weg und berühren Sie die
Messstelle nicht mehr mit den Fingern!
5 VORBEREITEN DER DMS‐INSTALLATION
Wichtig
Infolge der kurzen Reaktionszeit des Klebstoffs CA80 ist ein Ausrichten des DMS nicht
mehr möglich, nachdem der Klebevorgang begonnen wurde. Beachten Sie deshalb die
nachfolgenden Hinweise.
Bei DMS mit Anschlussbändchen kann der Lötstützpunkt in einem Arbeitsgang mit dem
DMS auf das Werkstück aufgebracht werden.
uBefreien Sie zunächst die Lötaugen des Stützpunktes mit einem Radierstift oder ähnli
chem von Oxidresten.
uSchieben Sie den Lötstützpunkt zwischen Bändchen und Träger des DMS.
uKürzen Sie die Anschlussbändchen (siehe Abb. 5.1a und Abb. 5.1b) und fixieren Sie
den Lötstützpunkt mit einem Stück Klebeband.
a) b)
Deckfolie des
Messgitterträgers
Hitzebeständiges
Klebeband
Anschluss
bändchen
LötstützpunktMessgitter
Trägerfolie des
Messgitterträgers
Abb. 5.1 Anschlussbändchen kürzen und mit DMS verbinden
uKleben Sie ein weiteres Stück Klebeband beidseitig überlappend auf die Oberseite des
DMS.
uLegen Sie den DMS auf die Messstelle und richten Sie ihn sorgfältig aus. Drücken Sie
dann ein Ende des Klebestreifens bis an den DMS mit der Pinzette fest an.
uZiehen Sie an der gegenüberliegenden Seite den DMS mit Klebeband wieder etwas ab,
so dass ein Scharnier entsteht, mit dem der DMS angehoben werden kann, ohne dass
sich seine Position verändert.
CA80
VORBEREITEN DER DMS‐INSTALLATION
8
Durch die nicht mit Klebstreifen abgedeckten Seiten des DMS kann überschüssiger Kleb
stoff entweichen (Abb. 5.2).
Klebestreifen zum Umklappen
des DMS
(hitzebeständiges Klebeband)
Ränder ca. 1mm freilassen (kein Klebestreifen)
Abb. 5.2 Fixieren des Klebebandes
uStellen Sie bei DMS ohne Anschlussbändchen die scharnierartige Verbindung nach
Abb. 5.3 her (ohne zusätzliche Lötstützpunkte).
Abb. 5.3 Scharnierartige Verbindung bei DM ohne Anschlussbändchen
Table of contents
Languages:
Other HBK Industrial Equipment manuals


Popular Industrial Equipment manuals by other brands


Siemens
Siemens SIMATIC RTLS4083T operating instructions

EIBENSTOCK
EIBENSTOCK BST 182 V/S Original instructions

STS
STS CTS01 operating instructions

Peri
Peri MULTIPROP MP 120 Instructions for assembly and use

PCB Piezotronics
PCB Piezotronics M205C Installation and operating manual

Cleveland
Cleveland NT-100 Operation manual