HBK PMX User manual
PMX
ENGLISH
Operating Manual

Hottinger Brüel & Kjaer GmbH
Im Tiefen See 45
D-64293 Darmstadt
Tel. +49 6151 803-0
Fax +49 6151 803-9100
www.hbkworld.com
Mat.:
DVS: A04354 03 E00 03
07.2022
EHottinger Brüel & Kjaer GmbH
Subject to modifications.
All product descriptions are for general information
only. They are not to be understood as a guarantee of
quality or durability.

3
PMX
TABLE OF CONTENTS
TABLE OF CONTENTS
1 Safety instructions 11................................................
2 Markings used 14....................................................
2.1 Markings used in this document 14.....................................
2.2 Symbols on the device 15.............................................
3 User information 16..................................................
3.1 Using this manual 16.................................................
3.2 About the PMX documentation 17......................................
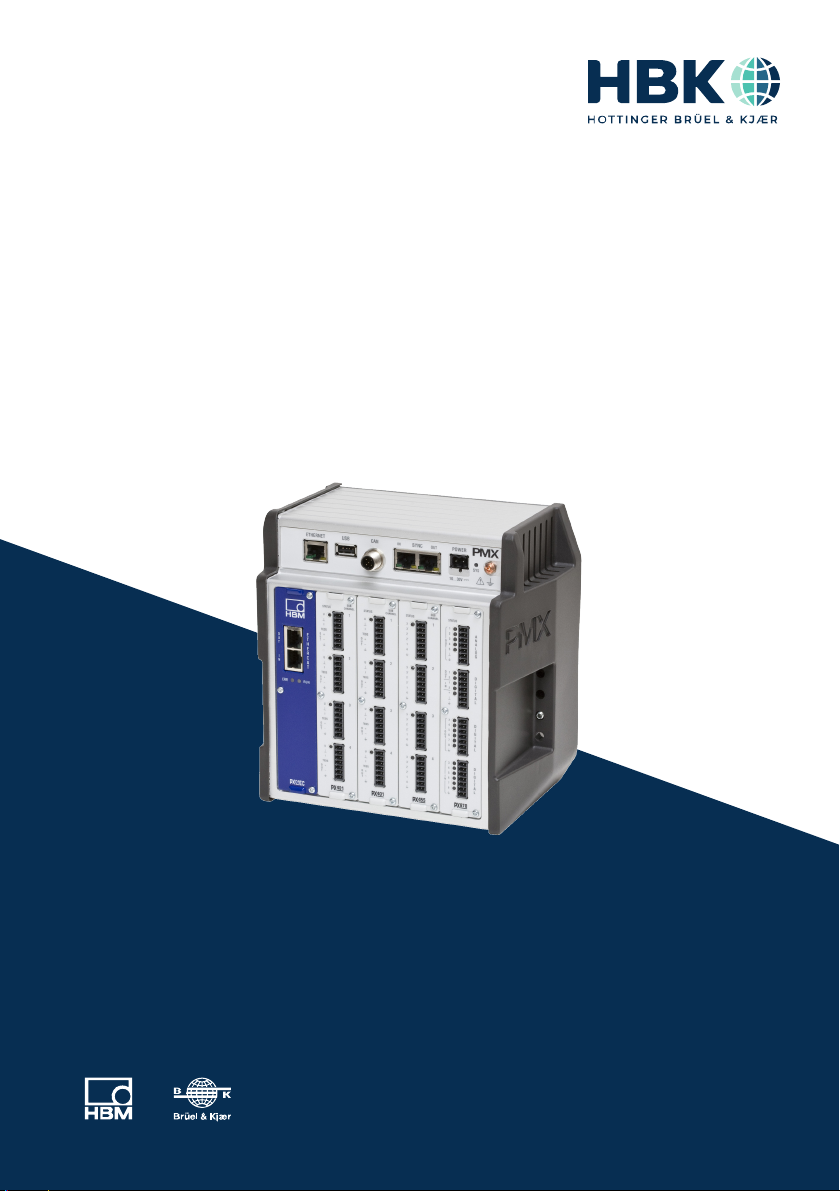
4 PMX product description 18...........................................
5 overview, scope of supply & accessories 21.............................
5.1 The PMX system 21..................................................
5.2 Scope of supply 26...................................................
5.3 Accessories 26......................................................
5.4 PMX web server and software 28.......................................
6 protection / housing / shielding design 32...............................
6.1 Cabinet mounting 32.................................................
6.2 Free mounting 34....................................................
7 Mounting/Dismounting/Replacing 36...................................
7.1 Assembly tools and tightening torques 36...............................
7.2 Support rail mounting 37..............................................
7.3 Mounting the wall bracket 40..........................................
7.4 Installing cable fastening plates (optional) 43............................
7.5 Replacing measurement and communication cards 44.....................
8 PMX electrical connections 46.........................................
8.1 Plug connection technology and clamping areas 46.......................
8.2 Overview of PMX functions 48.........................................
8.2.1 Combination options for input cards 49.................................
8.2.2 Meanings of the basic device connector sockets 49......................
8.2.3 LEDs for system monitoring (device LED) 50.............................
8.2.4 Fieldbus LEDs 52....................................................
8.2.5 Measurement card LEDs 57...........................................
8.3 Supply voltage 61....................................................
8.4 Measurement cards/transducer connection 62...........................
8.4.1 PX455 62..........................................................
8.4.2 Strain gage and inductive full bridges (6-wire circuit) 63...................

PMX
TABLE OF CONTENTS
4
8.4.3 Strain gage and inductive half bridges (6-wire circuit) 64..................
8.4.4 Strain gage and inductive full bridges in 6-wire circuit with zero-wire
TEDS 64...........................................................
8.4.5 Strain gage and inductive half bridges in 6-wire circuit with zero-wire
TEDS 66...........................................................
8.4.6 Strain gage and inductive full bridges (4-wire circuit) 68...................
8.4.7 Strain gage and inductive half bridges (4-wire circuit) 69..................
8.4.8 Strain gage and inductive full bridges (4-wire circuit) with zero-wire TEDS 70
8.4.9 Strain gage and inductive half bridges (4-wire circuit) with zero-wire TEDS 72
8.4.10 Intrinsically safe measuring circuits - operation with Zener barriers 73......
8.4.11 LVDT transducer 75.................................................
8.4.12 LVDT transducer with zero-wire TEDS 75...............................
8.4.13 Potentiometric transducer 76.........................................
8.4.14 Potentiometric transducer with zero-wire TEDS 77.......................
8.4.15 PX455 with Pt100 temperature measurement 78.........................
8.4.16 PX401 79..........................................................
8.4.17 Voltage source ± 10V 80.............................................
8.4.18 Current source ± 20mA 80............................................
8.4.19 Current drain ± 20mA 81.............................................
8.4.20 IEPE transducer with external amplifier 82...............................
8.4.21 PX401 with charge amplifier 82........................................
8.4.22 PX401 electrical isolation 84..........................................
8.4.23 PX460 85..........................................................
8.4.24 Voltage supply for signal transmitters and transducers up to 24 VDC
nominal 87.........................................................
8.4.25 Voltage supply for signal transmitters and transducers up to 5 VDC
nominal 88.........................................................
8.4.26 Frequency measurement (differential input) 89...........................
8.4.27 Frequency measurement (single-ended input) 90........................
8.4.28 Rotary encoder and incremental encoder, balanced (differential) 91.........
8.4.29 Rotary encoder and incremental encoder with direction signal, balanced
(differential) 92.....................................................
8.4.30 Rotary encoder and incremental encoder, unbalanced (single-pole) 93......
8.4.31 Rotary encoder and incremental encoder with direction signal, unbalanced
(single-pole) 94.....................................................
8.4.32 SSI encoder (active only) 95..........................................
8.4.33 Inductive rotary encoders or pulse generators (passive only) 96............
8.4.34 Connection and configuration of HBM torque transducers (T10, T12, T40) 98.
8.4.35 Connection and configuration of HBM torque transducer T210 104..........
8.4.36 Connection and configuration of HBM torque transducer T21WN 109........

5
PMX
TABLE OF CONTENTS
8.4.37 Connectionand configuration of HBM torque transducer T20WN
(without VK20A) 114..................................................
8.4.38 Connection and configuration of HBM torque transducer T20WN
(with VK20A) 116.....................................................
8.5 Input/output cards 117................................................
8.5.1 PX878 117..........................................................
8.5.2 Analog output ± 10V 117..............................................
8.5.3 Digital inputs and outputs 118..........................................
8.5.4 External supply voltages for the digital inputs and outputs (PX878) 120.......
8.6 Communication cards 123..............................................
8.6.1 Pin assignment for the PX01EC EtherCAT®communication card 123.........
8.6.2 Pin assignment for the PX01EP EtherNet/IP™ communication card 123.......
8.6.3 Pin assignment for the PX01PN PROFINET®IO communication card 124.....
8.7 TEDS transducer 124..................................................
8.7.1 TEDS connection 124.................................................
8.7.2 Starting up the TEDS module 125.......................................
8.7.3 PMX parameterization with TEDS 125...................................
9 Synchronization and time recording 127.................................
9.1 Synchronizing via internal PMX synchronization 127.......................
9.2 External synchronous data acquisition via an NTP server in the network 130...
9.3 Data acquisition via fieldbus: EtherCAT®, PROFINET®IO, EtherNet/IP™ 130....
9.4 Comparison of synchronization mechanisms 131..........................
10 Network, data security, policies 132.....................................
10.1 Network access and remote maintenance 132.............................
10.2 Data security 133.....................................................
10.3 Policies definition and passwords 133...................................
10.3.1 Policies definition 133.................................................
10.3.2 Passwords 134......................................................
10.3.3 Presetting user level by controller 134...................................
11 Start-up 135.........................................................
11.1 Hardware setup 135...................................................
11.1.1 Voltage supply/transducers 135........................................
11.1.2 Ethernet connection 135...............................................
11.2 Integrated PMX web server 135.........................................
11.3 Connect the PMX to a PC (HOST) or via a network 136......................
11.3.1 Making network settings via a USB flash drive 141........................
11.3.2 Changing network settings in a web browser 142..........................
11.4 Display and control options 144.........................................

PMX
TABLE OF CONTENTS
6
11.5 PMX web server menu structure 148.....................................
11.5.1 Overview of all device settings 148......................................
11.5.2 Restoring the factory settings 149......................................
11.6 PMX startup behavior 150..............................................
11.7 Operating behavior of the PMX 151......................................
11.8 Signal delays 151.....................................................
11.9 Fieldbus integration 156...............................................
11.9.1 PROFINET®IO connection 156.........................................
11.9.2 EtherCAT®connection 157.............................................
11.9.3 Setting the fieldbus update rate 158....................................
11.9.4 EtherNet/IP™ connection 159...........................................
12 Quick start 161.......................................................
12.1 Preparing the measurement system 161..................................
12.2 Typical operating sequence (measurement example) 166...................
12.3 Adjustment Assistant 171..............................................
12.4 Updating firmware (PMX web server) 172.................................
13 Internal calculation channels 174.......................................
13.1 Calculation rate 174...................................................
13.2 Descriptions of calculations 175.........................................
13.2.1 Scaling 175..........................................................
13.2.2 Two-point scaling 175................................................
13.2.3 Characteristic table (21 interpolation points) 175..........................
13.2.4 Polynomial 4th order 176..............................................
13.2.5 Tare 176............................................................
13.2.6 6x6 matrix 177.......................................................
13.2.7 Strain gage stress analysis 178.........................................
13.2.8 Evaluation functions 180..............................................
13.2.9 Filter (IIR, high pass or low pass) 180....................................
13.2.10 Rotation synchronous filter (CASMA) 182................................
13.2.11 Peak value 184.......................................................
13.2.12 Tolerance window 186................................................
13.2.13 Hold (analog triggering) 189...........................................
13.2.14 Hold (digital triggering) 190............................................
13.2.15 Mean (arithmetic, RMS) 191............................................
13.2.16 Moving average 192..................................................
13.2.17 Trigger (range) 193...................................................
13.2.18 Trigger function (pulse) 194............................................
13.2.19 Checkweigher 196....................................................
13.2.20 Mathematical functions 200...........................................

7
PMX
TABLE OF CONTENTS
13.2.21 Adder/subtractor 200.................................................
13.2.22 Multiplier 200........................................................
13.2.23 Divider 201..........................................................
13.2.24 Counter 201.........................................................
13.2.25 Integrator 202.......................................................
13.2.26 Differentiator 203.....................................................
13.2.27 Cartesianto polar coordinates 203......................................
13.2.28 Polar coordinates to Cartesian coordinates 204...........................
13.2.29 Modulo function 204..................................................
13.2.30 Constant signal 205..................................................
13.2.31 Technology functions 205.............................................
13.2.32 Two-state controller 205..............................................
13.2.33 PID controller 206....................................................
13.2.34 RTD Pt100 on PX455 207..............................................
13.2.35 Signal generators (square, triangle, sine, ...) 208...........................
13.2.36 Logic modules (AND, OR …) 209........................................
13.2.37 4:1 multiplexer 209...................................................
13.2.38 Deadband 210.......................................................
13.2.39 Edge detector 210....................................................
13.2.40 Pulse-width measurement 211.........................................
13.2.41 Timer 212...........................................................
13.2.42 Connection channel with (optional) delay (CODESYS) 213..................
13.2.43 Processing of digital signals 214........................................
13.3 Calculation examples 215..............................................
13.3.1 Peak value generation 215.............................................
13.3.2 Calculating the force introduction point 217..............................
13.3.3 Mechanical work via force-displacement integration 224...................
13.3.4 Checking the force at specific points on the displacement axis 232...........
13.3.5 Force-displacement measurement with relative zero 235...................
13.3.6 Checking the force with a tolerance band 241.............................
13.3.7 Event counter 246....................................................
14 Test signals and signal generators 250...................................
15 Parameter sets (formulas) 252..........................................
15.1 Configuring parameter sets 253.........................................
15.2 Changing from parameters to parameter sets 255..........................
15.3 Saving and loading measurement programs (parameter sets) 256............
15.4 Device storage (Clone device) 258.......................................

PMX
TABLE OF CONTENTS
8
16 Communication with a control system 259...............................
16.1 Device description file 259..............................................
16.2 Setting the transfer speed of the fieldbus 262.............................
16.3 Data transfer via fieldbus: 262..........................................
16.4 Input data, PMX -> PLC 262............................................
16.4.1 Device data (cyclic) 262...............................................
16.4.2 System status 263....................................................
16.4.3 Measured values (cyclic) 264...........................................
16.4.4 Measurement status 265..............................................
16.5 Output data PLC PMX 266.............................................
16.5.1 Device data (cyclic) 266...............................................
16.5.2 Measured value control words (cyclic) 268...............................
16.5.3 Measured value control words 269......................................
16.5.4 Fieldbus channels (CPU channels) 270..................................
16.6 PROFINET®IO 271....................................................
16.7 EtherCAT®273.......................................................
16.8 Using the PMX CoE Object Dictionary 275.................................
16.9 EtherNet/IP™ 278.....................................................
16.9.1 Configuration 278....................................................
16.9.2 Channel settings 279.................................................
16.9.3 Data structure 280....................................................
17 CAN interface (WGX001 only) 289.......................................
17.1 General 289..........................................................
17.2 CAN pin assignment 289...............................................
17.3 CANopen master/slave mode 291.......................................
18 CODESYS V3 Soft PLC (WGX001 only) 292...............................
18.1 General 292..........................................................
18.2 CODESYS development environment 292.................................
18.3 Preparation 294......................................................
18.4 Creating a project 295.................................................
18.5 Adding a PMX library 296..............................................
18.6 PMX library 297......................................................
18.7 Task configuration 310................................................
18.8 Cyclic data 310.......................................................
18.9 Signal diagram (I/O Mapping) 311.......................................
18.10 System events for PMX 313............................................
18.10.1 All 313..............................................................
18.10.2 com.hbm.fwconfig 313................................................
18.10.3 com.hbm.parameter 314..............................................

9
PMX
TABLE OF CONTENTS
18.10.4 com.hbm.fpgasrv 315.................................................
18.10.5 com.hbm.SysCfgMgr 316..............................................
18.10.6 com.hbm.storagemanager 321.........................................
18.10.7 com.hbm.sigproc 322.................................................
18.10.8 com.hbm.fieldbus 323................................................
18.10.9 com.hbm.CatmanServer 323...........................................
18.10.10 com.hbm.meassrv 323................................................
18.10.11 com.hbm.httpdata 323................................................
18.10.12 GUI 324.............................................................
18.10.13 com.hbm.DataLogger 324.............................................
18.11 Web visualization 326.................................................
18.12 CAN interface 327.....................................................
18.13 CAN master and slave mode 327........................................
18.14 PMX package 340.....................................................
19 Data storage 342.....................................................
20 Data acquisition software (DAQ) catman 344.............................
21 PMX command set 346................................................
21.1 Requirements and notation 346.........................................
21.2 Command list 348.....................................................
21.3 Examples 403........................................................
22 Object dictionary 407..................................................
22.1 Accessible data objects 407............................................
22.1.1 Measurement channels 408............................................
22.1.2 Calculated channels 410...............................................
22.2 Numbering plan 410...................................................
22.2.1 General objects 411..................................................
22.2.2 Measurement channels 411............................................
22.2.3 Calculated channels 412...............................................
22.2.4 Constant signals 412.................................................
22.2.5 Passwords 412......................................................
22.3 Data types 413.......................................................
22.4 Access via Ethernet command interface 414..............................
22.5 Access via fieldbus 415................................................
22.5.1 Send a request 416...................................................
22.5.2 Bit assignment 417...................................................
22.5.3 Response from PMX 418..............................................
22.5.4 Response to a read request 419........................................

PMX
TABLE OF CONTENTS
10
22.5.5 Response to a write request 419........................................
22.5.6 Retry 419...........................................................
22.6 Applying the new value 419.............................................
22.7 Generated header files 420.............................................
22.7.1 Value ranges of the objects 421........................................
22.8 Tips on using the object dictionary 422...................................
23 Quality & calibration certificates 423....................................
24 Firmware update 424..................................................
24.1 Preparation 424......................................................
24.2 Installing firmware 425................................................
25 Diagnosis & maintenance (health monitoring) 426.........................
25.1 Error messages/operating state (LED display) 426.........................
25.2 Device status error messages 432.......................................
25.2.1 Error in factory settings 433............................................
25.2.2 SYNC master 433....................................................
25.2.3 SYNC error 433......................................................
25.2.4 SYNC controller error 433..............................................
25.2.5 Heartbeat 433.......................................................
25.2.6 Sensor excitation voltage overloaded 433................................
25.2.7 Buffer overflow in command interface 433...............................
25.2.8 System not ready 433.................................................
25.2.9 CPU overload during calculations 433...................................
25.3 Resetting the PMX Administrator password 434...........................
25.4 Resetting the PMX to factory settings 434................................
25.5 Restoring lost PMX network settings and device names 435.................
25.6 Saving and restoring PMX device settings and CODESYS applications 437.....
25.7 Replacing measurement and communication cards 438.....................
25.8 Log file 439..........................................................
25.8.1 System log entries for system status 439................................
25.8.2 System log entries for channel status/measurement status 440.............
26 Waste disposal & environmental protection 441...........................
27 FAQs 442............................................................
28 Technical support 445.................................................
29 Glossary 446.........................................................
Index 451...................................................................

11
PMX
SAFETY INSTRUCTIONS
1 SAFETY INSTRUCTIONS
Intended use
The PMX data acquisition system, subsequently also referred to as the device, is to be
used exclusively for measurement tasks and directly related control tasks within the
operating limits detailed in the specifications. Use for any purpose other than the
above is deemed improper use.
Any person instructed to carry out installation, startup or operation of the device must
have read and understood the operating manual and in particular the technical safety
instructions.
In the interests of safety, the device should only be operated by qualified personnel and
as described in the Operating Manual. During use, compliance with the legal and safety
requirements for the relevant application is also essential. The same applies to the use
of accessories.
Notice
The device must not be directly connected to a DC voltage supply system. The supply
voltage may be 10 V ... 30V (DC).
The device may only be powered by a safety extra low voltage (safety transformer to
DIN VDE 0551 or EN 60742). Only operate built-in devices once they are installed in the
housing provided. Device development is guided by DIN EN 61010 Part 1 (VDE 0411
Part 1).
Before starting up, make sure that you are using a suitable supply voltage, and that the
circuit you are using is sufficiently protected.
Operating conditions
SProtect the device from direct contact with water.
SDo not expose the device to direct sunlight.
SProtect the device from moisture and weather such as rain or snow. The protection
class of the device is IP20 (DIN EN 60529).
SThe permissible relative humidity at 31 °C is 95 % (non condensing); linear reduc
tion up to 50 % at 40 °C.
SIt is safe to operate the PMX system up to a height of 2000 m.
SThe design or safety engineering of the device must not be modified without our
express consent. In particular, any repair or soldering work on motherboards
(replacement of components) is prohibited. When exchanging complete modules,
use only genuine parts from HBM.

PMX
SAFETY INSTRUCTIONS
12
SThe device is supplied ex works with a fixed hardware and software configuration.
Changes can only be made within the range of possibilities described in the
corresponding documentation.
SThe device is maintenance free.
SPlease note the following when cleaning the housing:
-Disconnect the device from all current and voltage supplies.
-Clean the housing with a soft, slightly damp (not wet!) cloth. Never use solvent,
as this could damage the label or the housing.
-When cleaning, ensure that no liquid gets into the device or connections.
SOld equipment that can no longer be used must be disposed of separately from
normal household garbage, in accordance with national and local regulations for
environmental protection and material recovery and recycling, see also section26
on page441.
Qualified personnel
Qualified persons are individuals entrusted with the installation, fitting, startup and
operation of the product and with the relevant qualifications for their work.
This includes people who meet at least one of the three following criteria:
SThey have knowledge of the safety equipment and procedures of measurement and
automation systems, and are familiar with them as project personnel.
SThey are operating personnel of measurement or automation systems and have
been instructed on how to handle the machinery. They are familiar with the opera
tion of the equipment and technologies described in this document.
SAs a commissioning or service engineer, they have successfully completed training
on the repair of automation plants. Moreover, they are authorized to start up,
ground and label circuits and equipment in accordance with safety engineering
standards.
Working safely
SError messages should only be acknowledged once the cause of the error has been
eradicated and there is no further danger.
SMaintenance and repair work on an open device with the power on may only be
performed by trained personnel who are aware of the dangers involved.
SAutomation equipment and devices must be designed to ensure adequate protec
tion or locking against inadvertent actuation (e.g. access control, password protec
tion, etc.).
SFor devices operating in networks, safety precautions must be taken in terms of
both hardware and software, so that an open circuit or other interruptions to signal
transmission do not result in undefined states or loss of data in the automation
device.

13
PMX
SAFETY INSTRUCTIONS
SFollowing work on settings or password-protected activities, make sure that any
controls that may be connected remain in a safe condition until the switching
behavior of the device has been tested.
Additional safety precautions
Additional safety precautions to meet the requirements of the relevant national and
local accident prevention regulations must be implemented in plants where
malfunctions could cause major damage, loss of data or even personal injury.
The performance and scope of supply of the device cover only a small proportion of
test and measuring equipment. Before starting up the device in a plant, first perform a
project planning and risk analysis, taking into account all the safety aspects of
measurement and automation engineering, to minimize residual risk. This particularly
concerns the protection of personnel and equipment. In the event of a fault, appropri
ate precautions must produce safe operating conditions.
General dangers of failing to follow the safety instructions
This is a state-of-the-art device that is safe to operate. However, there may be residual
risks if the device is installed or operated incorrectly.
Important
The safety instructions are also enclosed with the device in paper form
("Documentation and Safety instructions PMX", A03260).

PMX
MARKINGS USED
14
2 MARKINGS USED
2.1 Markings used in this document
So that you can start working quickly and safely with your product, the symbols and
markings used in this manual are standardized and are explained below.
Icon Meaning
NOTICE This marking draws your attention to a situation in
which failure to comply with safety requirements
can lead to damage to property.
Important
This marking draws your attention to important in
formation about the product or about handling the
product.
Tip
This marking indicates application tips or other
information that is useful to you.
Information
This marking draws your attention to information
about the product or about handling the product.
SList
This prompts you to take action (a single,
independent action)
1.
2.
…
Carry out this sequence of actions in the given order.
Emphasis
See …
Italics are used to emphasize and highlight text and
identify references to sections of the manual,
diagrams, or external documents and files.
Device -> New Bold text indicates menu items, as well as dialog
and window headings in the program environment.
Arrows between menu items indicate the sequence
in which the menus and sub-menus are called up
Sample rate Bold text in italics indicates inputs and input fields in
the user interfaces.

15
PMX
MARKINGS USED
2.2 Symbols on the device
Pay attention to the supply voltage
The symbol indicates that the supply voltage must be between
10 and 30 VDC, and that you should read and follow the
instructions given in this operating manual.
CE mark
With the CE mark, the manufacturer guarantees that the
product complies with the requirements of the relevant
EC directives (the Declaration of Conformity can be found on
the HBM website (www.hbm.com) under HBMdoc).
Statutory waste disposal marking
In accordance with national and local environmental protection
and material recovery and recycling regulations, old devices
that can no longer be used must be disposed of separately and
not with normal household garbage. See also section 26, page
441.
Marking of pollutant emission limit values (for deliveries to China)
Statutory mark of compliance with emission limits in electronic
equipment supplied to China.
Identifier when the CODESYS software is installed
CODESYS is a software platform for programmable logic
controllers. The license for CODESYS is already implemented
in WG001 basic housings.
20

PMX
USER INFORMATION
16
3 USER INFORMATION
Important
Obsolete documentation!
If you use an obsolete version of this document, or an obsolete version of any of the
documentation it mentions, this may result in the product being mounted and operated
incorrectly.
Make sure that all the documents you possess and use are always the current
version. The current documentation version can be found at https://www.hbm.com/
de/2981/pmx-modular-measuring-amplifier-system-for-the-iot/.
3.1 Using this manual
Read this operating manual thoroughly and in full before operating the equipment
for the first time.
The operating manual forms part of the product. Keep it in a safe place so that it is
permanently accessible to all users.
If you pass the device on to a third party, always pass it on together with the
requisite documentation.
Should you lose this manual, the current version can be found on our website, at
https://www.hbm.com/de/2981/pmx-modular-measuring-amplifier-system-for-the-
iot/.
Failure to comply with this manual can result in personal injury or damage to
equipment.
To help you quickly find the information you require, there is a full list of contents right
at the front of this operating manual.
There is also an index at the end of the manual, where you can look for individual
keywords.

17
PMX
USER INFORMATION
3.2 About the PMX documentation
The documentation of the PMX data acquisition system comprises:
Sthis operating manual in PDF format;
Sa printed Quick Start Guide;
Sa printed summary of the safety instructions;
Sthe specifications (data sheet) in PDF format;
Sa description of the functionalities and operation in the online help of the PMX web
server.
Important
These documents can be found on our website, always up-to-date.
You can find additional information at https://www.hbm.com/de/2981/pmx-modular-
measuring-amplifier-system-for-the-iot/ , including:
Sdevice description files for the real-time Ethernet cards (PROFINET®IO,
EtherCAT®1) or EtherNet/IP™2)),
Sconfiguration examples;
Sa video tutorial on PMX.
1) EtherCAT®is a registered trademark and patented technology, licensed by Beckhoff Automation
GmbH, Germany.
2) EtherNet/IP™ is a trademark of ODVA Inc. For more information regarding ODVA, visit
http://www.odva.org.

PMX
PMX PRODUCT DESCRIPTION
18
4 PMX PRODUCT DESCRIPTION
By buying the PMX data acquisition system, you have chosen a high-quality HBM
measurement system that is compact, powerful and variable. The data rate for all the
measurement and calculation channels is 19,200 or 38,400 measurements per second.
The device thus achieves an overall calculating rate of approximately 400,000 mea
sured values per second.
A vast number of different measurement, control and automation tasks can be
resolved with this measurement system.
Connection to a PC (HOST)
The PMX data acquisition system is connected to a PC via the standard Ethernet port,
and can be parameterized and operated via the internal web server.
You can connect to an automation system via the digital and analog inputs/outputs, as
well as via the PMX's fieldbus interfaces. This means the PMX can be easily connected
to a programmable logic controller (PLC) or a higher-level automation system.
Internal calculation channels
The PMX has 32 internal calculation channels as standard, which are freely available
for analysis and mathematical calculation of measurement signals. This allows you to
implement automation tasks from peak values to PID control simply and elegantly.
The following types of plug-in card are available:
PX401
SThe PX401 measurement card provides four individually configurable current or
voltage inputs with TEDS sensor detection.
SExtreme accuracy is guaranteed, as all the channels have their own A/D converter
with 24-bit resolution. This also allows the acquisition of all the channels to be
totally synchronized.
PX455
SThe PX455 measurement card, also featuring four channels with 24-bit resolution
and TEDS sensor recognition, is available for measurement with strain gages.
SThe measurement card is suitable for strain gages in both half bridge and full bridge
circuits, as well as for inductive transducers in half bridge and full bridge circuits,
LVDTs, potentiometric sensors, and Pt100 resistance thermometers.

19
PMX
PMX PRODUCT DESCRIPTION
PX460
SWith the PX460 frequency measurement you can operate torque transducers
(torque, rotational speed, angle of rotation), angle/incremental encoders, SSI, PWM
sensors, or perform a frequency measurement up to 2 MHz.
Channels 1 and 3: Frequency measurement (fixed)
Channels 2 and 4: Frequency (digital/inductive), counter, encoder, SSI, PWM
(adjustable)
The following measurement modes are available:
-up to four torque transducers (T10, T12, T40) for torque or rotational speed
measurement (without detection of direction of rotation);
-or two measurement channels for simultaneous measurement of rotational
speed and angle of rotation (with detection of direction of rotation);
-or one measurement channel for simultaneous measurement of rotational speed
and angle of rotation, and detection of direction of rotation and reference pulse;
-or two angle/incremental encoders, SSI, PWM sensors, magnetic transducers or
pulse counters each;
-or four measurement channels for frequency measurement up to 2 MHz including
two shunt calibrations and two 1-wire TEDS (sensor detection).
PX878
SThe PX878 input/output card has a total of eight digital inputs, eight digital outputs,
and five analog voltage outputs. The PMX can be controlled by this, as well as
operated with a downstream control (PLC). All real or calculated measurement
signals can be freely assigned to the outputs.
PX01EC, PX01PN and PX01EP
SThese interface cards can be optionally configured, and enable operation of the
PMX in an automation system via the PROFINET®IO, EtherCAT®1) or EtherNet/IP™2)
interfaces. Only one variant can be used in each case.
Connection technique
Transducers are connected to the amplifiers via plug terminals.
Plug terminals using push-in technology are available as standard, with a screw-on
system also available as an option. If required, both types can be coded with the
enclosed coding pins to prevent mix-ups.
1) EtherCAT®is a registered trademark and patented technology, licensed by Beckhoff Automation
GmbH, Germany.
2) EtherNet/IP™ is a trademark of ODVA Inc. For more information regarding ODVA, visit
http://www.odva.org.

PMX
PMX PRODUCT DESCRIPTION
20
TEDS (Plug&Measure)
PMX amplifiers support TEDS (Transducer Electronic Data Sheet, IEEE1451.4). The
transducers are automatically detected when connected, and the measurement chan
nel settings are made automatically.This efficiently minimizes setup times and user
errors.
PMX web server
An easy to operate web server, specifically tailored to the PMX and matched to the
measurement cards, is integrated into the device for configuration, data acquisition
and visualization. This gets you quickly to your measurement result. You can visualize
the data and then view it subsequently.
catman®Easy/AP PC software
Optionally, you can use HBM's catman®software to acquire, process and analyze PMX
measurement data. This allows you to display and analyze very large quantities of
measurement data (chart recorder function), and export it to standard formats.
Software driver
The PMX command set, a .NET API and a LabVIEW driver are provided for you to create
custom applications. This allows you to implement your own operating concepts and
integrate them into existing software solutions.
With the HBM LabVIEW driver, the PMX can be integrated into National Instruments
software via Virtual Instruments (VI). With the HBM DIAdem driver (version 6 or higher),
the PMX can be integrated into the DIAdem data acquisition software from National
Instruments. LabVIEW and DIAdem are registered trademarks of National Instruments.
Device implementation
The multi-client capability of the PMX makes it possible to access the device
simultaneously and without loss of speed via all the interfaces - including web server,
fieldbus and analog outputs.
Calibration certificates
Documented quality: HBM calibration certificates according to ISO 10012 for the
configured measurement cards and a declaration of compliance with the order 2.1
according to DIN EN 10204 are stored as PDF documents in the PMX's device memory
on shipping. Use the PMX web server to download them from the device. You can also
download the documents from the HBM website at https://www.hbm.com/
de/6871/support-download-calibration-certificates/.
Other manuals for PMX
1
Table of contents
Other HBK Industrial Equipment manuals


Popular Industrial Equipment manuals by other brands


Bosch
Bosch Rexroth HAD 1 Series operating instructions

ABB
ABB HT607959 Operation manual

T-Drill
T-Drill PLUS 115 SS: instruction manual

WALTERSCHEID
WALTERSCHEID ZWL 30 Installation and operating instructions

Venture Industries
Venture Industries VMS ATEX Operating and assembly instructions

ABB
ABB HT576102 Operation manual


