manuals.online logo
Brands
  1. Home
  2. •
  3. Brands
  4. •
  5. Helvex
  6. •
  7. Plumbing Product
  8. •
  9. Helvex 185-19-1 User manual

Helvex 185-19-1 User manual

ADVERTENCIA / WARNING
Este instructivo aplica al producto en cualquier acabado. / This instructive applies
to the product in any finish.
Cada metro de altura de
su producto a la base
del tinaco equivalen a
(0,1 kg/cm²) [1,42 PSI].
Every meter of height of
your product to the base
of the water tank (0,1
kg/cm²) [1,42 PSI]
equivals.
Visite nuestra página
www.helvex.com.mx,
para visualizar los videos
de instalación.
Visit our website
www.helvex.com.mx,
to view the installation
videos.
Requerimientos de
Instalación
Para el correcto funcionamiento de
este producto, la presión mínima
es de (1,0 kg/cm²) 14,2 PSI.
Relación
Altura Tinaco-Presión
10 m
30 m
60 m
PSI
Altura (h)
14,2
42,7
85,3
kg/cm²
1,0
3,0
6,0
Hola soy Fluxy, te
ayudaré a instalar
tu producto.
INSTALLATION GUIDE
GUÍA DE INSTALACIÓN
1-06-0795-4
For the correct operation of this
product, the minimum pressure is
(1,0 kg/cm²) 14,2 PSI.
Hi I'm Fluxy, I'll
help you to install
your product.
Installation Requirements Relation
Tub Height-Pressure
Height (h)
Fluxómetro para Mingitorio de Manija y
Entrada Superior para Spud de 19 mm /
Urinal Flushometer Handle and Top
Entry for Spud 19mm
[email protected]
Original Parts:
Consultancy and Technical
01(55)53339431
01800 909 2020 01 (55) 53 33 94 00
Refacciones Originales:
Asesoría y Servicio Técnico:
Ext. 5068, 5815 y 5913
Service:
53 33 94 21
01 800 890 0594
Para disminuir el riesgo de lesiones o daños a la propiedad, lea todas las instrucciones antes de instalar el
producto. Utilice gafas de seguridad. En obras de construcción, instalación, modificación, ampliación y
reparación deben cumplir con el reglamento de construcción y obras de su localidad. El producto ilustrado
puede sufrir cambios de aspecto como resultado de la mejora continua a la que está sujeto.
Agradecemos su elección por los productos HELVEX.
Estamos seguros de que su confiabilidad por el producto excederá sus más altas expectativas, cuya
funcionalidad, estética, durabilidad, respaldo integral y alta calidad le otorgarán plena satisfacción por años,
reflejando el compromiso con la calidad, innovación y el medio ambiente que forman parte de Helvex.
Thank you for choosing HELVEX products.
We are confident that the product reliability will exceed your maximum expectations. The functionality,
aesthetics, durability are at its highest quality! The comprehensive support will grant full satisfaction for years,
reflecting the commitment to quality, innovation and the environment as part Helvex.
To reduce the risk of injury or property damage, read all instructions. Before installing the product, please
remember to use safety glasses. In construction, installation, alteration, extension and repair, the rules of
constructions must be applied. As result of continuous improvement, the illustration product may change in
appearance.
[email protected]
Herramienta Requerida
desarmador plano teflón
/ Required Tools
teflon
flathead
screwdriver
llave inglesa
wrench
cortador de tubo
pipe cutter
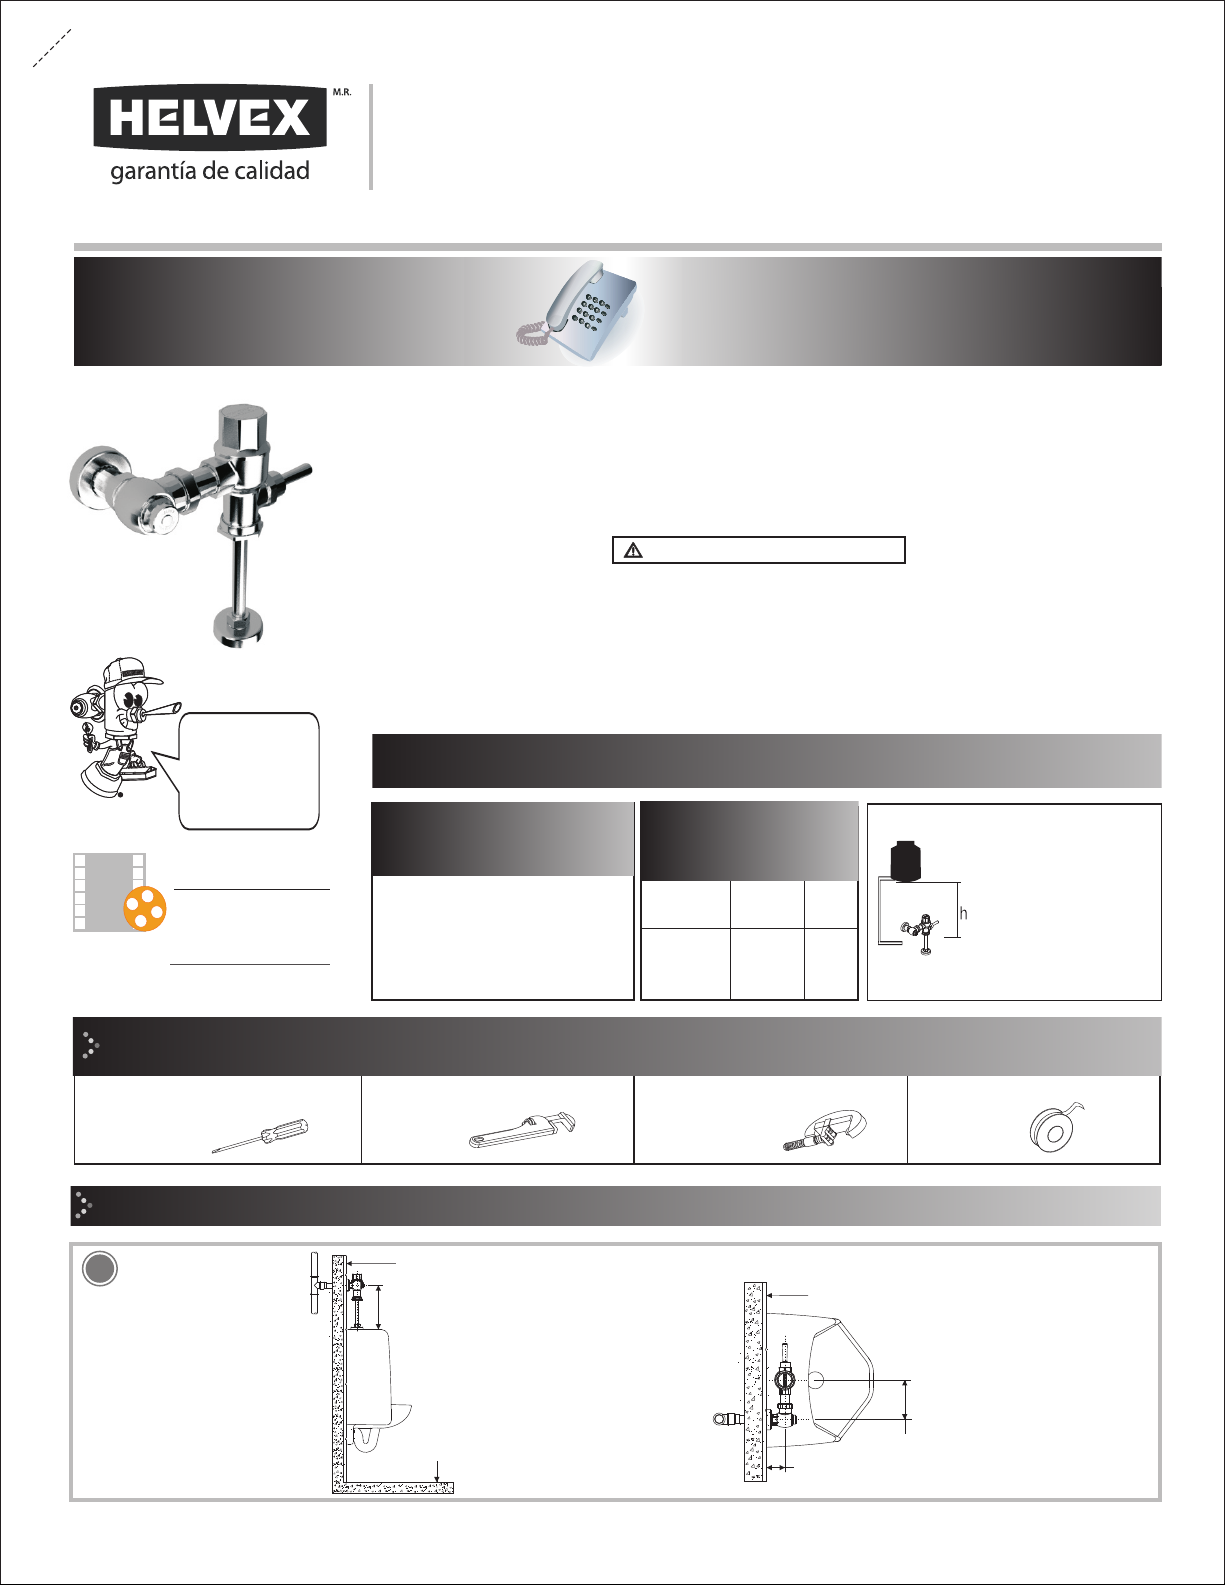
Dimensiones Recomendadas / Recommended Dimensions
185-19-1
1pared con acabado final
wall finish
26 cm (10,3”)
11-13 cm
(4,3-5,1”)
6cm (2,36”)
pared con acabado final
wall finish
NPT (Nivel de Piso Terminado)
(finished floor level)
VISTA SUPERIOR / TOP VIEW
VISTA LATERAL / SIDE VIEW
2
222
s a i e rlGan iIn tal cón G ne a / enerlIstallaton
*A
tubería de alimentación
Ø 32 mm (1¼”) (no incluida)
feed pipe
Ø 32 mm (1 ¼ ")(not included)
60 cm
(23,6”)
reducción campana de
Ø 32 a 25,4 mm (1¼” a 1”)
(no incluida)
bell reduction
Ø 32-25,4 mm (1 ¼ "to 1")
(not included)
tubo Ø 25,4 mm (1”) (no incluido)
tube Ø 25,4 mm (1 ") (not included)
adaptador (incluido)
adapter (included)
Verificar que la dimensión
la necesaria para enroscar la llave
de retención con su chapetón,
hasta el paño de la pared.
*A sea
Check that the dimension A is the
necessary to screw key retention with
escutcheon cloth to the wall.
Nota: La tubería debe ser de Ø 32mm (Ø 1 ¼”) desde la alimentación.
Note: The pipe diameter should be Ø 32mm (Ø1 ¼ ")from the feed.
cámara de aire con
tubo de 32mm (1¼”)
air chamber tube
32mm (1¼”)
Desarme el fluxómetro. /
Disassemble the flushometer.
4Presente la llave de retención y el adaptador con respecto a la ubicación del mueble. /
Present the holding key and adapter with respect to the location of the cabinet.
5
llave de
retención
holding key
cuerpo armado
armed body
adaptador
adapter
tuerca
nut
A
adaptador
adapter
llave de retención
holding key
chapetón
escutcheon
llave de retención
holding key
camisa
casing
camisa
casing
cortador de tubo
(no incluido)
pipe cutter
(not included)
Nota: Recorte la camisa si es necesario.
Note: Cut the shirt if necessary.
Comp entes el odu to/ P odu tC mponts
ond Pr cr c o ne
3
No. DESCRIPCIÓN DESCRIPTION
1 Cúpula Ciega para Fluxómetro Dome Blind Flushometer
2 Émbolo Armado 1L Plunger Armed 1L
3 Rondana S-21 Vulcanizada Washer S-21 Vulcanized
4 Anillo Presión Niple Extensión Pressure Nipple Ring Extension
5 O'ring 2-123 O'ring 2-123
6 Llave de Retención Armada Holding Key Armed
7 Adaptador Adapter
8 Tubo Camisa Flux. de 2" Shirt Flux Tube. 2 "
9 Chapetón para Fluxómetro Flange for Flushometer
10 Manija Armada para Fluxómetro Flushometer Handle Navy
No. DESCRIPCIÓN DESCRIPTION
11
Rondana tuerca, tuerca de 32 mm,
niple recto reducción 32 - 19 mm,
kit tuerca 19 mm c/rondanas y
chapetón mingitorio 19 mm
Washer nut, 1 ¼" nut, 1 ¼" - ¾"
straight nipple reduction, ¾"
setting kit nut with washers and
¾" urinal escutcheon
Para spud de Ø 19 mm / For Ø ¾” spud
3
1
2
11
10
4
5
6
7
8
9
8
cortador de tubo(no incluido)
pipe cutter (not included)
oco iqu
Cloque el uerp armado y verif e
d(B ar
la istancia ). Si es neces io
erecort el niple. /P hbo
lace t e dy
s nd e an
as embly a check th dist ce (B).
fnes he ppI ec sary cut t ni le.
3
Solde el adaptador. / Solder the
adapter.
6
A: Longitud resultante de presentar el adaptador,
la llave de retención y el mueble en posición.
A: Present the resulting length adapter, the holding
key and furniture in place.
tubería de alimentación
Ø 25 mm (1”) (no incluida)
supply pipe Ø 25 mm (1 ")
(not included)
pared con
acabado final
wall finish
adaptador
(incluido)
adapter (included)
A
Arme el niple para spud. / Assemble the nipple to spud.
9
Verifique el apriete del
spud. / Check the
tightness of the spud.
Coloque el chapetón y enrosque el cuerpo armado sin apretar. /
Place the escutcheon and screw the armed body loosely.
10 Coloque el niple armado. / Place the assembled nipple.
11
Nota: Enrosque el niple armado, posteriormente apriete firmemente el cuerpo
armado a la llave de retención.
Note: Screw nipple assembly, then firmly tighten the armed force to stop body.
Verifique que las rondanas estén
bien colocadas. / Check that the
washers are properly installed.
cuerpo armado
armed body
spud
(no incluido)
spud
(not included)
chapetón
escutcheon
rondana
washer
tuerca
nut
niple recto
straight nipple
niple armado
nipple armed
niple
nipple
cuerpo armado
armed body
B
Inserte el chapetón con la camisa y
enrosque la llave de retención. / Insert
the escutcheon with shirt and turn key
retention.
7
Nota: La instalación puede ser izquierda o derecha.
Note: Installation can be left or right.
Utilice teflón en el niple
roscado. / Use Teflon
threaded nipple.
camisa
chapetón
escutcheon
llave de retención
holding key
casing
rondana
washer
niple recto
straight nipple
tuerca
nut
tuerca spud
urinal nut
rondana de polietileno
polyethylene washer sello mingitorio
seal urinal
4
cúpula
dome
Coloque la rondana y la cúpula. / Place
the washer and the dome.
14
15 16 17
18 19 20
Abra la llave de retención para
purgar. / Open the shut-off valve to
purge.
Cierre la llave de retención. / Close
the shut-off valve.
Desenrosque la cúpula y retire la
rondana. / Unscrew the dome and
remove the washer.
cúpula
dome
rondana
washer
Verifique que no exista basura en el
interior del cuerpo y en la cúpula. /
Check that there is waste inside the
body and dome.
basura
garbage
Coloque nuevamente el émbolo,
rondana y enrosque la cúpula,
apretando firmemente. / Replace the
piston, washer and screw the dome,
pressing firmly.
Abra completamente la llave de
retención, coloque la cúpula y
accione 3 veces para estabilizar el
funcionamiento, permitiendo el ciclo
completo entre descarga en cada
accionamiento. / Fully open the shut-
off valve, replace the dome and press
3 times to stabilize the operation,
allowing the full cycle discharge
between each actuation.
cúpula
dome
13
cúpula
dome
rondana
washer
émbolo
(color gris)
plunger (gray color)
Desenrosque la cúpula y retire la
rondana y el émbolo. / Unscrew and
remove the dome washer and plunger.
llave de
retención
holding key
cúpula
dome
12 Cierre la llave de retención y abra el
suministro general del agua. / Close
the shut-off valve and open the general
water supply..
llave de
retención
holding key
rondana
washer
rondana
washer
émbolo
(color gris)
plunger (gray color)
llave de
retención
holding key
cúpula
dome
llave de
retención
holding key
cúpula
dome
Para obtener una descarga de su fluxómetro accione la palanca
una sola vez. Su fluxómetro descargará un volumen de agua de 1
litros. / For a download of the flush valve activate the lever once.
The flush valve of the water discharge volume of 1 liters.
21
Cierre la llave de retención y genere una descarga de agua para
liberar la presión. Proceda a desenroscar la cúpula y retire la
rondana y émbolo. / Close the shut-off valve and generate a
discharge of water to release the pressure. Proceed to unscrew
the dome and remove the washer and plunger.
22
Oprcón /Ope a on
e a i rtia i nod bine ce
Mnten miet el Ém olo/P stonMai t nan
Periodo óptimo de mantenimiento preventivo del émbolo : cada 6
meses / Best time preventive maintenance Piston: every 6 months
Desarme el émbolo, lave a chorro de agua y reemplace las piezas que tengan desgaste si es necesario, finalmente arme nuevamente. /
Disassemble the piston wash water jet and replace the parts for wear if necessary, finally assemble again.
23
Retire el tapón y cierre la llave de
retención. / Remove the cap and close
the shut-off valve.
24 Desenrosque la palanca. / Unscrew
the lever.
25 Verifique que el empaque cónico y la
rondana no estén desgastados,
límpielos o cámbielos si es necesario.
Arme nuevamente. / Check that the
tapered gasket and washer for wear,
clean or replace if necessary.
Reassemble.
26
Asegúrese de que las
muescas estén limpias. /
Make sure the grooves
are clean.
5
t i to aaanc v r
Man enim enP lanc / Mintena eLe e
llave de
retención
holding key
palanca
lever
cúpula
dome
cúpula
dome
rondana
washer
émbolo
(color gris)
plunger (gray color)
llave de
retención
holding key
cúpula
dome
cúpula
dome
rondana
washer
empaque
cónico
tapered gasket
émbolo macho
(color gris)
male plunger
(gray color)
émbolo hembra
fermale plunger
(verificar desgaste)
rubber washer
(check for wear)
rondana de hule
asiento con perno
bolt seat
resorte émbolo
spring plunger
llantita vulcanizada
(verificar desgaste)
llantita vulcanized
(check for wear)
rondana
washer
tornillo
screw
perno regulador
adjusting bolts
muesca
notch
HELVEX, S. A. DE C.V. Calzada Coltongo 293, Col. Industrial Vallejo 02300 Del. Azcapotzalco, México, D.F. Tel. (55) 53-33-94-00.
Es muy importante seguir las siguientes instrucciones para conservar los
acabados de los
1. Utilice únicamente agua y un paño limpio.
2. No utilice fibras, polvos, abrasivos, ni productos químicos.
3. No utilice objetos punzo-cortantes para limpiar los acabados.
4. Se recomienda realizar la limpieza de su producto diariamente.
Nota: Vea nuestros tips en la pag. www.helvex.com.mx
productos HELVEX, con brillo y en perfecto estado:
It is very important to follow the instructions below to preserve HELVEX products
finishes, shiny and in perfect condition:
1. Use only water and a clean cloth.
2. Do not use fibers, powders, abrasives, or chemicals.
3. Do not use sharp objects to clean the finish.
4. It is recommended to clean your product daily.
Note: See our tips on: www.helvex.com.mx
Recomendaciones de Limpieza / Cleaning Recommendations
Posibles Causas y Soluciones / Possible Causes and Solutions
In Guadalajara:
Contact:
Enter our free
training courses.
In Monterrey:
En la Ciudad de México:
In Mexico City:
En Monterrey:
En Guadalajara:
01 55 53 33 94 00
Ext. 5804, 5805 y 5806 (0133) 36 19 01 13
Comunícate:
Participa en nuestros
cursos gratuitos
de capacitación.
(0181) 83 33 57 67
(0181) 83 33 61 78
6
Problema / Problem Causa / Cause Solución / Solution
El émbolo del fluxómetro no es el correcto. / The flush
valve plunger is not correct.
Verifique que el émbolo sea el correcto (color gris). / Verify
that the plunger is correct (gray color).
La llave de retención está parcialmente abierta. / The
stop is partially open.
Abra totalmente la llave de retención (pag. 4 paso 20). / Open
fully the stop (page 4 step 20).
La presión de operación no es la adecuada. / The
operating pressure is not adequate.
Verifique que la presión mínima de operación sea de 1 kg/cm².
/ Verify that the minimum operating pressure is 1 kg/ cm ².
La llave de retención está cerrada. / The key to retention
is closed.
Abra la llave de retención (pag. 4 paso 20). / Open the shut-off
valve (page 4 step 20).
La línea esta obstruída. / Obstructed line.
Verifique el flujo del agua retirando el émbolo y realizando una
descarga. / Check the flow of water by removing the piston
and carrying a discharge.
El diámetro de la tubería no es la adecuada. / The
diameter of the pipe is not adequate.
Verifique que la tubería sea la indicada (pag. 1, dimensiones
recomendadas). / Check that the tubing is as stated (page 1,
dimensions recommended).
Las conexiones no están apretadas. / The connections
are not tight. Apriete firmemente. / Tighten.
Las rondanas están torcidas o mal colocadas. / The
washers are bent or misplaced.
Verifique que las rondanas esten colocadas correctamente
(pag. 3, paso 9). / Verify that the washers are positioned
correctly (page. 3, step 9).
Realice el mantenimiento (pag. 5, mantenimiento del émbolo). /
Maintain (page 5 piston maintenance).
La descarga es poca o
nula.
/ The download is little or
no.
Hay fuga en las
conexiones. / There are
leaks in the connections.
No cierra el flujo o tarda
en cerrar. / It shuts off the
flow or take to close.
Acumulación de basura en la esprea del émbolo. /
Accumulation of trash on the orifice on the piston.

Other Helvex Plumbing Product manuals

Helvex H-3003 User manual

Helvex

Helvex H-3003 User manual

Helvex 310-32 User manual

Helvex

Helvex 310-32 User manual

Helvex Vertika TV-081-S User manual

Helvex

Helvex Vertika TV-081-S User manual

Helvex E-709 User manual

Helvex

Helvex E-709 User manual

Helvex 25 User manual

Helvex

Helvex 25 User manual

Helvex KUBICA UTR-036 User manual

Helvex

Helvex KUBICA UTR-036 User manual

Helvex E-60 User manual

Helvex

Helvex E-60 User manual

Helvex ES-003 User manual

Helvex

Helvex ES-003 User manual

Helvex MAXIMA E-713 User manual

Helvex

Helvex MAXIMA E-713 User manual

Helvex TV-121 User manual

Helvex

Helvex TV-121 User manual

Helvex Nuva TV-203-C User manual

Helvex

Helvex Nuva TV-203-C User manual

Helvex NUVA E-46 User manual

Helvex

Helvex NUVA E-46 User manual

Helvex 185-19 User manual

Helvex

Helvex 185-19 User manual

Helvex NUVA E-47 User manual

Helvex

Helvex NUVA E-47 User manual

Helvex 282-H User manual

Helvex

Helvex 282-H User manual

Helvex UH-105-WOA User manual

Helvex

Helvex UH-105-WOA User manual

Helvex Premier 15104 User manual

Helvex

Helvex Premier 15104 User manual

Helvex Deco UDC-05 User manual

Helvex

Helvex Deco UDC-05 User manual

Helvex Kúbica 14104 User manual

Helvex

Helvex Kúbica 14104 User manual

Helvex Nuva E-3003 User manual

Helvex

Helvex Nuva E-3003 User manual

Helvex 185-19-0.5 User manual

Helvex

Helvex 185-19-0.5 User manual

Helvex 285-19 User manual

Helvex

Helvex 285-19 User manual

Helvex 185-19 User manual

Helvex

Helvex 185-19 User manual

Helvex Argos TV-296 User manual

Helvex

Helvex Argos TV-296 User manual

Popular Plumbing Product manuals by other brands

Viega Advantix 4937.2 Instructions for use

Viega

Viega Advantix 4937.2 Instructions for use

Sanela SLU 91PB Instructions for use

Sanela

Sanela SLU 91PB Instructions for use

ZUCCHETTI GILL ZGL706 Instruction for the installation

ZUCCHETTI

ZUCCHETTI GILL ZGL706 Instruction for the installation

Grohe 31 539 manual

Grohe

Grohe 31 539 manual

Relax Far Infrared Ray Sauna owner's manual

Relax

Relax Far Infrared Ray Sauna owner's manual

Moen POSI-TEMP L82691 Illustrated parts manual

Moen

Moen POSI-TEMP L82691 Illustrated parts manual

BELLOSTA 1530 installation instructions

BELLOSTA

BELLOSTA 1530 installation instructions

Glacier bay HD58302-1701 Use and care guide

Glacier bay

Glacier bay HD58302-1701 Use and care guide

Krowne Royal Series installation manual

Krowne

Krowne Royal Series installation manual

ESS Easy Drain Dryphon upgrade set 30 Installation advice

ESS

ESS Easy Drain Dryphon upgrade set 30 Installation advice

Luxart debutante DB411T0-CP Installation

Luxart

Luxart debutante DB411T0-CP Installation

American Standard Colony Soft 3-Handle Bath/Shower Fitting... Specification sheet

American Standard

American Standard Colony Soft 3-Handle Bath/Shower Fitting... Specification sheet

FM Mattsson Tronic Shower Panel WMS 9500-0000 Installation and maintenance  instruction

FM Mattsson

FM Mattsson Tronic Shower Panel WMS 9500-0000 Installation and maintenance instruction

Hans Grohe AddStoris 41742 Series Assembly instructions

Hans Grohe

Hans Grohe AddStoris 41742 Series Assembly instructions

Kohler K-997 quick start guide

Kohler

Kohler K-997 quick start guide

Kohler K-45210 Installation and care guide

Kohler

Kohler K-45210 Installation and care guide

Colacril ATMOSFERE.01 Assembly instructions

Colacril

Colacril ATMOSFERE.01 Assembly instructions

VIGO VG09039K manual

VIGO

VIGO VG09039K manual

manuals.online logo
manuals.online logoBrands
  • About & Mission
  • Contact us
  • Privacy Policy
  • Terms and Conditions

Copyright 2025 Manuals.Online. All Rights Reserved.