manuals.online logo
Brands
  1. Home
  2. •
  3. Brands
  4. •
  5. Helvex
  6. •
  7. Plumbing Product
  8. •
  9. Helvex H-13341G User manual

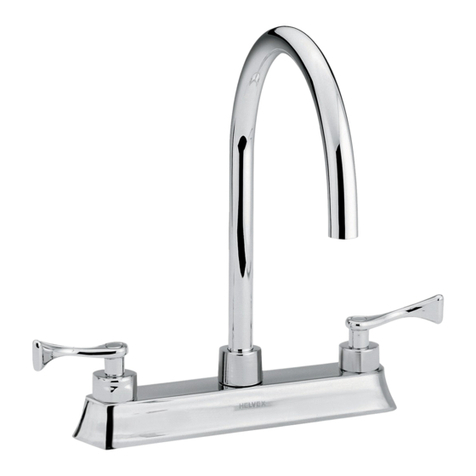
Helvex H-13341G User manual

Hola soy Fluxy, te
ayudaré a instalar
tu producto.
Hi I'm Fluxy, I'll
help you to install
your product.
INSTALLATION GUIDE
GUÍA DE INSTALACIÓN
1-02-0863-3
H-13341G
Mezcladora de Hospital de 8" a 12" con Cuello de
Ganso Giratorio y Manijas Largas / 8 "to 12"
Hospital Mixer with Swivel Goose Neck and Long
Handles
H-13341G
H13341G-1.9
Cada metro de altura de
su producto a la base
del tinaco equivalen a
(0,1 kg/cm²) [1,42 PSI].
Every meter of height of
your product to the base
of the tube is equivalent
to (0,1 kg/cm²) [1,42
PSI].
Para disminuir el riesgo de lesiones o daños a la propiedad, lea todas las instrucciones antes de instalar el
producto. Utilice gafas de seguridad. En obras de construcción, instalación, modificación, ampliación y
reparación deben cumplir con el reglamento de construcción y obras de su localidad. El producto ilustrado
puede sufrir cambios de aspecto como resultado de la mejora continua a la que está sujeto.
Agradecemos su elección por los productos HELVEX.
Estamos seguros de que su confiabilidad por el producto excederá sus más altas expectativas, cuya
funcionalidad, estética, durabilidad, respaldo integral y alta calidad le otorgarán plena satisfacción por años,
reflejando el compromiso con la calidad, innovación y el medio ambiente que forman parte de Helvex.
To reduce the risk of injury or property damage, read all instructions before installing the product. Please
remember to use safety glasses. In construction, installation, alteration, extension and repair, the rules of
constructions must be applied. As result of continuous improvement, the illustration product may change in
appearance.
ADVERTENCIA / WARNING
Esta guía de instalación aplica al producto en cualquier acabado. / This installation
guide applies to the product in any finish.
Thank you for choosing HELVEX products.
We are confident that the product reliability will exceed your maximum expectations. The functionality,
aesthetics, durability, quality and support will grant you full satisfaction for years, it is Helvex commitment to
the quality, innovation and the environment.
Requerimientos de Instalación
Installation Requirements
Requerimientos de Instalación
Installation Requirements
Modelo / Model Mínima / Minimum Máxima / Maximum
kg/cm² PSI kPa kg/cm² PSI kPa
6,0 85,3 588,3
Para el correcto funcionamiento de éstos productos, se
recomiendan las siguientes presiones:
For the correct operation of these products, the following
pressures are recommended:
H-13341G
perico destornillador de cruz
adjustable wrench
Herramienta Requerida / Required Tools
cross-screwdriver
/ Installation Dimensions
1
H13341G-1.9
H13341G-1.9 6,0 85,3 588,3
0,50 7,11 49,0
Dimensiones de Instalación
Mezcladora de Hospital de 8" a 12" con Cuello de
Ganso Giratorio y Manijas Largas / 8 "to 12"
Hospital Mixer with Swivel Goose Neck and Long
Handles
Para tarja de acero inoxidable barrene de acuerdo a las
distancias que se muestran en la figura. / For stainless steel
sink, sweep according to the distances shown in the figure.
6,3 cm
20,3 cm
*3,2 cm máx.
Tarja de acero Inoxidable
Espesor máximo de placa 1
cm. / Maximum plate
thickness 1 cm.
8,0"
2,48"
*1,25" max.
Stainless steel sink
llave de plomero
plumber’s wrench
0,25 3,55 24,5
[email protected]
Original Spare Parts:
Consultancy and Technical
(52) 55 53 33 94 31
(52) 55 53 33 94 00
Refacciones Originales:
Asesoría y Servicio Técnico:
Ext. 5913, 5068 y 4815
Service:
(52) 55 53 33 94 21
[email protected]
www.refaccioneshelvex.com.mx
2
Instalación General
/ General Installation
234
7
Inserte el cuerpo principal en tarja. /
Insert the main body into the sink.
Enrosque a tope el chapetón en el
cuerpo central. / Screw the escutcheon
into the central body.
5Enrosque la tuerca firmemente. / Screw
the nut tightly. 6Inserte la salida. / Insert the faucet. Apriete tuerca firmemente. / Tighten nut
securely.
8 9
Inserte la rondana en el cuerpo lateral e instale. / Insert the
washer into the side body and install.
Enrosque las mangueras a los cuerpos laterales y el cuerpo
central. / Thread the hoses to the side bodies and the central
body.
Retire el chapetón y el empaque del
c u e r p o c e n t r a l . / R e m o v e t h e
escutcheon and gasket from the central
body.
chapetón
empaque
cuerpo
central
escutcheon
gasket
central
body
cuerpo
central
central
body
tarja de acero
inoxidable
stainless steel sink
llave de plomero
chapetón
escutcheon
empaque
gasket
tuerca
nut
plumber's wrench
salida
faucet
tuerca
nut
Oriente correctamente su salida.
Orient your departure correctly.
4,8 cm
1.88"
rondana
washer
cuerpo derecho color azúl
body right blue color
cuerpo izquierdo
color rojo
body left red color
chapetón
empaque
escutcheon
gasket
llave de plomero
plumber's wrench
Apriete firmemente la tuerca del cuerpo lateral.
Tighten the side body nut securely.
manguera ½”-14 NPSM x 3/8” -18 NPSM
Mod. Sh-394 / ½ "-14 NPSM x 3/8" -18 NPSM
hose Mod. Sh-394.
3
10 11 Instale las manijas y sujetelas con los tornillos. / Install the
handles and secure them with the screws.
12 Abra la línea de alimentación principal. Para abrir, cerrar y regular la temperatura del agua, gire las manijas. / Open the main . To water supply line
open, close and regulate the water temperature, turn the handles.
13 14
Desenrosque, retire el aireador y limpie a chorro de agua. /
Unscrew, remove aerator and flush.
Enrosque nuevamente el aireador y colóquelo en la salida. /
Screw the aerator again and place it in the outlet.
Conecte las mangueras (no incluidas) a los cuerpos laterales y
después a la línea de alimentación. / Connect the hoses (not
included) to the side bodies and then to the water supply line.
Operación
/ Operation
mangueras (no incluidas)
hoses (not included)
Purgue las líneas de alimentación antes de conectar las mangueras.
Purge the water supply line before connecting the hoses.
destornillador de cruz
cross-screwdriver
tornillo
screw
manija
handle
Oriente correctamente las manijas. / Orient the handles correctly.
+ fría
+ caliente
Mantenimiento del Aireador
/ Aerator Maintenance
aireador Sh-282
empaque
aireador Sv-551
empaque
gasket gasket
Sh-282 aireator Sv-551 aireator
H-13341G H13341G-1.9 H-13341G H13341G-1.9
empaque
gasket empaque
gasket
aireador Sh-282
Sh-282 aireator
aireador Sv-551
Sv-551 aireator
4
Posibles Causas y Soluciones / Troublesshooting
Problema / Problem Causas / Causes Soluciones / Solutions
Aireador obstruído / Clogged areator.
La presión de operación no es la adecuada. /
The operating pressure is not adequate.
Retire el aireador y límpielo. / Remove the aereator and clean.
La salida está floja.
/ The faucet is loose.
La tuerca espárrago no esta apretada.
/ The shank nut is tight. Apriete firmemente la tuerca espárrago (Pag. 2, paso 5).
/ Tigthen the shank nut (Page 2, step 5).
La palanca maneral se encuentra cerrada. /
The lever handle is cosed.
Gire la palanca maneral, según la operación del producto (Pag. 3, paso 12)
Operación. / Open the main water valve (Page 3, step 12) Operation.
No sale agua.
/ No water flow.
Existe poco flujo de agua.
/ There is some water flow. Verifique las especificaciones de presión mínima (página 1) /
Verify the specifications the minimum pressure (page 1).
La válvula principal del agua se encuentra cerrada. /
The main water valve is closed.
Abra la válvula principal de agua. /
Open the main water valve.
Es muy importante seguir las siguientes instrucciones para conservar los
acabados de los productos HELVEX, con brillo y en perfecto estado:
1. Utilice únicamente agua y un paño limpio.
2. No utilice fibras, polvos, abrasivos, ni productos químicos.
3. No utilice objetos punzo-cortantes para limpiar los acabados.
4. Se recomienda realizar la limpieza de su producto diariamente.
Nota: Vea nuestros tips en la pag. www.helvex.com.mx
It is very important to follow the instructions below to preserve HELVEX products
finishes, shiny and in perfect condition:
1. Use only water and a clean cloth.
2. Do not use fibers, powders, abrasives, or chemicals.
3. Do not use sharp objects to clean the finish.
4. It is recommended to clean your product daily.
Note: See our tips on: www.helvex.com.mx
Recomendaciones de Limpieza / Cleaning Recommendations
In Guadalajara:
Contact:
Enter our free
training courses.
In Monterrey:
En la Ciudad de México:
In Mexico City:
En Monterrey:
En Guadalajara:
01 55 53 33 94 00
Ext. 5804, 5805 y 5806 (0133) 36 19 01 13
Comunícate:
Participa en nuestros
cursos gratuitos
de capacitación.
(0181) 83 33 57 67
(0181) 83 33 61 78
HELVEX, S. A. DE C. V. Calzada Coltongo # 293, Col. Industrial Vallejo, Alcaldía Azcapotzalco, C. P. 02300, Ciudad de México.

This manual suits for next models

1

Other Helvex Plumbing Product manuals

Helvex 444 User manual

Helvex

Helvex 444 User manual

Helvex PIAZZA UPIA-100 User manual

Helvex

Helvex PIAZZA UPIA-100 User manual

Helvex WHIP RM-30 User manual

Helvex

Helvex WHIP RM-30 User manual

Helvex Premier E-909 User manual

Helvex

Helvex Premier E-909 User manual

Helvex VP-1 User manual

Helvex

Helvex VP-1 User manual

Helvex 4954 User manual

Helvex

Helvex 4954 User manual

Helvex Alika E-920 User manual

Helvex

Helvex Alika E-920 User manual

Helvex AC10-8 User manual

Helvex

Helvex AC10-8 User manual

Helvex 410-19-0.5 User manual

Helvex

Helvex 410-19-0.5 User manual

Helvex Elegance 8148 User manual

Helvex

Helvex Elegance 8148 User manual

Helvex PIAZZA PIA-200 User manual

Helvex

Helvex PIAZZA PIA-200 User manual

Helvex 185-19-1 User manual

Helvex

Helvex 185-19-1 User manual

Helvex 185-19-0.5 User manual

Helvex

Helvex 185-19-0.5 User manual

Helvex 27 User manual

Helvex

Helvex 27 User manual

Helvex MAGNA DX User manual

Helvex

Helvex MAGNA DX User manual

Helvex 285-19 User manual

Helvex

Helvex 285-19 User manual

Helvex LV FUTURA1 User manual

Helvex

Helvex LV FUTURA1 User manual

Helvex ELITE UE-300-DX User manual

Helvex

Helvex ELITE UE-300-DX User manual

Helvex FB-185-19 User manual

Helvex

Helvex FB-185-19 User manual

Helvex MAGNA UTV-048 User manual

Helvex

Helvex MAGNA UTV-048 User manual

Helvex Optima H-200 User manual

Helvex

Helvex Optima H-200 User manual

Helvex PD-01-AI User manual

Helvex

Helvex PD-01-AI User manual

Helvex 24-CH User manual

Helvex

Helvex 24-CH User manual

Helvex E-45 User manual

Helvex

Helvex E-45 User manual

Popular Plumbing Product manuals by other brands

Blanco BLANCOMERKUR-S HD INSTALLATION AND CARE INSTRUCTIONS

Blanco

Blanco BLANCOMERKUR-S HD INSTALLATION AND CARE INSTRUCTIONS

Linki ONE325 quick start guide

Linki

Linki ONE325 quick start guide

ILBAGNOALESSI One 8.1497.1 Installation instruction

ILBAGNOALESSI

ILBAGNOALESSI One 8.1497.1 Installation instruction

KWC GASTRO 802341 Installation and service instructions

KWC

KWC GASTRO 802341 Installation and service instructions

Krowne SILVER 19-220L installation manual

Krowne

Krowne SILVER 19-220L installation manual

Oras Electra 6662STX Installation and maintenance guide

Oras

Oras Electra 6662STX Installation and maintenance guide

Hans Grohe 10452180 Assembly instructions

Hans Grohe

Hans Grohe 10452180 Assembly instructions

agape DROP ACER1099F Assembly instructions

agape

agape DROP ACER1099F Assembly instructions

Kohler 27406-2MB manual

Kohler

Kohler 27406-2MB manual

Kohler MODULO 78023T-4 installation instructions

Kohler

Kohler MODULO 78023T-4 installation instructions

Yokota YW-50C manual

Yokota

Yokota YW-50C manual

Lacava Libera 5302 owner's manual

Lacava

Lacava Libera 5302 owner's manual

Allen + Roth CAMERON 42MB installation manual

Allen + Roth

Allen + Roth CAMERON 42MB installation manual

Ideal-Standard A 2659 NU installation instructions

Ideal-Standard

Ideal-Standard A 2659 NU installation instructions

Grohe 6593000 Specifications

Grohe

Grohe 6593000 Specifications

Speakman SEF-1800 EYESAVER Installation, Maintenance & Operation Instructions

Speakman

Speakman SEF-1800 EYESAVER Installation, Maintenance & Operation Instructions

Kraus Oletto KPF-2631 installation manual

Kraus

Kraus Oletto KPF-2631 installation manual

Hans Grohe Flowstar 13954 Series Assembly instructions

Hans Grohe

Hans Grohe Flowstar 13954 Series Assembly instructions

manuals.online logo
manuals.online logoBrands
  • About & Mission
  • Contact us
  • Privacy Policy
  • Terms and Conditions

Copyright 2025 Manuals.Online. All Rights Reserved.