manuals.online logo
Brands
  1. Home
  2. •
  3. Brands
  4. •
  5. Helvex
  6. •
  7. Plumbing Product
  8. •
  9. Helvex KUBICA E-776 User manual

Helvex KUBICA E-776 User manual

perico
adjustable
wrench
INSTALLATION GUIDE
GUÍA DE INSTALACIÓN
1-05-2187-1
Artículos Incluidos en el Producto /
Hardware Included in the Product
llave allen 5/64"
5/64" allen wrench
teflón
Herramientas y Materiales Recomendados /
Recommended Tools and Materials
plumber’s
tape
KÚBICA E-776
MAGNA DX E-781
E-776
E-781
E-776
E-781
desarmador de cruz
phillips screwdriver
Para disminuir el riesgo de lesiones o daños a la propiedad, lea todas las instrucciones antes de instalar el
producto. Utilice gafas de seguridad. En obras de construcción, instalación, modificación, ampliación y
reparación deben cumplir con el reglamento de construcción y obras de su localidad. El producto ilustrado
puede sufrir cambios de aspecto como resultado de la mejora continua a la que está sujeto.
Agradecemos su elección por los productos HELVEX.
Estamos seguros de que su confiabilidad por el producto excederá sus más altas expectativas, cuya
funcionalidad, estética, durabilidad, respaldo integral y alta calidad le otorgarán plena satisfacción por años,
reflejando el compromiso con la calidad, innovación y el medio ambiente que forman parte de Helvex.
To reduce the risk of injury or property damage, read all instructions before installing the product. Please
remember to use safety glasses. In construction, installation, alteration, extension and repair, the rules of
constructions must be applied. As result of continuous improvement, the illustration product may change in
appearance.
ADVERTENCIA / WARNING
Esta Guía de Instalación Aplica al Producto en Cualquier Acabado
This Installation Guide Applies to the Product in any Finishing
Thank you for choosing HELVEX products.
We are confident that the product reliability will exceed your maximum expectations. The functionality,
aesthetics, durability, quality and support will grant you full satisfaction for years, it is Helvex commitment to
the quality, innovation and the environment.
Cada metro de altura de
su producto a la base del
tinaco equivalen a
(0,1 kg/cm²) [1,42 PSI].
Every meter of height of
your product to the base
of the tube is equivalent
to (0,1 kg/cm²) [1,42 PSI].
Requerimientos de Instalación
Installation Requirements
Requerimientos de Instalación
Installation Requirements
Modelo / Model Mínima / Minimum Máxima / Maximum
kg/cm² PSI kPa kg/cm² PSI kPa
Para el correcto funcionamiento de éstos productos, se
recomiendan las siguientes presiones:
For the correct operation of these products, the following
pressures are recommended:
1,2 17,06 117,67 6,0 85,3 588,3
/ Dimensions for Installation
Dimensiones para la Instalación
Hola soy Fluxy, te
ayudaré a instalar
tu producto.
Hi I'm Fluxy, I'll
help you to install
your product.
[email protected]
Original Spare Parts:
Consultancy and Technical
(52) 55 53 33 94 31
(52) 55 53 33 94 00
Refacciones Originales:
Asesoría y Servicio Técnico:
Ext. 5913, 5068 y 4815
Service:
(52) 55 53 33 94 21
[email protected]
www.refaccioneshelvex.com.mx
cutter silicón antihongos
antifungus silicone
Monomando de Balanceo de Presión para
Regadera, Tina o Regadera Manual con Desviador
Single Handle Pressure Balanced with Diverter for
Shower Head, Tub Spout or Hand Shower
1Ranure el muro con las dimensiones indicadas en los diagramas. / Slot the wall with the dimensions
shown in the diagrams.
Vista Superior / Top View
Vista Frontal / Front View
NPT Nivel de Piso Terminado
FFL Finished Floor Level
pared con
acabado final
finished wall
E-776
E-781
Acotación: cm (pulg.) / Dimension: cm (inch.)
A
*B
C
*1,20 m
(47”)
*16,0 cm
6,3"
NPT
FFL
*10,1 cm
4,0"
*Medidas Recomendadas / *Recommended Dimensions
1,19 cm (RI) Rango de Instalación
0,47" (IR) Installation Range
7,17
(2,82)
6,58
(2,59)
A*B C
Modelo / Model
7,77
(3,06)
*1,90 cm
74,8”
cámara
de aire
air chamber
*20-30 cm
7,8"-11,8"
max.
Medidas Recomendadas /
Recommended Dimensions
2
30 cm
max.11,8”
*70 cm
27,5” min.
tapón
plug
tubo Ø ½”
(no incluído)
Ø ½” tube
(not included)
NPT
FFL
120 m
(47,2")
4
56
Instalación General / General Installation
3Enrosque los conectores (no incluidos) con tubería (no incluida) a las conexiones de la caja. /
Screw the connectors (not included) with the tube (not included) to the box connections.
2
nivel
level
Desenrosque los tornillos para retirar la cubierta de plástico, desenrosque el
chapetón esférico y la tuerca para retirar el cartucho, purgue la instalación. Vuelva a
ensamblar. / Unscrew the screws to remove the plastic cover and unscrew the
cartridge cap and the nut to remove the cartridge, purge the installation.
Reassemble.
burbuja
bubble
VISTA FRONTAL
FRONT VIEW Coloque teflón en las
conexiones roscadas. /
Apply plumber’s tape around
the threaded connections.
1/2" - 14 NPT
(color negro)
salida a la *regadera
(black color)
*shower head outlet
1/2" - 14 NPT
(color azul)
entrada de agua fría
(blue color)
cold water inlet
1/2" - 14 NPT
(color rojo)
entrada de agua
caliente
(red color)
hot water inlet
1/2" - 14 NPT
(color negro)
*salida a la tina o a la *regadera manual
(black color)
*tub spout or *hand shower outlet
codo roscado
(no incluido)
threaded elbow
(not included)
Inserte la caja armada dentro del ranurado de la
pared, nivele y fije la instalación. / Insert the
assembly box within the slotted wall, level and
fix the installation.
Se considera que la caja está nivelada en el plano horizontal
y vertical, cuando la burbuja está en el centro. /
The box is considered to be level in the horizontal and
vertical plane, when the bubble is in the center.
Nota: Asegúrese de que el acabado final se instalará dentro
del Rango de Instalación (RI). / Note: Make sure that the
finished wall will be installed within the Installation Range (IR).
tuerca
nut
chapetón esférico
cartridge cap
cubierta de plástico
plastic cover
tornillo
screw
cartucho
cartridge
Mantenga hermética la instalación y genere una prueba
de fuga a la presión de operación (1,2 - 6 kg/cm²). /
Keep the installation airtight and generate a leak test at
the operating pressure (17,06 - 85,3 PSI).
Nota: Asegúrese de que no exista ninguna fuga en la instalación. /
Note: Make sure that there is no leakage in the installation.
tapón (no incluido)
cap (not included)
kg/cm²
PSI
7Instale la pared con acabado final. /
Install the finished wall. 8Desenrosque los tornillos y retire la
cubierta de plástico. / Unscrew the
screws and remove the plastic cover.
(*) No incluido
(*) Not included
línea de corte
cutting line
pared con
acabado final
tornillo
screw
9Aplique silicón alrededor de la caja, sellando entre la
caja y el acabado final. / Apply silicone around of the box,
sealing between the box and the finished wall.
silicón antihongos
antifungus silicone
13
11
2
14
Considerar estructuras de madera o metal
para instalar la caja en el muro falso.
Verifique el Rango de Instalación en el
paso 1 y las Medidas Recomendadas en el
paso 2. / Consider wood or metal structures
to install de box on drywall panels. Verify
the Installation Range in the 1 step and the
Recommended Dimensions in the 2 step.
Ubique la caja y marque los
barrenos en la estructura. /
Locate the box and mark the
holes on the structure.
Barrene las marcas. /Drill the marks.
soporte vertical
stud
soporte transversal
cross brace
Coloque la caja y enrosque los tornillos
(no incluidos) para fijar. /Place the box
and screw the screws (not included) to fix.
Instale la tuebería siguiendo los pasos 3 y 4,
purgue la instalación como en el paso 5. Finalice la
instalación siguiendo los pasos 6, 7, 8, 9 y 10. /
Install the tubing following the 3 and 4 steps, purge
the installation how the 5 step. Finish the
installation by following steps 6, 7, 8, 9 and 10.
muro falso
dry wall
12
10 Desenrosque el botón del desviador. Inserte el chapetón y
enrosque el botón del desviador. Inserte el maneral y
enrosque el opresor con la llave allen (incluida) para
fijarlo. / Unscrew the diverter button. Insert the escutcheon
and screw the diverter button. Insert the handle and screw
the set srew with the allen wrench (included) to fix it.
Instalación en Muro Falso / Drywall Installation
tornillo
screw
llave allen
allen wrench opresor
set screw
maneral
handle
chapetón
escutcheon
Operación / Operation
Para abrir y cerrar el flujo de agua, levante y baje el maneral. Para regular
la temperatura del agua, gire a la izquierda para caliente y gire a la derecha
para fría. / To open the water flow lift the lever and to close push the lever.
To adjust the water temperature, turn left for hot and turn right for cold.
Nota: Después de bañarse se recomienda limpiar el monomando con un trapo.
Note: After to take a shower the recomendation is clean the shower single control with a cloth.
abrir
open
+ fría
+ cold
+ caliente
+ hot
15
16
Abra la alimentación general de agua. / Open the general water supply.
17 Presione el desviador para desviar el flujo de agua hacia la
regadera y jálelo para desviar el agua hacia la salida de tina o
regadera manual. / Push the diverter to divert the water flow to
the shower head and pull it to divert the water flow to the tub spout
or hand shower.
Nota: Al cerrar el monomando, el desviador regresará a su posición inicial
desviando el flujo de agua hacia la salida de tina o regadera manual. /
Note: When closing the single handle control, the diverter will return to its starting
position by diverting the water flow to the tub spout or hand shower.
3
botón para
desviador
diverter button
Posibles Causas y Soluciones / Troubleshooting
Problema / Problem Causas / Causes Soluciónes / Solutions
Existe poco flujo de agua.
/ There is low water flow. Verifique la presión mínima requerida (Pág. 1).
/ Check the minimum pressure required (Page 1).
Apriete firmemente las conexiones (Pág. 2, paso 3). /
Thigtened the connections firmly (Page 2, step 3).
La presión de operación no es la adecuada.
/ The operating pressure is not adequate.
Las conexiones no están apretadas correctamente. /
The connections are not tightened correctly.
Limpie o reemplace el cartucho (Pág. 4, pasos 19 y 20).
/ Clean or remplace the cartridge (Page 4, steps 19 and 20).
El cartucho puede estar obstruído.
/ The cartridge may be clogged.
El opresor no está apretado. / The setscrew is not tight.
El maneral está flojo.
/ The handle is loose.
Apriete firmemente el opresor (Pág. 3, paso 10).
/ Tighten the set screw firmly (Page 3, step 10).
HELVEX, S. A. DE C. V. Calzada Coltongo # 293, Col. Industrial Vallejo, Alcaldía Azcapotzalco, C. P. 02300, Ciudad de México.
Es muy importante seguir las siguientes instrucciones para conservar los
acabados de los productos HELVEX, con brillo y en perfecto estado:
1. Utilice únicamente agua y un paño limpio.
2. No utilice fibras, polvos, abrasivos, ni productos químicos.
3. No utilice objetos punzo-cortantes para limpiar los acabados.
4. Se recomienda realizar la limpieza de su producto diariamente.
Visite nuestras páginas www.helvex.com.mx para México y www.helvex.com
para el mercado Internacional
It is very important to follow the instructions below to preserve HELVEX products
finishes, shiny and in perfect condition:
1. Use only water and a clean cloth.
2. Do not use fibers, powders, abrasives, or chemicals.
3. Do not use sharp objects to clean the finish.
4. It is recommended to clean your product daily.
Visit our pages www.helvex.com.mx for Mexico and www.helvex.com
for the International market.
Recomendaciones de Limpieza / Cleaning Recommendations
In Guadalajara:
Contact:
Enter our free
training courses.
In Monterrey:
En la Ciudad de México:
In Mexico City:
En Monterrey: En Guadalajara:
(52) 55 53 33 94 00
Ext. 5806, 5805 y 5804
33 36 19 01 13
Comunícate:
Participa en nuestros
cursos gratuitos
de capacitación.
81 83 33 57 67
81 83 33 61 78
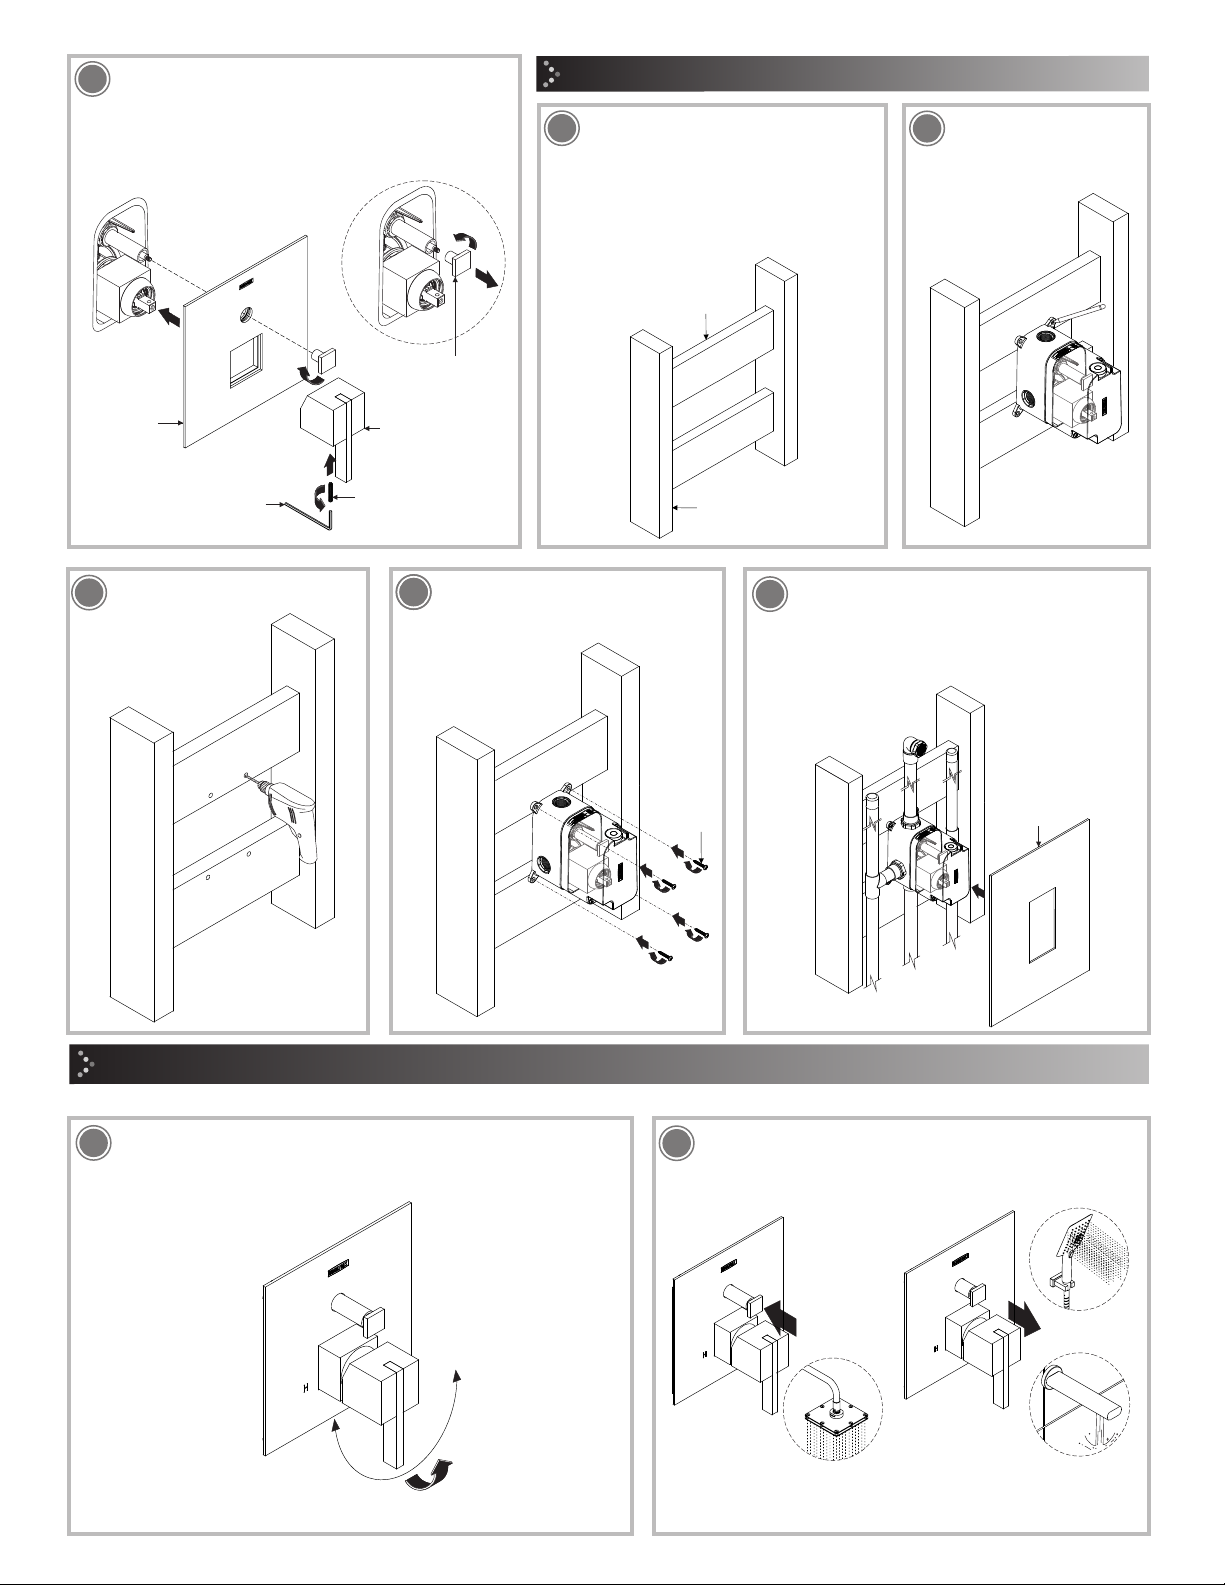
Cambio de Cartucho / Cartridge Replacement
Desenrosque el opresor con la llave allen (incluida)
para retirar el maneral. / Unscrew the set screw with
the allen wrench (included) to remove the handle.
Desenrosque el chapetón esférico y la tuerca, retire y reemplace el cartucho. Arme
nuevamente. / Unscrew the cartridge cap and the nut, remove and replace the cartridge.
Reassembly.
18
Hay fuga en las conexiones. /
There are leaks in the connections Colocar cinta teflón en las conexiones (Pág. 2, paso 3). /
Place the plumber’s tape on the connections (Page 2, step 3).
No se colocó cinta teflón en las conexiones. /
Did not place plumber’s tape on the connections.
maneral
handle
chapetón
escutcheon
llave allen
allen wrench
opresor
set screw
tuerca
nut
chapetón esférico
cartridge cap
cartucho
cartridge
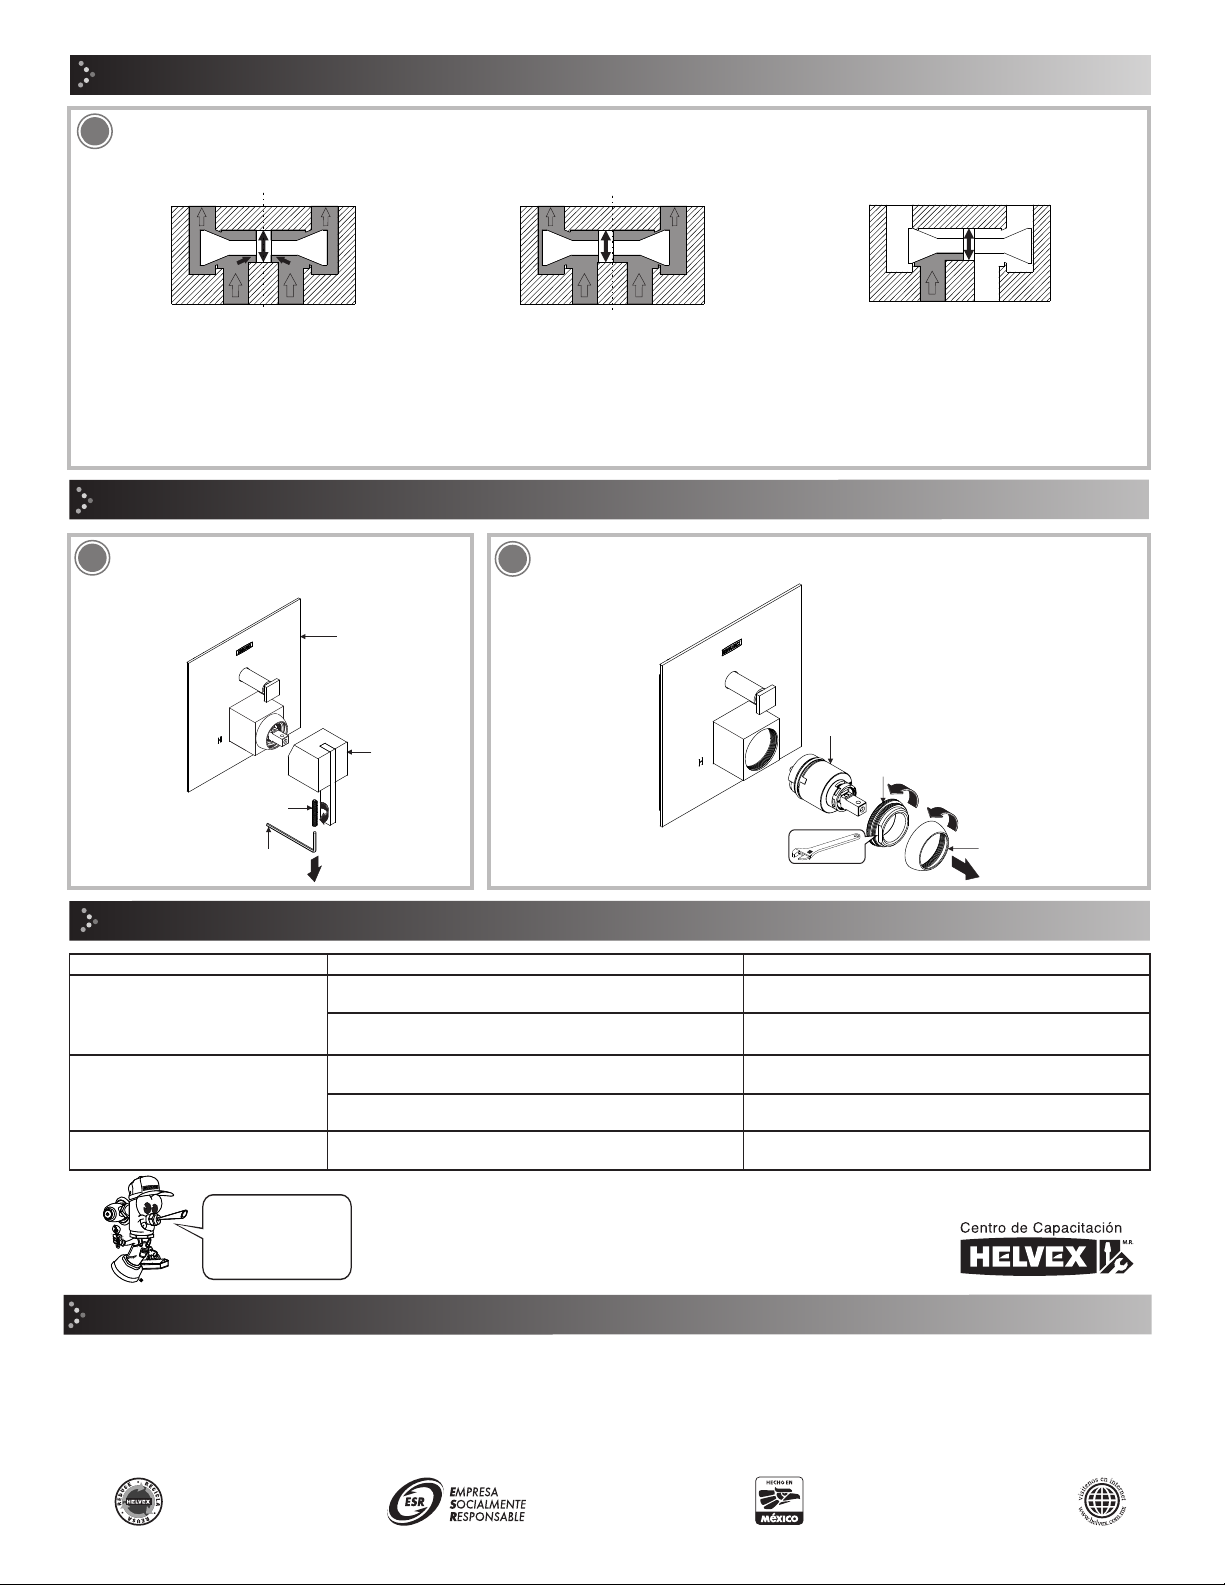
El dispositivo de balanceo de presión mantiene la presión constante, evitando quemaduras debido a que compensa los cambios de presión,
manteniendo la relación entre agua fría y caliente. / The pressure balancing device maintains constant pressure, avoiding scalding because it
compensates for pressure changes, maintaning the relationship between cold and hot water.
caliente
hot
fría
cold
La presión del agua es la misma por
consecuente también el empuje. /
The water pressure is equal therefore
thrust is the same.
La presión del agua caliente es menor a la
del agua fría, por lo tanto el empuje del
agua caliente también. / Hot water
pressure is lower than cold water, so the
hot water thrust too.
La presión del agua fría es igual a
cero. / Cold water pressure is zero.
Operación del Cartucho con Balanceo de Presión / Cartridge Operation with Pressure Balance
caliente
hot
fría
cold
caliente
hot
fría
cold
19 20
4

This manual suits for next models

1

Other Helvex Plumbing Product manuals

Helvex Vértika E-3010-DX User manual

Helvex

Helvex Vértika E-3010-DX User manual

Helvex Elegance 8124 User manual

Helvex

Helvex Elegance 8124 User manual

Helvex Nuva EP-2006 User manual

Helvex

Helvex Nuva EP-2006 User manual

Helvex 24-RHLI User manual

Helvex

Helvex 24-RHLI User manual

Helvex Clasica 104 User manual

Helvex

Helvex Clasica 104 User manual

Helvex H1000-TR011 User manual

Helvex

Helvex H1000-TR011 User manual

Helvex TV-030 User manual

Helvex

Helvex TV-030 User manual

Helvex Europeo EP-2001 User manual

Helvex

Helvex Europeo EP-2001 User manual

Helvex LV CASSINI User manual

Helvex

Helvex LV CASSINI User manual

Helvex 323-19-0.5 User manual

Helvex

Helvex 323-19-0.5 User manual

Helvex Premier H-3005 User manual

Helvex

Helvex Premier H-3005 User manual

Helvex MR-1005 Clásica User manual

Helvex

Helvex MR-1005 Clásica User manual

Helvex TV-120 User manual

Helvex

Helvex TV-120 User manual

Helvex IG-40 User manual

Helvex

Helvex IG-40 User manual

Helvex LIQUIDA TV-302 User manual

Helvex

Helvex LIQUIDA TV-302 User manual

Helvex Squadra E-929 User manual

Helvex

Helvex Squadra E-929 User manual

Helvex 313-19 User manual

Helvex

Helvex 313-19 User manual

Helvex 313-38-4.8 User manual

Helvex

Helvex 313-38-4.8 User manual

Helvex Kubica TR-036 User manual

Helvex

Helvex Kubica TR-036 User manual

Helvex Elegance 8148 User manual

Helvex

Helvex Elegance 8148 User manual

Helvex LAV MARCUS User manual

Helvex

Helvex LAV MARCUS User manual

Helvex PIURA PIU-201 User manual

Helvex

Helvex PIURA PIU-201 User manual

Helvex ATE User manual

Helvex

Helvex ATE User manual

Helvex SQUADRA E-710 User manual

Helvex

Helvex SQUADRA E-710 User manual

Popular Plumbing Product manuals by other brands

Pfister Glenora F-036-4GN Quick installation guide

Pfister

Pfister Glenora F-036-4GN Quick installation guide

Parker Hyperdrain HDF220/Low Pressure user manual

Parker

Parker Hyperdrain HDF220/Low Pressure user manual

Toto TBV01406 Installation and owner's manual

Toto

Toto TBV01406 Installation and owner's manual

Hans Grohe AXOR Citterio 39453 1 Series Installation instructions / warranty

Hans Grohe

Hans Grohe AXOR Citterio 39453 1 Series Installation instructions / warranty

glass 1989 PASODOBLE STEAM installation guide

glass 1989

glass 1989 PASODOBLE STEAM installation guide

Hans Grohe Talis S2 32047000 Instructions for use/assembly instructions

Hans Grohe

Hans Grohe Talis S2 32047000 Instructions for use/assembly instructions

Hans Grohe Metris M71 320 2 jet 73801 Series Instructions for use/assembly instructions

Hans Grohe

Hans Grohe Metris M71 320 2 jet 73801 Series Instructions for use/assembly instructions

Symmons Verity SLS4912PP Operation and maintenance manual

Symmons

Symmons Verity SLS4912PP Operation and maintenance manual

Kalia KONCEPT EVO KaliaProtek DR2048-005 Series Installation instructions / warranty

Kalia

Kalia KONCEPT EVO KaliaProtek DR2048-005 Series Installation instructions / warranty

Hans Grohe Allegro E Gourmet 06460XX0 Installation instructions / warranty

Hans Grohe

Hans Grohe Allegro E Gourmet 06460XX0 Installation instructions / warranty

Hans Grohe Metropol 74515 Series Instructions for use/assembly instructions

Hans Grohe

Hans Grohe Metropol 74515 Series Instructions for use/assembly instructions

Hans Grohe Talis E2 31612009 Instructions for use/assembly instructions

Hans Grohe

Hans Grohe Talis E2 31612009 Instructions for use/assembly instructions

Hans Grohe AXOR Citterio E 34435000 Instructions for use/assembly instructions

Hans Grohe

Hans Grohe AXOR Citterio E 34435000 Instructions for use/assembly instructions

Porcelanosa Smart Line 100145481 N386000038 manual

Porcelanosa

Porcelanosa Smart Line 100145481 N386000038 manual

aquabrass 8206 installation guide

aquabrass

aquabrass 8206 installation guide

Ronbow Signature series Installation and care guide

Ronbow

Ronbow Signature series Installation and care guide

Stern TOUCH FREE B AB1953 Installation and maintenance guide

Stern

Stern TOUCH FREE B AB1953 Installation and maintenance guide

Oras Optima 7140Y Installation and maintenance guide

Oras

Oras Optima 7140Y Installation and maintenance guide

manuals.online logo
manuals.online logoBrands
  • About & Mission
  • Contact us
  • Privacy Policy
  • Terms and Conditions

Copyright 2025 Manuals.Online. All Rights Reserved.