1-04-0231-1
Hola soy Fluxy, te
ayudaré a instalar
tu producto.
Hi I'm Fluxy, I'll
help you to install
your product.
*Estas coladeras no aplican en caso
de remodelación (solo si se remueven
los acabados).
*These floor drains are not applicable
in case of remodeling (only if the
finishes are removed).
1
INSTALLATION GUIDE
GUÍA DE INSTALACIÓN
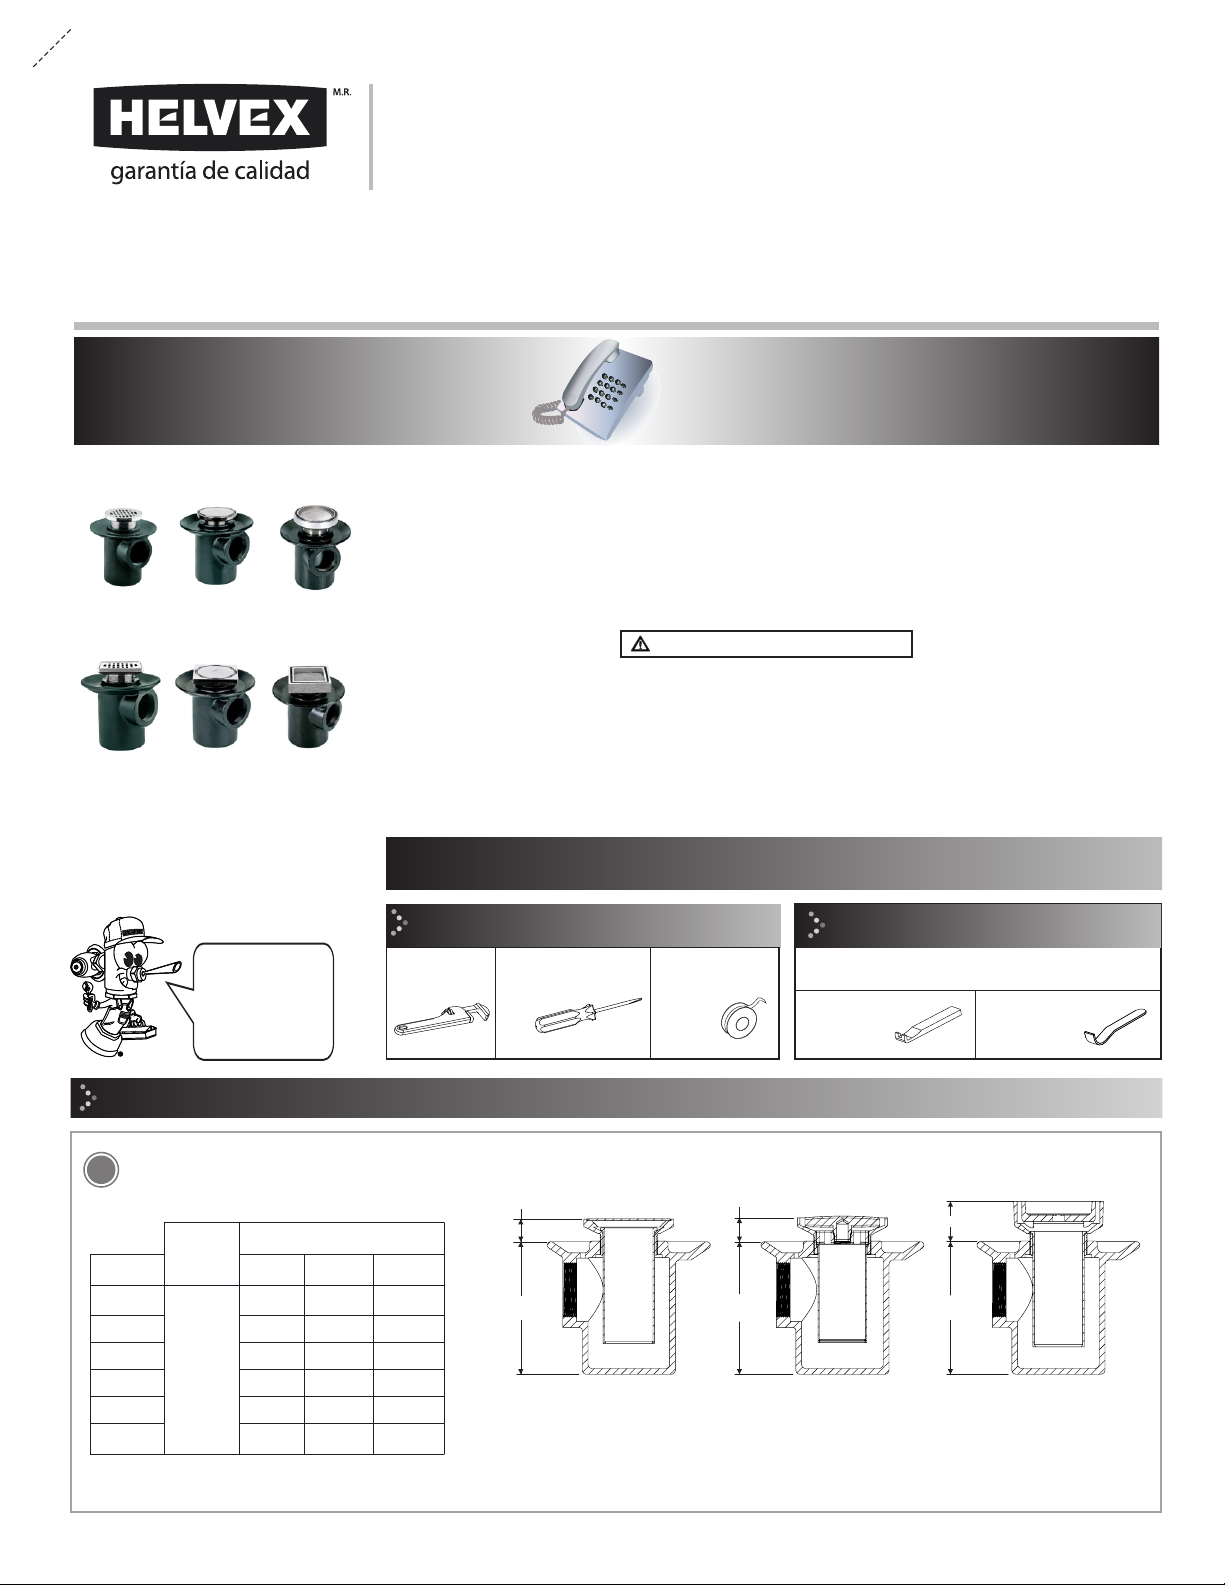
24
Coladera de una Boca de Rejilla Redonda
Floor Drain One Outlet with Round Grid
24-HL
Coladera de una Boca, Desagüe de Contorno Tapa Redonda
Floor Drain One Outlet, Round Lid Countour Drain
24-HLI
Coladera de una Boca, Desagüe de Contorno Redonda para Inserto Cerámico
Máximo de 10 mm
Floor Drain One Outlet, Round Countour Drain for Maximum 0,4" Ceramic Insert
24-CH
Coladera de una Boca de Rejilla Cuadrada
Floor Drain One Outlet with Square Grid
24-CHL
Coladera de una Boca, Tapa Redonda Desagüe de Contorno Cuadrado
Floor Drain One Outlet, Round Lid Square Countour Drain
24-CHLI
Coladera de una Boca, Desagüe de Contorno Cuadrada para Inserto Cerámico
Máximo de 10 mm
Floor Drain One Outlet, Square Countour Drain for Maximum 0,4" Ceramic Insert
Para disminuir el riesgo de lesiones o daños a la propiedad, lea todas las instrucciones antes de instalar el
producto. Utilice gafas de seguridad. En obras de construcción, instalación, modificación, ampliación y
reparación deben cumplir con el reglamento de construcción y obras de su localidad. El producto ilustrado
puede sufrir cambios de aspecto como resultado de la mejora continua a la que está sujeto.
Agradecemos su elección por los productos HELVEX.
Estamos seguros de que su confiabilidad por el producto excederá sus más altas expectativas, cuya
funcionalidad, estética, durabilidad, respaldo integral y alta calidad le otorgarán plena satisfacción por años,
reflejando el compromiso con la calidad, innovación y el medio ambiente que forman parte de Helvex.
To reduce the risk of injury or property damage, read all instructions before installing the product. Please
remember to use safety glasses. In construction, installation, alteration, extension and repair, the rules of
constructions must be applied. As result of continuous improvement, the illustration product may change in
appearance.
ADVERTENCIA / WARNING
Esta Guía de Instalación Aplica al Producto en Cualquier Acabado. /
This Installation Guide Applies to the Product in any Finishing.
Thank you for choosing HELVEX products.
We are confident that the product reliability will exceed your maximum expectations. The functionality,
aesthetics, durability, quality and support will grant you full satisfaction for years, it is Helvex commitment to
the quality, innovation and the environment.
Relación
Altura Tinaco-Presión
Relation
Herramienta y Materiales Recomandados /
Recommended Tools and Materials
llave inglesa
wrench
desatornillador plano
slotted screwdriver
Herramienta Incluida en el Producto /
Tools Included in the Product
Mod. 24-CHL
Mod. 24-HL
Mod. 24-HLI
maintenance wrench
llave para mantenimiento
teflón
plumbler´s
tape
Original Spare Parts:
Consultancy and Technical
(52) 55 53 33 94 31 (52) 55 53 33 94 00
Refacciones Originales:
Asesoría y Servicio Técnico:
Ext. 5913, 5068 y 4815
Service:
(52) 55 53 33 94 21
Modelo /
Model
24
24-HL
24-HLI
24-CH
24-CHL
24-CHLI
2,1 cm
(0,8")
3,3 cm
(1,3")
3,3 cm
(1,3")
2,2 cm
(0,9")
Máximo
Maximum
Mínimo
Minimum
4,6 cm
(1,8")
3,6 cm
(1,4")
1,7 cm
(0,7")
3,3 cm
(1,3")
3,3 cm
(1,3")
2,0 cm
(0,8")
B
24
24-CH 24-HL
24-CHL
24-HLI
24-CHLI
Medidas Generales / General Dimensions
AAA
Ajuste
Adjustment
1,2 cm
(0,5")
5,2 cm
(2,1")
3,7 cm
(1,4")
Altura / Total
(B)
1,1 cm
(0,4")
1,3 cm
(0,5")
1,0 cm
(0,4")
1,5 cm
(0,6")
1,6 cm
(0,6")
24-HL
24 24-HLI
24-CHL
24-CH 24-CHLI
B
B
Altura del
cuerpo /
Body height
(A)
14,4 cm
(5,7")


