manuals.online logo
Brands
  1. Home
  2. •
  3. Brands
  4. •
  5. Helvex
  6. •
  7. Plumbing Product
  8. •
  9. Helvex 444 User manual

Helvex 444 User manual

Hola soy Fluxy, te
ayudaré a instalar
tu producto.
INSTALLATION GUIDE
1-04-0228-2
Hi I'm Fluxy, I'll
help you to install
your product.
1
INSTALLATION GUIDE
GUÍA DE INSTALACIÓN
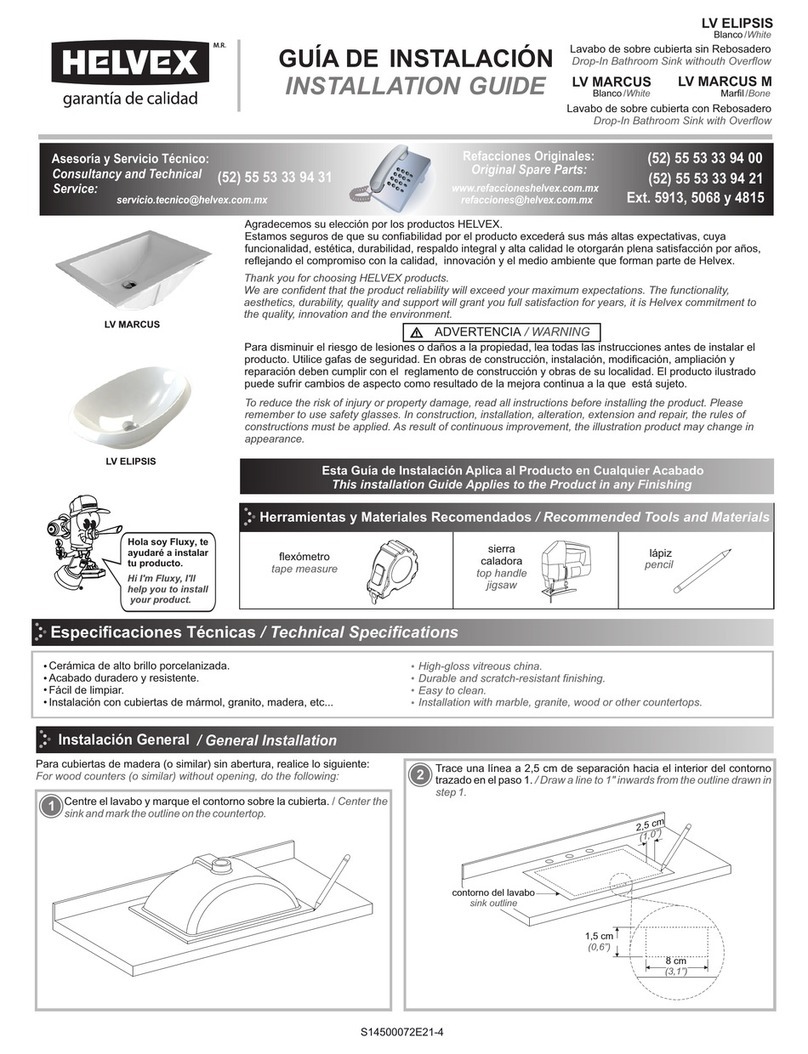
Herramientas y Materiales Recomendados / Recommended Tools and Materials
Esta Guía de Instalación Aplica al Producto en Cualquier Acabado
This Installation Guide Applies to the Product in any Finishing
Para disminuir el riesgo de lesiones o daños a la propiedad, lea todas las instrucciones antes de instalar el
producto. Utilice gafas de seguridad. En obras de construcción, instalación, modificación, ampliación y
reparación deben cumplir con el reglamento de construcción y obras de su localidad. El producto ilustrado
puede sufrir cambios de aspecto como resultado de la mejora continua a la que está sujeto.
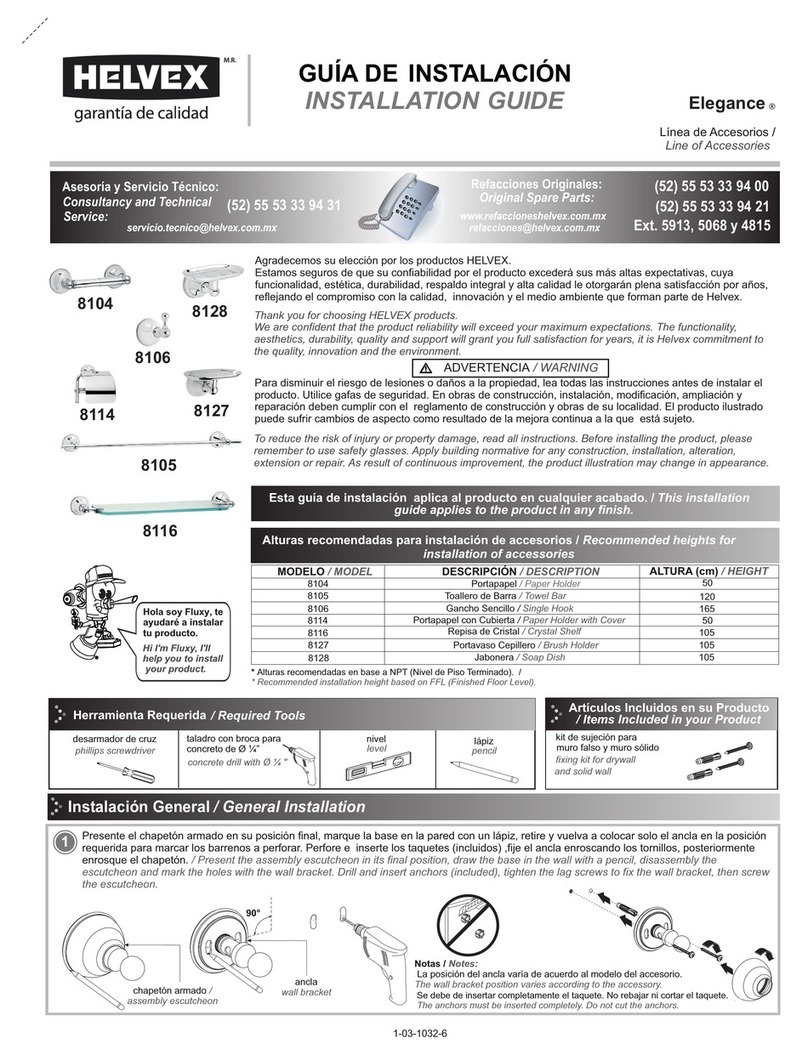
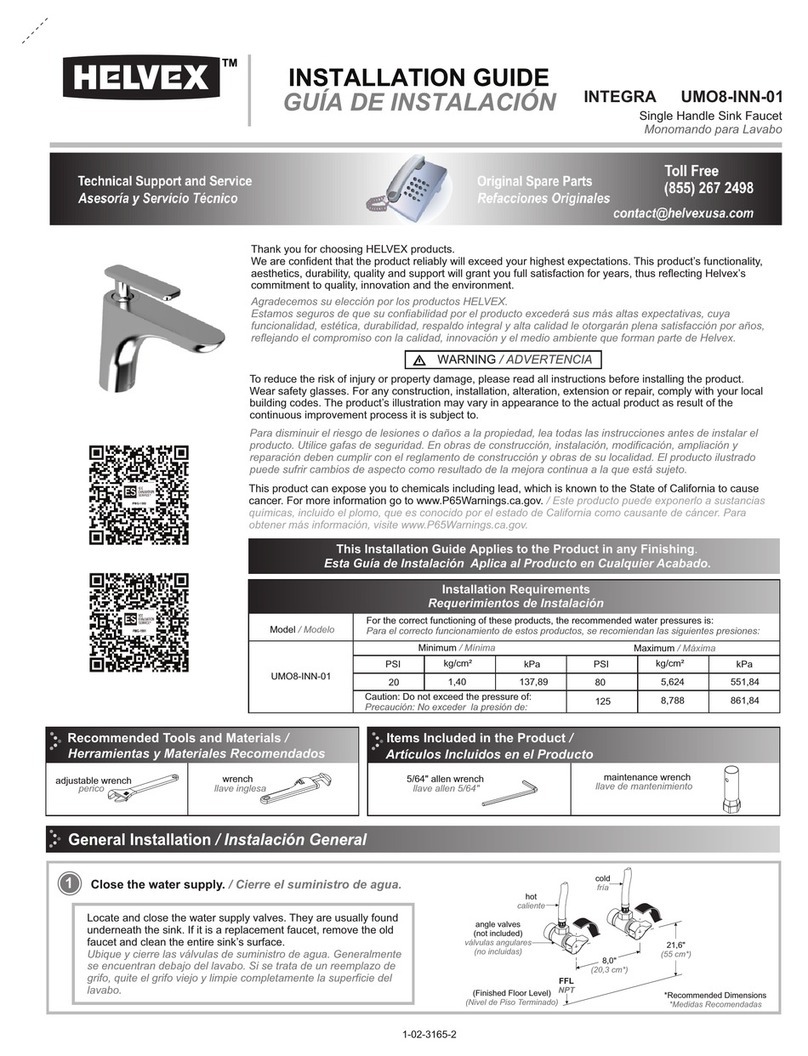
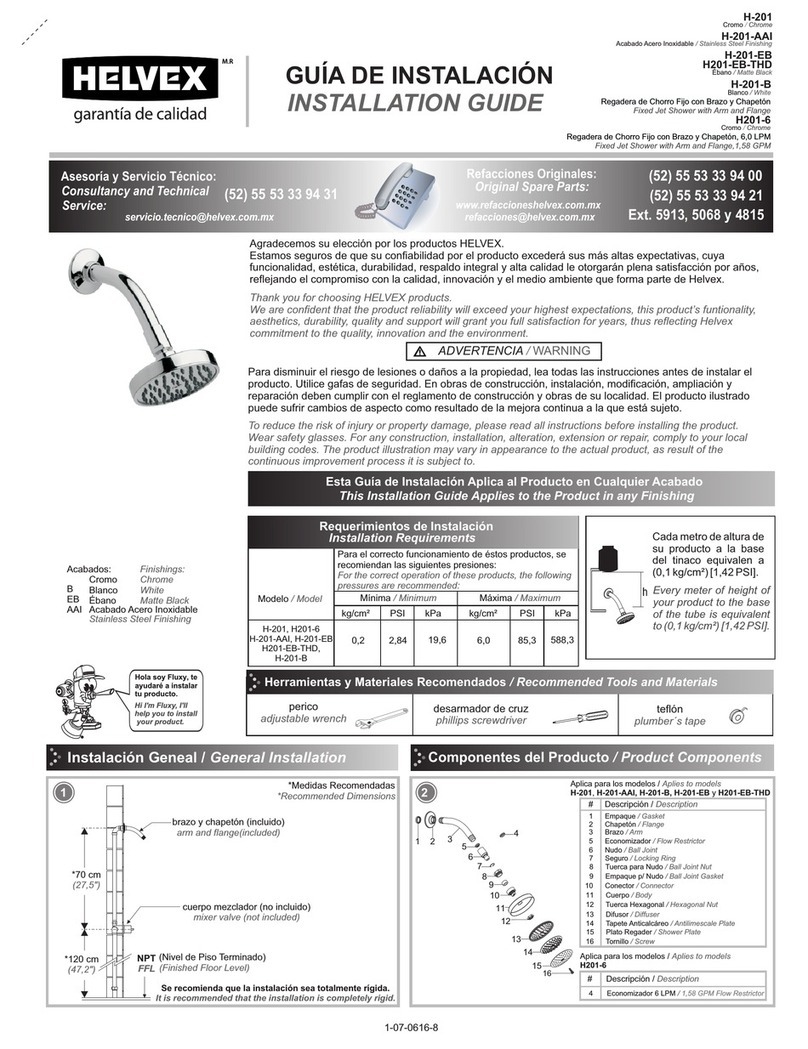
Agradecemos su elección por los productos HELVEX.
Estamos seguros de que su confiabilidad por el producto excederá sus más altas expectativas, cuya
funcionalidad, estética, durabilidad, respaldo integral y alta calidad le otorgarán plena satisfacción por años,
reflejando el compromiso con la calidad, innovación y el medio ambiente que forman parte de Helvex.
To reduce the risk of injury or property damage, read all instructions. Before installing the product, please
remember to use safety glasses. Apply building normative for any construction, installation, alteration,
extension or repair. As result of continuous improvement, the product illustration may change in appearance.
ADVERTENCIA / WARNING
Thank you for choosing HELVEX products.
We are confident that the product reliability will exceed your maximum expectations. The functionality,
aesthetics, durability, quality and support will grant you full satisfaction for years, it is Helvex commitment to
the quality, innovation and the environment.
Instalación General / General Installation
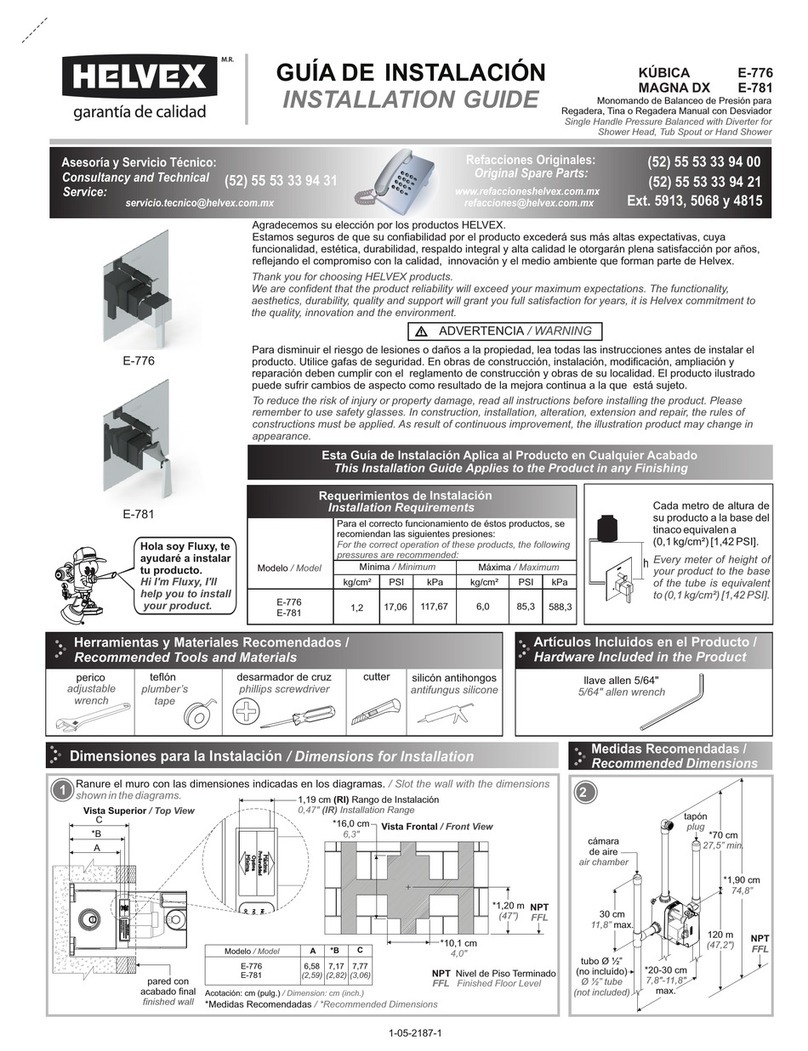
Coladera de Cúpula para Azotea. Conexión para Tubo
102 mm (4") Para Roscar
Cap Drain for Roof. Connection for 102 mm (4") Tube.
For Threading
444
Coladera de Cúpula para Azotea. Conexión para
Tubo 102 mm (4"). Para Retacar.
Cap Drain for Roof. Connection for 102 mm (4") Tube.
To Re-bottle.
444-X
Coladera de Cúpula para Azotea. Conexión para
Tubo 153 mm (6"). Para Retacar
Cap Drain for Roof. Connection for 153 mm (6") Tube.
To Re-bottle
446-X
Nota: No deben existir áreas de acumulacion de agua alrededor de la coladera ni en la losa.
Note: There must be no water acumulation areas around the drain or slab.
444
444-X
446-X
impermeabilizante
waterproof membrane
cople de hierro
fundido negro
black cast
iron coupling
impermeabilizante
waterproof membrane
cople roscado
4"-8 NPSM
4"-8 NPSM
threaded coupling tubo sanitario
sanitary pipe
Modelos: 444-X, 446-X. Conexión a tubo de hierro fundido Ø4" o Ø6"
con cople de transición
Models: 444-X, 446-X. Conecction to Ø4" or Ø 6" cast iron pipe
with neoprene shielded transition coupling
[email protected]
Original Spare Parts:
Consultancy and Technical
(52) 55 53 33 94 31
(52) 55 53 33 94 00
Refacciones Originales:
Asesoría y Servicio Técnico:
Ext. 5913, 5068 y 4815
Service:
(52) 55 53 33 94 21
[email protected]
www.refaccioneshelvex.com.mx
Modelo: 444
Para roscar
Model: 444
For threading
concreto
concrete
concreto
concrete
impermeabilizante
waterproof membrane
concreto
concrete
tubo sanitario
sanitary pipe
tubo sanitario
sanitary pipe
Modelos: 444-X, 446-X. Conexión a tubo de hierro fundido Ø4" o Ø6" con
cople de hierro fundido negro
Models: 444-X, 446-X. Conecction to Ø4" or Ø6" cast iron pipe
with black cast iron coupling
dado con matraca
screwing wrench
cople de transición
neoprene shielded
trnasition coupling
2
Instalación General / General Installation
Desenrosque los tornillos hexagonales y retire el anillo coladera
con la cúpula. / Unscrew the hexagonal screws and remove the
clamp collar with the dome strainer.
tornillo
hexagonal
hexagonal screw
anillo coladera
clamp collar
cúpula
dome strainer
cuerpo coladera
strainer body
cople transición
neoprene shielded
transition coupling
cople de hierro
fundido negro
black cast iron
coupling
adhesivo
adhesive
tornillo
clamp screw
3
adhesivo
adhesive
cople roscado
(no incluido)
threaded
coupling
(not included)
tubería sanitaria
(no incluida)
sanitary pipe
(not included)
Para el modelo 444, enrosque el cople roscado (no incluido) e
inserte la tubería (no incuida). / For model 444, screw the
threaded coupling (not included) and insert the pipe (not
included).
4A
4B
Para los modelos 444-X y 446-X, inserte el cople de hierro
fundido negro (no incluido) y coloque adhesivo para fijar. / For the
444-X and 446-X models, insert the black cast iron coupling (not
included) and place adhesive to fix.
Para los modelos 444-X y 446-X, coloque la coladera en el
tubo tisa 4" (no incluido) y retaque con formula 2000 para
sellar; siga conectando tubería Tisa Fofo. / For the 444-X and
446-X models, place the strainer on the tisa tube 4 "(not
included) and retake with formula 2000 to seal, continue to
connect Tisa Fofo tubing.
5
Para los modelos 444-X y 446-X, inserte el cople de transición (no
incluido) y apriete los tornillos para fijar con la abrazadera (no
incluido). / For the 444-X and 446-X models, insert the neoprene
shielded transition coupling (not included) and tightening the
screws to fix with the clamp (not included).
90°
90°
6
Nivele como se muestra. / Align as shown.
Rellene el área con concreto al ras del cuerpo de la coladera
realizando una pendiente hacia la coladera. / Fill the area with
concrete all way to the strainer body making a slope towards the
drain.
2
3
8
Coloque el impermeabilizante. / Place the waterproof membrane.
Retire el impermeabilizante de la cavidad del cuerpo coladera para colocar el anillo coladera, enrosque los tornillos exagonales para fijar,
inserte la cúpula y girela para asegurarla. / Remove th waterproof membrane of the bady cavity to place the clamp collar, screw the hexagonal
screws to fix, insert the dome strainer and turn to fix.
impermeabilizante
waterproof membrane
7
tornillo hexagonal
hexagonal screw
anillo coladera
clamp collar
cúpula
dome strainer
impermeabilizante
waterproof membrane
Mantenga libre de basura u objetos que obstruyan la coladera. / Keep waste free or objects that obstruct the strainer.
cúpula
dome strainer
Limpieza y Mantenimiento / Cleaning and Maintenance
Limpie la acumulación de basura alrededor de la coladera para retirar la cúpula girandola. Si existe algún sedimento que obstruya en la parte
interna, debe de ser retirado. / Clean waste acomulation around the strainer to remove the dome strainer by turning it. If there is any sediment
obstructing the internal part, must be removed
9
Posibles Causas y Soluciones / Troubleshooting
No se impermeabilizó correctamente.
/ It is not waterproofed correctly.
Problema / Problem Causas / Causes Soluciones / Solutions
Realice la limpieza de la coladera (página 3, paso 9).
/ Clean the strainer (page 3, step 9).
Hay filtraciones en la
pared del piso inferior.
/ There are leaks in the
wall of the lower floor.
Verifique las recomendaciones de instalación y proceda a
rectificar el impermeabilizado. / Check the
installation recommendations and proceed to rectify
the waterproofing.
Existen objetos obstruyendo la rejilla que no permiten el
desalojo del agua pluvial. / There are objects obstructing the
grid that do not allow the evacuation of rainwater.
El desalojo de agua es
lento o nulo. / Water eviction
is slow or null.
Enter our free
training courses.
Participa en nuestros
cursos gratuitos
de capacitación.
Recomendaciones de Limpieza / Cleaning Recommendations
HELVEX, S. A. DE C. V. Calzada Coltongo # 293, Col. Industrial Vallejo, Alcaldía Azcapotzalco, C. P. 02300, Ciudad de México.
Es muy importante seguir las siguientes instrucciones para conservar los
acabados de los productos HELVEX, con brillo y en perfecto estado:
1. Utilice únicamente agua y un paño limpio.
2. No utilice fibras, polvos, abrasivos, ni productos químicos.
3. No utilice objetos punzo-cortantes para limpiar los acabados.
4. Se recomienda realizar la limpieza de su producto diariamente.
Visite nuestras páginas www.helvex.com.mx para México y www.helvex.com
para el mercado Internacional
It is very important to follow the instructions below to preserve HELVEX products
finishings, shiny and in perfect conditions:
1. Use only water and a clean cloth.
2. Do not use fibers, powders, abrasives, or chemicals.
3. Do not use sharp objects to clean the finishings.
4. It is recommended to clean your device daily
Visit our websites www.helvex.com.mx for México and www.helvex.com
for the international market
In Guadalajara:
Contact:
In Monterrey:
En la Ciudad de México:
In Mexico City:
En Monterrey: En Guadalajara:
(52) 55 53 33 94 00
Ext. 5806, 5805 y 5804
33 36 19 01 13
Comunícate:
81 83 33 57 67
81 83 33 61 78

This manual suits for next models

2

Other Helvex Plumbing Product manuals

Helvex KUBICA E-776 User manual

Helvex

Helvex KUBICA E-776 User manual

Helvex Nuva EP-2006 User manual

Helvex

Helvex Nuva EP-2006 User manual

Helvex AQUA E-762 User manual

Helvex

Helvex AQUA E-762 User manual

Helvex Squadra E-929 User manual

Helvex

Helvex Squadra E-929 User manual

Helvex TV-030 User manual

Helvex

Helvex TV-030 User manual

Helvex SQUADRA E-711 User manual

Helvex

Helvex SQUADRA E-711 User manual

Helvex LIQUIDA TV-302 User manual

Helvex

Helvex LIQUIDA TV-302 User manual

Helvex Liquida TV302-1.5 User manual

Helvex

Helvex Liquida TV302-1.5 User manual

Helvex ADARA E-312 User manual

Helvex

Helvex ADARA E-312 User manual

Helvex RM-24 User manual

Helvex

Helvex RM-24 User manual

Helvex Vértika MP-1000 User manual

Helvex

Helvex Vértika MP-1000 User manual

Helvex LIQUIDA UTV-302 Manual

Helvex

Helvex LIQUIDA UTV-302 Manual

Helvex Explora HOT-106 User manual

Helvex

Helvex Explora HOT-106 User manual

Helvex PIAZZA PIA-200 User manual

Helvex

Helvex PIAZZA PIA-200 User manual

Helvex LV FUTURA1 User manual

Helvex

Helvex LV FUTURA1 User manual

Helvex Kubica E-84 User manual

Helvex

Helvex Kubica E-84 User manual

Helvex 110-32 User manual

Helvex

Helvex 110-32 User manual

Helvex SPACIO HSTRWDSP User manual

Helvex

Helvex SPACIO HSTRWDSP User manual

Helvex MR-1005 Clásica User manual

Helvex

Helvex MR-1005 Clásica User manual

Helvex 310-32 User manual

Helvex

Helvex 310-32 User manual

Helvex E-308 User manual

Helvex

Helvex E-308 User manual

Helvex KUBICA UTR-036 User manual

Helvex

Helvex KUBICA UTR-036 User manual

Helvex H-3302-C/B User manual

Helvex

Helvex H-3302-C/B User manual

Helvex E-711 User manual

Helvex

Helvex E-711 User manual

Popular Plumbing Product manuals by other brands

Pfister elevate ext 529 Series Assembly instructions

Pfister

Pfister elevate ext 529 Series Assembly instructions

Elkay SwirlFlo DRKR14C Specifications

Elkay

Elkay SwirlFlo DRKR14C Specifications

Hewi S50.01.00001 Installation and operating instructions

Hewi

Hewi S50.01.00001 Installation and operating instructions

Moen ROTHBURY 6202AZ Illustrate parts list

Moen

Moen ROTHBURY 6202AZ Illustrate parts list

Signature Hardware 902828 quick start guide

Signature Hardware

Signature Hardware 902828 quick start guide

Franke F3EV1024 2030054684 Installation and operating instructions

Franke

Franke F3EV1024 2030054684 Installation and operating instructions

Glacier bay HD873X-6210H Installation and care guide

Glacier bay

Glacier bay HD873X-6210H Installation and care guide

Grohe GROHTHERM F manual

Grohe

Grohe GROHTHERM F manual

Moen Lever Brushed Nickel 84781BN Specifications

Moen

Moen Lever Brushed Nickel 84781BN Specifications

Uponor KaMo Combi Port PRO XU Installation and operation manual

Uponor

Uponor KaMo Combi Port PRO XU Installation and operation manual

rada Rada Outlook 150 1.1621.136 product manual

rada

rada Rada Outlook 150 1.1621.136 product manual

Sterling Plumbing 14619-3 Specification sheet
Sterling Plumbing

Sterling Plumbing 14619-3 Specification sheet

Franke RODX617 Installation and operating instructions

Franke

Franke RODX617 Installation and operating instructions

ABOUTWATER A763AU instructions

ABOUTWATER

ABOUTWATER A763AU instructions

Hans Grohe 40967800 Assembly instructions

Hans Grohe

Hans Grohe 40967800 Assembly instructions

EOS P1 Installation and user guide

EOS

EOS P1 Installation and user guide

AWT 160 Series Installation and operation instruction

AWT

AWT 160 Series Installation and operation instruction

Hans Grohe AXOR Citterio 39437009 Instructions for use/assembly instructions

Hans Grohe

Hans Grohe AXOR Citterio 39437009 Instructions for use/assembly instructions

manuals.online logo
manuals.online logoBrands
  • About & Mission
  • Contact us
  • Privacy Policy
  • Terms and Conditions

Copyright 2025 Manuals.Online. All Rights Reserved.