manuals.online logo
Brands
  1. Home
  2. •
  3. Brands
  4. •
  5. Helvex
  6. •
  7. Plumbing Product
  8. •
  9. Helvex E-300-DX-EB User manual

Helvex E-300-DX-EB User manual

Hola soy Fluxy, te
ayudaré a instalar
tu producto.
Instalación General
INSTALLATION GUIDE
GUÍA DE INSTALACIÓN
1-02-3187-3
Hi I'm Fluxy, I'll
help you to install
your product.
/ General Installation
Monomando para Fregadero
Kitchen Sink Faucet
E-300-DX
Cromo / Chrome
E-300-DX-EB
Ébano / Matte Black
[email protected]
Original Spare Parts:
Consultancy and Technical
(52) 55 53 33 94 31
(52) 55 53 33 94 00
Refacciones Originales:
Asesoría y Servicio Técnico:
Ext. 5913, 5068 y 4815
Service:
(52) 55 53 33 94 21
[email protected]
www.refaccioneshelvex.com.mx
ELITE
Para disminuir el riesgo de lesiones o daños a la propiedad, lea todas las instrucciones antes de instalar el
producto. Utilice gafas de seguridad. En obras de construcción, instalación, modificación, ampliación y
reparación deben cumplir con el reglamento de construcción y obras de su localidad. El producto ilustrado
puede sufrir cambios de aspecto como resultado de la mejora continua a la que está sujeto.
Agradecemos su elección por los productos HELVEX.
Estamos seguros de que su confiabilidad por el producto excederá sus más altas expectativas, cuya
funcionalidad, estética, durabilidad, respaldo integral y alta calidad le otorgarán plena satisfacción por años,
reflejando el compromiso con la calidad, innovación y el medio ambiente que forman parte de Helvex.
To reduce the risk of injury or property damage, read all instructions before installing the product. Please
remember to use safety glasses. In construction, installation, alteration, extension and repair, the rules of
constructions must be applied. As result of continuous improvement, the illustration product may change in
appearance.
ADVERTENCIA / WARNING
Esta Guía de Instalación Aplica al Producto en Cualquier Acabado
This Installation Guide Applies to the Product in any Finishing
Thank you for choosing HELVEX products.
We are confident that the product reliability will exceed your maximum expectations. The functionality,
aesthetics, durability, quality and support will grant you full satisfaction for years, it is Helvex commitment to
the quality, innovation and the environment.
Cada metro de altura de
su producto a la base
del tinaco equivalen a
(0,1 kg/cm²) [1,42 PSI].
Every meter of height of
your product to the base
of the tube is equivalent
to (0,1 kg/cm²) [1,42
PSI].
Requerimientos de Instalación
Installation Requirements
E-300-DX
E-300-DX-EB 0,7 9,95 68,6
Requerimientos de Instalación
Installation Requirements
Modelo / Model Mínima / Minimum Máxima / Maximum
kg/cm² PSI kPa kg/cm² PSI kPa
6,0 85,3 588,3
Para el correcto funcionamiento de éstos productos, se
recomiendan las siguientes presiones:
For the correct operation of these products, the following
pressures are recommended:
5/64" allen wrench
llave allen 5/64"
Herramientas y Materiales Recomendados
Recommended Tools and Materials Artículos Incluidos en el Producto / Hardware Included in the Product
aerator key
llave para aireador
installation wrench
llave de instalación
maintenance wrench
llave de mantenimiento
teflónperico
adjustable wrench plumber´s tape
caliente
hot
fría
cold
*55 cm
(21,6”)
*20,3 cm
(8”)
angle valves
(not included)
válvulas
angulares
(no incluidas)
NPT
FFL *Medidas Recomendadas
*Recommended dimensions
(Nivel de Piso Terminado)
(Finished Floor Level)
1Cierre el suministro de agua. / Close the water supply.
Ubique y cierre las válvulas de suministro de agua.
Generalmente se encuentran debajo del lavabo. Si se trata de un
reemplazo de grifo, quite el grifo viejo y limpie completamente la
superficie del lavabo.
Locate and close the water supply valves.
Usually found under the sink. If it is a replacement faucet, remove
the old faucet and clean the entire surface of the sink.
TV-012
2
Se muestran las dimensiones recomendadas para la instalación. /
The recommended dimensions for installation are showed.
Enrosque las mangueras (incluidas) a los tubos
de alimentación y posteriormente a la línea de
alimentación. / Screw hoses (included) to the
supply tubes and then to the supply line.
tubos de
alimentación
supply tubes
mangueras (incluidas)
hoses (included)
2
*Recommended Dimesions
*Medidas Recomendadas
4
Instalación de las Mangueras / Hoses Installation
Inserte la salida y verifique que se coloque
el o’ring. / Insert the faucet and check that
the o’ring is placed.
5
6
tuerca
nut
empaque
gasket
líneas de
alimentación
supply lines
placa de
sujeción
fixing plate
empaque
gasket
tuerca
nut
Inserte la placa de fijación y el
empaque, enrosque la tuerca con la
llave de instalación (incluida). / Insert
the fixing plate and gasket, screw the
nut with the installation wrench
(included).
Inserte el cubre taladros y enrosque las tuercas mariposa con las anclas para fijarlo. / Insert the
deck plate and screw the wing nuts with the bracket to fix it.
tuerca mariposa
wing nut
ancla de sujeción
bracket
chapetón
deck plate
Desenrosque la tuerca y retire el empaque. / Unscrew the nut and
remove the gasket.
3
8
o’ring
o’ring
20,3 cm
7,9"
*Ø 3,5 cm
1,3"
6,3 cm
2,48"
tarja
sink
7Para purgar las líenas de alimentación,
abra el suministro de agua y cierre. / To
purge supply lines, open and close angle
valves.
válvulas
angulares
agua caliente
hot water
agua fría
cold water
angle valves
3
Operación / Operation
La salida es
giratoria. / The
faucet is rotating.
+ caliente
+ hot
abrir
open
+ fría
+ cold
Desenrosque el aireador con la llave para
aireador (incluida). / Unscrew the aerator
with aerator key (included).
9
10
llave para
aireador
aerator
key
11 Enrosque nuevamente el aireador. / Screw
the aerator again.
12
Cierre el suministro de agua antes de comenzar, desenrosque el
opresor del maneral con la llave allen (incluida), retire el maneral
con el chapetón. / Close the water supply before to start, unscrew
the set screw from the handle with the allen wrench (included),
remove the handle and cartridge cap.
14
cartucho
cartridge
SH-1154
tuerca de
sujeción
locknut
Desenrosque la tuerca de sujeción con la llave de mantenimiento
(incluida), cambie el cartucho y arme nuevamente. / Unscrew the
locknut with the maintenence wrench (included), change the
cartridge and assemble again.
Limpieza del Aireador / Cleaning the Aerator
Apriete
firmemente. /
Tighten.
Limpie el aireador a chorro de agua
con un cepillo suave. / Clean the
aerator with water and a soft brush.
Cambio del Cartucho / Cartridge Replacement
aireador
aerator
cartridge cap
chapetón
opresor
set screw
handle
maneral
llave para
aireador
aerator
key
aireador
aerator
13
Abra las líneas de alimentación. Para abrir el flujo del agua jale la palanca y para cerrar presione la palanca. Para ajustar la temperatura del agua,
gire a la izquierda para caliente y gire a la derecha para fría. / Open the supply lines. To open the water flow pull the lever and to close push the lever.
To adjust the water temperature, turn left for hot and turn right for cold.
Posibles Causas y Soluciones / Troubleshooting
Es posible que las conexiones no estén
firmemente apretadas. / Connections are possibly
not firmly tightened.
No sale agua. /
No water flow.
Las válvulas de alimentación principal se encuentran
cerradas. / The water supply valves are closed.
Operation).
Abra las válvulas principales de agua (Pág. 2, paso 7). /
La salida está floja. / The
faucet is loose.
Hay fuga en las
conexiones. / There are
leaks in the connections.
Existe poco flujo de
agua. / There is low
water flow.
La tuerca no está apretada. / The nut is not tightened. Apriete firmemente la tuerca.(Pág. 2, paso 6). / Tighten
the nut (Page 2, step 6).
La palanca maneral se encuentra cerrada. / The lever
handle is closed.
Levante y/o gire la palanca maneral, según la operación del
producto (Pág. 3, Operación). / Lift and/or turn the lever
handle, according to the product operation (Page 3,
Aireador obstruído. / Clogged aerator. Retire el aireador y límpielo. (Pág. 3, paso 9, 10 and 11). /
Remove the aerator and clean (Page 3, step 9, 10 and 11).
Las válvulas de alimentación principal se encuentran
cerradas. / The water supply valves are closed.
Abra las válvulas principales de agua (Pág. 2, paso 7). /
Open the water supply valve (Page 2, step 7).
O´ring dañado. / Damaged o´ring.
Fuga en la base del
cuello. / Leak in the
spout base.
Apriete firmemente la conexión (Pág. 2, paso 8) Instalación
de las mangueras. / Tighten the connections
(Page 2, step 8) Installation of hoses.
Cambie los o´rings o los componentes necesarios (Pág. 4,
paso 15 y 16) / Change the required o´rings or components
(Page 4, step 15 y 16.)
Mantenimiento del Cuello / Spout Maintenance
Es muy importante seguir las siguientes instrucciones para conservar los
acabados de los productos HELVEX, con brillo y en perfecto estado:
1. Utilice únicamente agua y un paño limpio.
2. No utilice fibras, polvos, abrasivos, ni productos químicos.
3. No utilice objetos punzo-cortantes para limpiar los acabados.
4. Se recomienda realizar la limpieza de su producto diariamente.
Visite nuestras páginas www.helvex.com.mx para México y www.helvex.com
para el mercado Internacional
It is very important to follow the instructions below to preserve HELVEX products
finishes, shiny and in perfect condition:
1. Use only water and a clean cloth.
2. Do not use fibers, powders, abrasives, or chemicals.
3. Do not use sharp objects to clean the finish.
4. It is recommended to clean your product daily.
Visit our pages www.helvex.com.mx for Mexico and www.helvex.com
for the International market.
Recomendaciones de Limpieza / Cleaning Recommendations
In Guadalajara:
Contact:
Enter our free
training courses.
In Monterrey:
En la Ciudad de México:
In Mexico City:
En Monterrey: En Guadalajara:
(52) 55 53 33 94 00
Ext. 5806, 5805 y 5804
33 36 19 01 13
Comunícate:
Participa en nuestros
cursos gratuitos
de capacitación.
81 83 33 57 67
81 83 33 61 78
HELVEX, S. A. DE C. V. Calzada Coltongo # 293, Col. Industrial Vallejo, Alcaldía Azcapotzalco, C. P. 02300, Ciudad de México.
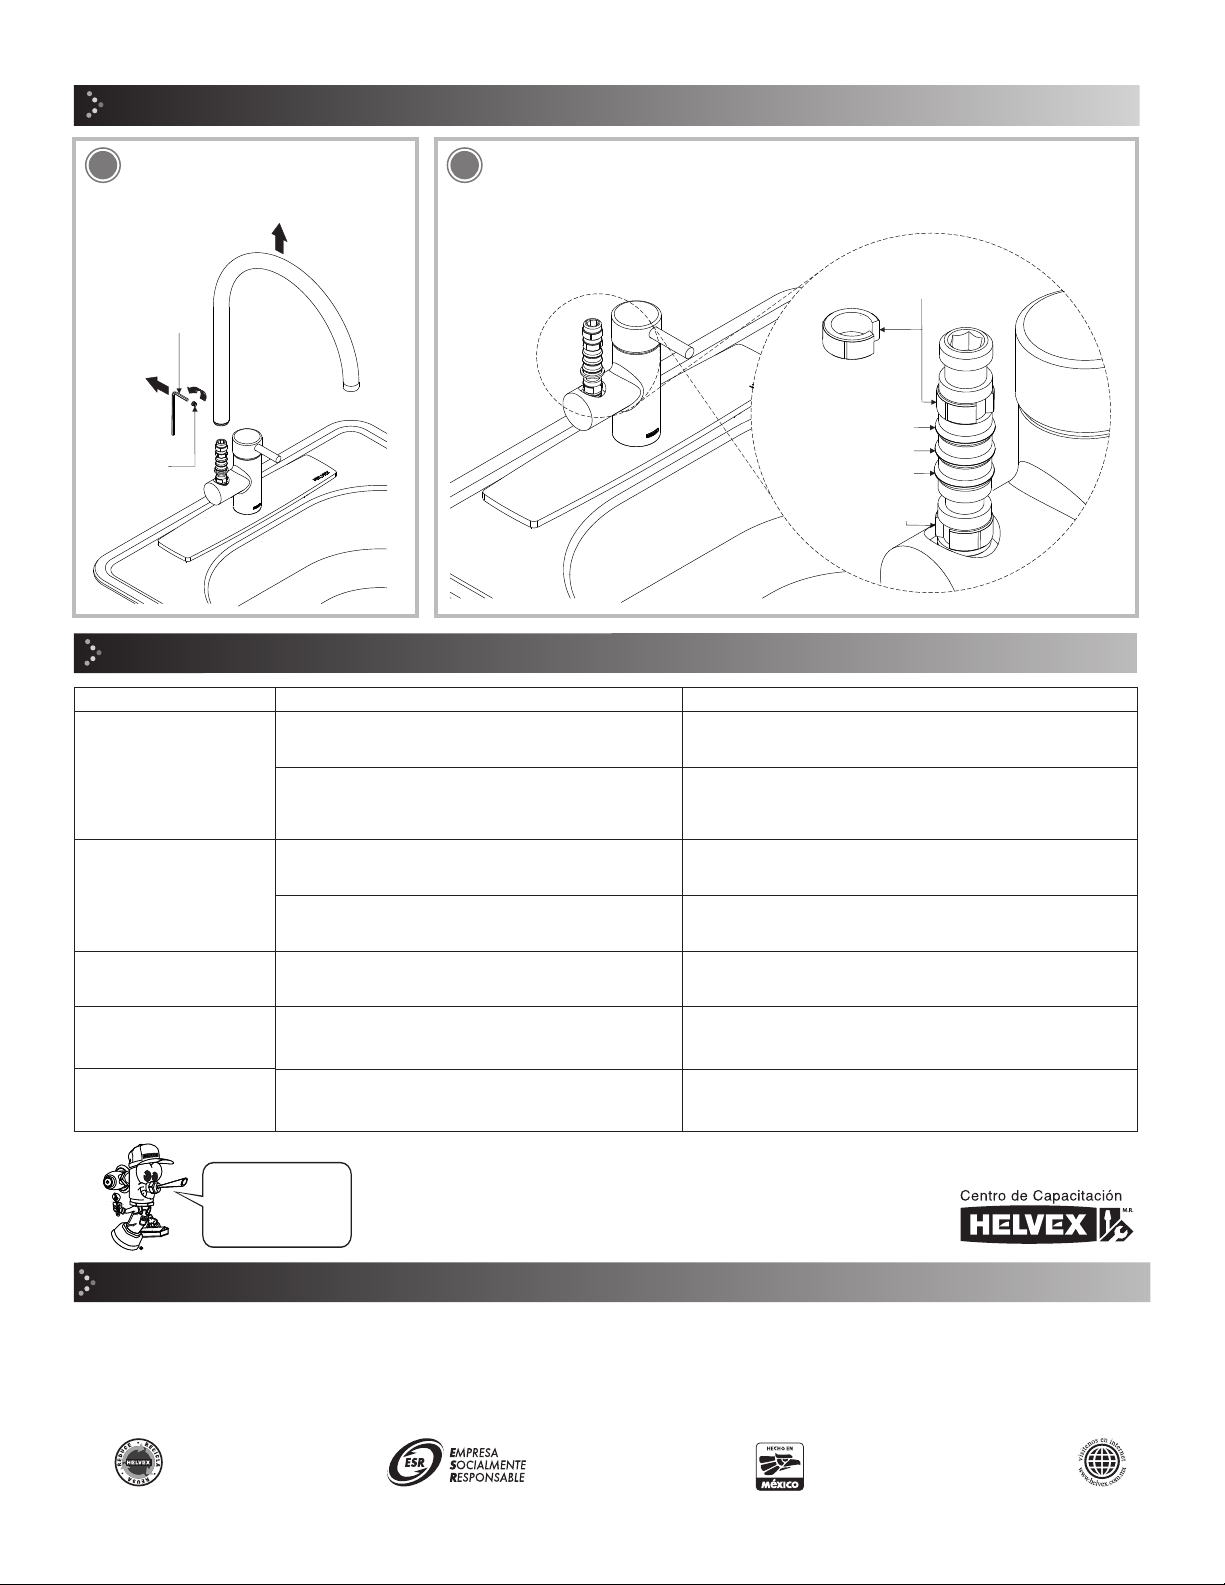
Desenrosque el tornillo con la llave allen
5/64" (incluida) para remover el cuello. /
Unscrew the screw with the 5/64" allen
wrench (included) to remove the spout.
15 Retire los bujes de plástico y posteriormente haga el cambio de los componentes
necesarios, finalmente vuelva a ensamblar. / Remove the plastic bushings and then make
the change of the required components, finally reassemble.
16
tornillo
screw
llave allen
(incluida)
allen wrench
(included)
Problema / Problem Causa / Cause Solución / Solution
buje de plástico
plastic bushing
o´ring
buje de plástico
plastic bushings
o´ring
o´ring

This manual suits for next models

1

Other Helvex Plumbing Product manuals

Helvex SQUADRA E-793 User manual

Helvex

Helvex SQUADRA E-793 User manual

Helvex MR-1005 Clásica User manual

Helvex

Helvex MR-1005 Clásica User manual

Helvex Konos E-916 User manual

Helvex

Helvex Konos E-916 User manual

Helvex 27 User manual

Helvex

Helvex 27 User manual

Helvex Elegance 8124 User manual

Helvex

Helvex Elegance 8124 User manual

Helvex EXPLORA E-705 User manual

Helvex

Helvex EXPLORA E-705 User manual

Helvex PIA-100 User manual

Helvex

Helvex PIA-100 User manual

Helvex Magna DX TV-048-S User manual

Helvex

Helvex Magna DX TV-048-S User manual

Helvex Vértika MP-1000 User manual

Helvex

Helvex Vértika MP-1000 User manual

Helvex 22 User manual

Helvex

Helvex 22 User manual

Helvex MG MOJAVE User manual

Helvex

Helvex MG MOJAVE User manual

Helvex TV-302 User manual

Helvex

Helvex TV-302 User manual

Helvex UREC-01-WA User manual

Helvex

Helvex UREC-01-WA User manual

Helvex URM-22 User manual

Helvex

Helvex URM-22 User manual

Helvex 4954 User manual

Helvex

Helvex 4954 User manual

Helvex ATE User manual

Helvex

Helvex ATE User manual

Helvex Nuva TV-201 User manual

Helvex

Helvex Nuva TV-201 User manual

Helvex Argos TV-296 User manual

Helvex

Helvex Argos TV-296 User manual

Helvex 185-19 User manual

Helvex

Helvex 185-19 User manual

Helvex Clasica 104 User manual

Helvex

Helvex Clasica 104 User manual

Helvex S-25 User manual

Helvex

Helvex S-25 User manual

Helvex MAGNA DX UE-914 User manual

Helvex

Helvex MAGNA DX UE-914 User manual

Helvex ATR-1 User manual

Helvex

Helvex ATR-1 User manual

Helvex Elegance 8128 User manual

Helvex

Helvex Elegance 8128 User manual

Popular Plumbing Product manuals by other brands

Moen SANI-STREAM 8797 manual

Moen

Moen SANI-STREAM 8797 manual

Grohe Allure Brilliant 19 784 manual

Grohe

Grohe Allure Brilliant 19 784 manual

Cistermiser Easyflush EVO 1.5 manual

Cistermiser

Cistermiser Easyflush EVO 1.5 manual

Kohler Triton Rite-Temp K-T6910-2A installation guide

Kohler

Kohler Triton Rite-Temp K-T6910-2A installation guide

BEMIS FNOTAB100 Installation instruction

BEMIS

BEMIS FNOTAB100 Installation instruction

Hans Grohe ShowerTablet Select 700 13184000 Instructions for use/assembly instructions

Hans Grohe

Hans Grohe ShowerTablet Select 700 13184000 Instructions for use/assembly instructions

Akw Stone Wash Basin Installation instructions manual

Akw

Akw Stone Wash Basin Installation instructions manual

Enlighten Sauna Rustic-4 user manual

Enlighten Sauna

Enlighten Sauna Rustic-4 user manual

Moen ShowHouse S244 Series quick start guide

Moen

Moen ShowHouse S244 Series quick start guide

Sanela SLWN 08 Mounting instructions

Sanela

Sanela SLWN 08 Mounting instructions

Franke 7612982239618 operating instructions

Franke

Franke 7612982239618 operating instructions

Heritage Bathrooms Granley Deco PGDW02 Fitting Instructions & Contents List

Heritage Bathrooms

Heritage Bathrooms Granley Deco PGDW02 Fitting Instructions & Contents List

Tres TOUCH-TRES 1.61.445 instructions

Tres

Tres TOUCH-TRES 1.61.445 instructions

STIEBEL ELTRON WS-1 Operation and installation

STIEBEL ELTRON

STIEBEL ELTRON WS-1 Operation and installation

Miomare HG00383A manual

Miomare

Miomare HG00383A manual

BELLOSTA revivre 6521/CR1 quick start guide

BELLOSTA

BELLOSTA revivre 6521/CR1 quick start guide

American Standard Heritage Amarilis 7298.229 parts list

American Standard

American Standard Heritage Amarilis 7298.229 parts list

BorMann Elite BTW5024 quick start guide

BorMann

BorMann Elite BTW5024 quick start guide

manuals.online logo
manuals.online logoBrands
  • About & Mission
  • Contact us
  • Privacy Policy
  • Terms and Conditions

Copyright 2025 Manuals.Online. All Rights Reserved.