Toilet Installation / Instalación del Inodoro
2
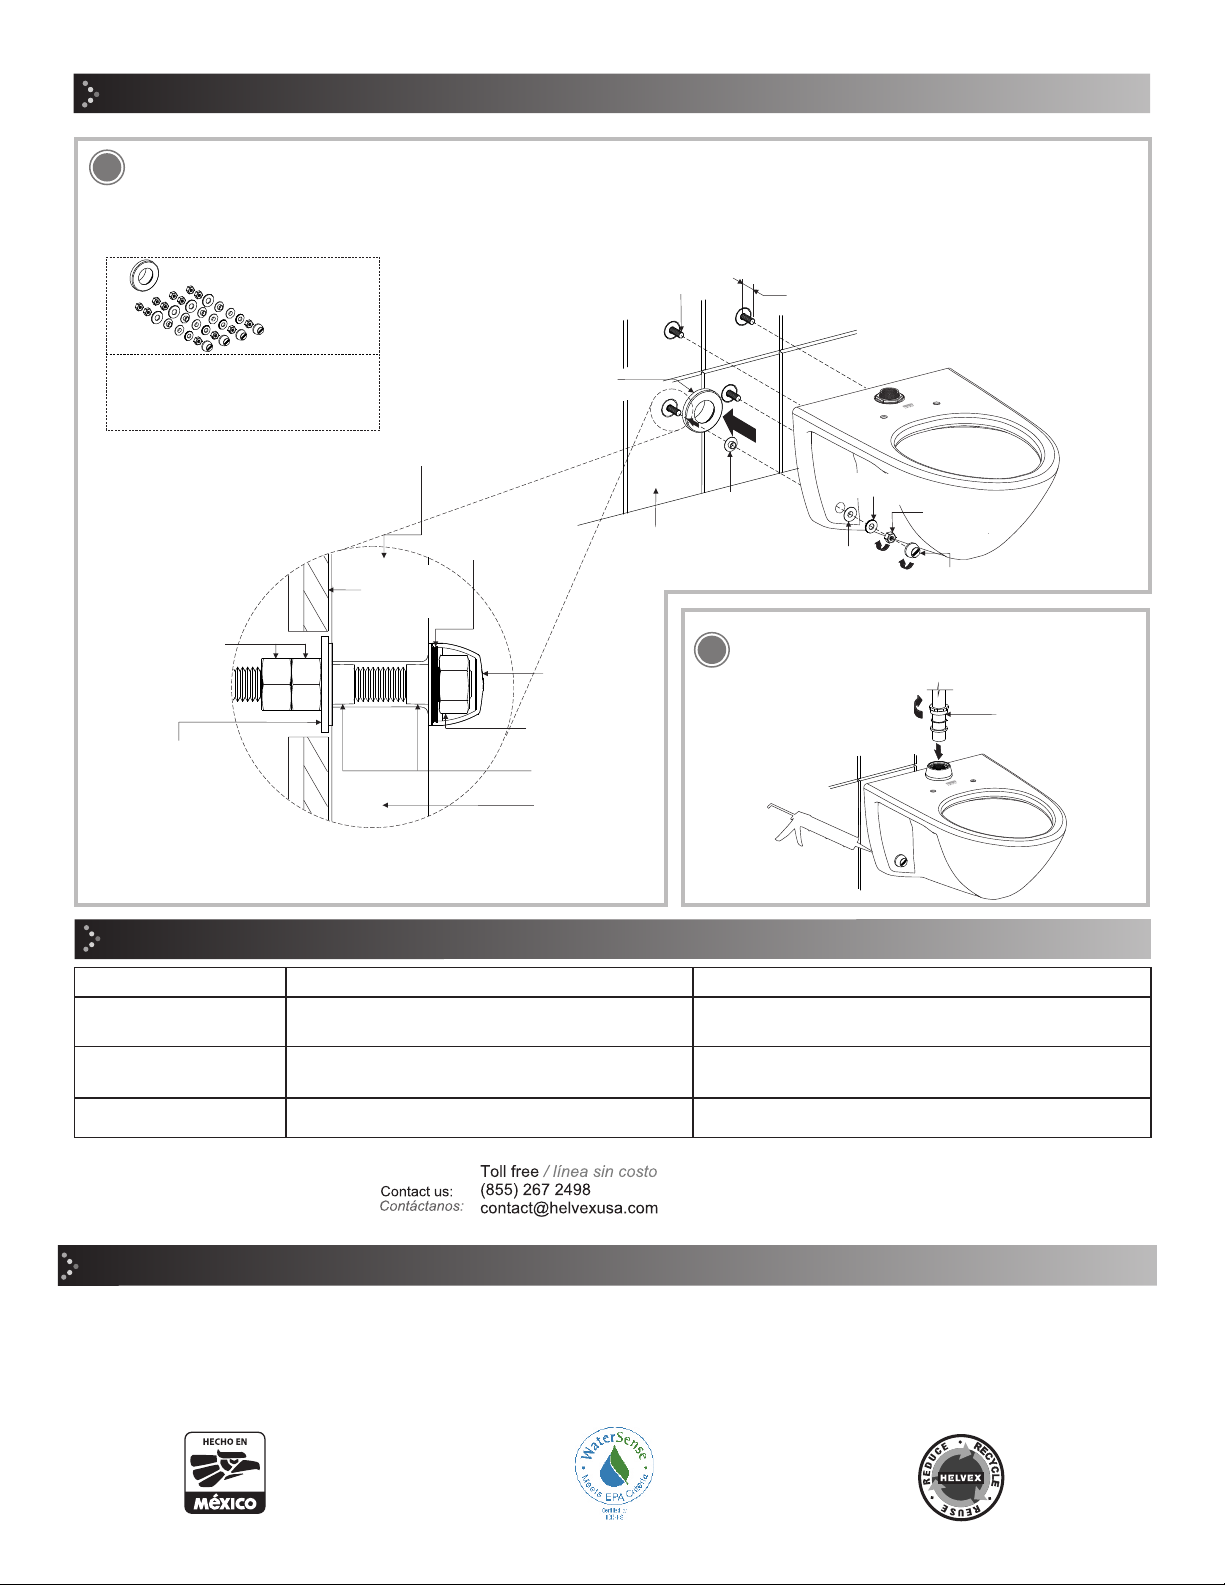
seal gasket
empaque
2
Insert the gasket into the drain pipe (not included), screw a couple of back-up nuts into each mounting stud to act as the rear fixing limit, then insert
the back-up washers to the finished wall level and insert the bushings, the toilet, the bushings and screw the threaded washers and fix with the
nuts to, finally screw the nut cover caps. / Inserte el empaque al tubo de desagüe, enrosque un par de tuercas de respaldo en cada espárrago de
montaje para que actúen como el límite trasero de fijación, posteriormente inserte las rondanas de respaldo al nivel de la pared con acabado final
e inserte los bujes, el inodoro, los bujes y enrosque las rondanas roscadas y fije con las tuercas, finalmente enrosque los cubretornillos.
Make sure the toilet is leveled both in the
horizontal and vertical planes. / Asegúrese
de que inodoro quede nivelado en los
planos horizontal y vertical.
3
Apply anti-fungus silicone around the toilet’s baseline and
then install the flushometer. / Aplique silicón anti-hongos
en el perímetro de la base del inodoro y posteriormente
instale el fluxómetro.
back-up nuts
tuercas del respaldo
back-up washer
rondanas del respaldo
finished wall
pared con
acabado final
Note: Is necessary to screw and fix per each mounting stud the 2 back-up nuts calculating
that the back-up washer is at the level of the finished wall, as shown in the A Detail. / Nota: Es
necesario atornillar y fijar por cada espárrago de montaje las 2 tuercas de respaldo
calculando que la rondana de respaldo esté nivel de la pared terminada, como se muestra en
el Detalle A.
2,48”
6,3 cm
finished wall
pared con
acabado final
mounting stud
espárrago de montaje
bushing
buje
Troubleshooting / Posibles Causas y Soluciones
Problem / Problema Causes / Causas Solutions / Solución
The flush lever is not pressed properly. /
La palanca no es accionada correctamente.
Verify that the flushometer operating requirements are met. / Compruebe
que se cumpla los requerimientos de operación del fluxómetro.
Waste is not flushed correctly. /
No se barren correctamente
los desperdicios.
Gasket was not installed properly or is damaged. /
No se instaló correctamente en el empaque o está dañado.
Install gasket properly or replace it. /
Instale correctamente o reemplace el empaque.
Water leaks on the bowl’s back. /
Fuga de agua en el respaldo
de la taza.
The nuts are loose. /
Las tuercas de sujeción están flojas.
Tighten the nuts. /
Apriete las tuercas de sujeción.
The bowl moves. /
Se mueve la taza.
(not included)
(no incluidas)
Note: included in the US-TZF-P
adjustable water closet carrier system
Nota: se incluyen en el sistema de soporte
ajustable US-TZF-P
threaded washer
rondana roscada
cap nut
cubierta
bushings
bujes
nut
tuerca
nipple flushometer
assembly (not included)
niple armado del fluxómetro
(no incluido)
bushing
buje
nut
tuerca
nut cover caps
cubretornillos
threaded washer
rondana roscada
A Detail
Detalle A
ceramic toilet
taza cerámica
ceramic toilet
taza cerámica
It is very important to follow the instructions below to preserve HELVEX products
finishings, shiny and in perfect conditions:
1. Use only water and a clean cloth.
2. Do not use fibers, powders, abrasives, or chemicals.
3. Do not use sharp objects to clean the finishings.
4. It is recommended to clean your device daily
Visit our website www.helvexusa.com
Es muy importante seguir las siguientes instrucciones para conservar los
acabados de los productos HELVEX, con brillo y en perfecto estado:
1. Utilice únicamente agua y un paño limpio.
2. No utilice fibras, polvos, abrasivos, ni productos químicos.
3. No utilice objetos punzo-cortantes para limpiar los acabados.
4. Se recomienda realizar la limpieza de su producto diariamente.
Visite nuestra página www.helvexusa.com
Cleaning Recommendations / Recomendaciones de Limpieza


