manuals.online logo
Brands
  1. Home
  2. •
  3. Brands
  4. •
  5. Helvex
  6. •
  7. Plumbing Product
  8. •
  9. Helvex V. D. 1176-6 User manual

Helvex V. D. 1176-6 User manual

1
Hola soy Fluxy, te
ayudaré a instalar
tu producto.
Herramienta Requerida
Recomendaciones de Instalación
Válvula de Drenaje Antiretorno para
Tubo de PVC Ø 6" / Anti-return
Drain Valve for PVC Pipe Ø 6 "
Hi I'm Fluxy, I'll
help you to install
your product.
/ Required Tools
/ Installation Recommendations
V. D. 1176-6
INSTALLATION GUIDE
GUÍA DE INSTALACIÓN
1-04-0203-1
Se recomienda contar con un registro donde se puedan generar las maniobras para los mantenimientos sin ninguna obstrucción de espacio. /
It is recommended to have a register where maneuvers can be generated for maintenance without any obstruction of space.
1.20m
(47.24”) Variable
Variable
Sentido del flujo
entrada salida
input output
Flow direction
[email protected]
Original Parts:
Consultancy and Technical
01(55)53339431
01800 909 2020 01 (55) 53 33 94 00
Refacciones Originales:
Asesoría y Servicio Técnico:
Ext. 5068, 5815 y 5913
Service:
53 33 94 21
01 800 890 0594
[email protected]
ADVERTENCIA / WARNING
Agradecemos su elección por los productos HELVEX.
Estamos seguros de que su confiabilidad por el producto excederá sus más altas expectativas, cuya
funcionalidad, estética, durabilidad, respaldo integral y alta calidad le otorgarán plena satisfacción por años,
reflejando el compromiso con la calidad, innovación y el medio ambiente que forman parte de Helvex.
Thank you for choosing HELVEX products.
We are confident that the product reliability will exceed your maximum expectations. The functionality,
aesthetics, durability, quality and support will grant you full satisfaction for years, it is Helvex commitment to the
quality, innovation and the environment.
Para disminuir el riesgo de lesiones o daños a la propiedad, lea todas las instrucciones antes de instalar el
producto. Utilice gafas de seguridad. En obras de construcción, instalación, modificación, ampliación y
reparación deben cumplir con el reglamento de construcción y obras de su localidad. El producto ilustrado
puede sufrir cambios de aspecto como resultado de la mejora continua a la que está sujeto.
To reduce the risk of injury or property damage, read all instructions before installing the product. Please
remember to use safety glasses. In construction, installation, alteration, extension and repair, the rules of
constructions must be applied. As result of continuous improvement, the illustration product may change in
appearance.
Esta guía de instalación aplica al producto en cualquier acabado. / This installation
guide applies to the product in any finish.
Nota: Se puede adaptar una reducción de Ø 6" a Ø 4"
excéntrica (No incluida) si lo requiere la instalación.
El adaptador excéntrico debe ir cementado al tubo de
PVC. / Note: A reduction of Ø 6 "to Ø 4" eccentric (Not
included) can be adapted if the installation requires it.
The eccentric adapter must be cemented to the PVC
tube.
2°
llave española 1/2"
1/2 " spanish key
pendiente 2% mínimo
(2cm x cada metro lineal) /
pending 2% minimum
(2cm x linear meter)
Nota: No funciona con PVC Hidráulico.
/ Note: It does not work with Hydraulic PVC.
tubo PVC sanitario Ø 6" (No incluido)
Ø 6" PVC sanitary pipe (Not included)
2
Instalación General
/ General Installation
VISTA SUPERIOR
TOP VIEW
Flujo a descarga
directa a la red
principal.
Flow directly to
the discharge
mains.
Se recomienda instalar la válvula antes del último registro dirigido hacia la red ramal general. / It is recommended to install the valve before
the last record directed towards the general branch network.
2
3
Retire el seguro. / Remove insurance.
4 5 Desenrosque los tornillos de la tapa, retire la tapa y el empaque para nivelar la
válvula. / Unscrew the screws of the cover, remove the cover and the gasket
to level the valve.
tornillo
empaque
screw
gasket
A: A la entrada y descarga de la válvula, no debe existir ninguna obstrucción, para evitar estancamientos y garantizar el buen funcionamiento.
A: At the inlet and outlet of the valve, there should be no obstruction to avoid deadlocks and guarantee proper functioning.
insurance
seguro
42,5 cm
(16,7”)
tapa
cover
nivel
level
tubo PVC sanitario Ø 6" (No incluido)
Ø 6" PVC sanitary pipe (Not included)
tubo PVC sanitario Ø 6" (No incluido)
Ø 6" PVC sanitary pipe (Not included)
reducción cónica Ø 6"-
Ø 4” (No incluida)
Ø 6"- Ø 4” conical
reduction (Not included)
Nota: No funciona con PVC Hidráulico.
/ Note: It does not work with Hydraulic PVC.
No debe existir alguna obstrucción o
registro hacia la red principal.
There should not be any obstruction
or log into the main network.
VISTA LATERAL
SIDE VIEW
90°
FLUJO
FLOW
AA
tubo PVC sanitario Ø 6" (No incluido)
Ø 6" PVC sanitary pipe (Not included)
tubo PVC sanitario Ø 6" (No incluido)
Ø 6" PVC sanitary pipe (Not included)
Nota: No funciona con PVC Hidráulico.
/ Note: It does not work with Hydraulic PVC.
reducción cónica Ø 6"-
Ø 4” (No incluida)
Ø 6"- Ø 4” conical
reduction (Not included)
3
Desenrosque los tornillos, retire el anillo brida y el empaque cónico para insertarlos en el tubo y ensamblarlos a la entrada de la válvula, apriete
los tornillos para asegurar y fijar el ensamble. / Unscrew the screws, remove the brida ring and the conical gasket to insert them into the tube and
assemble them to the valve inlet, tighten the screws to secure and secure the assembly.
6
7a Desenrosque los tornillos, retire el anillo brida y el empaque cónico para insertarlos en el tubo y ensamblar a la salida de la válvula, apriete los
tornillos para asegurar y fijar el ensamble. 7b Coloque el empaque y la tapa, enrosque los tornillos para fijar y asegurar la tapa. / 7a Unscrew the
screws, remove the brida ring and conical gasket to insert them into the tube and assemble to the valve outlet, tighten the screws to secure and
secure the assembly. 7b Attach the gasket and cover, screw the screws to secure the cover.
7
Asegúrese de que la
compuerta e interior
de la válvula se
encuentren libres de
tierra o cemento. /
Make sure the gate
valve and interior
are free of dirt or
cement.
empaque cónico
conical gasket
tornillo
screw
anillo brida
brida ring
tubo PVC sanitario Ø 6"
(No incluido)
Ø 6" PVC sanitary pipe
(Not included)
reducción cónica Ø 6"- Ø 4”
Ø 6"- Ø 4” conical reduction
tornillo
empaque
screw
gasket
tapa
cover
tubo PVC sanitario Ø 6"
(No incluido)
Ø 6" PVC sanitary pipe
(Not included)
empaque cónico
conical gasket
tornillo
screw
anillo brida
brida ring
7a
7b
tornillo
screw
empaque cónico
conical gasket
anillo brida
brida ring
Nota: Apretar los tornilos en el orden que se muestra en el diagrama 7c.
/ Note: Tighten the screws in the order shown in diagram 7c.
7c
1
2
3
4
2
3
4
1
4
01 55 53 33 94 00
Ext. 5804, 5805 y 5806 (0133) 36 19 01 13
Comunícate:
Participa en nuestros
cursos gratuitos
de capacitación.
(0181) 83 33 57 67
(0181) 83 33 61 78
In Guadalajara:
Contact:
Enter our free
training courses.
In Monterrey:
En la Ciudad de México:
In Mexico City:
En Monterrey:
En Guadalajara:
Es muy importante seguir las siguientes instrucciones para conservar los
acabados de los productos HELVEX, con brillo y en perfecto estado:
1. Utilice únicamente agua y un paño limpio.
2. No utilice fibras, polvos, abrasivos, ni productos químicos.
3. No utilice objetos punzo-cortantes para limpiar los acabados.
4. Se recomienda realizar la limpieza de su producto diariamente.
Visite nuestras páginas www.helvex.com.mx para México y www.helvex.com
para el mercado Internacional
It is very important to follow the instructions below to preserve HELVEX products
finishes, shiny and in perfect condition:
1. Use only water and a clean cloth.
2. Do not use fibers, powders, abrasives, or chemicals.
3. Do not use sharp objects to clean the finish.
4. It is recommended to clean your product daily.
Visit our pages www.helvex.com.mx for Mexico and www.helvex.com
for the International market.
Recomendaciones de Limpieza / Cleaning Recommendations
HELVEX, S. A. DE C. V. Calzada Coltongo # 293, Col. Industrial Vallejo, Del. Azcapotzalco, C. P. 02300, Ciudad de México.
Posibles Causas y Soluciones
No circula el agua en la
válvula. / No water flows into
the valve.
Fuga en las conexiones. /
Leak in the connections.
La trampa está atorada. / The trap is stuck
No se apretaron los tornillos firmemente. / The screws were
not tightened firmly.
Verifique que la trampa este libre de tierra o cemento (pag. 3 paso
7.) . / Verify that the trap is free of dirt or cement (page 3 step 7.)
Verifique que los tornillos se encuentren apretados firmemente (pag.
3, paso 6 y 7.). / Check that the screws are firmly tightened (page 3,
steps 6 and 7.).
Problema / Problem Causa / Cause Solución / Solution
/ Troubleshooting
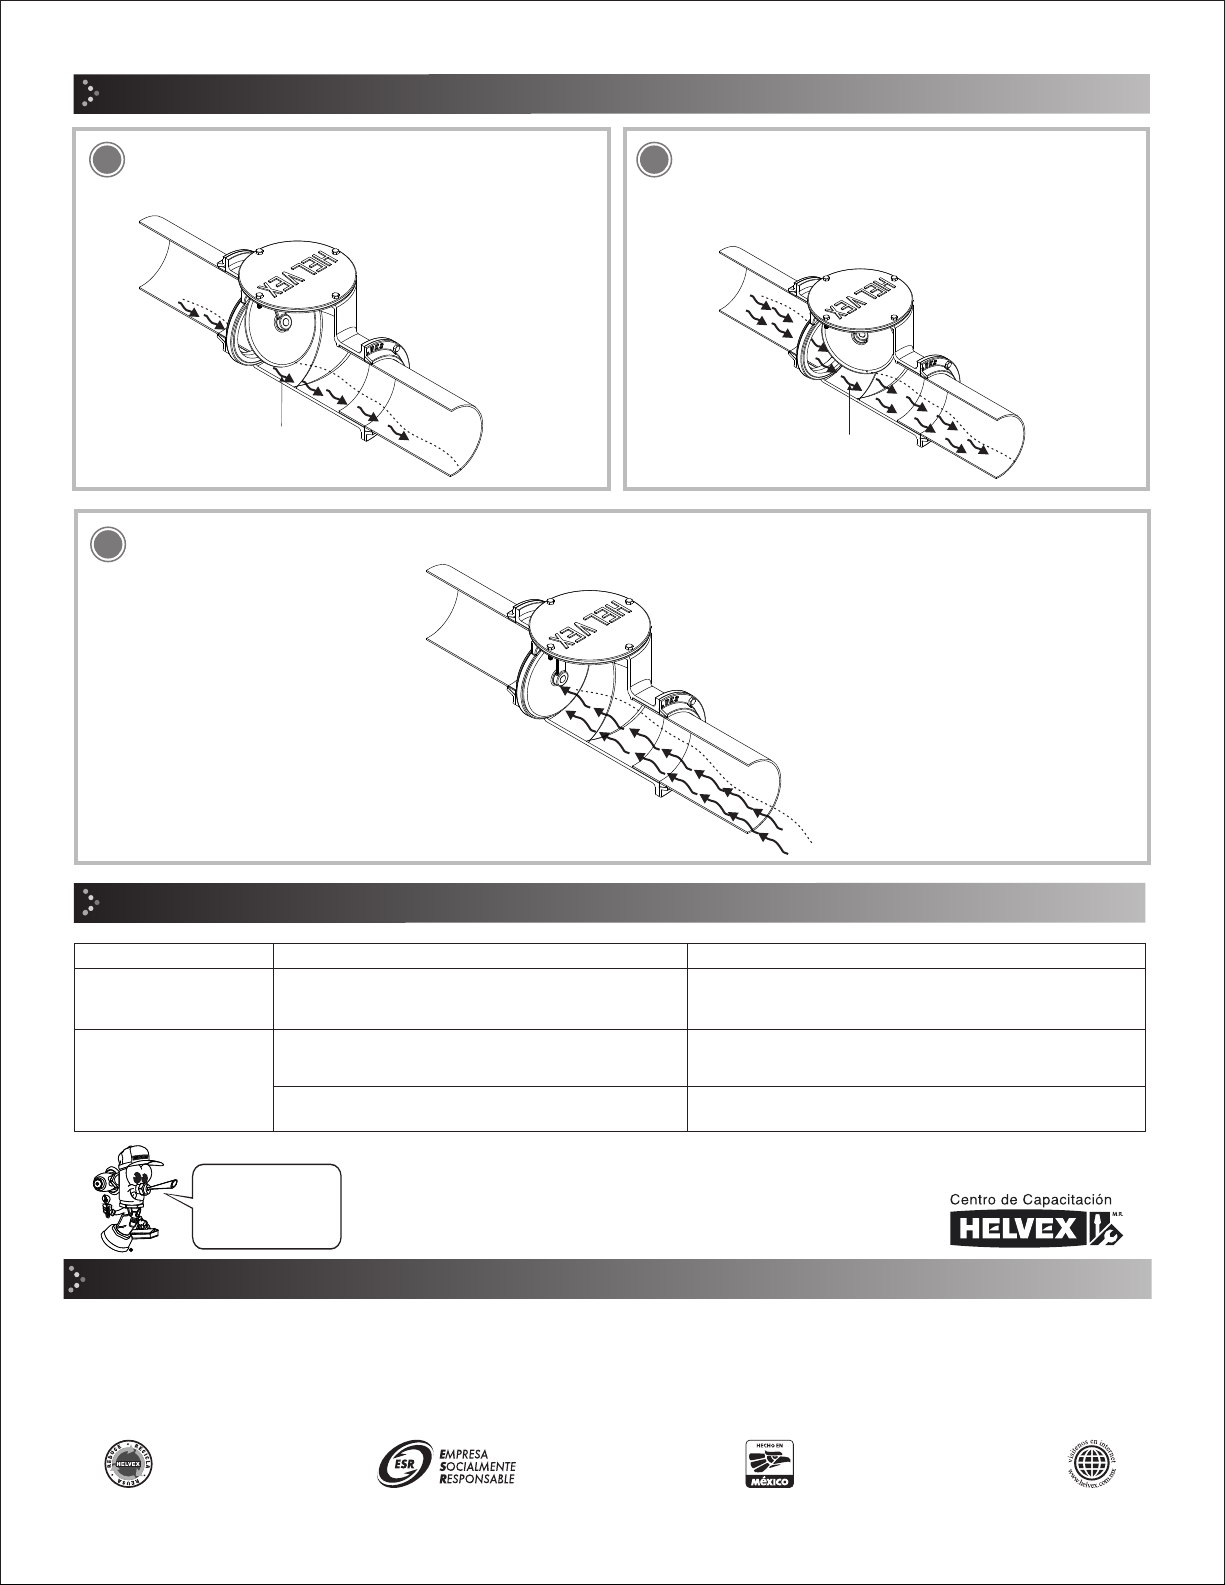
10 C. Compuerta Cerrada. La compuerta cierra totalmente a la menor presión en sentido contrario, impidiendo el regreso de aguas negras y
evitando inundaciones. / C. Closed Gate. The damper totally closed at the lowest pressure in the opposite direction, preventing the return of
sewage and avoid flooding.
No se colocó el empaque cónico. / The conical gasket was
not placed.
Coloque el empaque cónico (pag. 3, paso 6 y 7.). / Check that the
screws are firmly tightened (page 3, steps 6 and 7.).
8
9
Operación / Operation
A. Posición normal. La compuerta queda ligeramente abierta,
para permitir la circulación de aire por las líneas de drenaje.
A. Normal position. The gate is propped open to allow
circulation of air through the drain lines.
dirección del flujo
B. Compuerta Abierta. La compuerta puede abrirse lo que sea
necesario, para permitir la salida de aguas negras de la casa o
edificio, hacia el colector de la calle. / B. Open Gate. The gate
can be opened as necessary, to permit the release of sewage
from the house or building, to the collector street.
flow direction dirección del flujo
flow direction

Other Helvex Plumbing Product manuals

Helvex Nuva TV-061-S User manual

Helvex

Helvex Nuva TV-061-S User manual

Helvex Maxima E-712 User manual

Helvex

Helvex Maxima E-712 User manual

Helvex E-709 User manual

Helvex

Helvex E-709 User manual

Helvex Liquida TV302-1.5 User manual

Helvex

Helvex Liquida TV302-1.5 User manual

Helvex 27 User manual

Helvex

Helvex 27 User manual

Helvex FC-185-19 User manual

Helvex

Helvex FC-185-19 User manual

Helvex H1000-TR011 User manual

Helvex

Helvex H1000-TR011 User manual

Helvex PD-01-AI User manual

Helvex

Helvex PD-01-AI User manual

Helvex E-308 User manual

Helvex

Helvex E-308 User manual

Helvex RM-27 User manual

Helvex

Helvex RM-27 User manual

Helvex IG-40 User manual

Helvex

Helvex IG-40 User manual

Helvex TV-012 User manual

Helvex

Helvex TV-012 User manual

Helvex 1342-H User manual

Helvex

Helvex 1342-H User manual

Helvex 24 User manual

Helvex

Helvex 24 User manual

Helvex 185-19-1 User manual

Helvex

Helvex 185-19-1 User manual

Helvex Nuva H-900 User manual

Helvex

Helvex Nuva H-900 User manual

Helvex Nuva EP-99 User manual

Helvex

Helvex Nuva EP-99 User manual

Helvex EP-3007-EB User manual

Helvex

Helvex EP-3007-EB User manual

Helvex ADARA E-312 User manual

Helvex

Helvex ADARA E-312 User manual

Helvex Premier E-909 User manual

Helvex

Helvex Premier E-909 User manual

Helvex Ergo E-39 User manual

Helvex

Helvex Ergo E-39 User manual

Helvex Argos TV-296 User manual

Helvex

Helvex Argos TV-296 User manual

Helvex TZF NAO User manual

Helvex

Helvex TZF NAO User manual

Helvex Argos TV-296 User manual

Helvex

Helvex Argos TV-296 User manual

Popular Plumbing Product manuals by other brands

Graff TERRA G-6710-LM46B installation instructions

Graff

Graff TERRA G-6710-LM46B installation instructions

BELLOSTA baby-s 7205/R/B Installation instruction

BELLOSTA

BELLOSTA baby-s 7205/R/B Installation instruction

Elkay Avado LKLFAV2031CR Installation & owner's manual

Elkay

Elkay Avado LKLFAV2031CR Installation & owner's manual

Axor Terrano 37136XX1 parts list

Axor

Axor Terrano 37136XX1 parts list

Symmons 3DIVBODYNSSRT Operation & maintenance manual

Symmons

Symmons 3DIVBODYNSSRT Operation & maintenance manual

Laufen 8.2 1 Series manual

Laufen

Laufen 8.2 1 Series manual

SILESTONE INTEGRITY DUE L Installation guidelines

SILESTONE

SILESTONE INTEGRITY DUE L Installation guidelines

Mora armatur Izzy Miniprofi 70 28 45 manual

Mora armatur

Mora armatur Izzy Miniprofi 70 28 45 manual

B DUTCH BD700.000017 installation manual

B DUTCH

B DUTCH BD700.000017 installation manual

Gessi TRASPARENZE 44873 manual

Gessi

Gessi TRASPARENZE 44873 manual

American Standard Selectronic Proximity Faucet installation instructions

American Standard

American Standard Selectronic Proximity Faucet installation instructions

Spectrum Brands Pfister Park Avenue R89-XFE Quick installation guide

Spectrum Brands

Spectrum Brands Pfister Park Avenue R89-XFE Quick installation guide

Sani-Lav 56FFL operating manual

Sani-Lav

Sani-Lav 56FFL operating manual

Fleck 7000SXT Service manual

Fleck

Fleck 7000SXT Service manual

Sanipex BAGNODESIGN BDM-KOY-305 Series installation guide

Sanipex

Sanipex BAGNODESIGN BDM-KOY-305 Series installation guide

Gessi RETTANGOLO 20013 manual

Gessi

Gessi RETTANGOLO 20013 manual

Hansa Murano Mounting and operating instructions

Hansa

Hansa Murano Mounting and operating instructions

Hans Grohe Rebris S 72530 1 Series Installation and user instructions

Hans Grohe

Hans Grohe Rebris S 72530 1 Series Installation and user instructions

manuals.online logo
manuals.online logoBrands
  • About & Mission
  • Contact us
  • Privacy Policy
  • Terms and Conditions

Copyright 2025 Manuals.Online. All Rights Reserved.