manuals.online logo
Brands
  1. Home
  2. •
  3. Brands
  4. •
  5. Helvex
  6. •
  7. Plumbing Product
  8. •
  9. Helvex E-306 User manual

Helvex E-306 User manual

Este instructivo aplica al producto en cualquier acabado. / This instructive applies
to the product in any finish.
Herramienta Requerida
perico
/ Required Tools
adj ustable
wrench
installation wrench
Herramienta Incluida en su Producto
/ Tools Included in your Product
llave de instalación llave para tuerca
monomando
nut wrench
tap
Cada metro de altura de
su producto a la base
del tinaco equivalen a
(0,1 kg/cm²) [1,42 PSI].
Every meter of height of
your product to the base
of the water tank (0,1
kg/cm²) [1,42 PSI]
equivals.
Visite nuestra página
www.helvex.com.mx,
para visualizar los videos
de instalación.
Visit our website
www.helvex.com.mx,
to view the installation
videos.
Requerimientos de
Instalación
Relación
Altura Tinaco-Presión
Hola soy Fluxy, te
ayudaré a instalar
tu producto.
Instalación General
hot
cold
Caliente
Fría
*55 cm
(21,6”)
*20,3 cm
agle valves
n
vál as
vul
an
gulares
NPT
(8”)
*Recommended Actions
*Medidas Recomendadas
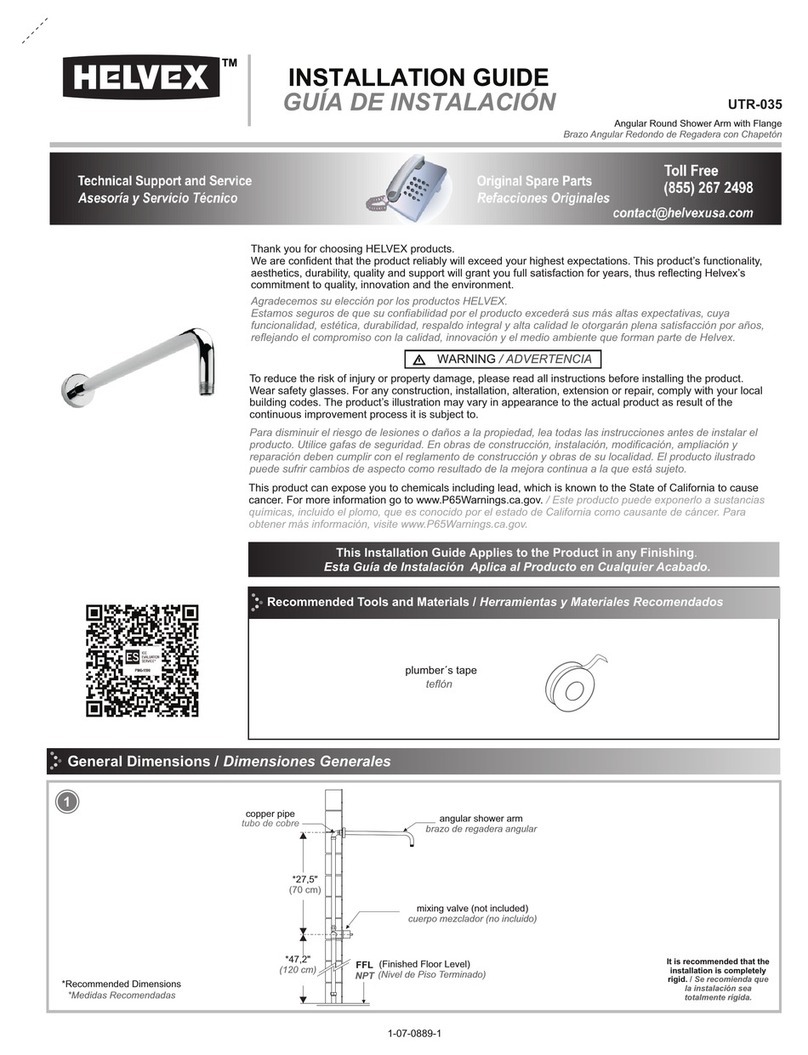
INSTALLATION GUIDE
GUÍA DE INSTALACIÓN
1-02-2156-6
(Nivel de Piso Terminado)
For proper operation of this
product is the lowest pressure (0,6
kg/cm²) 8,53 PSI.
Hi I'm Fluxy, I'll
help you to install
your product.
Installation Requirements Relation
Tub Height-Pressure
/ General Installation
Height (h)
1Cierre el suministro de agua. / Close the water supply.
Ubique y cierre las válvulas de suministro de agua.
Generalmente se encuentran debajo del lavabo. Si se trata de un reemplazo
de grifo, quite el grifo viejo y limpie completamente la superficie del lavabo.
Locate and close the water supply valves.
Usually found under the sink. If it is a replacement faucet, remove the old
faucet and clean the entire surface of the sink.
Monomando para Fregadero con Manguera
Retráctil, con Sistema Anticalcáreo y Dos
Tipos de Chorro / Sink with mixer for
Retractable Hose with Antiscale System and
Two Types Chorro
E-306
[email protected]
Original Parts:
Consultancy and Technical
01(55)53339431
01800 909 2020 01 (55) 53 33 94 00
Refacciones Originales:
Asesoría y Servicio Técnico:
Ext. 5068, 5815 y 5913
Service:
53 33 94 21
01 800 890 0594
Para el correcto funcionamiento de
este producto, la presión mínima
es de (0,6 kg/cm²) 8,53 PSI.
5 m
6 m
7 m
PSI
Altura(h)
7,11
8,53
9,95
kg/cm²
0,5
0,6
0,7
destornillador
screwdriver
1
ADVERTENCIA / WARNING
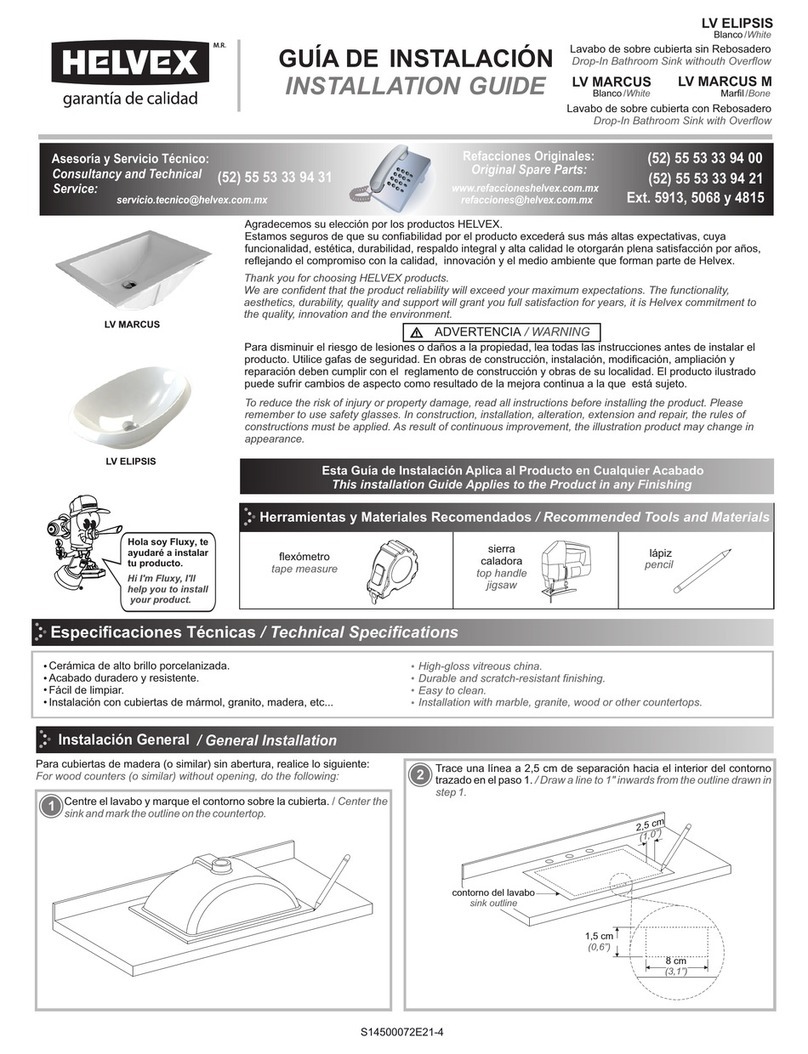
Para disminuir el riesgo de lesiones o daños a la propiedad, lea todas las instrucciones antes de instalar el
producto. Utilice gafas de seguridad. En obras de construcción, instalación, modificación, ampliación y
reparación deben cumplir con el reglamento de construcción y obras de su localidad. El producto ilustrado
puede sufrir cambios de aspecto como resultado de la mejora continua a la que está sujeto.
Agradecemos su elección por los productos HELVEX.
Estamos seguros de que su confiabilidad por el producto excederá sus más altas expectativas, cuya
funcionalidad, estética, durabilidad, respaldo integral y alta calidad le otorgarán plena satisfacción por años,
reflejando el compromiso con la calidad, innovación y el medio ambiente que forman parte de Helvex.
Thank you for choosing HELVEX products.
We are confident that the product reliability will exceed your maximum expectations. The functionality,
aesthetics, durability are at its highest quality! The comprehensive support will grant full satisfaction for years,
reflecting the commitment to quality, innovation and the environment as part Helvex.
To reduce the risk of injury or property damage, read all instructions. Before installing the product, please
remember to use safety glasses. In construction, installation, alteration, extension and repair, the rules of
constructions mustbe applied. As result of continuous improvement, the illustration product may change in
appearance.
allen wrench 5/64”
llave allen 5/64”
ntalci en ra
I s a ón G e l /
en a n la o
G erl I sta l ti n
Instalac óndelas Mangueras
i
/ Insa lati n of H se
t l o o s
Inserte el o’ring en el espárrago y coloque el monomando
en la tarja. / Insert the o’ring on the stud and place the tap
in the sink.
Gire la tuerca de sujeción para ajustar la altura del chapetón y
permitir el libre giro del monomando. / Turn the lock nut to adjust
the height of the flange and allow free rotation of the mixer.
ajuste
de altura /
adjustment
height
El ajuste de altura
es manual. /
The height adjustment
is manual.
Inserte por la parte inferior, la placa de sujeción y el
empaque. Enrosque firmemente la tuerca con la llave de
instalación (incluida). / Insert the lower part, the clamping
plate and the gasket. Firmly tighten the nut with the wrench
installation (included)..
Enrosque las mangueras (incluidas) a los tubos de alimentación. /
Screw the hose (included) to feeding tubes.
tubos de
alimentación
/ feed pipes
mangueras ½”-14 NPSM
x 3/8”-24 UNF x 12”
/ hoses ½ "-14 NPSM
x 3/8 "-24 UNF x 12"
tubo izquierdo agua fría
(azul) / tube cold (blue)left
tubo derecho agua caliente (rojo)
/ right tube hot water (red)
2
4
2 3
5
base / base
empaque /
packing
tuerca / nut
a
cbezal /e
h ad
o’r g
in / o’r g
in
Apriete
firmemente
la tuerca. /
Tighten firmly
nut.
tuerca de sujeción /
clamp nut
llave de
instalación
(incluida) /
installation
wrench
(included).
Operación
p a i
/ O er t on
Enrrosque las mangueras (incluidas) a las válvulas angulares. / Screw hoses
(included) to angle valves.
válvula angular / angular
valve
Purge la línea de
alimentación antes de
conectar. / Purge the
supply line before
connecting.
Enrosque la manguera retráctil al tubo
alimentador. / Retractable hose to screw the
feeder tube.
manguera retráctil /
retractable hose
tubo
alimentador /
feeder tube
empaque /
packing
contrapeso /
counterweight
7Coloque el contrapeso. / Place the
counterweight.
Coloque el contrapeso
a la mitad
del largo de la manguera.
aproximadamente
/
Place the counterweight
approximately half the
length of the hose.
Abra la línea de alimentación principal. Mueva hacia atrás para abrir y gire para regular
la temperatura. Jale hacia afuera el cabezal para utilizar la manguera retráctil y gire en
la posición deseada. / Open the main power line. Move back to open and turn to
regulate the temperature. Pull out the head to use the retractable hose and turn on the
desired position..
El monomando cuenta con dos tipos de chorro:
aireado y tipo regadera. Presione el botón ubicado en
la parte superior de la regadera para seleccionar el
tipo de chorro deseado. / The mixer has two spray
modes: aerated shower type. Press the button on top
of the shower to select the desired type of jet button.
NOTA: Al cerrar el paso del agua o reducir el flujo, el tipo de chorro
regresa a la posición de chorro aireado. / NOTE: When you shut off
the water or reduce the flow, the type of jet returns to the position of
aerated spray.
chorro
aireado /
jet airy
chorro tipo
regadera /
jet type
sprinkler
Para eliminar el sarro acumulado en los anticalcáreos, sólo pase el dedo
por encima de estos. /
To remove plaque accumulated in the limescale, just swipe your finger
over them.
anticalcáreos
/ limescale
Mantenimiento
M inten nc
/aae
3
7
6
68
69
6
10
6
11
cabezal / head
girar / turn
+ caliente
/ + hot
+ fria
/ + cold
abrir
/ open
Mantenimiento del Aireador y Cambio del Cartucho / Maintenance and Change CartridgeAerator
Desenrosque el barril, retire el aireador y limpie a
chorro de agua y arme nuevamente. / Unscrew
the barrel, remove the aerator and clean water
jet and assemble again..
Posibles Causas y Soluciones / Possible Causes and Solutions
Pr o b lema / Pr o b lem C ausa / C ause So luci ó n / So l ut i o n
No sale agua. La línea principal o las llaves están cerradas. / The main
line or t he keys are locked.
Abra la línea principal o las llaves angulares. / Open the main line or
angle brackets.
Hay fuga en las conexiones. / There
are leaks in t he connections.
Las conexiones no están firmemente apretadas. / The
connections are not t ight. Apriete firmemente las conexiones. / Tight en connections.
Existe f ilt ración hacia abajo de la
tarja. / There is filt ering down the
sink.
No se colocó el o'ring en el chapetón. / The o'ing is not
placed on the escutcheo.
Coloque el o'ring en la base del chapetón. Pag. 2 , paso 2. / Place
the O-ring at t he base of t he escutcheon. Pag 2 st ep 2.
La manguera retráctil está
demasiado corta al jalar el cabezal.
/ The retract able hose is way t oo
short to pull t he head.
El cont rapeso está muy próximo al espárrago. / The
counterweight is very close to the stud.
Recorra el contrapeso hacia la conexión del tubo alimentador. / Tour
counterweight to port tube feeder.
Al abrir en el sentido del agua fría,
sale agua caliente o al contrario./
Opening in the sense of cold water
comes out hot water or vice versa.
Las mangueras están invertidas / The hoses are reversed Invierta la conexión de las mangueras. / Swapped hoses.
4
01 55 53 33 94 00
Ext. 5804, 5805 y 5806 (0133) 36 19 01 13
Comunícate:
Participa en nuestros
cursos gratuitos
de capacitación.
(0181) 83 33 57 67
(0181) 83 33 61 78
In Guadalajara:
Contact:
Enter our free
training courses.
In Monterrey:
En la Ciudad de México:
In Mexico City:
En Monterrey:
En Guadalajara:
HELVEX, S. A. DE C.V. Calzada Coltongo 293, Col. Industrial Vallejo 02300 Del. Azcapotzalco, México, D.F. Tel. (55) 53-33-94-00.
Es muy importante seguir las siguientes instrucciones para conservar los
acabados de los
1. Utilice únicamente agua y un paño limpio.
2. No utilice fibras, polvos, abrasivos, ni productos químicos.
3. No utilice objetos punzo-cortantes para limpiar los acabados.
4. Se recomienda realizar la limpieza de su producto diariamente.
Nota: Vea nuestros tips en la pag. www.helvex.com.mx
productos HELVEX, con brillo y en perfecto estado:
It is very important to follow the instructions below to preserve HELVEX products
finishes, shiny and in perfect condition:
1. Use only water and a clean cloth.
2. Do not use fibers, powders, abrasives, or chemicals.
3. Do not use sharp objects to clean the finish.
4. It is recommended to clean your product daily.
Note: See our tips on: www.helvex.com.mx
Recomendaciones de Limpieza / Cleaning Recommendations
6
12
lever-handle
palanca maneral
rod holder
poste sujetador
clamp nut
tuerca de sujeción
cartridge retaining
tuerca de sujeción de cartucho
Sh-1131
oppressor
opresor
llave para Mantenimiento
wrench for
maintenance
packing
aerator
barrel
empaque
aireador
barril
6
13
o’ring
Desenrosque el opresor con la llave allen 5/64” (incluida), retire la palanca jalándola hacia
arriba. Desenrosque el poste sujetador y retire la tuerca de sujeción y la tapa deslizante con
empaque y rondana antifricción. Desenrosque la tuerca de sujeción del cartucho y retire el
o’ring. Cambie el cartucho y arme nuevamente. / Unscrew the oppressor with the allen wrench
5/64 "(included), remove the lever pulling up. Unscrew and remove the bra post clamp nut and
slide with packing and friction washer. Unscrew the nut holding the cartridge and remove the
O-ring. Replace the cartridge and assemble again.
tapa deslizante con empaque amortiguador y rondana antifricción
/ slider with cushion packaging and friction washer

Other Helvex Plumbing Product manuals

Helvex UH-105-WOA User manual

Helvex

Helvex UH-105-WOA User manual

Helvex Vertika E-701-S User manual

Helvex

Helvex Vertika E-701-S User manual

Helvex ME-3000 User manual

Helvex

Helvex ME-3000 User manual

Helvex EP-3007-EB User manual

Helvex

Helvex EP-3007-EB User manual

Helvex Nuva EP-2006 User manual

Helvex

Helvex Nuva EP-2006 User manual

Helvex Nuva TV-200 User manual

Helvex

Helvex Nuva TV-200 User manual

Helvex C-69-S User manual

Helvex

Helvex C-69-S User manual

Helvex Alika E-920 User manual

Helvex

Helvex Alika E-920 User manual

Helvex TZF NAO User manual

Helvex

Helvex TZF NAO User manual

Helvex 444 User manual

Helvex

Helvex 444 User manual

Helvex Forza TV-304 Instruction Manual

Helvex

Helvex Forza TV-304 Instruction Manual

Helvex Deco UDC-05 User manual

Helvex

Helvex Deco UDC-05 User manual

Helvex Vertika TV-081-S User manual

Helvex

Helvex Vertika TV-081-S User manual

Helvex Mangna DX Mangna DX User manual

Helvex

Helvex Mangna DX Mangna DX User manual

Helvex 24-RHLI User manual

Helvex

Helvex 24-RHLI User manual

Helvex 282-H User manual

Helvex

Helvex 282-H User manual

Helvex Nuva TV-203-C User manual

Helvex

Helvex Nuva TV-203-C User manual

Helvex E-40 User manual

Helvex

Helvex E-40 User manual

Helvex Kubica TR-036 User manual

Helvex

Helvex Kubica TR-036 User manual

Helvex 24 User manual

Helvex

Helvex 24 User manual

Helvex Nuva TV-203 User manual

Helvex

Helvex Nuva TV-203 User manual

Helvex Konos E-916 User manual

Helvex

Helvex Konos E-916 User manual

Helvex FC-185-19 User manual

Helvex

Helvex FC-185-19 User manual

Helvex 25 User manual

Helvex

Helvex 25 User manual

Popular Plumbing Product manuals by other brands

KWC 10.151.423.000 Specifications

KWC

KWC 10.151.423.000 Specifications

Sanela SLZA 43S Mounting instructions

Sanela

Sanela SLZA 43S Mounting instructions

Sanela SLP 07F Instructions for use

Sanela

Sanela SLP 07F Instructions for use

Graff SENTO G-6310-LM42B installation instructions

Graff

Graff SENTO G-6310-LM42B installation instructions

Sanela Livo 11315 Instructions for use

Sanela

Sanela Livo 11315 Instructions for use

Toto MERCER TL756DD owner's manual

Toto

Toto MERCER TL756DD owner's manual

Thetford XR17200 quick start guide

Thetford

Thetford XR17200 quick start guide

American Standard Bedpan Cleanser 7007.000 Assembly manual

American Standard

American Standard Bedpan Cleanser 7007.000 Assembly manual

Alpine Saunas HY-YM6008 Installation & owner's manual

Alpine Saunas

Alpine Saunas HY-YM6008 Installation & owner's manual

Schmidlin ECOPUR 200S manual

Schmidlin

Schmidlin ECOPUR 200S manual

Sanela Piezo SLS 02PT Instructions for use

Sanela

Sanela Piezo SLS 02PT Instructions for use

Fortis SAN MARCO 8920500 quick guide

Fortis

Fortis SAN MARCO 8920500 quick guide

baliv 30 Series manual

baliv

baliv 30 Series manual

Sanela SLU 93NP Instructions for use

Sanela

Sanela SLU 93NP Instructions for use

Grohe 14018XX1 Specification sheet

Grohe

Grohe 14018XX1 Specification sheet

Hans Grohe Focus 31825000 Instructions for use/assembly instructions

Hans Grohe

Hans Grohe Focus 31825000 Instructions for use/assembly instructions

Hans Grohe Logis 71074000 Instructions for use/assembly instructions

Hans Grohe

Hans Grohe Logis 71074000 Instructions for use/assembly instructions

Belanger 43CT PRODUCT CARE

Belanger

Belanger 43CT PRODUCT CARE

manuals.online logo
manuals.online logoBrands
  • About & Mission
  • Contact us
  • Privacy Policy
  • Terms and Conditions

Copyright 2025 Manuals.Online. All Rights Reserved.