manuals.online logo
Brands
  1. Home
  2. •
  3. Brands
  4. •
  5. HEPRO
  6. •
  7. Mobility Aid
  8. •
  9. HEPRO Gripo User manual

HEPRO Gripo User manual

1
hepro.no
Gripo
Servicemanual
Gripo 35100
2
HEPRO - Aid manufacturer
HEPRO is a Norwegian industrial company that develops, manufactures and sells
technical aids for adults and children with mobility impairment. e company was
established in 1987 and has to day about 50 employees. e company`s headquarters
and factory is located in Rognan, Nordland.
Services are performed in the factory at Rognan, but also by partners in many parts of
the country. Our sales personnel are also trained in technical maintenance. If you identify
product errors or have other queries, please contact your supplier or importer.
Services are performed in the factory at Rognan, but also by partners in many parts of
the country. Our sales personnel are also trained in technical maintenance. If errors on
products or other queries, please contact your supplier or importer.
When used in accordance with the supplied assembly guide and the user reference
manual, Hepro provides a two year warranty against defects in material and
workmanship. Please address warranty complaints or other inquiries about the product
to your supplier or importer. Always state the product`s serial number as a reference.
e product is designed, tested and produced in conformity to following regulations and
requirements:
NS-EN 12182 ”Technical aids for disabled persons.”
93/42/EØF ”Equipment class 1, marked
Technical Service
Adaptations and Special Adaptations
Warranty
3
Short product description
Gripo Alu is classified in NS-EN ISO 9999 as a medical device and within
the product group 180806, and is defined as a TELESCOPIC POLE to carry
support devices.
e pole is tested according to EN 12182 and approved for a horizontal
load of 100 kg on the middle of the pole with maximum length 3,0 meter.
It is produced in the materials of aluminum and plastic and intended for
clamping between the floor and ceiling of any room where the ceiling and
floor have enough strength to withstand a point load of 100 kg.
In each end of the pole there is a plate-shaped end plate with a friction
ring installed. e force between the plates is maintained by a gas spring
with an average pressure of 100 kg. is makes the pole possible to be
installed without use of any form of screw or nail connection, causing
perforation of floor or ceiling, and the dismantling of the bar leaves no
marks.
With support of different accessories the pole can be adapted to many
different pole use situations.e pole can be used in rooms with headroom
from 2,1 meter to 3,0 meter, and it is delivered in only one model in which
the aluminum tubes are in the natural aluminum colour, and all plastic
parts in black colour.
Product information covers the following model:
35100 GRIPO 210-300mm
Type/designation
4
Generally, the product is structured by the following main components, which will also
appear in how the product is broken down in the exploded view.
 35112 Base plate
 35115 Outer tube with lifting mechanism
 35111 Inner tube with tight lining
 35270 Quick Release lock with lining
 35207 Gas lift
 35110 Top plate
35100 Gripo
DIMENSIONS
Height 2,1 – 3,0m
Inner tube Ø31 x 6,0 x 1600mm
Outer tube Ø40 x 3,0 x 1750mm
Average gas spring pressure 900N
Top plate Ø290mm
Base plate Ø200mm
Max horizontal load on the middle of pole 100kg
Product weight without accessories 4,7kg
Max user weight 150kg
MATERIALS AND COMPONENTS
Inner and outer tube Aluminium 6063 T6
Surface protection Elox
Gas spring MDI S16S1870, 900N
Top plate Plastic PA6 GF15
Base plate Plastic PA6 GF15
Tubes for accessories Aluminium 6063 T6 Elox
Technical specifications
Structure
5
e installation of the pole should be carried out by a trained installer or, by someone that
has thoroughly understood the assembly user guide.
 e product should not be assembled without prior training and before the user
reference manual has been carefully read and understood.
 Any kind of support devices can be dangerous for the user, if assembled, installed or
used incorrectly.
 Any sign of loosening, it must not be used, and help should be called.
 e pole must not be installed in rooms with headroom exceeding the approved height,
or be placed where there can be any risk for pinching.
 When used in showers, a friction mat has to be used under the base plate. #52007
 If the red warning indicator is visible, the assembly is wrong and the pole must not be
used. Reassembly the pole and make sure to rotate the inner tube clockwise so that the
inner tube is locked in place with the outer tube before you lock the quick release lock
and press down the foot pedal.
Warning
Safety provisions
Test before installation
e ceiling should be examined beforehand, with regard to strength and accessibility
for the placement of the pole in the desired location. For false ceiling, the pole should
preferably be placed directly under the beams or battoning to prevent ceiling damage. If
the ceiling is made of concrete, the pole can be placed anywhere. If the ceiling is made of
gypsum, or other week material, e #35153 Top plate Big has to be used, or the ceiling
has to be reinforced by for instance using a more solid plywood between the pole`s top
plate and the ceiling.
6
Function verification and testing of product and accessories
After the installation is completed, it must be checked that the red mark in the upper part
of the inner tube just below the top plate is not visible. is should also be checked
regularly while the pole is in use.
If the red marking is apparent the cause may be:
-
A weak ceiling structure that causes the power/pressure of the pole to push the ceiling up. To rectify this, use the Large Top
plate #35153, or reinforce the ceiling. Alternatively, the pole should be moved to an area where the construction is strong enough.
- e tightening screw on the quick release may have loosened. Tighten the nut on the quick release till it sits tight.
When recycling the pole, all surfaces must be inspected for damage. Take special care of
the rim in the top and base plate, which create the friction ring used for stabilising the pole.
If this shows sign of darkning, it should be replaced.
After this control, the pole must be installed in a room where the ceiling is solid, and the
Quick Release must be checked so that the red marking is not visible after installation.
Error indications and routines to follow
If the pole seems loose, out of line, or there are marks on the floor or ceiling that indicate
the pole has been displaced, assembly must be checked by a competent person. If the
red mark on the top of the inner tube appears, the pole must not be used before new
installation is completed and checked. is may indicate that the pole is either not
installed correctly or the ceiling is not strong enough.
If an error occurs, using problems or suspected wrongly installation, please contact your
supplier. By request, always give the serial number affixed to the pole.
Use Gripo user manual for installation instructions.
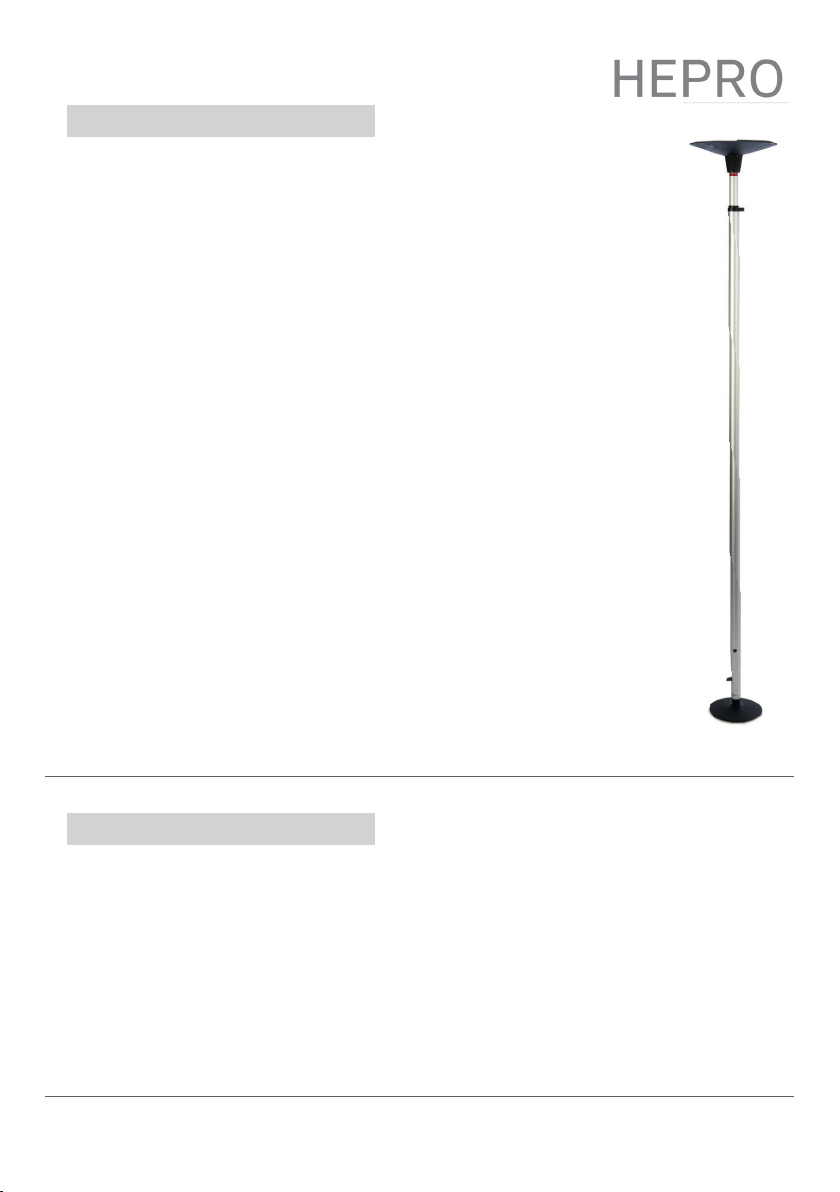
Installation
7
Normal dusting and cleaning with wet cloth and soap is sufficient.
GENERAL
It is sufficient to inspect the pole upon recycling. For poles that are older than 5 years, the
producer receommends inspection for potential recycling, once a year.
PRODUCTS WITH SPECIAL LOADS
e product has no particular need for periodic inspection, unless it is being used and
exposed to special or extreme loads, over and above standard usage.
If the pole is being exposed to special or extreme loads, it would be an advantage to both
the user and the supplier, that the special considerations be evaluated for usage and
maintenance needs.
Periodic inspection
Cleaning performed by user
Preparation for reuse
To ensure that the user receives a secure aid when the pole is recycled, it is important
that the aid undergoes a thorough technical inspection and is properly cleaned before it is
sent to a new user. As manufacturer and supplier, we believe that the inspection
described in section 2.3.2 is sufficient. Worn parts musy be checked and/or replaced if
they are considered to lead to reduced safety for the user.
Part catalog
In the following sections the article name and article number included in the standard
product will be stated.
8
1 35110 Top plate
2 35207 Gas lift
3 35270 Quick release lock with lining
4 35115 Outer tube with lifting mechanism
5 35112 Base plate
6 35111 Inner tube with tight lining
7 35113 Complete foot pedal
Parts, other than those stated, in the images above, must never be used or
changed, as this can cause disqualification of the products’ acceptance criteria,
and thus change its status from being an aid, to a tool that can be deemed dan-
gerous for use, or damaging to the environment.
Reservedelsliste
7
1
23
4
6
7
5
Seq.
ROF KIT NR.
HEPRO KIT NR.
DESC.
Q'ty
135110 35110
Top Plate
1
235207 35207
Gas Lift with Top
Plate 1 for Gripo
1
3
35270-BK
35270
Quick Release Set
1
4
35115-00
35115
Outer Tube
1
535112 35112
Bottom Plate
1
6
35111-00
35111
Inner Tube
1
7
35113-00
35113
Foot Pedal Set
1
臺崙實業有限公司
TAILUEN INDUSTRY CO., LTD.
Tolerance
Unit
Date
Drawn
Projection
DWG No.
Desc.
Rev.
mm
Erica
0.3mm
2018/06/13
Title
Gripo
ROF & HEPRO
Main product 35100
Gripo Exploded Drawing
7
1
23
4
6
7
5
Seq.
ROF KIT NR.
HEPRO KIT NR.
DESC.
Q'ty
135110 35110
Top Plate
1
235207 35207
Gas Lift with Top
Plate 1 for Gripo
1
3
35270-BK
35270
Quick Release Set
1
4
35115-00
35115
Outer Tube
1
535112 35112
Bottom Plate
1
6
35111-00
35111
Inner Tube
1
7
35113-00
35113
Foot Pedal Set
1
臺崙實業有限公司
TAILUEN INDUSTRY CO., LTD.
Tolerance
Unit
Date
Drawn
Projection
DWG No.
Desc.
Rev.
mm
Erica
0.3mm
2018/06/13
Title
Gripo
ROF & HEPRO
Main product 35100
Gripo Exploded Drawing
9
Mestring - Trygghet - Trivsel
Se og kjøp våre produkter på hepro.no
HEPRO AS
Øvermoan 9, 8250 Rognan
+47 46 74 55 55 marked@hepro.no

Other manuals for Gripo

5

This manual suits for next models

1

Other HEPRO Mobility Aid manuals

HEPRO Gripo User manual

HEPRO

HEPRO Gripo User manual

HEPRO 35255 Programming manual

HEPRO

HEPRO 35255 Programming manual

HEPRO 35153 User manual

HEPRO

HEPRO 35153 User manual

HEPRO Gripo User manual

HEPRO

HEPRO Gripo User manual

HEPRO Gripo User manual

HEPRO

HEPRO Gripo User manual

HEPRO Gripo User manual

HEPRO

HEPRO Gripo User manual

HEPRO 35149 User manual

HEPRO

HEPRO 35149 User manual

HEPRO CTM HS 740 User manual

HEPRO

HEPRO CTM HS 740 User manual

HEPRO Gripo User manual

HEPRO

HEPRO Gripo User manual

HEPRO Gripo Alu User manual

HEPRO

HEPRO Gripo Alu User manual

HEPRO 35208 User manual

HEPRO

HEPRO 35208 User manual

Popular Mobility Aid manuals by other brands

Rhythm Healthcare B3170S quick start guide

Rhythm Healthcare

Rhythm Healthcare B3170S quick start guide

Drive 10125 quick start guide

Drive

Drive 10125 quick start guide

Moretti MOPEDIA RS975-36 instruction manual

Moretti

Moretti MOPEDIA RS975-36 instruction manual

Timago TGR-R KP-O 5021 Instructions for use

Timago

Timago TGR-R KP-O 5021 Instructions for use

Drive Nitro Rollator user manual

Drive

Drive Nitro Rollator user manual

Careline G-280 user manual

Careline

Careline G-280 user manual

Mobilate Roami-Rose Gold user manual

Mobilate

Mobilate Roami-Rose Gold user manual

Guardian MDS86800XW User Instructions & Warranty

Guardian

Guardian MDS86800XW User Instructions & Warranty

Costway BA1199 user manual

Costway

Costway BA1199 user manual

NRS Healthcare MOWBRAY LITE PLUS User instructions

NRS Healthcare

NRS Healthcare MOWBRAY LITE PLUS User instructions

Drive ROOMBA user manual

Drive

Drive ROOMBA user manual

CareCo Kona Owner's handbook

CareCo

CareCo Kona Owner's handbook

human care 90700 user manual

human care

human care 90700 user manual

Drive GoLite 200 operating instructions

Drive

Drive GoLite 200 operating instructions

Decon wheel MED3099 Assembly instructions

Decon wheel

Decon wheel MED3099 Assembly instructions

NRS Healthcare M01278 User instructions

NRS Healthcare

NRS Healthcare M01278 User instructions

Invacare Thumb Saver 1109379 Installation and operating instructions

Invacare

Invacare Thumb Saver 1109379 Installation and operating instructions

Gordon Ellis BIG FOOT Instructions for use

Gordon Ellis

Gordon Ellis BIG FOOT Instructions for use

manuals.online logo
manuals.online logoBrands
  • About & Mission
  • Contact us
  • Privacy Policy
  • Terms and Conditions

Copyright 2025 Manuals.Online. All Rights Reserved.