HERO DESTINI 125 Series User manual

PREFACE No: IB16A
Thank you for selecting a Hero MotoCorp DESTINI 125. We wish you many miles of
continued riding pleasure in the years ahead.
Authorised Distributor or the authorised dealer(s) of the Distributor (‘‘Dealer’’) will be glad to
provide you further information or assistance and to handle your future service needs.
This booklet is your guide to the basic operation and maintenance of your new Hero
MotoCorp DESTINI 125. Please take time to read it carefully. As with any fine machine,
proper care and maintenance are essential for trouble-free operation and optimum
performance.
We, at Hero MotoCorp, are committed to demonstrate excellence in our environment
performance on a continual basis, as an intrinsic element of our corporate philosophy. To
achieve this we commit ourselves to continue product innovations to improve environment
compatibility and strengthen the green supply chain. We are also using non asbestos brake
shoes and engine gaskets which are environment friendly in nature.
Let us make this world a safer, healthier and more environment friendly place.

ALL INFORMATION, ILLUSTRATION, PHOTOGRAPH, DIRECTIONS,
SPECIFICATIONS AND OTHER CONTENTS COVERED IN THIS OWNER'S
MANUAL ARE BASED ON THE LATEST PRODUCT INFORMATION AVAILABLE
AT THE TIME OF ITS PRINTING APPROVAL, AND THE ACCURACY OR
CORRECTNESS OF THE SAME IS NOT UNDERTAKEN OR GUARANTEED.
Hero MotoCorp Ltd RESERVES THE RIGHT TO MAKE CHANGES IN ITS
CONTENTS AT ANY TIME WITHOUT NOTICE AND/OR INCURRING ANY
OBLIGATION, WHATSOEVER. NO ONE IS ALLOWED TO REPRODUCE ANY
PART OF THIS PUBLICATION WITHOUT OBTAINING PRIOR WRITTEN
PERMISSION FROM Hero MotoCorp Ltd.
NOTE

Pg. No.
CONTENTS
Pg. No.
•Accessories and modifications 8
SAFE RIDING TIPS 9
VEHICLE SPECIFICATION 2
•Protective apparel 5
VEHICLE VIEWS 11
•Instruments and indicators 14
MAJOR COMPONENTS 16
•Brakes (Integrated Braking) 16
ESSENTIAL INDIVIDUAL COMPONENTS 24
•Ignition switch 24
HANDLEBAR SWITCHES CONTROL 25
•i3s (Idle Stop Start System) 26
•Fuel filler cap/Lock/Seat lock/Helmet holder 28
•Steering lock 27
•Document compartment/Tool kit holder 29
•Boot lamp/Boot lamp switch/USB charger 30
•Important safety information 4
PARTS FUNCTION 14
•Tyres (Tubeless) 20
•LCD panel 15
•Luggage hook 31
•Front inner box 32
•Side stand indicator 32
TIPS FOR HEALTHY ENVIRONMENT 10
•Side stand switch/Side stand 32
•Fuel 18
•Keys 16
•Pillion footrest/Women pillion step 33
•Center compartment 29
FEATURES 25
BODY PARTS REMOVAL 34
•Rear brake 18
VEHICLE SAFETY 4
•Load limits and guidelines 7
VEHICLE IDENTIFICATION 1
•Center cover/Body cover 35
•Front upper cover assembly 37
•Center compartment 35
SECONDARY AIR SUPPLY SYSTEM 58
IDLE SPEED/BRAKE SHOE WEAR 65
BATTERY 66
TOOL KIT 49
FUSE REPLACEMENT/SUSPENSION 68
BULB REPLACEMENT 69
SAFETY PRECAUTIONS 52
CATALYTIC CONVERTER 71
STEERING LOCK 48
AIR SUCTION VALVE (ASV) 72
STARTING THE ENGINE 41
REMOVING ROAD SALT 72
STORAGE GUIDE 73
BASIC TROUBLESHOOTING 74
DELIVERY CERTIFICATE
POLISHING OF VEHICLE 72
HERO GENUINE PARTS
AIR CLEANER ELEMENT 56
•Floor side cover 38
RUNNING IN/RIDING 43
MAINTENANCE 51
FINAL DRIVE OIL REPLACEMENT 63
MAINTENANCE SCHEDULE 53
•Rear view mirror/Headlamp assembly 39
THROTTLE OPERATION 59
AIR CLEANER DRAIN TUBE CLEANING 58
CLEANING OF VEHICLE/WASHING OF VEHICLE 49
PRE-RIDE INSPECTION 40
PARKING 48
i3s THROTTLE SWITCH ADJUSTMENT 60
•Headlamp focus adjustment 40
ANTI-THEFT TIPS 41
ENGINE OIL 61
SPARK PLUG 64
JOB APPLICABLE TO PERIODIC SERVICES
OWNERSHIP RECORD AND DATA
SERVICE RECORD SHEET
SERVICE ADVICE SHEET


1
Vehicle Identification Number (VIN)
VEHICLE IDENTIFICATION
Engine No.
Location: Stamped on the lower side of
the left crankcase.
Location: Stamped on the lower right side of
the frame, visible from the window provided
on right floor side cover.
XXXXEJY
ZXYYYYY
Model: DESTINI 125
VIN Engine
Variants
Engine No.: XXXXEJYZXYYYYY
XXXXEJ Y Z X YYYYY
Engine
Description Year of
Manufacturing Assembly Plant Month of
Manufacturing Serial Number
VIN and Engine No. may be required:
2. For dealing with legal & insurance departments.
1. During registration of the vehicle.
N04 EJ
Sheet metal wheel/Integrated braking (LX)
VIN: MBLXXW05XYZXYYYYY
MBL XXW05 Y
Manufacturer
code Vehicle
Description Model Year
X
Check
Digit
ZX YYYYY
Plant
Code Month of
Manufacturing Production
Serial Number
MBLXXW05XYZXYYYYY
W05 EJ
Cast wheel/Integrated braking (VX)

2
VEHICLE SPECIFICATION SPECIFICATIONSITEM
Dimensions
Overall length
Overall width
Overall height
Wheelbase
1809 mm
729 mm
1154 mm
1245 mm
Saddle height
Ground clearance 778 mm
155 mm
Weight
Engine oil
Transmission (Final drive) oil
Fuel tank
Maximum power
Maximum torque
Bore and stroke
Compression ratio
Displacement
0.80 litre at disassembly and 0.70 litre at draining
0.12 litre at disassembly
0.10 litre at draining
5.5 litres
6.5 kW (8.7 BHP) @ 6750 rpm
10.2 N-m @ 5000 rpm
52.4x57.8 mm
9.9:1
124.6 cc
Capacities
Engine
Rear suspension Unit swing with spring loaded hydraulic damper
Champion-RG8YC (Federal Mogul)
Spark plug gap
Valve clearance
Idle speed
Front suspension
0.8-0.9 mm
0.14 mm
0.14 mm
1700±200 rpm
Intake (cold)
Exhaust (cold)
Chassis and suspension
Spark plug
Frame type High rigidity under bone
Telescopic, hydraulic shock absorber
VX model
LX model
111.5 kg
112 kg
Front fork oil disassembly 108±2 ml
Kerb weight

3
SPECIFICATIONSITEM
Primary reduction
Final reduction Variomatic drive, (2.53-0.8)
50/20x49/14 (8.75)
Transmission
Rear brake drum type
Battery
Alternator 110 W @ 5000 rpm
Electricals
Starting system
Headlamp (High/Low)
Tail/Stop lamp
Turn signal lamp
Meter Illumination
Kick/Electric start
12V-35/35W Halogen bulb-**MFR
12V-5/21W
12V-10W x4 nos.(**MFR-Clear Lens-Amber bulb)
12V-105mW (White LED)x 2 nos.
Turn signal indicator 12V-85mW x2nos. (Green LED)
Hi Beam indicator
Licence plate
Side stand indicator
Boot lamp
12V-105mW (Blue LED)
12V-5W
12V-85mW (Red LED)
* MF stands for Maintenance Free
** MFR stands for Multi-Focal Reflector
Internal expanding shoe type (Dia. 130 mm)
Clutch system Dry, automatic centrifugal clutch
12V-4Ah ETZ5 *MF battery
Position lamp 12V-5W
Tyre size Front
Rear
90/100x10-53 J (Tubeless tyre)
VEHICLE SPECIFICATION
Caster angle 27.5°
i3s indicator 12V-105mW (Blue LED)
LCD Illumination 12V-105mW (Amber LED)
Front brake drum type
Internal expanding shoe type (Dia. 130 mm)
(Integrated braking)
Fuse 10Ax2,15 A
12V-30mW (LED)

There is much that you can do to protect
yourself when you ride. You will find many
helpful recommendations through out this
manual. Following are a few that we consider
most important.
Your vehicle can provide many years of
service and pleasure if you take responsibility
for your own safety and understand the
challenges you can meet on the road.
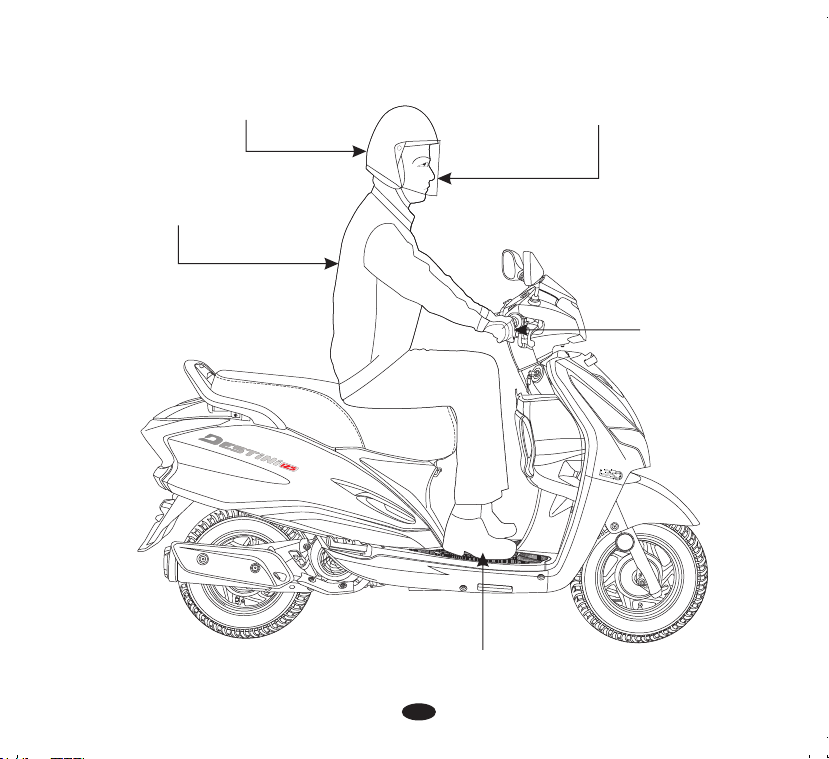
It is a proven fact, Helmet significantly reduces
the number and severity of head injuries. So
always wear a helmet and make sure your
pillion rider does the same. We also
recommend that you wear eye protection,
sturdy boots, gloves and other protective gear
( page 6).
Always wear a helmet
Before riding your vehicle
Make sure that you are physically fit, mentally
focused and free of alcohol and drugs. Check
that you and your pillion are both wearing an
approved vehicle helmet and protective
apparel. Instruct your pillion on holding onto
the grab rail or your waist, leaning with you in
turns, and keeping their feet on the foot pegs,
even when the vehicle is stopped.
Take time to learn & practice your
vehicle
VEHICLE SAFETY
Even if you have ridden other vehicles,
practice riding in a safe area to become
familiar with how this vehicle works and
handles, and to become accustomed to the
vehicle's size and weight.
IMPORTANT SAFETY INFORMATION
Ride defensively
Always pay due attention to other vehicles
around you, and do not assume that other
drivers see you. Be prepared to stop quickly or
perform an evasive maneuver.
Make yourself easily visible
Some drivers do not see vehicles because they
are not looking for them. To make yourself
more visible, wear bright reflective clothing,
position yourself so that others can see you,
signal before turning or changing lanes, and
use horn which will help others to notice you.
Ride within your limits
Pushing the limits is another major cause of
vehicle accidents. Never ride beyond your
personal abilities or faster than conditions
demand. Remember that fatigue and
negligence can significantly reduce your ability
to make good judgements and ride safely.
Do not drink and ride
Keep your vehicle in safe condition
Riding under the influence of alcohol or drugs
is dangerous. Alcohol can reduce your ability
to respond to changing conditions and reduce
the reaction time. Do not drink and ride.
For safe riding, its important to inspect your
vehicle before every ride and perform all
recommended maintenance. Never exceed
load limits, and only use accessories that have
been approved by Hero MotoCorp for this
vehicle. See (page 7) for more details.
4

Additional riding gear
Your helmet is your most important piece of
riding gear because it offers the best
protection against head injuries. A helmet
should fit your head comfortably and securely.
A bright coloured helmet can make you more
noticeable in traffic, as can reflective strips.
Helmets and eye protection
•Leather gloves to keep your hands warm
and help prevent blisters, cuts, burns, and
bruises.
•Sturdy boots with non-slip soles to help
protect your feet and ankles.
An open-face helmet offers some protection,
but a full-face helmet offers more. Always
were face shield or goggles to protect your
eyes and help your vision.
•A two wheeler riding suit or jacket for
comfort as well as protection. Bright
coloured reflective clothing can help make
you more noticeable in traffic. Be sure to
avoid loose clothes that could get caught on
any part of your vehicle.
In addition to a helmet and eye protection, we
also recommend:
If you are involved in a crash
Personal safety is your first priority. If you or
anyone else has been injured, take time to
assess the severity of the injuries and whether
it is safe to continue riding. Call for emergency
assistance if needed. Also follow applicable
laws and regulations if another person or
vehicle is involved in the crash.
If you decide to continue riding, first evaluate
the condition of your vehicle. If the engine is
still running, turn it off. Inspect for fluid leaks,
check the tightness of critical nuts and bolts,
and check the handlebar, brake levers, brakes,
and wheels. Ride slowly and cautiously. Your
vehicle may have suffered damage that is not
immediately apparent. Have your vehicle
thoroughly checked at a qualified service
facility as soon as possible.
PROTECTIVE APPAREL
For your safety, we strongly recommend that
you always wear a helmet which should
conform as per your country standards, in
addition to eye protection, boots, gloves, long
pants and a long sleeve shirt or jacket
whenever you ride. Take care of loose/
hanging clothes while solo/pillion riding.
Although complete protection is not possible,
wearing proper gear can reduce the chance of
injury when you ride.
Following are suggestions to help you choose
proper riding gear.
5
WARNING
!!
•Be sure you and your pillion always wear a
helmet, eye protection and other protective
apparel when you ride.
•Not wearing a helmet increases the chance
of serious injury or death in a crash.

6
PROTECTIVE APPAREL
Shoes should be close fitting,
low heels and offer ankle protection
Always wear HELMET
Wear bright or
reflective clothing
Wear a face shield or goggles
Wear gloves

Your vehicle has been designed to carry you,
one pillion and limited amount of cargo. When
you add cargo or carry a passenger, you may
feel some difference during acceleration and
braking. But so long as you keep your vehicle
well maintained, with good tyres and brakes,
you can safely carry loads within the limits and
guidelines.
Loading
However exceeding the weight limit or
carrying an unbalanced load can seriously
affect your vehicle's handling, braking and
stability. Non accessories, genuine
modifications, and poor maintenance can
reduce your safety margin.
How much weight you put on your vehicle,
and how you load it, are important to your
safety. Anytime you ride with a pillion or cargo
you should be aware of the following
information.
The following pages give more specific
information on loading, accessories and
modifications.
LOAD LIMITS AND GUIDELINES
Front luggage hook : 3.0 kg
Rear luggage hook : 3.0 kg
Putting too much weight in individual storage
compartments can also affect stability and
handling. So be sure to stay within the limits
given below:
Maximum weight:
Front inner box : 1.5 kg
Center compartment : 10.0 kg
Following are the load limits for your vehicle:
Includes the weight of the rider, pillion, all
cargo and all accessories.
Maximum weight capacity: 130 kg
Load limits
Your vehicle is primarily intended for
transporting you and a pillion. If you wish to
carry more cargo, check with your Authorised
Distributor/Dealer for advice and be sure to
read the information regarding accessories on
(page 8).
Loading guidelines
Improperly loading your vehicle can affect its
stability and handling. Even if your vehicle is
properly loaded, you should ride at reduced
speeds whenever carrying cargo.
7
WARNING
!!
•Overloading or improper loading can cause
a crash and you can be seriously injured.
•Follow all load limits and other loading
guidelines in this manual.
(1) Center compartment (2) Front inner box
(3) Rear luggage hook (4) Front luggage hook
4
3
12

Follow these guidelines whenever you carry a
pillion or cargo:
•Check that both tyres are properly inflated.
•To prevent loose items from creating a
hazard, make sure the center compartment
is closed and that any other cargo is securely
tide down before you ride away.
•Place cargo weight as close to the center of
the vehicle as possible.
•Balance cargo weight evenly on both sides.
Modifying your vehicle or using non Hero
MotoCorp accessories can make your vehicle
unsafe. Before you consider making any
modifications or adding any accessory, be sure
to read the following information.
ACCESSORIES & MODIFICATIONS
Accessories
We strongly recommend that you use only
genuine accessories that have been specifically
designed and tested for your vehicle. Hero
MotoCorp cannot test all other accessories,
you must be personally responsible for proper
selection, installation and use of non genuine
accessories. Check with your dealer for
assistance and always follow these guidelines:
•Make sure the accessories does not obstruct
any lamps, reduce ground clearance and
banking angle, limit suspension travel or
steering travel, alter your riding position or
interfere with operating any controls.
•Be sure electrical equipment does not
exceed the vehicle's electrical system
capacity. A blown fuse can cause loss of
lights (page 3).
•Do not pull a trailer or sidecar with your
vehicle. This vehicle is not designed for
these attachments, and their use can
seriously impair your vehicle handling.
We strongly advise you not to remove any
original equipment or modify your vehicle in
any way that would change its design or
operation. Such changes could seriously
impair your vehicle's handling, stability and
braking, making it unsafe to ride.
Removing or modifying your lamps, muffler,
emission control system or other equipment
can also make your vehicle not meeting the
emission standards.
Modifications
8
WARNING
!!
•Improper accessories or modifications can
cause a crash in which you can be seriously
hurt or killed.
•Follow all instructions in this owner's manual
regarding accessories and modifications.

•Give way to others on the road and signal
before you make a turn.
•Always wear a helmet with chinstrap
securely fastened and insist on a helmet for
your pillion rider. Helmet should conform as
per safety standards applicable in your
country.
•Always conduct simple pre-ride inspection
(page 40).
•While riding, keep your leg closed and sit in
a comfortable position.
•For stopping vehicle, use both brakes
simultaneously, keeping throttle in the close
position.
•Before riding make sure in which mode you
are riding whether with i3s switch “ON’ or
“OFF”.
•To make yourself more visible, wear bright
reflective clothing that fits well.
•Ride defensively and at a steady speed
(between 40-50 km/hr).
•During night time, dip headlamps of your
vehicle for oncoming traffic, or when
following another vehicle.
•Take care of loose/hanging clothes while
solo/pillion riding.
•Get your vehicle serviced regularly by the
Authorised Distributor/Dealer
•Never touch any part of the hot exhaust
system like muffler.
•Never use cell phone while riding the
vehicle.
•Never ride under the influence of alcohol or
drugs.
•Do not cross the continuous white/yellow
line in the center of the road, while
overtaking.
•Do not litter the road.
•Never take your hands off the steering
handle while riding.
•Concentrate on the road and avoid talking
to the pillion rider or others on the road.
•Do not attach large or heavy items to the
handlebars.
•Avoid sudden acceleration, braking and
turning of your vehicle.
SAFE RIDING TIPS
Do's: Don'ts:
9

•Fuel saving & Reduce pollution: Switch "OFF" the engine while waiting at traffic
signal points to save fuel and reduce pollution, if the waiting period is long.
•Healthy engine: The engine is the lifeline of every vehicle. To keep it healthy, it should be
tuned regularly, which will also help reduce pollution and improve vehicle performance.
•Genuine spares: Always insist on Hero MotoCorp genuine parts as spurious or
incompatible spares and accessories can upset or deteriorate your vehicle’s running
condition.
The following tips shall ensure a healthy vehicle, healthy environment, and a healthy you.
•Regular servicing: Get your vehicle serviced at an Authorised service station, as per the
service schedule, for an optimum performance and keep the emission level under check.
•Genuine engine oil: Hero 4T Plus SAE 10W 30 SL grade (JASO MB) engine oil
recommended by Hero MotoCorp and make sure you change it every 6000 km (with
top up every 3000 km) to keep the engine fit and environment healthy.
•Noise pollution: Noise beyond a certain decibel is pollution. Whether it is from horns or
defective mufflers, excessive noise will cause headaches and discomfort.
TIPS FOR HEALTHY ENVIRONMENT
10

*Accessories and features shown may not be part of standard fitment.
11
TOP VIEW VEHICLE VIEWS
17
20
5
2
3
1
911
715
18
8
6
16
21
4
10 12
19
13 14
22
(1) Choke knob
(2) Horn switch
(3) Turn signal switch
(4) Integrated brake lever
(5) Parking lever
(6) Rear view mirror
(7) /PassingDimmer switch
(8) Hi-beam indicator
(9) Side stand indicator
(10) Turn signal indicator
(11) Speedometer
(1 ) Fuel gauge2
(18) Throttle grip
(21) Ignition switch with steering lock,
seat lock and fuel lid opener
(1 ) Odometer6
(14) Service reminder
(17) Front brake lever
(13) Reset button
(1 ) Tripmeter5
(19) i3s switch
(20) Starter switch
(22) i3s indicator

12
(1) Side stand switch**
(Optional)
(2) Side stand** (Optional)
(4) Pillion footrest
(3) Main stand (12) Rear luggage hook
(10) Seat
(9) Rear grip
(11) Boot lamp* (inside)
(13) Headlamp
LEFT SIDE VIEW
(6) Women pillion
(5) Kick starter pedal
step** (Optional)
(8) Tail/Stop lamp
(7) Rear turn signal lamp
9
7
12
8
23456
1
13
11 10
*Optional in LX model **Optional in VX & LX models
*Accessories and features shown may not be part of standard fitment.

13
(4) Front inner box**
(Optional)
(3) Pillion step
(2) Oil level dipstick
(1) Exhaust muffler (5) Front turn signal lamp
(6) Position lamp
(7) Front luggage hook
RIGHT SIDE VIEW
(8) USB charger* (Optional (inside)
(10) Licence plate lamp
(9) Center compartment (inside)
5
4
2
9 78
10
1
6
3
*Accessories and features shown may not be part of standard fitment.
*Optional in LX model **Optional in VX & LX models

(optional) stand.
1 Side stand indicator Light glows when the vehicle is parked on the side
2 Turn signal indicator (L) Flashes when left turn signal switch is operated.
3 Speedometer Indicates riding speed.
4 Fuel gauge Indicates approximate fuel quantity (page 15).
5 Turn signal indicator (R) Flashes when right turn signal switch is operated.
6 Reset button Button when long pressed resets tripmeter to zero.
7 Service reminder Displays when a service is due (page 15).
Shows the distance travelled since the last reset
8 Tripmeter
(page 15).
9 Odometer Shows accumulated mileage (page 15).
indicating that i3s system is functional.
Indicator glows for few seconds and turns “OFF”
10 i3s indicator
PART FUNCTIONS
INSTRUMENTS AND INDICATORS
The indicators are in the speedometer panel
above the headlamp. The functions are as
below.
Sl. No. Description Function
11 High beam indicator Light glows when headlamp is in Hi beam.
14
16
54
7
2 3
11 98
10

15
(a) Odometer/Tripmeter
LCD panel
(1) Fuel gauge (2) Vertical bars
F
E
2
1
Tripmeter displays upto 999.9 km If the
(b) Fuel gauge
The odometer (1) shows accumulated
distance travelled.
The tripmeter (2) shows distance travelled
since trip meter was reset last time.
tripmeter exceeds "999.9" km it will return
to "0.0" km automatically.
When tripmeter is selected long press the reset
button (3) will reset tripmeter to zero.
The odometer displays from "0 to 999999" km
The approximate amount of fuel quantity
available in the fuel tank is indicated by the
number of vertical bars in the display. Each
segment display approx. 1.0 litre of fuel.
If all the vertical bars (2) are displayed it means
fuel quantity in the fuel tank is approximately
5.5 litres (minimum).
The fuel gauge (1) is of a liquid crystal display
(LCD) type.
The service reminder (1) is to indicate to a
user to bring the vehicle to an Authorised
Distributor/Dealer for service.
The service reminder can only be reset at an
Authorised Distributor/Dealer.
(c) Service reminder
If only one vertical bar is displayed and blinks,
this indicates that the fuel quantity is low and
the fuel tank should be refilled as soon as
possible.
The service reminder shall start blinking when
the vehicle covers kilometers as specified in
the maintenance schedule. The service
reminder will keep on blinking throughout the
kilometer interval for a particular service and
will stay “ON” thereafter.
NOTE
After getting the vehicle serviced, make sure
that the service reminder has been reset.
(1) Odometer (2) Tripmeter (3) Reset button
80
60
40
20
0
100
F
E
/h
120
1
3
2

16
TOTAL
DISTANCE
(Odometer Reading)
OFF
Blinking
ON
Blinking
ON
Blinking
ON
•
•
•
Indicator
Behaviour
0 km
500 - 750 km
After 750 km
3000 - 3500 km
After 3500 km
6000 - 6500 km
After 6500 km
•
•
•
KEYS
This vehicle has two keys and a key number
plate.
You will need the key number if you ever have to
replace a key. Store the plate in a safe place.
(1) Keys (2) Key number plate
XXXX
1 2
BRAKES (INTEGRATED BRAKING)
(Information you need to operate this
vehicle)
MAJOR COMPONENTS
When one applies the left lever, front & rear
brakes activate jointly.
The distance, the front brake lever (1) and
integrated brake lever (2) moves before each
brake starts to engage is called free play (3).
Measured at the tip of brake levers, free play
should be maintained at 20-30 mm.
Brakes are items of personal safety and should
always be maintained with proper adjustments.
80
60
40
20
0
100
F
E
/h
120
1
(1) Service reminder
This manual suits for next models
2
Table of contents
Other HERO Scooter manuals