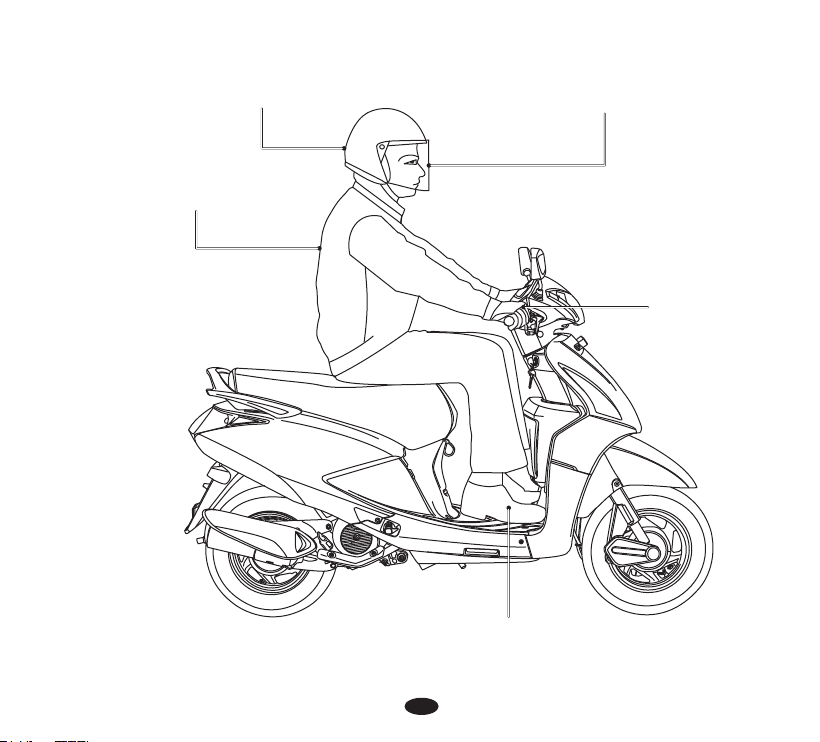
HERO PLEASURE User manual

PREFACE
Thank you for selecting a Hero MotoCorp PLEASURE. We wish you many miles of
continued riding pleasure in the years ahead.
We, at Hero MotoCorp, are committed to demonstrate excellence in our environment
performance on a continual basis, as an intrinsic element of our corporate philosophy. To
achieve this we commit ourselves to continue product innovations to improve environment
compatibility and strengthen the green supply chain. We are also using non asbestos brake
shoes and engine gaskets which are environment friendly in nature.
This booklet is your guide to the basic operation and maintenance of your new
Hero MotoCorp PLEASURE. Please take time to read it carefully. As with any fine machine,
proper care and maintenance is essential for trouble-free operation and optimum
performance.
Your Authorised Distributor and Dealer(s) of the Distributor (”Dealer”) will be glad to provide
further information or assistance and is equipped to handle your future service needs.
Let us make this world a safer, healthier and more environment friendly place.
No: IBUD

ALL INFORMATION, ILLUSTRATION, PHOTOGRAPH, DIRECTIONS,
SPECIFICATIONS AND OTHER CONTENTS COVERED IN THIS OWNER'S
MANUAL ARE BASED ON THE LATEST PRODUCT INFORMATION AVAILABLE
AT THE TIME OF ITS PRINTING APPROVAL, AND THE ACCURACY OR
CORRECTNESS OF THE SAME IS NOT UNDERTAKEN OR GUARANTEED.
Hero MotoCorp Ltd RESERVES THE RIGHT TO MAKE CHANGES IN ITS
CONTENTS AT ANY TIME WITHOUT NOTICE AND/OR INCURRING ANY
OBLIGATION, WHATSOEVER. NO ONE IS ALLOWED TO REPRODUCE ANY
PART OF THIS PUBLICATION WITHOUT OBTAINING PRIOR WRITTEN
PERMISSION FROM Hero MotoCorp Ltd.
NOTE

CONTENTS
Pg. No. Pg. No.
VEHICLE IDENTIFICATION 1
PRODUCT SPECIFICATION 2
VEHICLE SAFETY 4
ŸImportant safety information 4
ŸProtective apparel 5
ŸLoad limits and guidelines 7
ŸAccessories and modifications 8
TIPS FOR HEALTHY ENVIRONMENT 9
VEHICLE VIEWS 10
PARTS FUNCTION 13
ŸInstruments and indicators 13
MAJOR COMPONENTS 14
ŸBrakes (Integrated Braking) 14
ŸFuel 16
ŸTyres (Tubeless) 17
ESSENTIAL INDIVIDUAL COMPONENTS 20
Ignition switch 20
HANDLEBAR SWITCHES CONTROL 21
FEATURES 21
ŸSteering lock 21
ŸSeat lock 22
ŸCenter compartment 22
ŸLuggage hook 23
ŸFront inner box 23
ŸMobile charging socket 23
ŸBoot lamp/Boot lamp switch 24
ŸSide stand indicator/Side stand switch 25
BODY PARTS REMOVAL 25
ŸCenter compartment 25
ŸBody cover 26
ŸCenter cover 27
ŸFront upper cover 27
ŸRear view mirror 28
ŸHeadlamp case 28
ŸHeadlamp focus 29
PRE-RIDE INSPECTION 29
ANTI-THEFT TIPS 30
STARTING THE ENGINE 30
RUNNING IN 32
RIDING 32
PARKING 37
STEERING LOCK 37
TOOL KIT 37
CLEANING OF VEHICLE 38
WASHING OF VEHICLE 38
MAINTENANCE 38
ŸImportance of maintenance 39
ŸMaintenance safety 40
ŸSafety precautions 40
ŸMaintenance schedule 42
ŸAir cleaner element 45
ŸDrain tube 46
ŸEngine oil 46
ŸEngine oil level check 46
ŸEngine oil replacement/Oil strainer cleaning 47
ŸSpark plug 48
ŸIdle speed 49
ŸBrake shoe wear 49
ŸBattery 50
ŸFuse replacement 51
ŸSide stand 52
ŸBulb replacement 53
POLISHING OF VEHICLE 55
REMOVING ROAD SALT 55
STORAGE GUIDE 55
ŸStorage 55
ŸRemoval from storage 56
BASIC TROUBLESHOOTING 57
DELIVERY CERIFICATE
HERO GENUINE PARTS
JOBS APPLICABLE TO PERIODIC SERVICES
SERVICE RECORD SHEET
SERVICE ADVICE SHEET
OWNERSHIP RECORD AND DATA


MBLXXW02XYZXYYYYY
VIN
VEHICLE IDENTIFICATION
Engine No.
Location: Stamped on the lower side of
the left crankcase.
Location: Stamped on the lower right side of
the frame, visible from the window provided
on right floor side cover.
XXXXEGY
ZXYYYYY
Model: Pleasure
VIN
N03
Engine
EG
Variants
W02 EG
VIN: MBLXXW02XYZXYYYYY
VIN and Engine No. may be required:
1. During registration of the vehicle.
2. For dealing with Legal & Insurance Departments.
Sheet metal wheel/Integrated braking
Cast wheel/Integrated braking
1
MBL XXW02 Y
Manufacturer
code Vehicle
Description Model Year
X
Check
Digit
Engine No.: XXXXEGYZXYYYYY
XXXXEG Y Z
Engine
Description Year of
Manufacturing Assembly Plant
ZX YYYYY
Plant
Code Month of
Manufacturing Production
Serial Number
X YYYYY
Month of
Manufacturing Serial Number

PRODUCT SPECIFICATION SPECIFICATIONSITEM
Dimensions
Overall length
Overall width
Overall height
Wheelbase
Saddle height
Ground clearance
Kerb weight
1750 mm
705 mm
1115 mm
1240 mm
760 mm
125 mm
101 kg
Weight
Engine oil
Transmission oil
Fuel tank
Maximum power
Maximum torque
Bore and stroke
Compression ratio
Displacement
0.80 litre at disassembly and 0.70 litre at draining
0.12 litre at disassembly
0.10 litre at draining
5.0 litres (Min)
5.15 kW @ 7000 rpm
8.10 N-m @ 5000 rpm
50.0x52.0 mm
9.9:1
102 cc
Champion-PRZ 9 HC (Federal Mogul)
Capacities
Engine
Spark plug gap
Valve clearance
Idle speed
Front Suspension
Rear Suspension
Caster angle
0.7-0.8 mm
0.14 mm
0.14 mm
1700±100 rpm
27° 30'
Intake (cold)
Exhaust (cold)
Chassis and suspension
Spark plug
Chassis Type High rigidity under bone
Bottom link with spring loaded hydraulic damper
Unit swing with spring loaded hydraulic damper
Tyre size Front
Rear
90/100x10-53 J (Tubeless Tyre)
2

PRODUCT SPECIFICATION SPECIFICATIONSITEM
Primary reduction
Final reduction Variomatic (2.51-0.85)
50/20x49/13 (9.423)
Transmission
Front/Rear brake Drum type
Battery
Alternator
12V - 4Ah (ETZ-5) *MF Battery
110 W
Electricals
Starting System
Headlamp (High/Low)
Tail/Stop lamp
Turn signal lamp
Meter Illumination
Kick/Electric Start
12V-35/35W Halogen Bulb-**MFR
12V 5/21W **MFR
12V 10W x 4 nos.( MFR-Clear Lens-Amber bulb)
**
12V-1.7Wx2 nos.
Turn signal indicator 12V-3.0Wx2 nos.
Hi Beam indicator
Side stand indicator
Fuse
12V-1.7W
12V-1.7W
2A, 10A
* MF stands for Maintenance Free
** MFR stands for Multi-Focal Reflector
Internal expanding shoe type (Dia. 130 mm)
(Integrated braking)
Clutch system Dry, Automatic Centrifugal Clutch
3

VEHICLE SAFETY
IMPORTANT SAFETY INFORMATION
Your vehicle can provide many years of
service and pleasure if you take responsibility
for your own safety and understand the
challenges you can meet on the road. There is
much that you can do to protect yourself when
you ride. You will find many helpful
recommendations through out this manual.
Following are a few that we consider most
important.
Always wear a helmet
It is a proven fact, Helmets significantly
reduces the number and severity of head
injuries. So always wear a helmet and make
sure your pillion rider does the same. We also
recommend that you wear eye protection,
sturdy boots, gloves and other protective gear
(page 5).
Make yourself easily visible
Some drivers do not see vehicles because they
are not looking for them. To make yourself
more visible, wear bright reflective clothing,
position yourself so that others can see you,
signal before turning or changing lanes, and
use horn which will help others to notice you.
Ride within your limits
Pushing the limits is another major cause of
vehicle accidents. Never ride beyond your
personal abilities or faster than conditions
demand. Remember that alcohol, drugs,
fatigue and inattention can significantly
reduce your ability to make good judgements
and ride safely.
Keep your vehicle in safe condition
For safe riding, its important to inspect your
vehicle before every ride and perform all
recommended maintenance. Never exceed
load limits, and only use accessories that have
been approved by Hero MotoCorp for this
vehicle. See (pages 7) for more details.
4
NOTE
To make yourself more visible, wear bright
reflective clothing that fits well.

PROTECTIVE APPAREL
For your safety, we strongly recommend that
you always wear a helmet which should
conform as per your country standards, in
addition to eye protection, boots, gloves, long
pants and a long sleeve shirt or jacket
whenever you ride. Take care of loose/
hanging clothes while solo/pillion riding.
Although complete protection is not possible,
wearing proper gear can reduce the chance of
injury when you ride. Following are
suggestions to help you choose proper riding
gear.
Helmets and eye protection
Your Helmet is your most important piece of
riding gear because it offers the best
protection against head injuries. A helmet
should fit your head comfortably and securely.
A bright coloured helmet can make you more
noticeable in traffic, as can reflective strips.
An open-face helmet offers some protection,
but a full-face helmet offers more. Always
were face shield or goggles to protect your
eyes and help your vision.
Additional riding gear
In addition to a helmet and eye protection, we
also recommend:
ŸSturdy boots with non-slip soles to help
protect your feet and ankles.
ŸLeather gloves to keep your hands warm
and help prevent blisters, cuts, burns, and
bruises.
ŸA two wheeler riding suit or jacket for
comfort as well as protection. Bright
coloured reflective clothing can help make
you more noticeable in traffic. Be sure to
avoid loose clothes that could get caught on
any part of your vehicle.
5
WARNING
!!
ŸNot wearing a helmet increases the chance
of serious injury or death in a crash.
ŸBe sure you and your passenger always wear
a helmet, eye protection and other rotective
apparel when you ride.

PROTECTIVE APPAREL
Always wear HELMET
Wear bright or reflective
clothing
Wear a face shield or goggles
Wear gloves
Shoes should be close fitting, low heels
and offer ankle protection
6

LOAD LIMITS AND GUIDELINES
Your vehicle has been designed to carry you,
one pillion and limited amount of cargo. When
you add cargo or carry a passenger, you may
feel some difference during acceleration and
braking. But so long as you keep your vehicle
well maintained, with good tyres and brakes,
you can safely carry loads within the limits and
guidelines.
However exceeding the weight limit
or carrying an unbalanced load can seriously
affect your vehicle's handling, braking and
stability. Non Hero MotoCorp accessories,
modifications, and poor maintenance can
reduce your safety margin.
The following pages give more specific
information on loading, accessories and
modifications.
Loading
How much weight you put on your vehicle,
and how you load it, are important to your
safety. Anytime you ride with a pillion or cargo
you should be aware of the following
information.
Putting too much weight in individual storage
compartments can also affect stability and
handling. So be sure to stay within the limits
given below:
Maximum weight:
Center compartment : 10 kg
Front inner box : 1.5 kg
Luggage hook : 1.5 kg
Load limits
Following are the load limits for your vehicle:
Maximum weight capacity: 130 kg
Includes the weight of the rider, pillion, all
cargo and all accessories.
(1) Center compartment (2) Front inner box
(3) Luggage Hook
2
3
1
Loading guidelines
Your vehicle is primarily intended for
transporting you and a pillion. If you wish to
carry more cargo, check with your Authorised
Distributor/Dealer for advice and be sure to
read the information regarding accessories on
(page 8).
Improperly loading your vehicle can affect its
stability and handling. Even if your vehicle is
properly loaded, you should ride at reduced
speeds whenever carrying cargo.
7
WARNING
!!
ŸOverloading or improper loading can cause
a crash and you can be seriously injured.
ŸFollow all load limits and other loading
guidelines in this manual.

Follow these guidelines whenever you carry a
pillion or cargo:
ŸCheck that both tyres are properly inflated.
ŸTo prevent loose items from creating a
hazard, make sure the center compartment
is closed and that any other cargo is securely
tide down before you ride away.
ŸPlace cargo weight as close to the center of
the vehicle as possible.
ŸBalance cargo weight evenly on both sides.
Accessories
We strongly recommend that you use only
genuine Hero MotoCorp accessories that
have been specifically designed and tested for
your vehicle. Hero MotoCorp cannot test all
other accessories, you must be personally
responsible for proper selection, installation
and use of non-Hero MotoCorp accessories.
Check with your dealer for assistance and
always follow these guidelines:
ACCESSORIES & MODIFICATIONS
Modifying your vehicle or using non-Hero
MotoCorp accessories can make your
vehicle unsafe. Before you consider making
any modifications or adding any accessory, be
sure to read the following information.
ŸMake sure the accessories does not obstruct
any lamps, reduce ground clearance and
banking angle, limit suspension travel or
steering travel, alter your riding position or
interfere with operating any controls.
ŸBe sure electrical equipment does not
exceed the vehicle's electrical system
capacity (page 3). A blown fuse can cause
loss of lights.
ŸDo not pull a trailer or sidecar with your
vehicle. This vehicle is not designed for
these attachments, and their use can
seriously impair your vehicle handling.
Modifications
We strongly advise you not to remove any
original equipment or modify your vehicle in
any way that would change its design or
operation. Such changes could seriously
impair your vehicle's handling, stability and
braking, making it unsafe to ride.
Removing or modifying your lamps, muffler,
emission control system or other equipment
can also make your vehicle not meeting the
emission standards.
8
WARNING
!!
ŸImproper accessories or modifications can
cause a crash in which you can be seriously
hurt or killed.
ŸFollow all instructions in this owner's manual
regarding accessories and modifications.

The following tips shall ensure a healthy vehicle, healthy environment, and a healthy you.
ŸHealthy engine: The engine is the lifeline of every vehicle. To keep it healthy, it should be
tuned regularly, which will also help reduce pollution and improve vehicle performance.
ŸRegular Servicing: Get your vehicle serviced at an Authorised service station, as per the
service schedule, for an optimum performance and keep the emission level under check.
ŸGenuine Spares: Always insist on Hero MotoCorp genuine parts as spurious or
incompatible spares and accessories can upset or deteriorate your vehicle’s running
condition.
ŸGenuine engine oil: Hero 4T Plus SAE 10W 30 SJ grade (JASO MA) engine oil
recommended by Hero MotoCorp and make sure you change it every 6000 kms.
(with top up every 3000 kilometres) to keep the engine fit and environment healthy.
ŸNoise pollution: Noise beyond a certain decibel is pollution. Whether it is from horns or defective
mufflers, excessive noise will cause headaches and discomfort.
ŸFuel Saving & Reduce Pollution: Switch "OFF" the engine while waiting at traffic signal
points to save fuel and reduce pollution, if the waiting period is long.
TIPS FOR HEALTHY ENVIRONMENT
9

(1) Choke knob
(2) Horn switch
(3) Turn signal switch
(4) Integrated brake lever
(5) Parking lever
(6) Rear view mirror
(7) Dimmer switch
(8) Odometer
(9) Speedometer
(10) Side stand indicator
(11) Hi-beam indicator
(12) Turn signal indicator
(13) Fuel gauge
(14) Front brake lever
(15) Throttle grip
(16) Starter switch
(17) Ignition switch with steering lock
(18) Mobile charging socket
*Accessories and features shown may not be part of standard fitment.
TOP VIEW VEHICLE VIEWS
14
15
16
17
6
5
4
2
3
1
12
10
911
7813
10
18

8
6
10
*Accessories and features shown may not be part of standard fitment.
7
2345
1
(1) Side stand switch
(2) Side stand
(3) Main stand
(4) Pillion step
(5) Kick starter pedal
(6) Rear turn signal lamp
(7) Tail/stop lamp
(8) Rear grip
(9) Boot lamp
(10) Luggage hook
(11) Headlamp
11
LEFT SIDE VIEW
11
9
VEHICLE VIEWS

(1) Exhaust muffler
(2) Oil level dipstick
(3) Pillion step
(4) Front inner box
(5) Front turn signal lamp
(6) Position lamp
(7) Center compartment (Inside)
RIGHT SIDE VIEW
5
6
34
2
1
7
*Accessories and features shown may not be part of standard fitment.
12
VEHICLE VIEWS

PARTS FUNCTION
Instruments and indicators
The indicators are in the speedometer panel
above the headlamp. The functions are as
below :
Sl. No.
1
2
3
4
5
Description Function
Odometer Shows accumulated mileage
Hi beam indicator Light glows when headlamp is in Hi beam
Speedometer Indicates driving speed
Turn signal indicator Flashes when turn signal switch is operated
(a) Fuel gauge
When the fuel gauge (1) needle enters the red
band (2), fuel will be low and you should refill
the tank as soon as possible. The amount of
fuel left in the tank when the needle enters the
red band is approximately 1.2 Litres.
(1) Fuel gauge (2) Red band
6Fuel gauge Indicates approximate fuel quantity
Side stand indicator Light glows when the side stand is down
12
6543
2
1
13

MAJOR COMPONENTS
(Information you need to operate this vehicle)
Brakes (Integrated braking)
Brakes are items of personal safety and should
always be maintained with proper adjustments.
When one applies the left lever, front & rear
brakes activate jointly.
The distance, the front brake lever (1) and
integrated brake lever (2) moves before each
brake starts to engage is called free play (3).
(i)
(ii)
A
4
5
Measured at the tip of brake levers, free play
should be maintained at 10-20 mm.
Adjustment:
Right hand front brake cable (A) on “F” side
ŸPush the integrated brake arm (4) by hand
in the direction as shown.
ŸTurn the first adjuster nut (5) till you cannot
turn it by hand.
ŸCheck the free play of front brake lever.
(4) Integrated brake arm (5) First adjuster nut
(i) Decrease free play (ii) Increase free play
14
(2) Integrated brake lever
(3) Free play:10-20 mm
2
3
(1) Front brake lever (3) Free play : 10-20mm
1
3FREE PLAY: 10-20 mm
ŸIf the free play is more than 20 mm further
turn the adjuster nut to obtain desired free
play.
Left hand front brake cable (B) on “I” side.
ŸPush the integrated brake arm (4) by hand
in the direction as shown.
NOTE
“F” & “I” is marked on integrated brake arm.

ŸTurn the second adjuster nut (6) until a gap
is created between joint (7) and the slot on
the first side in integrated brake arm.
ŸAfter ensuring the gap, turn the second
adjuster nut counterclockwise by half
rotation.
(6) Second adjuster nut
(i) Decrease free play (ii) Increase free play
7
(i)
(ii)
6
B
4 7
ŸMake free play adjustment by turning the
adjuster nut (8) in the brake arm (9).
ŸCheck the free play of integrated brake
lever.
FREE PLAY: 10-20 mm
ŸIf the free play is more than 20 mm further
turn the adjuster nut to obtain desired free
play.
Make sure the cut-out on the adjusting nut
(1) is seated on the brake joint pin (2) after
making final free play adjustment.
15
(8) Adjuster nut (9) Brake arm
Decrease free play (ii) Increase free play
(ii)
(i) 9
8
(1) Adjusting nut (2) Brake joint pin
If proper adjustment cannot be obtained by
this method, visit your Authorised
Distributor/Dealer.
Other checks:
Check brake cable for kinks or signs of wear
that could cause sticking or failure.
Make sure the brake arm spring and fasteners
are in good condition.
ü
X
(A) Cut-out not seated (B) Cut-out seated
122
1
Rear brake

Fuel
(a) Fuel tank
The fuel tank is located under the seat.
The fuel tank capacity is 5.0 litres (Minimum).
To open the fuel filler cap (1), unlock
and lift up the seat (page 22), then
remove the fuel filler cap by turning it
counterclockwise.
Do not overfill the tank. There should be no
fuel in the filler neck (3).
After refueling, be sure to tighten the fuel filler
cap firmly by turning it clockwise.
Make sure the arrow marks (2) on the fuel
filler cap and the fuel tank are aligned.
(1) Fuel filler cap (2) Arrow marks
1
2
16
NOTE
Apply the brake several times and check for
free wheel rotation after the brake lever is
released.
deposits in engine and on spark plug, which
extends the life of exhaust system and other
components.
(3) Filler neck (4) Fuel
(b) Petrol containing alcohol
If you decide to use a petrol containing alcohol
(gasohol), be sure its octane rating is at least
as high as that recommended by Authorised
Distributor/Dealer.
There are two types of "gasohol", one
containing ethanol, and the other containing
methanol.
4
3
NOTE
If "Spark knock" or "pinking" occurs at a steady
engine speed under normal load, change petrol
brand. If the same still persists, consult your
Authorised Distributor/Dealer. Failure to do so
is considered misuse, and damage caused by
misuse is not covered under Hero MotoCorp
warranty policy.
We recommend that you use unleaded petrol
because the muffler in the vehicle is fitted with
a catalytic convertor, it also produces lesser
Do not use petrol that contains more than
10% of ethanol.
ŸDo not use petrol containing methanol
Other manuals for PLEASURE
1
Table of contents
Other HERO Scooter manuals