manuals.online logo
Brands
  1. Home
  2. •
  3. Brands
  4. •
  5. HoldPeak
  6. •
  7. Multimeter
  8. •
  9. HoldPeak 760A Installation manual

HoldPeak 760A Installation manual

760A
OPERATION MANUAL
3 1/2 DIGITAL MULTIMETER
1.INTRODUCTION
This instrument is a compact 、battery operated、handheld
3 1/2 digital multimeter designed for use by technicians、
servicemen、students、and hobbyists who required an
instrument that is accurate、reliable 、and always ready for use.
The Dual-slope-A/D converter uses C-MOS technology for
auto-zeroing 、polarity selection and over-range indication. Full
overload protection is provided. It is powered by a standard 9V
transistor radio type battery .please read this manual that
describes various useful message before using the multimeter.
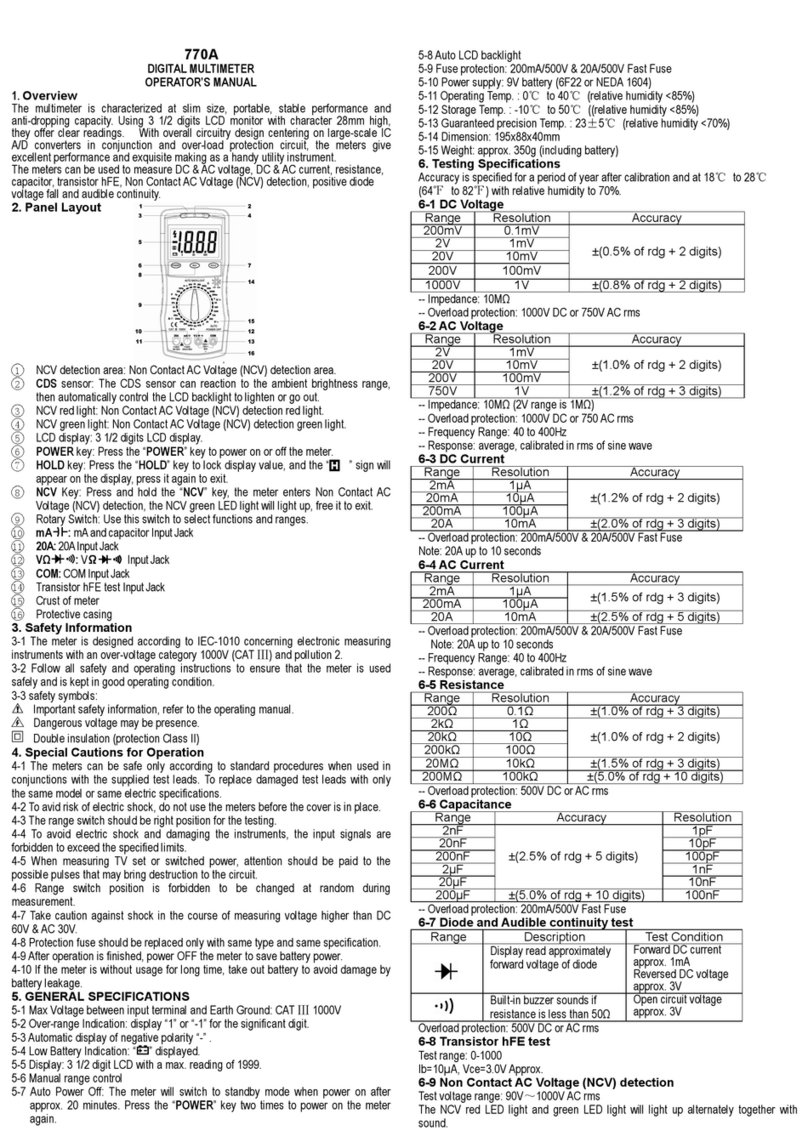
2.Panel Layout
1)LCD Display: 3½ digits, LCD digit height 27mm
2)POWER Switch:Boot Up / Shutdown
3)Data-hold Switch (HOLD):Pressing this button, the meter enters
the auto data hold mode and “HOLD” is displayed on the LCD.
4)Back Light/ Function switch indicator lamp key: Pressing the
button turns the backlight and the function switch indicator lamp
on,pressing it again turns them off.
5)Function switch indicator lamp
6) hFE Input Jack
7) Rotary Switch: use this switch to select functions and ranges
8) mechanical blocking system.
9)V ΩInput Jack、20A Input Jack、mA Input Jack 、COM
Input Jack
3.SPECIFICATION
3.1 GENERAL CHARACTERISTICS
3.1.1 3 1/2 digit big LCD max. Indication 1999.
3.1.2 Auto-Zero & Auto-Polarity.
31.3 Over range: indication of “1”or “-1”.
3.1.4 Low battery indication: “ ”
3.1.5 Power supply: 9V Zinc-carbon battery.
3.1.6 Safety standards :The meter is up to the standards of
IEC1010 Double Insulation , Pollution Degree 2 ,over voltage
Category Ⅲ.
3.1.7 Mechanical blocking system for terminal sockets to
prevent mistake operation
3.1.8 Temperature for guaranteed accuracy: 23℃±5℃
3.1.9 Temperature range:
Operating :0℃to 40 ℃Storage : -20℃to 60 ℃
3.1.10 Humidity range:
Operating: max 75%RH Storage: max 80%RH
3.1.11 Size: 190mm×88.5mm×27.5mm
3.1.12 Weight: Approx 320g (including battery).
31.13 Accessories:
operation manual 1 piece
test leads 1 pair
color gift box 1 piece
3.2 MEASUREMENT SPECIFICATION
Environment:
Temperature : 23℃±5℃relative humidity : max .75%
3.2.1 DC voltage
Range
Accuracy
Resolution
200mV
±(0.5% of rdg + 8digits)
100uV
2V
1mV
20V
10mV
200V
100mV
1000V
±(1.5% of rdg + 8 digits)
1V
Overload Protection : 1000V DC/700Vrms AC on other ranges.
Input impedance : 10MΩon all ranges
3.2.2 AC voltage (Average sensing. calibrated to rms of sine
wave)
Range
Accuracy
Resolution
2V
±(1.5% of rdg + 10 digits)
1mV
20V
10mV
200V
100mV
700V
±(2.5% of rdg +10 digits)
1V
Frequency:2V~20V at 40Hz~400Hz; 700V at 40Hz~200Hz
Overload Protection: 1000V DC/700Vrms AC on all ranges.
Input impedance : 1MΩon 2V range; 10 MΩon other ranges.
3.2.3 DC Current
Range
Accuracy
Resolution
2mA
±(0.8% of rdg +8 digits)
1μA
20mA
10μA
200mA
±(1.2% of rdg +8 digits)
100μA
20A
±(2.0% of rdg +10 digits)
10mA
Overload Protection:0.2A/250V fuse 20A/250 fuse 20A up to
10 seconds
3.2.4 AC current (Average sensing. Calibrated to rms of sine
wave)
Range
Accuracy
Resolution
2mA
±(1.0% of rdg + 8 digits)
1μA
200mA
±(2.0% of rdg + 8 digits)
100μA
20A
±(3.0% of rdg + 15 digits)
10mA
Frequency: 40~200Hz
Overload protection: 0.2A /250V fuse,20A/250V fuse 20A up to
10 seconds
3.2.5 Resistance
Range
Accuracy
Resolution
200Ω
±(1.2% of rdg +15 digits)
0.1Ω
2kΩ
±(0.8% of rdg + 8 digits)
1Ω
20kΩ
10Ω
200kΩ
100Ω
2MΩ
1kΩ
20MΩ
±(2.5% of rdg + 15 digits)
10kΩ
200MΩ
±【5.0% of (rdg -10)+ 30 digits】
100kΩ
Overload protection:250V DC/250Vrms AC for all range.
3.2.6 Capacitance
Range
Accuracy
Resolution
2nF
±(2.5% of rdg + 25 digits)
1pF
20nF
±(2.5% of rdg + 20 digits)
10pF
200nF
100pF
2μF
1nF
20μF
10nF
Overload Protection :36V DC/36Vrms AC for all range
3.2.7 Transistor hFE test
Range
Description
Test Condition
hFE
Display read approx .hFE value
(0~1000) of transistor under test
(NPN and PNP Type )
Bast Current
approx 10 μA
Vce approx 3V
3.2.8 Diode test and Audible Continuity Test
Range
Description
Test Condition
Display read approximately
forward Voltage of diode.
Forward DC current
approx 1.5mA
.Reversed DC
voltage
approximately 3V
Built-in buzzer sounds if
resistance is less than 80Ω.
Open circuit voltage
approx 3V
Overload protection: 250V DC/250Vrms AC.
4. HOW TO USE THE MULTIMETER
PRELIMINARY NOTE:
1. If the battery is weak. a “ ” sign will appear on display. The
battery should be replaced
2. The mark or sign“ ”next to the test lead jacks is for warning
that the input voltage or current should not exceed the indicated
values. This is to prevent damage to internal circuity.
3.The FUNCTION switch should be set to the range to be used
before operation.
4.1 DC Voltage Measurement
1) Set the FUNCTION switch to “V ”range to be used.
(2) Connect the BLACK test lead to the “COM”jack and the
RED test lead to the “VΩ”jack
(3) Connect the test leads across the source or load under
measurement.
Note:1.If the voltage range is not known beforehand. Set the
FUNCTION switch to high range and work down.
2.When “1”is display,over range is being indicated and the
FUNCTION switch must be set to a higher range .
3.Don’t apply more than DC 1000V to the input, indication is
possible at higher voltage but there is danger of damaging the
internal circuity.
4.Use extreme caution to avoid contact with high tension
circuits when measuring high voltage
4.2 AC Voltage Measurement
(1) Set the FUNCTION switch to “V~” range to be used.
(2) Connect the BLACK test lead to the “COM”jack and the
RED test lead to the “VΩ”jack .
(3) Connect the test leads across the source or load under
measurement.
Note:1.See DC voltage measurement note 1~2.
2. Don’t apply more than 700Vrms AC to the input, indication
is possible at higher voltage but there is danger of damaging
the internal circuity.
3. Use extreme caution to avoid contact with high tension
circuits when measuring high voltage.
DC current Measurement
(1) Set the FUNCTION switch to “A”range to be used.
(2) Connect the BLACK test lead to the “COM”jack and the
RED test lead to the “mA”jack for a maximum of 200mA. for a
maximum of 20A ,move the RED test lead to “20A”.jack .
(3) Connect the test leads in series with the load under
measurement.
Note:1. If the current range is not known beforehand .set the
FUNCTION switch to high range and work down.
2. When “1”is display ,overrange is being indicated and the
FUNCTION switch must be set to a higher range.
3. The maximum input current is 200mA 、20A depending upon
the jack used .Excessive current will blow the fuse which
must be replaced . The fuse rating should be 200mA or 20A
and no more to prevent damage to the internal circuity.
4.4 AC Current Measurement
(1) Set the FUNCTION switch to “A~”range to be used .
(2) Connect the BLACK test lead to the “COM”jack and the
RED test lead to the “mA”jack for a maximum of 200mA.for a
maximum of 20A, move the RED test lead to “20A”jack.
(3) Connect the test leads in series with the load under
measurement.
Note:1. If the current range is not known beforehand. .set the
FUNCTION switch to high range and work down.
2. When “1”is display ,over range is being indicated and the
FUNCTION switch must be set to a higher range.
3. The maximum input current is 200mA 、20A depending upon
the jack used .Excessive current will blow the fuse which must
be replaced . The fuse rating should be 200mA or 20A and no
more to prevent damage to the internal circuity.
4.5 Resistance Measurement
(1) Set the FUNCTION switch to “Ω”range to be used
(2) Connect the BLACK test lead to the “COM”jack and the
RED test lead to the “VΩ”jack .
(3) Connect the test leads across the resistance under
measurement.
Note:
1. If the resistance value being measured exceeds the
maximum value of the range selected, an over-range indication
will be displayed (“1”). Select a higher range .For resistance of
approximately 1 Megohm and alove. the meter may take a few
seconds to stabilize . This is normal for high resistance
readings.
2. When the input is not connected, i. e at open circuit .the sign
“1”will be displayed for the overrange condition.
When checking in-circuit resistance, be sure the circuit under
test has all power removed and that all capacitors are fully
discharged.
4.6 Capacitance Measurement
(1) Set the FUNCTION switch to “C”to be used and the “LC”
button to be pushed down.
(2) Insert the capacitor under measurement into the two jacks
“LCx-”and “LCx+”on the front panel.
Note:
1. Capacitors should be discharged before being inserted into
the test-jacks.
2. When testing large capacitance, note that there will be a
certain time lag before the final indication.
3. Do not connect an external voltage or charged capacitor
(especially larger capacitors) to measuring terminals.
4.7 Diode Measurement and audible continuity test
(1) Set the FUNCTION switch to the “ ” range and connect
the test leads across the diode under measurement, display
shows the approx. forward voltage of this diode.
(2) Connect the BLACK test lead to “COM”jack and the
RED test lead to the “VΩ”jack..
(3) Connect the test leads to two point of circuit, if the
resistance is lower than approx. 80Ω, the buzzer sounds.
4.8 back light
Press button "LIGHT" backlight illume, Again press once
backlight breath go out.
4.9 Transistor hFE Test
(1) Set the FUNCTION switch the “hFE” range.
(2) Determine whether the transistor is NPN or PNP and
locate the Emitter. Base and collector leads. Insert the leads
into the proper holes in the socker on the front pane.
(3) The display will read the approximated hFE value at the
test condition Base current 10uA , Vce3V.
5..MAINTENANCE
(1) The multimeter is a precision electronic device. Do not
tamper with the circuity . to avoid damage :
A : Never connect more than 1000V DC or 750Vrms AC.
B : Never connect a source of voltage under the condition of
resistance measurement .
C : Never operate the meter unless the battery cover is in
place and fully closed .
D : Battery and / or fuse replacement should be done after the
test leads have been disconnected and POWER IS OFF .
(2) Turn off the power if the meter is not in use, removed the
battery if the meter will be free for long period.
(3) If a sign of “ ” appear on the display, open the
compartment cover, remove the spent battery and replace it
with a battery of the same type. fuse replacement fellow the
same the same steps .
(4) Contact with the maintenance service center of our
company if you have trouble.
(5) Please take out the battery when not using for a long
time.
6. WARRANTY
Warranty this instrument to be free defects in material
and workmanship for a period of one year .Any instrument
found defective within one year from the delivery date and
returned to the factory with transportation charge prepaid. will
be repaired , adjusted or replaced at no charge to the original
purchaser . This warranty does not cover expendable items
such as batteries or fuse. if the defect has been caused by a
misuse or abnormal operating conditions the repair will be billed
at a normal cost.
Above picture and content just for your reference.
Please be subject to the actual products if
anything different or updated. Please pardon for
not informing in advance.
Other HoldPeak Multimeter manuals

HoldPeak HP-90F User manual

HoldPeak

HoldPeak HP-90F User manual

HoldPeak 870CR User manual

HoldPeak

HoldPeak 870CR User manual

HoldPeak 4201 User manual

HoldPeak

HoldPeak 4201 User manual

HoldPeak 870N User manual

HoldPeak

HoldPeak 870N User manual

HoldPeak 90B User manual

HoldPeak

HoldPeak 90B User manual

HoldPeak HP-36C User manual

HoldPeak

HoldPeak HP-36C User manual

HoldPeak HP-570C-APP User manual

HoldPeak

HoldPeak HP-570C-APP User manual

HoldPeak HP-770H User manual

HoldPeak

HoldPeak HP-770H User manual

HoldPeak HP-90E User manual

HoldPeak

HoldPeak HP-90E User manual

HoldPeak HP-37A User manual

HoldPeak

HoldPeak HP-37A User manual

HoldPeak 870N User manual

HoldPeak

HoldPeak 870N User manual

HoldPeak 39K User manual

HoldPeak

HoldPeak 39K User manual

HoldPeak 770A User manual

HoldPeak

HoldPeak 770A User manual

HoldPeak 850E User manual

HoldPeak

HoldPeak 850E User manual

HoldPeak HP-770H User manual

HoldPeak

HoldPeak HP-770H User manual

HoldPeak 770A User manual

HoldPeak

HoldPeak 770A User manual

HoldPeak 36 k User manual

HoldPeak

HoldPeak 36 k User manual

HoldPeak HP-760E User manual

HoldPeak

HoldPeak HP-760E User manual

HoldPeak 6300 User manual

HoldPeak

HoldPeak 6300 User manual

HoldPeak 870E Installation manual

HoldPeak

HoldPeak 870E Installation manual

HoldPeak 6205 User manual

HoldPeak

HoldPeak 6205 User manual

HoldPeak 6208 User manual

HoldPeak

HoldPeak 6208 User manual

HoldPeak 770C User manual

HoldPeak

HoldPeak 770C User manual

HoldPeak 6688D User manual

HoldPeak

HoldPeak 6688D User manual

Popular Multimeter manuals by other brands

Extech Instruments 380900 user guide

Extech Instruments

Extech Instruments 380900 user guide

Maxwell Digital Multimeters 25404 user manual

Maxwell Digital Multimeters

Maxwell Digital Multimeters 25404 user manual

Chauvin Arnoux F205 Start guide

Chauvin Arnoux

Chauvin Arnoux F205 Start guide

Greenlee CM-300 instruction manual

Greenlee

Greenlee CM-300 instruction manual

Zhangzhou Weihua DT5801 Operator's manual

Zhangzhou Weihua

Zhangzhou Weihua DT5801 Operator's manual

RS PRO IDM93N instruction manual

RS PRO

RS PRO IDM93N instruction manual

Extech Instruments EX540-NIST user manual

Extech Instruments

Extech Instruments EX540-NIST user manual

KYORITSU KEW MATE 2000A instruction manual

KYORITSU

KYORITSU KEW MATE 2000A instruction manual

LOVATO ELECTRIC DMG600 instruction manual

LOVATO ELECTRIC

LOVATO ELECTRIC DMG600 instruction manual

Megger BMM2500 user guide

Megger

Megger BMM2500 user guide

Kaiweets HT118A manual

Kaiweets

Kaiweets HT118A manual

Keysight 8163A user guide

Keysight

Keysight 8163A user guide

Tense EM-07D user manual

Tense

Tense EM-07D user manual

Keysight Technologies U1251B Modification Recommended Service Note

Keysight Technologies

Keysight Technologies U1251B Modification Recommended Service Note

RGK DT-916 Operating	 instruction

RGK

RGK DT-916 Operating instruction

IDEAL 61-704 Technical manual

IDEAL

IDEAL 61-704 Technical manual

VOLTCRAFT VC271 SE operating instructions

VOLTCRAFT

VOLTCRAFT VC271 SE operating instructions

Keysight 34401A Manual update

Keysight

Keysight 34401A Manual update

manuals.online logo
manuals.online logoBrands
  • About & Mission
  • Contact us
  • Privacy Policy
  • Terms and Conditions

Copyright 2025 Manuals.Online. All Rights Reserved.