INSTALLATION
Model#
ST124A216110
Length (ft)
24
Bulb Spacing
1.64 ft
Input (watt)
10.5W
No. Bulb
12
Congratulations on your recent purchase of the LED string lights.
Purchase additional lights to form one continuous string up to 720 feet!
17”
11”
Fold Fold
Fold Fold
EN | 1 EN | 2 EN | 3
IMPORTANT SAFETY INSTRUCTIONS
READ ALL INSTRUCTIONS • LISEZ TOUTES LES INSTRUCTIONS
WARNING: When using outdoor use portable luminaires, basic safety precautions should always be
followed to reduce the risk of fire, electric shock, and personal injury, including the following:
a) Use only two-wire outdoor extension cords that have two-prong plugs and receptacles that accept the
appliance's plug.
b) This portable luminaire has a polarized plug (one blade is wider than the other) as a feature to reduce
the risk of electric shock. This plug will fit in a polarized outlet only one way. If the plug does not fit fully
in the outlet, reverse the plug. If it still does not fit, contact a qualified electrician. Never use with an
extension cord unless plug can be fully inserted. Do not alter the plug.
c) Ground Fault Circuit Interrupter (GFCI) protection is to be provided on the circuit(s) or outlet(s) to be
used for the wet location portable luminaire. Receptacles are available having built-in GFCI protection
and are able to be used for this measure of safety.
d) Use only with an extension cord for outdoor use, such as an extension cord of cord type SEW, SEOW,
SEOOW, SOW, SOOW, STW, STOW, STOOW, SJEW, SJEOW, SJEOOW, SJW, SJOW, SJOOW, SJTW,
SJTOW, or SJTOOW.
SAVE THESE INSTRUCTIONS
IMPORTANT: Read all safety precautions and installation instructions carefully before installing or
servicing this fixture. Failure to comply with these instructions could result in a potentially fatal electric
shock, fire, and/or property damage.
In order to ensure proper installation, please follow each step below.
AVERTISSEMENT: lors de l’utilisation de luminaires portables extérieurs, des précautions de sécurité
élémentaires doivent toujours être suivies pour réduire les risques d’incendie, de choc électrique et de
blessures, notamment:
a) Utilisez uniquement des rallonges extérieures à deux fils munies de fiches à deux broches et de prises
qui acceptent la fiche de l'appareil.
b) Ce luminaire portable a une fiche polarisée (une lame est plus large que l’autre) qui permet de réduire
les risques de choc électrique. Cette fiche ne peut être insérée dans une prise polarisée. Si la fiche ne
s'insère pas complètement dans la prise, inversez-la. Si le problème persiste, contactez un électricien
qualifié. Ne jamais utiliser avec une rallonge à moins que la fiche puisse être complètement insérée.
Ne modifiez pas la fiche.
c) Une protection de disjoncteur de fuite à la terre (GFCI) doit être fournie sur le (s) circuit (s) ou la (les)
prise (s) à utiliser pour le luminaire portable pour site humide. Les prises sont disponibles avec une
protection GFCI intégrée et peuvent être utilisées pour cette mesure de sécurité.
d) Utilisez uniquement avec une rallonge pour utilisation à l'extérieur, telle qu'une rallonge de type SEW,
SEOW, SEOOW, SOW, SOW, STOW, STOW, STOW, STOOW, SJEW, SJEOOW, SJW, SJOW, SJOOW,
SJTOW, SJTOW, ou SJTOOW.
CONSERVEZ CES INSTRUCTIONS
IMPORTANT: Lisez attentivement toutes les précautions de sécurité et les instructions d'installation
avant d'installer ou de réparer ce luminaire. Le non respect de ces instructions peut entraîner un choc
électrique, un incendie et / ou des dégâts matériels potentiellement mortels.
Afin de garantir une installation correcte, veuillez suivre chaque étape ci-dessous.
3. Guide wires in compliance with local electrical and building codes may also be used to
support the string lights.
4. Once appropriate GFCI outlet location, mounting surface and hardware are determined,
mount your string lights.
5. When finished mounting, plug the male plug into the GFCI receptacle and place the
female receptacle cover firmly over the unused outlet.
6. Adapter (A) Installation Instructions:
For Concrete / Masonry Installation:
a. Using Adapter mounting holes as a guide, mark area to drill with a pen or pencil
b. Predrill 6mm diameter holes.
c. Install the expansion wall anchors (B) (included) into the holes, and then screw the
self-tapping screws (C) (included) into the expansion wall anchors allowing enough room to
pull adapter through adapter eyelets.
d. Thread the adapter (A) mounting holes over the installed screws, then pull the adapter (A)
to fix it on the mounting screw, and then tighten the screws (C) to secure adapter.
For Wood Installation:
a. Using Adapter mounting holes as a guide, mark area to drill with a pen or pencil.
STEP 1: INITIAL SETUP
1. Carefully unpack string lights from box, then remove protective film from each bulb.
Dispose of film properly (see warning).
2. When installing string lights outside, a Ground Fault Circuit Interrupter (GFCI) receptacle
should be used. Before installing, plug the string lights into the GFCI receptacle to ensure all
lights work properly.
IMPORTANT: Unplug the string lights prior to mounting.
STEP 2: INSTALLING STRING LIGHTS
1. IMPORTANT: Only mount string lights to a solid support such as joists, beams, studs or
other solid mounting surfaces.
2. Each String Light is designed with a universal keyhole for mounting with lights hanging
downward. Hardware options (not included) screws, nail, zip ties, hooks and more.
INSTALLATION
REMOTE CONTROL
BATTERY
REMOTE IS INTENDED FOR DRY LOCATIONS
Requires 2 AAA Battery (included and packed in blister card with remote control.)
• RECEPTACLE OUTLETS USED FOR POWERING STRING LIGHTS SHALL COMPLY WITH ALL
NATIONAL AND LOCAL ELECTRICAL CODES.
• CONSULT LOCAL ELECTRICIAN IF UNSURE OF COMPLIANCE REQUIREMENTS.
• DO NOT SUBMERSE.
• DO NOT USE AROUND AQUARIUMS.
• STRING LIGHTS ARE A WET LOCATION PRODUCT AND HAVE NO REPLACEABLE OR SERVICEABLE
PARTS.
• DO NOT USE WITH EXTENSION CORD NEAR WATER OR WHERE WATER MAY ACCUMULATE.
• KEEP LAMPS AT LEAST 16 FEET FROM POOLS AND SPAS.
• KEEP PLUGS AND RECEPTACLES DRY.
• AVOID DAMAGE TO THE CORDS AND LAMP ASSEMBLIES DURING INSTALLATION. PERIODICALLY
INSPECT THE STRING LIGHTS FOR PHYSICAL DAMAGE OR OTHER DAMAGE CAUSED BY
OUTDOOR EXPOSURE TO THE ELEMENTS.
• REPLACE ANY DAMAGED STRING LIGHTS STRINGS.
• DO NOT INSTALL IN LOCATIONS WHERE STRING LIGHTS CAN BE STEPPED ON.
• ENSURE STRING LIGHTS ARE UNPLUGGED FROM POWER DURING INSTALLATION.
• STRING LIGHTS SHOULD BE INSTALLED OUT OF THE REACH OF CHILDREN OR NOT ALLOWING
CHILDREN TO PLAY WITH THEM.
WARNING • ATTENTION
RISK OF ELECTRIC SHOCK • RISQUE DE CHOC ÉLECTRIQUE
RISK OF FIRE • RISQUE D'INCENDIE
• STRING LIGHTS ARE DESIGNED TO BE MOUNTED WITH THEIR INDIVIDUAL KEYHOLE MOUNTING
FEATURE. DO NOT MOUNT STRING LIGHTS BY USING THE MAIN ELECTRICAL CORD OR THE
INDIVIDUAL DROP CORDS.
IMPORTANT SAFETY INSTRUCTIONS
-
• STRING LIGHTS ARE DESIGNED TO BE LINKED BY USING THEIR ELECTRICAL PLUGS AND
RECEPTACLES TO A MAXIMUM DISTANCE OF 720 FEET.
• STRING LIGHT INTERCONNECTING RECEPTACLES ARE INTENDED ONLY FOR THE LINKING OF
COMPATIBLE STRING LIGHT STRINGS. DO NOT USE STRING LIGHT RECEPTACLES FOR ANY
OTHER ELECTRICAL PURPOSE.
• DO NOT MOUNT STRING LIGHTS IN ANY POSITION WHERE THE BULB IS FACING UP.
• DO NOT ALLOW THE LED LAMP ASSEMBLIES TO BE IN CONTACT WITH COMBUSTIBLE MATERI
ALS. LED LAMP ASSEMBLIES SHOULD HANG FREELY AND NOT BE SUSCEPTIBLE TO REPETITIVE
DAMAGE CAUSED BY ENVIRONMENTAL CONDITIONS SUCH AS WIND, RAIN, AND ICE.
• NOT INTENDED FOR INSTALLATION IN CEILINGS, SOFFITS, CABINETS, ATTICS, OR OTHER
ENCLOSED SPACES.
REMOVING STRING LIGHTS SETS
1. Always unplug string lights from their receptacle prior to removing.
2. Carefully remove each light individually from the mounting hardware.
NOTE: For your safety, never pull or jerk lights from mounting hardware.
3. Store lights in a dry location.
REPLACING BULBS
*To purchase additional replacement bulbs, please contact IDC Customer Service.
1. Unplug light strand from power outlet.
2. Unscrew cap (D) to reveal light bulb.
NOTE: UNSCREW CAP (D) ONLY, DO NOT TWIST THE LIGHT BULB.
3. Carefully remove light bulb and discard.
4. Align 2 pins of replacement bulb with 2 holes on light strand and gently push pins into
holes. Match (+)/(-) marking on string with (+)/(-) on bulb to install correctly.
5. Screw cap (D) back tightly but do not over tighten.
6. Plug in light strand.
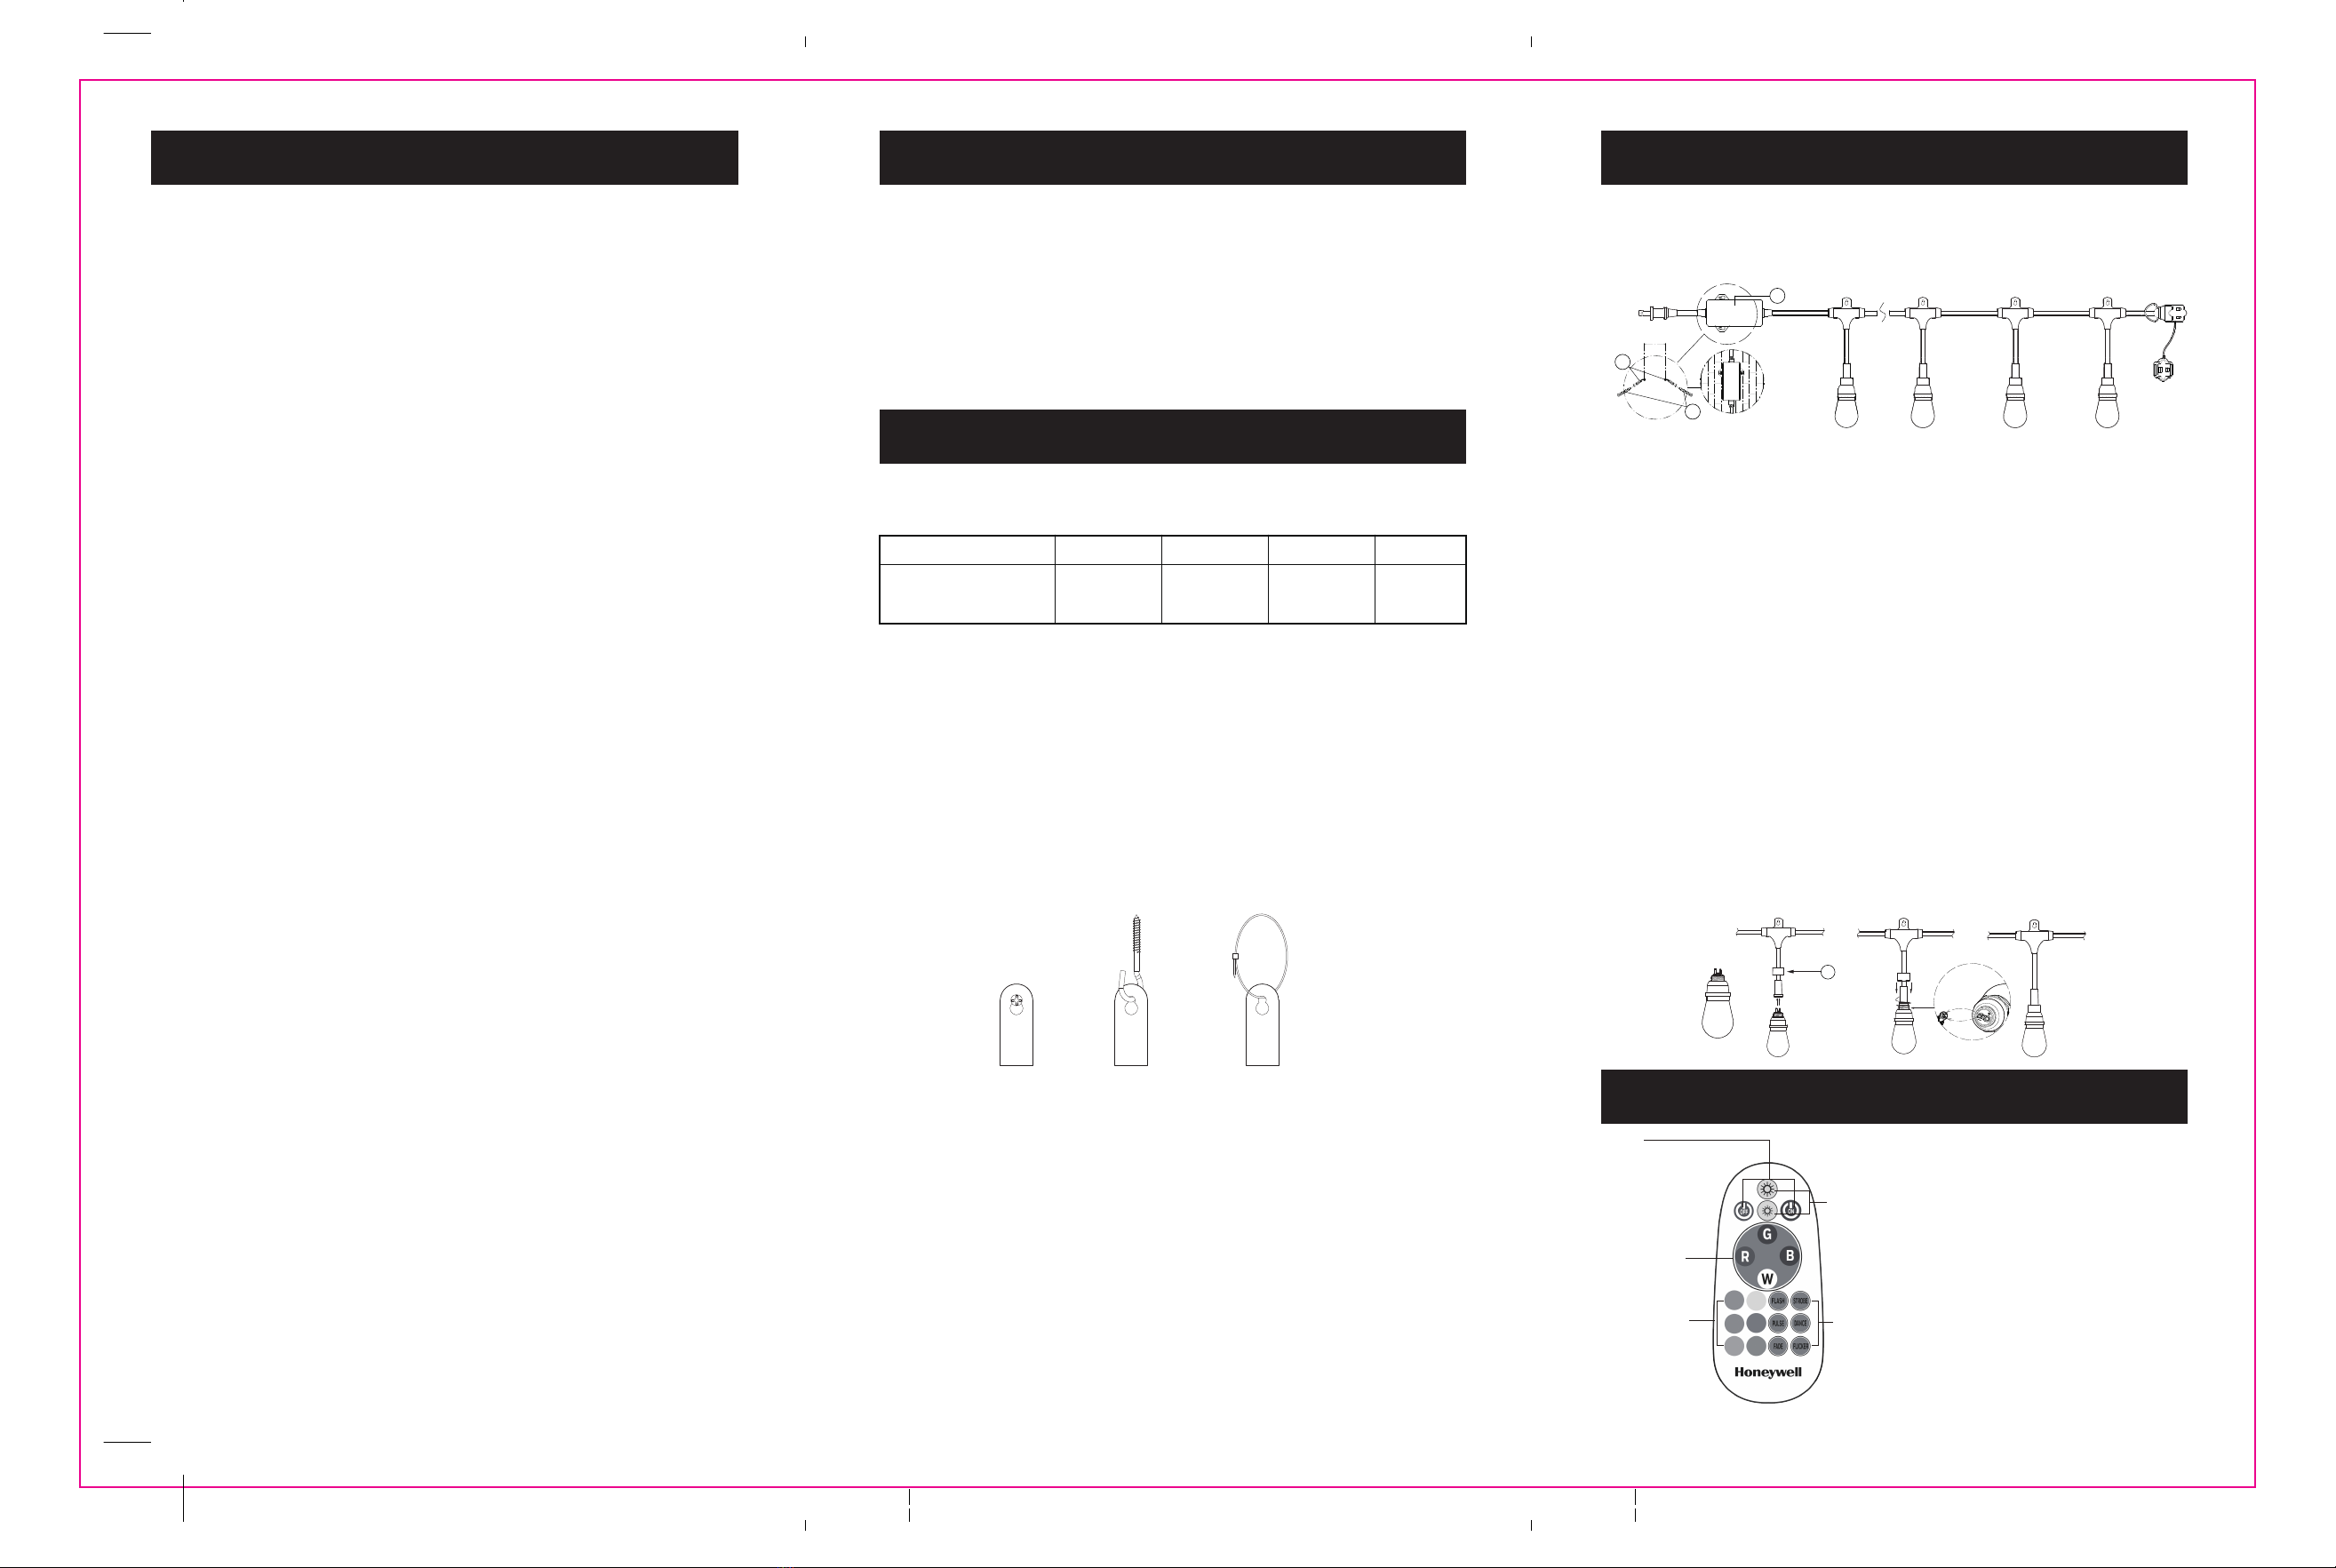
STEP 3: INSTALLING MULTIPLE STRING LIGHTS SETS
NOTE: Always unplug string light from outlet before connecting additional string light.
Extend the length of your lights by connecting more than one strand together to form one
continuous string up to 720 feet! Simply follow the above installation steps making sure each
connection between strands is secure and the end female receptacle is securely covered using
the receptacle cover when done.
54mm
B
A
C
b. Screw the self-tapping screws (C) (included) into wood surface allowing enough room to
pull adapter through adapter eyelets.
c. Thread the adapter (A) mounting holes over the installed screws, then pull the adapter (A)
to fix it on the mounting screw, and then tighten the screws (C) to secure adapter.
Remote Control Operation
- The remote control unit will operation lights within
20 m/65 ft range.
- Install batteries and point remote towards string light
to activate light strand.
- Use the DIMMER, RGBW SELECTOR, COLOR
SELECTOR, and COLOR CHANGING MODE
functions by pointing the remote control towards
the string light and selecting the desired function.
Controls brightness of string light.
COLOR CHANGING MODE
Select different lighting scene.
COLOR SELECTOR
Changes color of LEDs
(Orange, Yellow, Light
Blue, Pink, Purple,
Neon Green)
POWER
Controls string light.
“ON” - turns string lights ON.
“OFF”- turns all lights OFF.
RGBW SELECTOR
Changes colorof LEDs
(Red, Green, Blue or White)
DIMMER
D


