HRS ZE05 Series User manual

ZE05 SERIES INSTRUCTION SHEET
1.PURPOSE
2.COMPONENTS
3.ASSEMBLY PROCESS
4.REPAIR PROCESS
5.INSERTION/EXTRACTION PROCEDURE
6.OTHER / NOTES
COUNT
DESCRIPTION OF REVISIONS
DESIGNED
CHECKED
DATE
8
1
DIS-T-00019678
TY.MOGI
AH.EDASHIGE
20231209
名称TITLE
ZE05 SERIES INSTRUCTION SHEET
APPROVED
HK.UMEHARA
20170713
CHECKED
HK.UMEHARA
20170713
DESIGNED
KT.MATSUDA
20170713
WRITTEN
KT.MATSUDA
20170713
技術指定書TECHICAL SPECIFICATION
ETAD-T0649-00
8
1/ 14
FORM HC0011-9-1
HIROSE ELECTRIC CO.,LTD.
△
△
8
Completely revised
Dec.1.2023Copyright2023HIROSEELECTRICCO.,LTD.AllRightsReserved.

HIROSE ELECTRIC CO.,LTD.
ETAD-T0649-00
8
2/14
FORM HC0011-9-2
△
1.PURPOSE OF THIS DOCUMENT
This document provides explanations about Hirose part name ZE05-*S-HU/R(*), compatible terminal crimping,
harness assembly, and how to mate. Please read carefully before using connector.
Also, please keep it in a place where you can view it at any time, while using the connector.
Pictures and diagrams used in this document are of representative products.
The contents of this document are subject to change without any notice.
2.COMPONENTS
COMPONENT PART SUMMARY
PART
PART
DESCRIPTION
HIROSE PART NAME
NOTE
1
CRIMP
TERMINAL
ZE05-2022SCF
For 0.3~0.5sq, tin plating
2
HOUSING
RETAINER
(Preset state)
ZE05-2S-HU/R
Applicable cable outer diameter
φ1.4~1.7※
ZE05-4S-HU/R
ZE05A-4S-HU/R
ZE05-5S-HU/R
ZE05-8DS-HU/R
ZE05A-8DS-HU/R
ZE05-12DS-HU/R
ZE05A-12DS-HU/R
ZE05-16DS-HU/R
ZE05-20DS-HU/R
ZE05-24DS-HU/R
3
CABLE
-
-
※If the outer diameter of the wire exceeds 1.6 mm, it may be difficult to insert it into the
housing depending on the insulation material. For products not listed above, please contact our sales department.
Dec.1.2023Copyright2023HIROSEELECTRICCO.,LTD.AllRightsReserved.

HIROSE ELECTRIC CO.,LTD.
ETAD-T0649-00
8
3/14
FORM HC0011-9-2
△
Example of pin number
(Terminal numbers for other numbers of pins will also have the same arrangement)
3.ASSEMBLY PROCESS
Note: For information regarding crimping, please refer to ‘ETAD-T0589-00’ZE05-2022SCF CRIMP QUALITY
STANDARD. Wires and crimping conditions confirmed using our tools can be found in the crimping conditions table.
①Cut the cable.
Please set the cut length referring to the dimensions on the right.
②Strip and crimp the cable according to the crimp quality standards and crimp conditions table.
Note: Please use our company's crimping tool.
List of crimping tool part number
Part No.
Crimping tool P/N
HRS No.
ZE05-2022SCF
AP105-ZE05-2022S
901-5239-0
HT802/ZE05-2022S
780-0045-0
Estimated cable cut length = cable length above +8mm
Dec.1.2023Copyright2023HIROSEELECTRICCO.,LTD.AllRightsReserved.

HIROSE ELECTRIC CO.,LTD.
ETAD-T0649-00
8
4/14
FORM HC0011-9-2
△
③Insert contact and push until a click is heard.
※Please take care to ensure that the terminal is inserted in the correct orientation.
NOTE 1: Please holding the cable and insert straight into the housing.
Do not use more than 10N of force during this process.
※If you hold the crimp terminal area and insert it with a force of 10N or more, the crimp terminal may be inserted even
if the terminal is in the opposite direction, or deformed.
NOTE 2: If the crimped terminal does not enter the housing smoothly pull out the terminal gently and then re-insert.
Top of connector
Underside of connector
More than 10mm
Note: To prevent excessive load to the terminal, it is recommended to
hold the wire at least 10mm away from the terminal.
Excludes cases such as a problem with workability due to bent wires, etc.
Hold right next to the terminal.
Insert from an angle.
OK
NG
OK
NG
NG
Dec.1.2023Copyright2023HIROSEELECTRICCO.,LTD.AllRightsReserved.

HIROSE ELECTRIC CO.,LTD.
ETAD-T0649-00
8
5/14
FORM HC0011-9-2
△
NOTE 3.If the crimp terminal is inserted at an excessive angle or routed at an excessive angle during insertion,
the terminal will become deformed and the contact gap will open or close incorrectly.
④After inserting the crimp terminal, pull the cable lightly (10N or less).
Please make sure that the crimp terminal is properly secured to the lance.
<Example: Reverse insertion>
Note.If the terminal is inserted upside down, the terminal will stop at the position shown in the bottom row of the
diagram above. If you apply more force to try to insert the terminal, it will be in the state shown in the upper row of the
diagram above.
✕
Deformation of terminal
✕
Deformation of terminal
NG
NG
NG
NG
Dec.1.2023Copyright2023HIROSEELECTRICCO.,LTD.AllRightsReserved.

HIROSE ELECTRIC CO.,LTD.
ETAD-T0649-00
8
6/14
FORM HC0011-9-2
△
<Example: semi-insert>
⑤After inserting the terminals, look at the connector from the mating side and confirm
that the terminals are inserted correctly.
【 O K 】 The terminal is inserted
correctly. It looks like the frame of the
female terminal is almost square.
【NG】The terminal is inserted upside down.
The curled part of the female terminal is visible on
the lock lever side.
➡In this state, the terminal is locked inside the
connector and as the terminal cannot be removed
without damaging the connector, replace with new
connector and terminal.
Additionally, if you try to insert the terminal in this
direction, the terminal insertion force is higher than
in the normal direction.
【NG】The terminal is not inserted all the way.
The female terminal is not clearly visible.
➡Insert the terminal until you can see the
terminal.
Attached to a lance
Curl part
NG
NG
OK
OK
Dec.1.2023Copyright2023HIROSEELECTRICCO.,LTD.AllRightsReserved.

HIROSE ELECTRIC CO.,LTD.
ETAD-T0649-00
8
7/14
FORM HC0011-9-2
△
⑥Press preset retainer until a click is heard.
When setting the retainer, push in both ends with your fingernails in the order of ①to ②on each side.
Note. Do not route the wires while the retainer is in the preset state.
Doing so may cause the terminal may be removed, or the female housing or terminal to be damaged or deformed.
Set the retainer immediately after completing the terminal insertion.
NOTE.We also have retainer set jigs available. If you need them, please contact our sales department.
○
○
✕
✕
Press the center part of connector.
Press left and right of connector at the same time.
①
②
①
②
OK
OK
NG
NG
Dec.1.2023Copyright2023HIROSEELECTRICCO.,LTD.AllRightsReserved.

HIROSE ELECTRIC CO.,LTD.
ETAD-T0649-00
8
8/14
FORM HC0011-9-2
△
In the event that a jig will be used for setting of the retainer, please ensure that there is clearance
on either side of the retainer. Using a jig that does not allow such clearance may result in damage to the
female housing.
⑦Electrical test
Clamping areas of connectors
During electrical tests, the areas shown in below picture can be clamped (Example:ZE05-12DS-HU/R)
OK
NG
Dec.1.2023Copyright2023HIROSEELECTRICCO.,LTD.AllRightsReserved.

HIROSE ELECTRIC CO.,LTD.
ETAD-T0649-00
8
9/14
FORM HC0011-9-2
△
⑧Location of test probes
The test probes should be located in front face as described below(to avoid any damage to the terminal):
Dec.1.2023Copyright2023HIROSEELECTRICCO.,LTD.AllRightsReserved.

HIROSE ELECTRIC CO.,LTD.
ETAD-T0649-00
8
10/14
FORM HC0011-9-2
△
⑨Definition of test probe
The recommended probe should have the following characteristics:
・Diameter: Φ0.5~0.6mm
・Tip shape: flat
・Plating: Gold plated
・Spring force: 1N maximum
・Stroke: see section below
⑩Recommendations for electrical tests
・Perform test after insertion of terminals and closing of retainer.
・Avoid any deformation on housing and terminal during electrical test.
・Replace any damaged housing and terminal with a new one.
Probe diameter
Dec.1.2023Copyright2023HIROSEELECTRICCO.,LTD.AllRightsReserved.

HIROSE ELECTRIC CO.,LTD.
ETAD-T0649-00
8
11/14
FORM HC0011-9-2
△
4.REPAIR PROCESS
Note:Housing cannot be reused. Please use a new housing after repair.
①Using the specialized repair tool, disengage the retainer lock and return the retainer to the preset condition.
Note 1.Please refer to the following section (P.11)for details on the specialized tool.
Note 2.If the retainer does not unlock even after pushing in with the specialized tool, use a precision screwdriver
to push up the edge of the retainer (as shown in the figure below) slightly while pushing in with the specialized tool.
※No direction
move up and down
Dec.1.2023Copyright2023HIROSEELECTRICCO.,LTD.AllRightsReserved.

HIROSE ELECTRIC CO.,LTD.
ETAD-T0649-00
8
12/14
FORM HC0011-9-2
△
②Insert the tool into the terminal cavity and push to the end.
After pushing in, hold the cable at a slight angle with the jig and pull out the terminal with a force of 20N or less.
If it does not come out with a force of 20N, the terminal may not be unlocked correctly, so please try again
by inserting the specialized tool.
③Repair tool summary
Retainer Repair Tools - Part Number Summary
Applicable Part
Repair Tool Name
Repair Tool Part Number
ZE05-2S-HU/R
ZE05-2DC-HU/R/RE-MD
902-5144-0
ZE05-4S-HU/R
ZE05A-4S-HU/R
ZE05-5S-HU/R
ZE05-8DS-HU/R
ZE05-12DC-HU/R/RE-MD
902-5143-0
ZE05A-8DS-HU/R
ZE05-12DS-HU/R
ZE05A-12DS-HU/R
ZE05-16DS-HU/R
ZE05-20DS-HU/R
ZE05-20-24DC-HU/R/RE-MD
902-5160-0
ZE05-24DS-HU/R
Terminal
Repair tool insertion hole
Dec.1.2023Copyright2023HIROSEELECTRICCO.,LTD.AllRightsReserved.

HIROSE ELECTRIC CO.,LTD.
ETAD-T0649-00
8
13/14
FORM HC0011-9-2
△
5.Insertion and extraction procedure
※Illustrations in this section are of representative products.
5-1. Insertion procedure
①Align the lock groove of the board side connector with the lock direction of the harness side connector when mating.
②Insert it until it locks and you hear a click.
Note:After completing the work, pull the connector in the detachment direction
and check that it does not come off.
5-2. Removal procedure
①While pushing the female connector all the way in the mating direction, press the lock button
until the lock is released.
Note:Push the lock button down until it touches the housing to release the lock.
②Pull the connector straight out.
Note:If the lock is not fully unlocked, it cannot be pulled out.
If you try to pull it out by force, you may damage the housing or deform the terminal.
Pulling direction
Dec.1.2023Copyright2023HIROSEELECTRICCO.,LTD.AllRightsReserved.

HIROSE ELECTRIC CO.,LTD.
ETAD-T0649-00
8
14/14
FORM HC0011-9-2
△
6.Other / Notes
1) Do not touch the terminal contact points or the interior of the barrel.
2) When handle terminals, please wear gloves in order to prevent corrosion.
3) Placing items on top of a terminal or dropping a terminal may result
in shape deformities or contamination. Please handle terminals with care.
4) In the event of terminals becoming tangled, please do not forcibly pull or bend them apart,
but disentangle them carefully.
5) Use caution when handling terminals so as to avoid deformation.
6) Make sure that the crimped cables do not become entangled.
When bundling or stacking cables, please prevent the terminals from being subjected to any external force.
7) Use caution to ensure that the part is not subjected to any large impacts.
8) Avoid storing in dusty areas.
9) Do not place wire harnesses on the floor.
10) Refrain from any handling that may result in terminal damage or deformation.
11) If the retainer is out of the housing, do not use either the housing or the retainer.
12) Do not use the housing if it was dropped.
Dec.1.2023Copyright2023HIROSEELECTRICCO.,LTD.AllRightsReserved.
Table of contents
Other HRS Cables And Connectors manuals
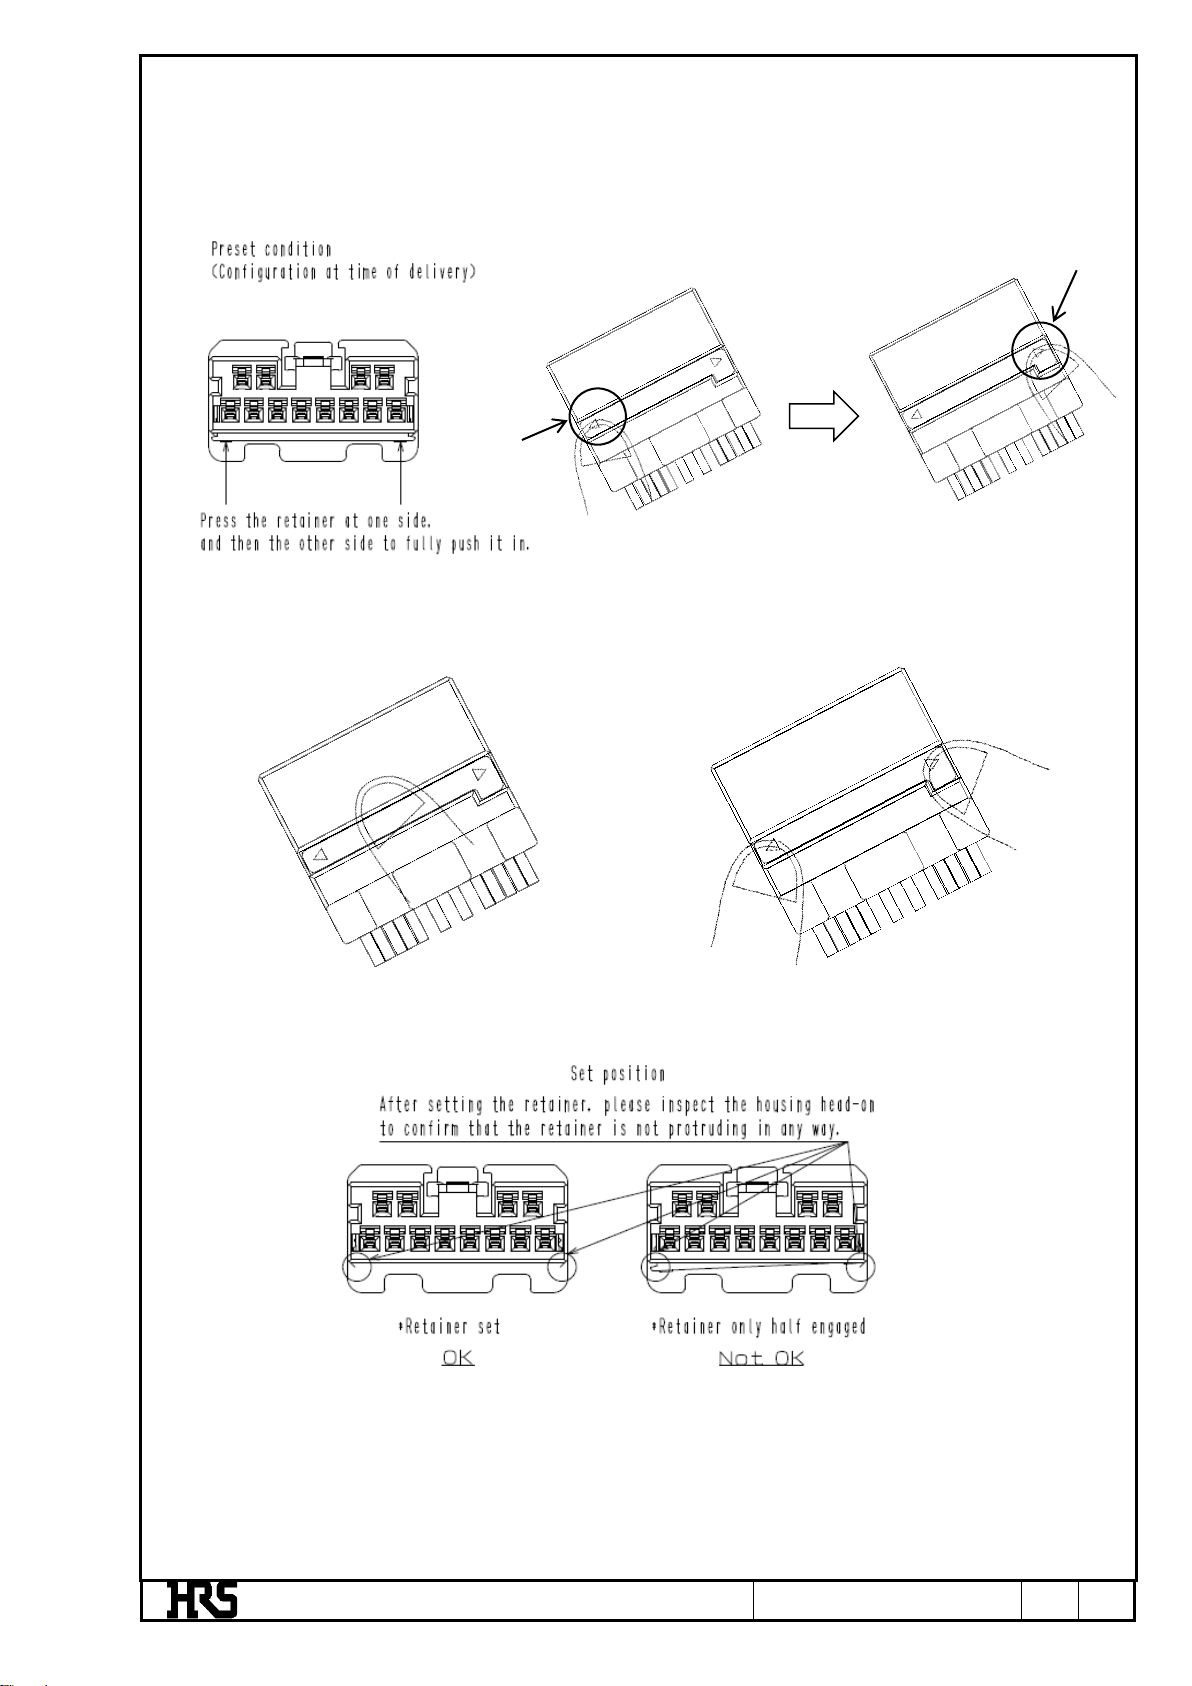
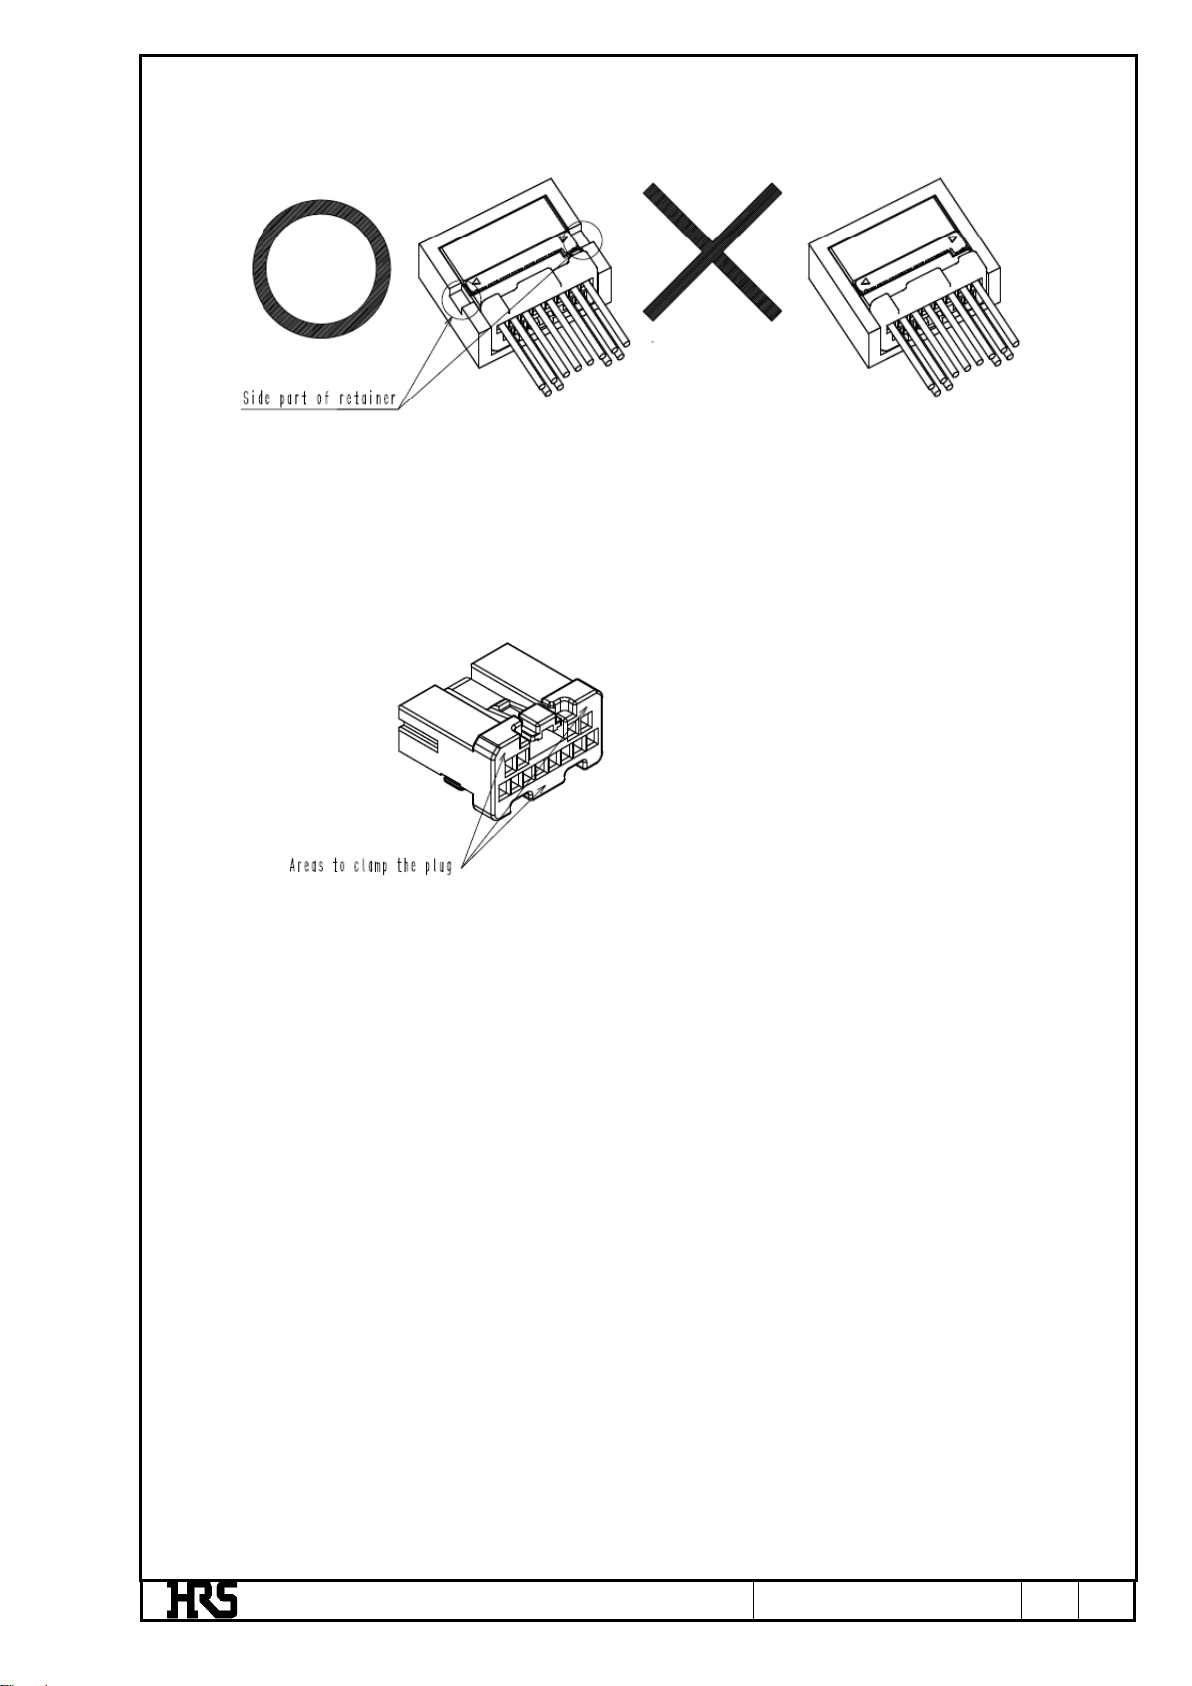
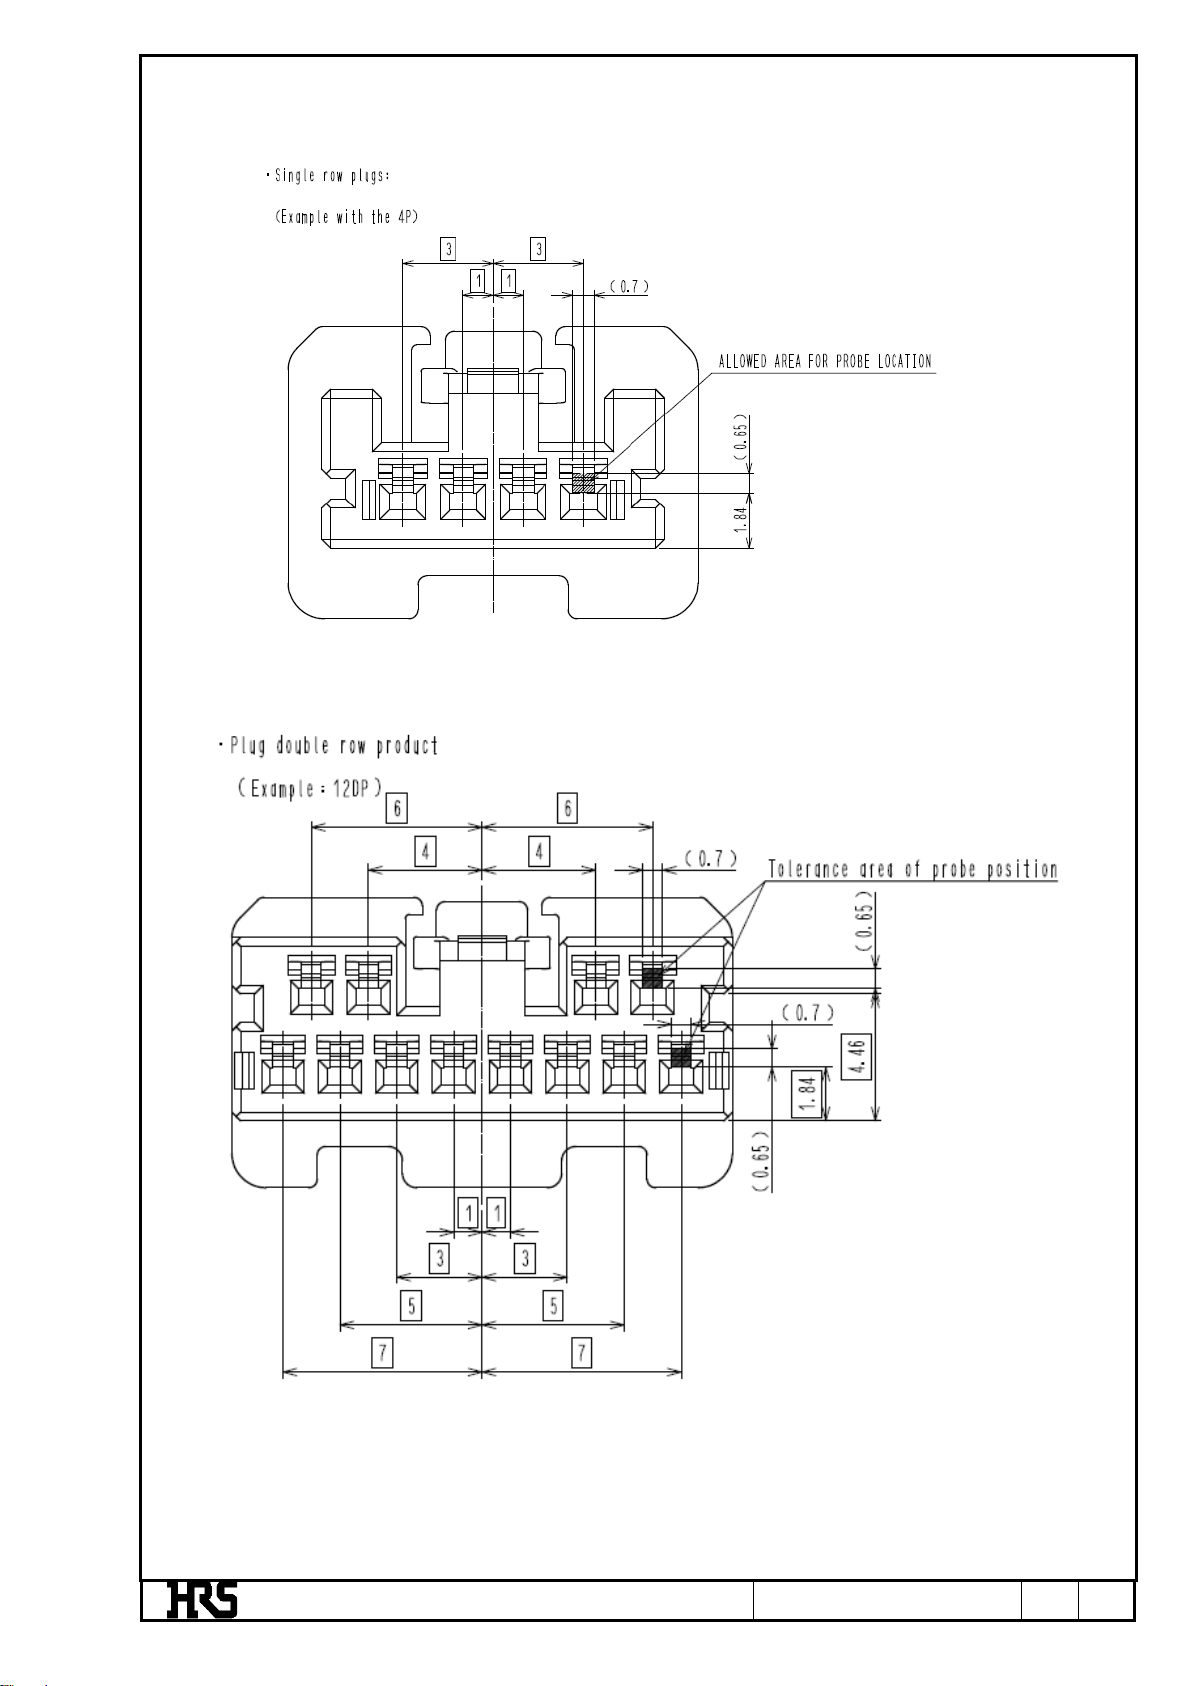
HRS
HRS DF57 Series User manual

HRS
HRS DF51 Series User manual

HRS
HRS DF57H S-1.2C Series User manual

HRS
HRS GT36 User manual

HRS
HRS DF62W Series User manual

HRS
HRS SignalBee DF13 Series User manual

HRS
HRS BNC75 Series Manual

HRS
HRS GT36A User manual

HRS
HRS FH67 Series User manual

HRS
HRS Hirose IT3 Quick start guide

HRS
HRS BM20 Series User manual

HRS
HRS FH12-20S-0.5SH(54) User manual

HRS
HRS DF62W EP 2.2C Series User manual

HRS
HRS BM25 Series User manual

HRS
HRS GT50 Series Instruction Manual

HRS
HRS HELIX User manual

HRS
HRS HIF Series User manual

HRS
HRS FH29 Series User manual

HRS
HRS BM25 Series Instruction Manual

HRS
HRS GT50 Series User manual