Huck LH-224 User manual

Instruction Manual
LH-224 & LH-224B
Pneudraulic Installation Tool
Huck International Ltd.
LH-224 ENG
Revision: 17.02.00


Contents
Safety Guidelines 1 & 2
Safety Glossary 3
Description 4
Intended Use 4
Specifications 4
Disposal 4
Dimensions 5
Principle of Operation 6
Preparation for Use 6
Instructions for Use 8
Servicing and Preventative Maintenance 9
Disassembly 10
Main Components 14
Assembly 15
Filling and Bleeding Procedure 17
Exploded View 19
Parts List 20
Pintail Collection Bottle 21

Before using equipment:
1. Only Huck Installation Equipment
should be used to install Huck fasteners.
2. Only persons that have received
training approved by Huck International
Ltd should use Huck Installation
Equipment.
3. The Manuals and/or Data sheets and
warning stickers/labels supplied with the
Installation equipment should be studied
before connecting the equipment to any
primary power supply, in particular the
following sections:
Warnings and Cautions.
Specifications
Electrical and/or Air supply.
Principals of Operation.
Preparation for use.
Regular use.
Regular maintenance.
4. W ith hydraulic tooling, ensure that it is
suitable for use with the Huck Powerig or
Huck approved hand pump being used.
5. Check that the Powerig or approved
hand pump "Pull" and "Return" pressures
have been adjusted to suit the tool being
used. Reference must be made to the
instruction manual supplied with the
equipment.
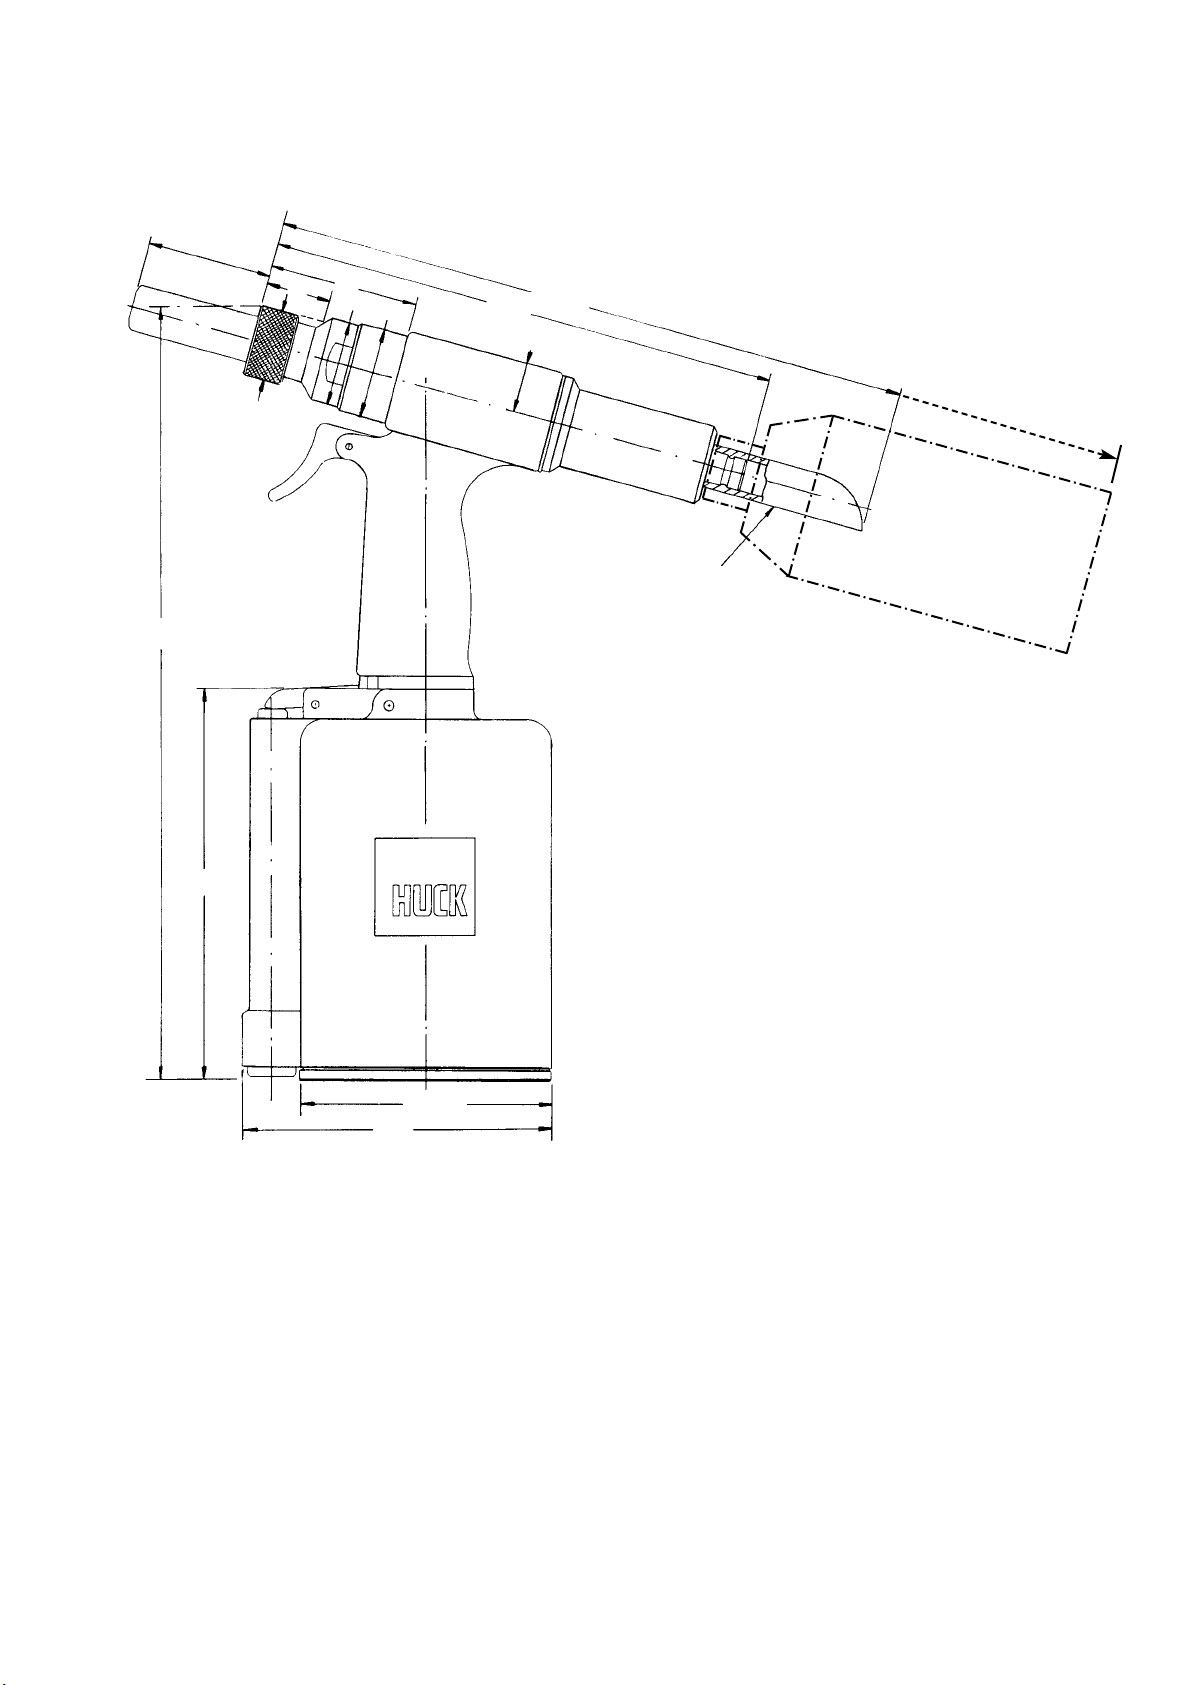
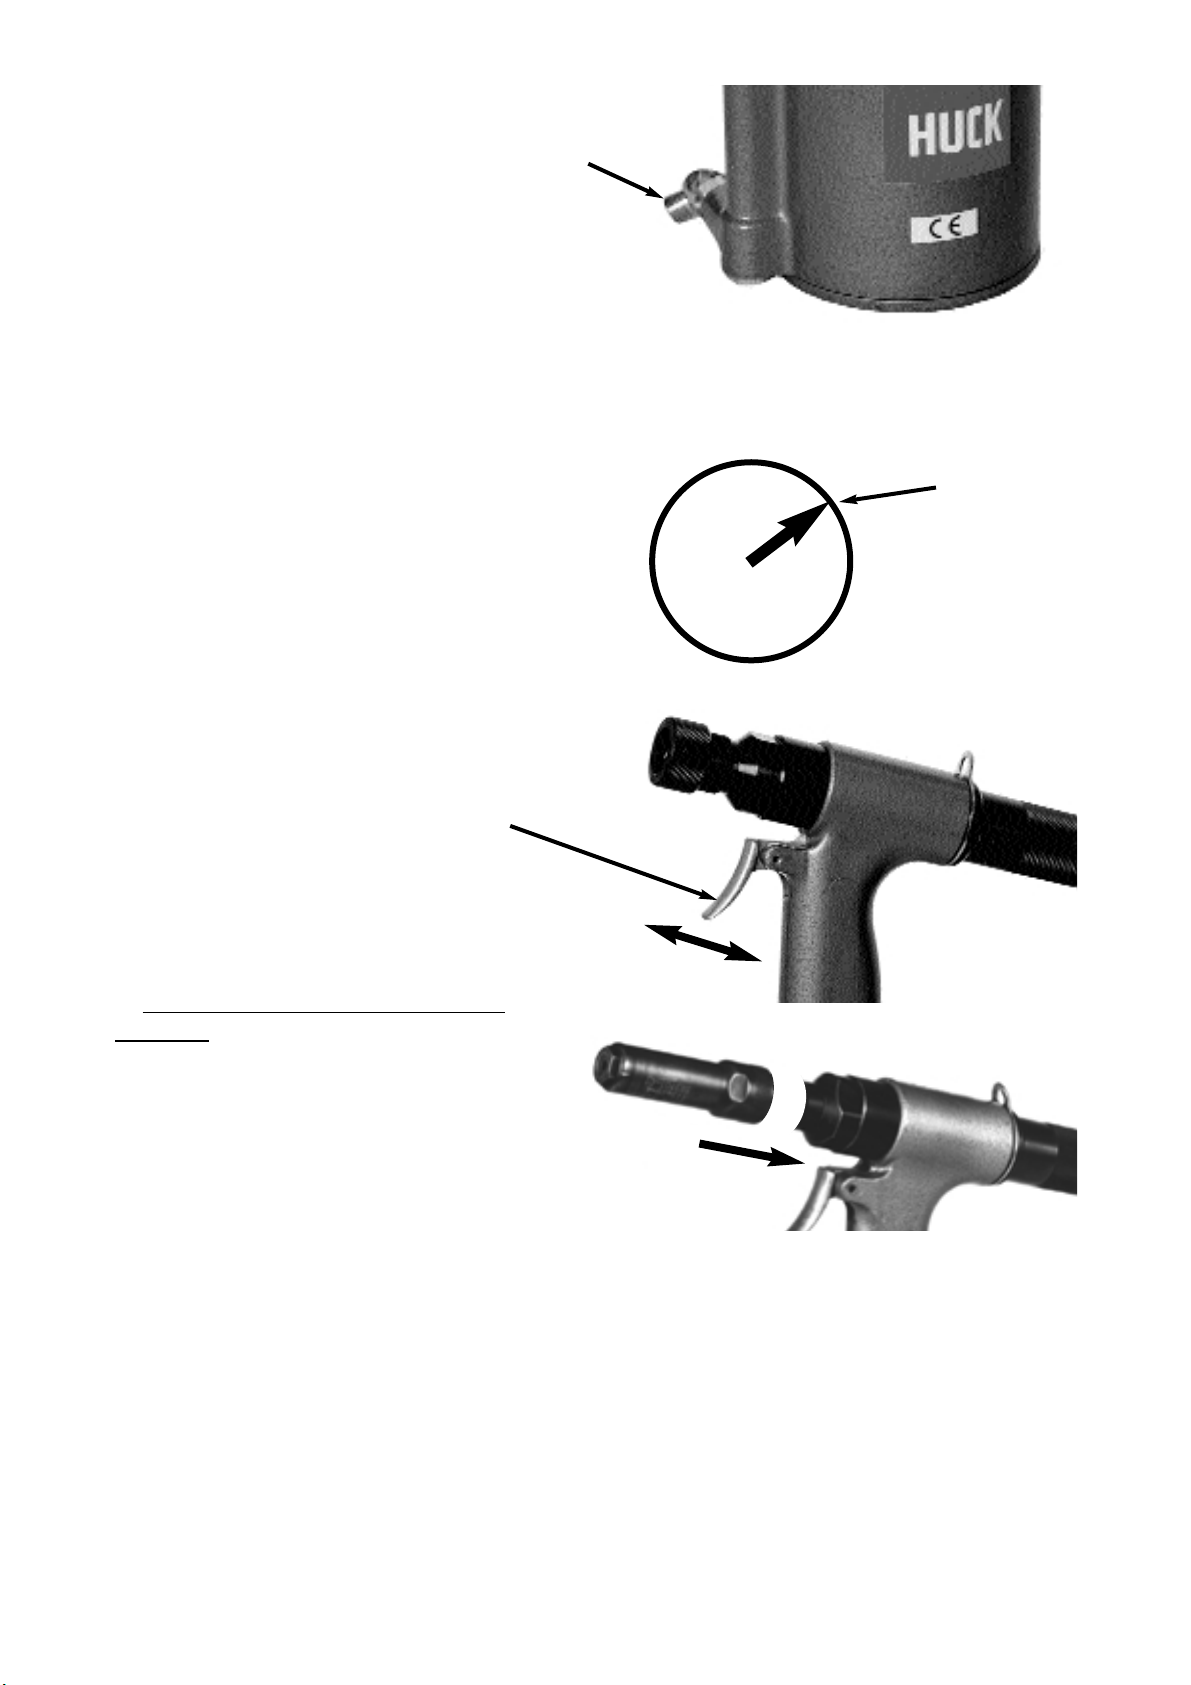
6. Check that the Nose Assembly is of the
correct type suitable for installing the
fastener being used.
7. V isually check all pneumatic and/or
hydraulic hoses, electrical cables,
Powerigs, hand pumps and hand tools, for
any visible signs of damage and leakage.
ALL HYDRAULIC HOSES SHOULD BE
RENEWED EVERY FIVE YEARS.
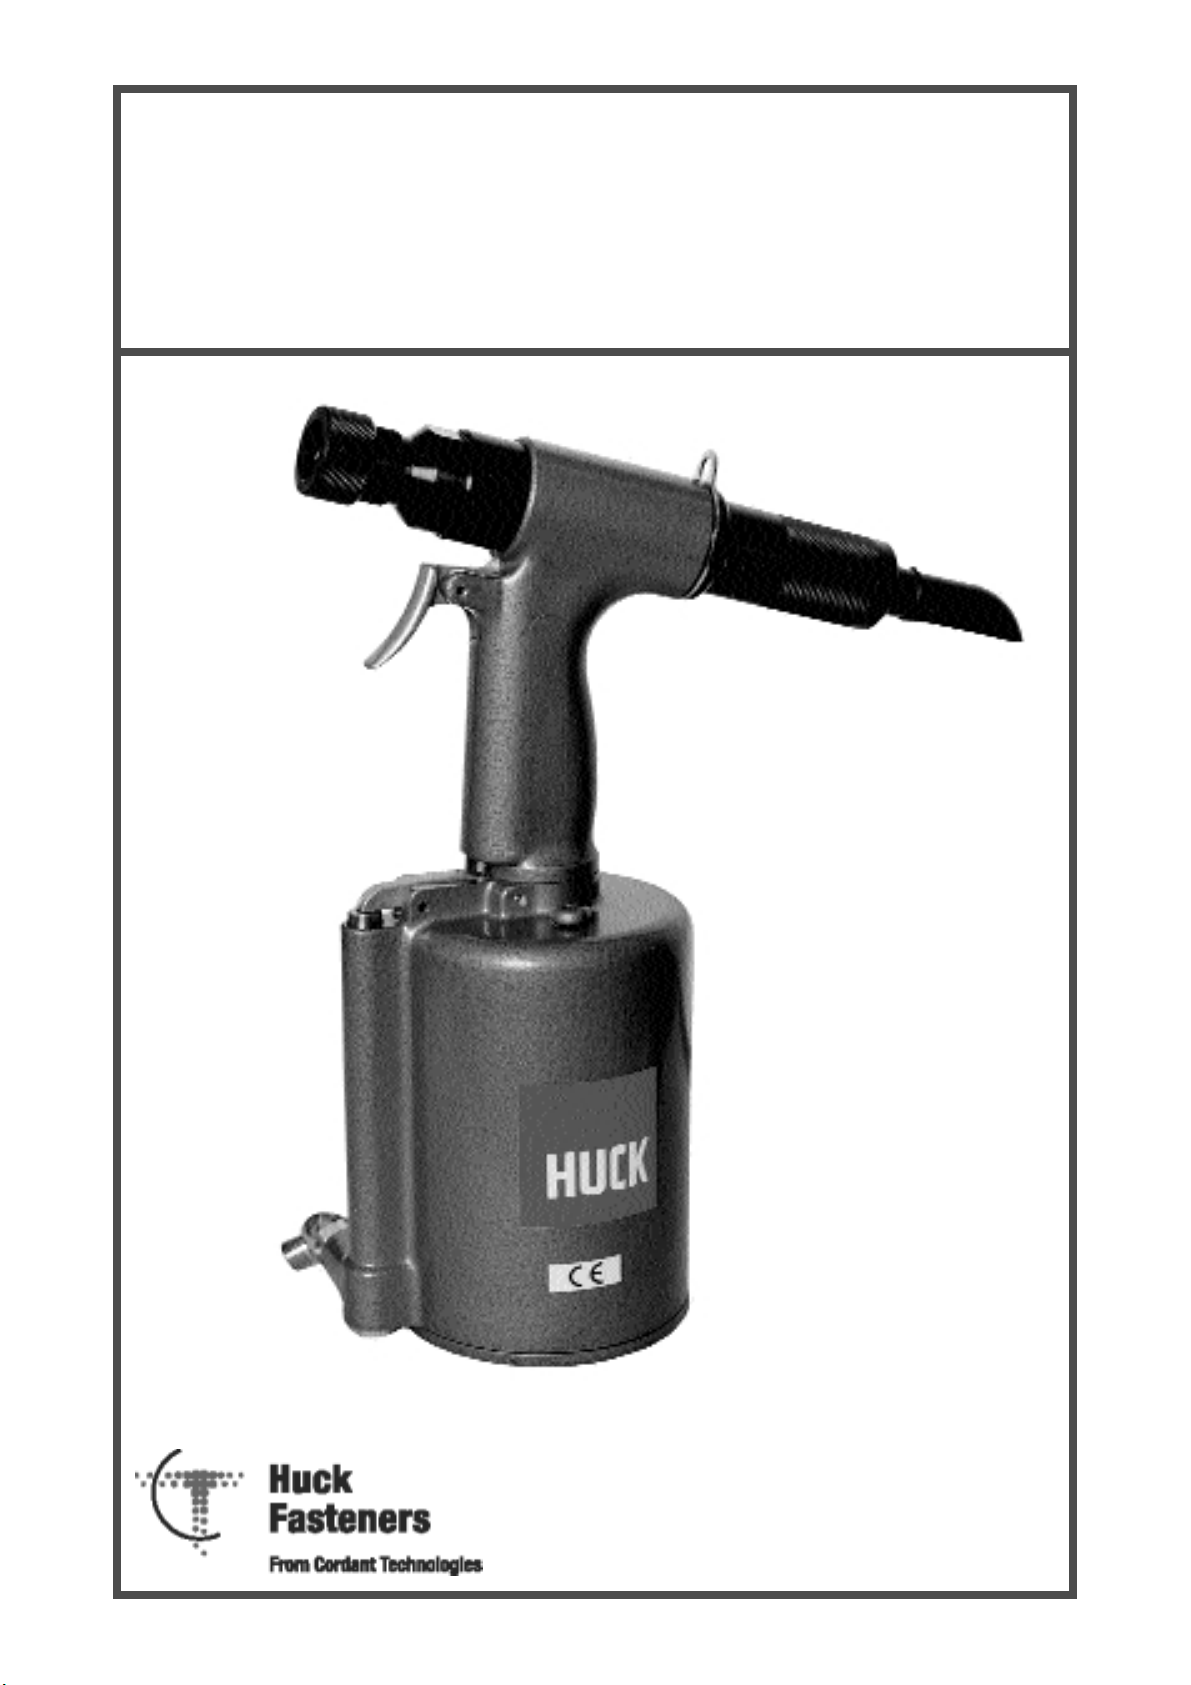
Huck Fastening Systems
Safety Guidelines when using Huck Installation Equipment to install Huck Fasteners.
8. Do not connect any equipment to
primary power supplies or attempt to use
any equipment, that shows signs of
damage or leakage.
9. Ensure that all air and/or hydraulic hose
and/or electrical plugs/connectors are
correctly connected before switching on
supply to equipment.
When operating the equipment:
10. When using fasteners in some types
of structure, the fracturing of the pintail
during installation may generate noise
levels above the first action level of the
Noise at Work
Regulations and therefore hearing
protection must be worn.
11. It is recommended that eye protection,
(eg. safety glasses), should be worn by
the operator.
12. Never look directly at the front or rear
of the installation tool.
13. Never hold the Installation Tool around
the Nose Assembly.
14. Keep hands/fingers clear of any
moving parts and also apertures in Nose
Assemblies.
15. W arning
Fasteners should only ever be installed in
the actual workpiece to prevent possible
high velocity ejection from the Nose
Assembly due to tensile forces induced
during pintail fracture.
16. When using two piece fasteners, (ie.
Pin and Collar type), the
conical/chamfered end of the collar MUST
always be towards the Nose assembly,
NOT against the work piece.
1

17. Keep fingers clear from the underside
of the head, collars and blind side of
fasteners and from within the joint being
fastened, during the installation cycle.
18. Do not look directly at the head or
blind side of fasteners during the
installation cycle.
19. During the installation cycle, the tool
will pull and straighten itself to the axis of
the fastener, beware of hands being
trapped against any nearby structure.
KEEP HANDS CLEAR
20. In the event of any dif ficulty whilst
installing a fastener, releasing the tool
trigger at any time during the installation
cycle will immediately put the tool into
reverse.
21. Beware of fastener pintails which are
ejected, (sometimes forcibly), from the
tool at the completion, or at pintail
fracture, during the installation cycle.
Tools designed to have Pintail Deflectors
and or catchers must never be used
without them.
22. Do not continue to use any equipment
which develops a fault whilst being used.
23. A void kinking of hoses or dragging of
hoses and electrical cables over sharp
objects.
2

This instruction manual must be read
with particular attention to the
following safety guide lines, by any
person servicing or operating this tool.
1. Safety Glossary
W ARNINGS - Must be understood to
avoid severe personal injury.
CAUTIONS - show conditions that will
damage equipment and or structure.
Notes - are reminders of required
procedures.
Bold, Italic type and unerlining -
emphasises a specific instruction.
2. Huck equipment must be maintained in
a safe working condition at all times and
inspected on a regular basis for damage
or wear. Any repair should be done by a
qualified repair person trained on Huck
procedures.
3. Repair person and Operator must read
and understand any Warning and Caution
stickers/labels supplied with equipment
before connecting equipment to any
primary power supply - - as applicable,
each of the sections in this manual have
specific safety, and other information.
4. When repairing or operating Huck
installation equipment always wear
approved eye protection. Where
applicable, refer to ANSI Z87.1 - 1989.
5. Disconnect primary power source
before doing maintenance on Huck
equipment.
6. If any equipment shows signs of
damage, wear or leakage, do not connect
it to the primary power supply.
7. Make sure proper power source is used
at all times.
8. Never remove any safety guards or
pintail deflector.
9. Never install a fastener in free air,
personal injury from fastener ejecting may
occur.
10. Do not abuse tool by dropping or
using it as a hammer. Reasonable care of
installation tools by operators is an
important factor in maintaining tool
ef ficiency, eliminating downtime and in
preventing an accident which may cause
severe personal injury.
3

Description
The pneumatically operated LH-224 is a
lightweight, high speed Installation Tool
designed to install Huck blind and two
piece Fasteners up to 6.35 mm (1/4")
diameter. Pulling action of the piston is
provided by a pneumatic- hydraulic
intensifier system powered by 6.2 to 6.9
bar (90 to 100 psi) air pressure. The
correct Nose Assembly must be fitted to
the Installation Tool to suit the particular
Huck fastener being used.
The fastener installation sequence starts
when the Tool trigger is operated and the
return cycle
starts when the trigger is released. The
Tool piston is returned to the fully forward
position by a compresssion spring in the
head of the tool at the completion of the
fastener installation cycle.
Intended Use
The LH-224 hand held Installation Toolis
designed to be used in a normal, factory
working environment in conjunction with
the appropriate Huck Nose Assembly,to
install Huck MAGNA-LOK, MAGNA-
BULB, AUTO-BULB, C6L or MAGNA-
GRIP fasteners with a maximum diameter
of 6.35 mm (0.250").
Specifications
Installation Tool Type LH-224 & LH-224B
Maximum recomended Air supply pressure 6.9 bar (100 psi)
Installation Tool stroke 2 1 m m
Installation Tool capacity 19 kN
Length (LH-224) 260 mm
Length (LH-224B) 340 mm
W idth (nominal Air Cylinder diameter) 107 mm
Height 322 mm
W eight 2.8 kg
Dimensions and weight of the Installation Tool are shown on page 5.
Noise
The sound measurement is in accordance with BS EN ISO 3746: 1996. Data is as
follows: SEL (dBA) average Peak(C weighted (dBA) average
W ithout Fasteners: 78.075 77.025
*Installing Fasteners: 71.975 121.425
V ibration
The vibration measurement is in accordance with BS EN 28662-1:1993. Data as follows:
* Installing Fasteners: Aeq (m/s2) average = 2.458
Huck Fasteners MGP-R8-10 Pin plus MGC-U8 Collar installed in aluminium test plates
held in a workbench vice.
Disposal
Metalic and non-matilic parts/components/materials, (including any fluids), should be
disposed of by processing through authorised methods and in accordance with current
legislation. 4

Fig. 1
Dimensions and Data
5
Nose
Assembly*
All dimensions in millimetres
(345 for LH-224B)
Removable
*Dimensions see Nose Assembly Data Sheets
Specifications
W eight : 2.8 kg (2.93 kg for LH-224B)
Stroke : 21 mm
Capacity : 19 kN
Power Source : Air 90 100 psi
322
163
129 107
30
260
220
21
65
30 37
35

Principle of Operation
When the Trigger 23 is depressed the Throttle Valve 28 moves to down position,
pressurized air is directed to underneath the Air Piston 58 , causing the Piston and Piston
Rod 49 to move upward. The air above the Piston is exhausted from the tool. As the
Piston Rod 49 moves upward, a column of hydraulic oil is forced into the head of the tool
in front of the Pull Piston 15 , which moves back. The attached Nose Assembly moves
with the Pull Piston to start fastener installation. When fastener installation is completed,
the Trigger 23 is released and the Spring 30 causes the Throttle Valve 28 to return to its
up position. Pressure from Spring 18 returns the Pull and Air Pistons to their original
positions. The air from below the Air Piston is exhausted from the the tool. The Shock
Absorber 68 impedes oil flow at pinbreak helping prevent tool recoil.
Preparation for Use
The air supply connector has a male pipe thread to accept an air hose fitting. Quick
disconnect fitings and a 6.4 mm (1/4") inside diameter air hose are recommended. An air
supply of 6.2 to 6.9 bar (90-100 psi) capable of delivering 566 l/min (20 CFM) is
recomended. The air supply should be equipped with a fifter-regulator-lubricator unit.
1. Read and ensure that you understand
the Safety Guidelines at the front of this
manual. Also, read and ensure that you
understand the Specification, Noise,
V ibration and Principal of Operation
information shown on page 4.
2. V isually check the Installation Tool for
damage and leakage, replace or rectify
as necessary.
3. Ensure the Deflector is in place on
the Installation Tool and that it is not
damaged. Replace with a new Deflector
if necessary.
Continued on next page.....
6

7. Disconnect the air supply from
the tool.
Select correct Nose Assembly from
Tool/Nose Assembly Matrix. Screw Collet
Assembly (including Lock Collar & Shim if
applicable), onto tool Piston and tighten
with a spanner. To Prevent the Piston
rotating during tightening, insert a small
allen key, (approx. 5 mm dia.), through the
side hole of the Anvil Adaptor 4 and into
the matching hole in the Pull Piston 15 .
Slde Anvil over Collet; slide Retaining Nut
3 over Anvil and tighten onto Anvil
Adaptor 4.
4. Put in a few drops of Automatic
Transmission Fluid (ATF)/DEXRON Il, (or
equivalent), into the Air Inlet Connector 43 .
Screw quick disconnect fitting into Air Inlet
Connector.
CAUTION: Do not use TEFLON
tape on threads - - use TEFLON in stick
form only. (Huck Part Number 503273).
5. Set air supply pressure regulator to
6.2-6.9 bar (90-100 psi). Connect air hose
totool.
6.2-6.9 bar
(90-100 psi)
6. Using the Installation Tool Trigger,
cycle the Tool several times to ensure
correct function and that the Tool Piston
returns to the fully forward position
8. Re-connect air supply and test for
correct Tool function and fastener
installation.
Note
Use Vibratite or similar anti-loosening
compound on threads of Collet to help
maintain tightness during use.
7
Pressure
Gauge

Instructions for use
1. Read and ensure that you understand
the Safety Guidelines at the front of this
manual. Also, read and ensure that you
understand the Specification, Noise,
V ibration and Principal of Operation
information shown on page 4.
2. Ensure that the hole in the material to
be joined is prepared in accordance with
the information shown on the Engineering
Standards for the fastener being installed.
3. Ensure that the grip length of the
fastener to be installed is correct for the
material thickness to be joined, (refer to
the appropriate Engineering Standards for
the fastener being used).
4. Ensure that the equipment has been
prepared for use, (refer to the section in
this manual "Preparation for Use").
W ARNING
DO NOT OPERATE TOOLS WITHOUT
PINTAIL DEFLECTORS. UNSHIELDED
EYES, ESPECIALLY, MAY BE
PERMANTLY INJURED AND OTHER
SEVERE INJURIES MAY BE CAUSED
BY FLYING PINTAILS. WHEN A
DEFLECTOR IS IN PLACE ON THE
TOOL, BROKEN PINTAILS WILL STILL
EJECT WITH SPEED AND FORCE. BE
SURE THE PINTAIL DEFLECTOR IS
DIRECTED SAFELY.
5. Insert the fastener into the prepared
hole.
6. Hold the Installation Tool firmly by the
handle with the hand in a position that
enables finger operation of the Air Trigger.
If necessary, use the other hand to
support the Installation Tool by holding the
Air Cylinder of the tool. D O N O T place the
hand arround the Nose Assembly.Ifa
Pintail Collector Bottle or Bag is not fitted
to the Installation Tool, ensure the
Deflector is positioned safely so that the
ejected Pintails will not cause injury to
yourself or fellow workers. 8
7. Place the Nose Assembly over the
Pintail of the fastener and gently push
forward until the Anvil of the Nose
Assembly is in contact with the fastener.
Operate the Air Trigger.
8. When the fastener Pintail fractures, (at
the same time the Installation Tool may be
released from the installed fastener),
release the Trigger. The Installation Tool
Piston and inner components of the Nose
Assembly will now return to the fully
forward position, (return stroke), ready to
install the next fastener; this normally
takes about one second.
To avoid damage to the Nose Assembly,
D O NOT place the Nose Assembly over
the Pintail of a fastener until the return
stroke is completed.
9. If a Pintail Collector Bottle or Bag is
fitted to the Installation Tool, empty at
regular intervals using authorised disposal
proceedures.
Failure to do this will could result in
Pintails causing a blockage in the
Installation Tool and/or Nose Assembly
resulting in serious damage to
components.
10. In the event of a mains air supply
failure coincident with a fastener retained
in the Nose Assembly of the Installation
Tool, the Installation Tool and Nose
Assembly must be placed in a safe
location to prevent inadvertent operation
of the Trigger once power is restored.

Servicing the Tool
General
1. The efficiency and life of any tool
depends upon proper maintenance.
Regular inspection and correction of minor
problems will keep tool operating
efficiently and prevent downtime. The tool
should be serviced by personnel who are
thoroughly familiar with how it operates.
2. A clean, well-lighted area should be
available for servicing the tool. Special
care must be taken to prevent
contamination of pneumatic and hydraulic
systems.
3. Proper hand tools must be available.
4. All parts must be handled carefully and
examined for damage or wear. Always
replace Seals, when tool is disassembled
for any reason. Components should be
disassembled and assembled in a straight
line without bending, mis-alignment, or
undue force. Disassembly and assembly
procedures outlined in this manual should
be followed.
5. Consumable parts should be available
at all times. Other components, as useage
dictates, should also be available.
W ARNING
Inspect tool for damage and/or wear
before each use. Do not operate if
damaged or worn, as severe personal
injury may occur.
Daily
1. If a Filter-Regulator-Lubricator unit is
not being used, disconnect air supply at
the tool and put a few drops of Automatic
Transmission Fluid (ATF) or light oil into
the air inlet of the tool. If the tool is in
continuous use, put a few drops of oil in
every two to three hours.
2. Bleed the air line to clear it of
accumulated dirt or water before
connecting air hose to the tool.
3. Check all hoses and couplings for
damage or air leaks, tighten or replace if
necessary.
4. Check the tool for damage or
air/hydraulic leaks, tighten or replace if
necessary.
5. Check the Nose Assembly for tightness
or damage, tighten or replace if
necessary.
6. Check stroke periodically, ifstrokeis
short add oil. If stroke is still short, then
bleed the tool in accordance with the
instructions in this manual. (Bleeding
should not have to be done on a daily
basis).
W eekly
1. Disassemble and clean nose
assemblies and reassemble as per
applicable NOSE ASSEMBLY DATA
SHEET.
2. Check the tool and all connecting parts
for damage or oil/air leaks, tighten or
replace if necessary.
9

Disassembly Instructions
W ARNING
The air supply hose must be
disconnected from the tool before
cleaning, or carrying out any
maintenance. Severe personal injury
may occur if the air supply hose is not
disconnected.
1. Remove Nose Assembly,Pintail
Deflector and/or Pintail Collector Bottle.
2. Firmly hold the Handle of the
Installation Tool in a vice, (use rubber
faced vice grips).
Remove Deflector.
Unscrew the Rear Gland 21 from the
head of the tool.
CAUTION
THE REAR GLAND IS UNDER
PRESSURE FROM THE VERY
POWERUL INTERNAL SPRING -
REMOVE WITH CARE.
3. Remove Rear Gland 21 and Spring 18
from the tool head.
Continued on next page.....
10

4. Remove the Bleed Plug 9 & O Ring 10.
5. Remove Pull Piston 15 from the tool
head by inserting a small punch into the
front of the Piston and tapping gently with
a hammer.
The Piston will slide out and can be
removed.
Take care to contain any hydraulic fluid
which may escape.
6. Any damaged O Rings and/or Back-
up Rings can now be replaced.
Continued on next page.....
11

7. Unscrew Anvil Adaptor 4 anti-clockwise
from head of the tool.
8. Invert tool to allow any remaining
hydraulic fluid to drain into a suitable
container.
9. Using a pin punch and hammer,
remove throttle lever Pivot Pin 22 .
10. Remove Throttle Valve 28 & Spring 30
from tool body.
Continued on next page.....
12

11. Clamp inverted tool firmly in a vice,
(use fibre vice clamps). Use a 28 mm
socket wrench to unscrew Cylinder Cap
51 anti-clockwise and expose Air Piston
58 & Nut 61 .
12. Use a pair of locking pliers, (eg. Mole
Grips), locked onto the Nut 61 and pull
the Air Piston assembly out of the
cylinder.
13. Us a 18 mm socket wrench to remove
Plug 39 at the base of the Throttle Valve.
14. Remove Ball 36 and Spring 37.
Continued on next page.....
13

1
Handle
LH -401
51
Cylinder Cap
LH -419
45
Cylinder
LH -417-1
49
Piston Rod
LH -418
59
Bumper
LH -28
58
Air Piston
LH -421
18
Spring
LH -403-1
Deflector
100378
21
Rear Gland
LH -405
15
Pull Piston
LH -402-1
19
Guide Tube
LH -404-1
4
Adaptor-Anvil
LH -195
3
Nut-Retaining
103090NR
39
Plug
LH -413
36
Ball
LH -411
28
V alve-Throttle
LH -408
37
Spring
LH -412
30
Spring
LH -409
23
T rigger
LH -406
24
Linkage
LH -33
25
Lever-Throttle
LH -407
Fig. 2
LH-224 Main Components
14

Assembly Instructions
2. Apply grease to the O Rings and Back-
up on the Piston 15.
3. Locate Piston inside the head assembly
by pushing gently on the rear of the
Piston.
4. Gently tap the rear of the Piston with a
non-metalic soft faced hammer to locate
the Piston fully inside the head assembly.
Continued on next page.....
1. Assemble Adaptor-Anvil 4 onto the
Handle 1, fully tighten clockwise with a
spanner.
15

6. Use a wad of cloth or paper to protect
the hand, locate the Rear Gland over
the Spring. Push the Rear Gland forward
against the Spring to engage with the
thread on the head assembly, rotate
clockwise and fully tighten.
CAUTION
THE REAR GLAND IS UNDER
PRESSURE FROM THE VERY
POWERUL INTERNAL SPRING -
ENSURE THREAD OF REAR GLAND IS
FULLY ENGAGED BEFORE REMOVING
HAND.
Replace Deflector. If the Deflector is
damaged, replace with a new one.
5. Locate Spring 18 inside head assembly.
Locate Hanger 20 and O Ring 57 onto the
threads of the Rear Gland 21.
7. Assemble Linkage 24 and Lever-
Throttle 25 together by lightly tapping
Pin 22 with a hammer into the holes in
both components.
Continue from step 3 of the Filling
and Bleeding Procedure ..........
8. Replace the Bleed Plug 9 & O Ring
10 and fully tighten.
16

Filling and Bleeding Procedure
1. Clamp inverted tool firmly in a vice,
(use fibre vice clamps). Use a 28 mm
socket wrench to unscrew Cylinder Cap
51 anti-clockwise and expose Air Piston
58 & Nut 61 .
2. Use a pair of locking pliers, (eg. Mole
Grips), locked onto the Nut 61 and pull
the Air Piston assembly out of the Air
Cylinder.
3. Fill the Handle assembly of the tool
with clean Hydraulic Automatic
Transmission Fluid (ATF). Continue filling
until the fluid is level with the bottom of
the chamfer of the small hydraulic
cylinder in the neck of the tool.
To prevent contamination of the
hydraulic fluid, use a clean container.
4. Clean any contaminates form the Air
Cylinder using a lint free cloth. Insert Air
Piston assembly into Air Cylinder
ensuring that the Piston Rod 49 locates
into its mating cylinder.
Continued on next page..... 17
This manual suits for next models
1
Table of contents
Other Huck Power Tools manuals