Husky HOEC5210B12M User manual

THANK YOU
USE AND CARE GUIDE
Questions, problems, missing parts?
Before returning to the store, call
Husky Customer Service
8 a.m.- 7 p.m., EST, Monday-Friday
1-888-HD-HUSKY
HUSKYTOOLS.COM
We appreciate the trust and confidence you have placed in Husky through the purchase of this We strive to continually mobile workbench.
create quality products designed to enhance your home. Visit us online to see our full line of products available for your home
improvement needs. Thank you for choosing Husky!
Model # HOEC5210B12M
SKU # 0000 000 000
HUSKY 52 IN. 10-DRAWER MOBILE WORKBENCH WITH POWER ADJUSTABLE-HEIGHT TOP
9 a.m.- 6 p.m., EST, Saturday

Table of Contents
Table of Contents ...................................................... 2
Safety Information
........................................................ 2
Warranty ........................................................................ 3
Pre-Assembly
.......................................................
4
Assembly ...............................................................
Operation ................................................................
Maintenance ..........................................................
Safety Information
When moving this product, push it rather than pull it.
Do not alter this product in any manner.
DANGER: Do not stand on this product. You
may fall or cause the product to tip.
DANGER: Do not move the product prior to closing
and locking all the drawers. The drawers could come
open and make the product unstable and tip.
DANGER: Do not mount this product on a
truck bed or any other moving object.
CAUTION: Do not lift this product directly
with a forklift or tow with any mechanical devices.
CAUTION: Do not exceed the maximum
weight loading capacity of elevating wood top or
drawers. See Specifications on page 4.
CAUTION: Only transport this product when
empty. Properly secure when transporting.
Do not open more than one drawer at a time.
Do not let children age under 18 approach or operate the product.
Lock all drawers before moving the product.
To help prevent the product from tipping, load the product
starting with the bottom drawers.
Do not step in any drawer/drawers.
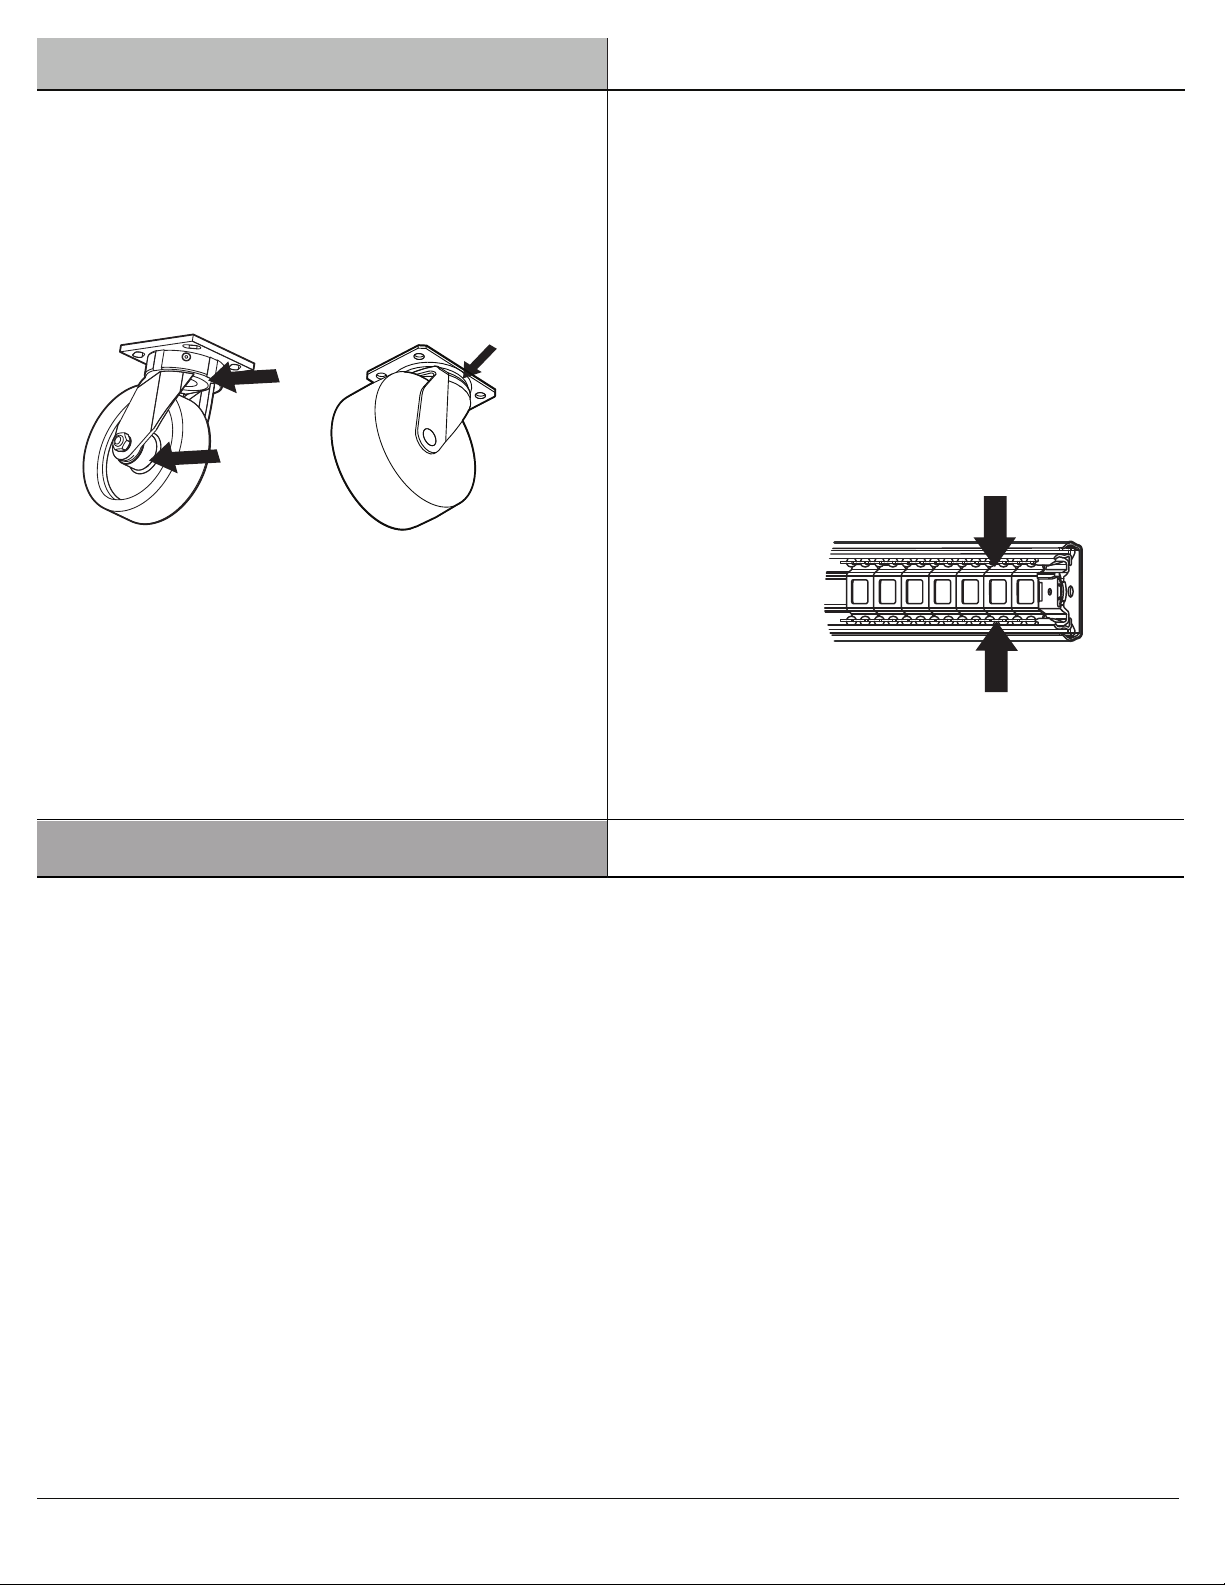
Keep the locking casters’ brake set unless you are
moving the cabinet. This will help to prevent the product
from rolling.
Care and Clearning
...................................................
Service Parts
....................................................................
Tools Required .............................................................. 4
Hardware Included .......................................................
Specifications ................................................................ 4
Package Contents
................................................
5
Make sure all drawers close tightly before locking/unlocking.
WARNING: Keep the product on a level
surface. The product may become unstable and
tip if stored or moved on an uneven surface.
6
7
8
8
9
1.
2.
3.
4.
5.
6.
7.
8.
9.
2
4
CAUTION: Remove hands and objects when
lowering the wood top to avoid pinching or crushing.
CAUTION: Clear all obstructions in top tray areas
before lowering the wood top to avoid damage to
your items or this product.
Plug and Outlet Safety
WARNING: Chest/cabinet plugs must match the outlet. Never
modify the plug in any way. Do not use any adapter plugs with earth
(grounded) chest/cabinet power strips. Unmodified plugs and
matching outlets will reduce risk of electric shock.
WARNING: Avoid body contact with earthed or grounded surfaces
such as pipes, radiators, ranges and refrigerators. There is increased risk
of electric shock if your body is earthed or grounded.
WARNING: Chests/cabinets marked “Grounding Required” have a
power strip with a three wire cord and three prong grounding plug. The
plug must be connected to a properly grounded outlet (See Figure).
If the power strip should electrically malfunction or break down,
grounding provides a low resistance path to carry electricity away
from the user, reducing the risk of electric shock. The grounding
prong in the plug is connected through the green wire inside the
cord to the grounding system in the power strip. The green wire in
the cord must be the only wire connected to the
power strip's grounding system and must
never be attached to an electrically “live”
terminal. Your power strip must be plugged into
an appropriate outlet, properly installed and
grounded in accordance with all codes and ordinances.

Warranty
The manufacturer warrants the product to be free from defects in materials and workmanship for a period of three (3) years from date of
purchase. This warranty applies only to the original consumer and only to products used in normal use and service. If this product is
found to be defective, the manufacturer’s only obligation, and your exclusive remedy, is the repair or replacement of the product at the
manufacturer’s discretion, provided that the product has not been damaged through misuse, abuse, accident, modifications, alteration
neglect or mishandling. This warranty shall not apply to any product that is found to have been improperly installed, set-up, or used in
any way not in accordance with the instructions supplied with the product. This warranty shall not apply to a failure of the product
as a result of an accident, misuse, abuse, negligence, alteration, faulty installation, or any other failure not relating to faulty material or
workmanship. This warranty shall not apply to the finish on any portion of the products such as surface and/or weathering, as this is
considered normal wear and tear.
The manufacturer does not warrant and specifically disclaims any warranty, whether express or implied, of fitness for a particular purpose,
other than the warranty contained herein. The manufacturer specifically disclaims any liability and shall not be liable for any consequential
or incidental loss or damage, including but not limited to any labor/expense costs involved in the replacement or repair of said product.
Contact the Customer Service Team at 1-888-HD-HUSKY or visit www.huskytools.com.
HUSKYTOOLS.COM
Please contact 1-888-HD-HUSKY for further assistance.
3

Pre-assembly
TOOLS REQUIRED
Safety
goggles
HARDWARE INCLUDED
SPECIFICATIONS
AA
BB
Bolt M6 x 15L 6
Washer
CC Bolt M8 x 15L
16
16
AA BB CC
DD 10MM/13MM Wrench 1
DD
Maximum capacity (drawer) 100 lbs
Maximum capacity (bottom deep drawers) 200 lbs
Maximum capacity (elevating wood top) 300 lbs
Maximum capacity (total unit) 1,200 lbs
4
NOTE: Hardware not shown to actual size.
NOTE: Begin product assembly close to the final
intended location of your mobile workbench. This product
is heavy and may be difficult to move after assembly.
Part Description Quantity
EE
EE Bolt M4 x 10L 4
FF
FF Screw 1/4 x 3/4 2
Phillips
screwdriver

Pre-assembly (continued)
HUSKYTOOLS.COM
PACKAGE CONTENTS
5 Please contact 1-888-HD-HUSKY for further assistance.
A
B
C
D
E
F
G
J
I
K
H
Part Description Quantity
A Wood top 1
B Side handle 1
C Rolling cabinet 1
D Swivel caster with brake 2
E Drawer slide 100 lbs (pair) 12
F Drawer 10
G Rigid caster 2
H Power strip bracket 2
I Key (set) 1
J Lock 1
K Safety bracket 2

Assembly
Attaching the side handle
Installing the casters
NOTE: The holes in the cabinet are tapped and do not
require nuts.
□
Ensure all cabinet drawers are securely locked into
□ Lay the rolling cabinet (C) on its back on top of the
packaging material to protect the finish.
□ Mount the two swivel casters with brake (D) to the rolling
cabinet (C) usingfour bolts (CC) and washers (BB) per
caster. The swivel casters with brake (D) should be
□ Mount the two rigid casters (G) to the rolling
cabinet (C) using four bolts (CC) and washers (BB) per
□ Tighten all bolts with a 13 mm wrench (DD).
□ Return the rolling cabinet (C) to its upright position.
CAUTION: Do not over tighten the screws.
□
place using the key (I) and lock (J) on the rolling cabinet (C).
installed on the same side as the side handle (B).
caster.
□
Attach the side handle (B) to the cabinet using four bolts
(AA).
Tighten all bolts with the 10 mm wrench (DD).
□
6
1
2
6
Do not over tighten the bolts to avoid damage to the finish.
Warning: Two or more people may be required for this
step due to the weight of the workbench.
CC
B
C
D
DD
BB
G
3Attaching the power strip brackets
□
Attach the power strip brackets (H) to the cabinet using four
bolts (EE).
Tighten all bolts using a screwdriver.
□
Do not over tighten the bolts to avoid damage to the finish.
NOTE: The holes in the cabinet are tapped and do not
require nuts.
□
4Attaching the safety brackets (optional)
□
(AA) and two screws (FF) for the other side on the wall.
Tighten all bolts using a screwdriver and a wrench.
□
Do not over tighten the bolts to avoid damage to the finish.
NOTE: This step is optional. User can decide whether
to attach the brackets or not.
□
Attach the safety brackets (K) to the cabinet by using two bolts
K
AA
FF
B
AA
H
EE

Operation
HUSKYTOOLS.COM
Locking and unlocking the unit
IMPORTANT : The drawers must be fully closed before
locking / unlocking the unit.
7
2
□ To lock the unit, insert the key (I) into the lock (J) and turn
□ To unlock the unit, insert the key (I) into the lock (J) and
it one quarter turn counterclockwise. Then remove the key.
turn it one quarter turn clockwise. Then remove the key.
To raise the work surface, long press the up button to the
it reaches the desired height or rests back on top of the
To lower the work surface, long press the down button until
The setting is re-adjustable per user’s request.
Adjusting the height of the
wood top work surface
desired height or until it reaches it’s top.
□
□
1
When the wood top is lowered to a certain height, it slows
NOTE:
WARNING: There is no storage in the center tray.
Use front and back trays only for storage. Do not remove items
I
from trays when the wood top if being raised or lowered.
down to prevent pinched hands. And there is still an
interval when fully lowered based on safety considerations.
rolling cabinet.
the preferable heights as M1 or M2, lift the work surface
to the desired height first then long press M1 or M2 button for
□
three seconds until the red lights flash 3 times.
When the light turns to be blue, the setting is done.
M1 & M2 is for memorizing the working height. To memorize
Please contact 1-888-HD-HUSKY for further assistance.
Installing the drawers
□ Pull the slides and slide carrier out until fully extended.
□ Hold the slide on the cabinet while aligning it with
the slide on the drawer.
□
□ Slowly push the drawer until it is fully closed to
engage the slide.
□ Open the drawer and close it to verify proper
operation.
Slightly insert one side and repeat for the other side.
4
Removing the drawers
□ Fully extend and empty the drawer.
3
□ On the slide, lift up the plastic release lever on one slide
and push down the plastic release lever on the other slide.
Gently pull the drawer out so the slides can ride over
the stops.
Please connect with electricity before operation.
□

Maintenance
Maintaining the casters Maintaining the drawers
□ Grease the casters annually using high quality
bearing grease.
□ Periodically clean the drawer trim and inside the
drawers with a mild detergent and water.
□ Remove grease and oil with a standard,
nonflammable cleaning fluid.
□ The use of drawer liners is recommended to protect
the finish inside the drawers and make the drawers
easier to clean. Drawer liners can be purchased at
The Home Depot. .
□ Lubricate the slides semi-annually with grease or
equivalent.
□
This steel product has been coated with industrial powder coating for a durable finish. To help protect this finish, do not allow harsh chemicals
Care and Cleaning
®
such as oil or grease to remain on the powder coating surface. Use a glass cleaner ( Windex or equivalent product) to clean and maintain all
powder coated surfaces.
□
The wood top is made of Parawood (also called Rubberwood) which has a polyurethane coating to help protect it from moisture. It can be cleaned
®
with most household cleaners, such as Windex .
1
2
8
□
The crank gears and shafts are lubricated at the factory and sealed inside the unit. They do not require normal lubrication maintenance.
Some squeaking is normal when operating the crank.

Service Parts
HUSKYTOOLS.COM
9 Please contact 1-888-HD-HUSKY for further assistance.
E
A
B
D
G
J
I
H
K
Part Description Quantity
A Wood top 1
B Side handle 1
D Swivel caster w/brakes 2
E Drawer slide 100 lbs (pair) 12
G Rigid caster 2
H Power strip bracket 2
I Key (set) 1
J Lock 1
K Safety bracket 2

Questions, problems, missing parts? Before returning to the store, call
Husky Customer Service
8 a.m.-7 p.m., EST, Monday-Friday, 9 a.m. - 6 p.m. EST Saturday
1-888-HD-HUSKY
HUSKYTOOLS.COM
Retain this manual for future use.

SKU Núm. 0000 000 000
Modelo Núm. HOEC5210B12M
GUÍA DE USO Y
BANCO DE TRABAJO MÓVIL HUSKY CON 10 CAJONES Y CUBIERTA ELÉCTRICA DE
ALTURA AJUSTABLE, DE 1.32 M
¿Preguntas, problemas o piezas faltantes?
Antes de devolver a la tienda, llama al Servicio al Cliente de Husky
de lunes a viernes, entre 8:00
a.m.y 7:00 p.m. (Hora Estándar del Este) y lossábados
entre 9:00 a.m. y 6:00 p.m. (Hora Estándar del Este).
1-888-HD-HUSKY
HUSKYTOOLS.COM
GRACIAS POR TU COMPRA
Apreciamos la confianza que has depositado en Husky al comprar este banco de trabajo móvil.
Nos esforzamos continuamente para crear productos de calidad diseñados para mejorar tu hogar.
Visítanos por Internet para ver nuestra línea completa de productos disponibles

Tabla de contenido
Información de seguridad
2
Seguridad con enchufes y tomacorrientes
Ensamblaje .............................. 6
Funcionamiento .............................. 7
Mantenimiento .............................. 8
Mantenimiento y limpieza .............................. 8
Piezas de repuesto .............................. 9
Tabla de contenido .............................. 2
Información de seguridad .............................. 2
Garantía .............................. 3
Pre-ensamblaje .............................. 4
Herramientas necesarias .............................. 4
Herrajes incluidos .............................. 4
Especificaciones .............................. 4
Contenido del paquete .............................. 5
1. No abras más de un cajón a la vez.
2. No permitas que los niños menores de 18 años estén cerca del
producto ni que lo manipulen.
3. Para evitar que el producto se caiga, coloca los artículos
comenzando por los cajones inferiores.
4. Mantén bloqueados los frenos de las ruedas excepto si vas a
mover el gabinete. Esto ayudará a evitar que el producto ruede.
5. Cierra con seguro todos los cajones antes de mover el producto.
6. Asegúrate de que todos los cajones cierren bien antes de
cerrar/abrir.
7. No te pares sobre ningún cajón/cajones.
8. Cuando vayas a mover este producto, empújalo en lugar de
halarlo.
9. No modifiques este producto de ninguna manera.
ADVERTENCIA: Evita el contacto físico con las superficies conectadas a
tierra como tuberías, radiadores, estufas y refrigeradores. Existe mayor riesgo
de descarga eléctrica si tu cuerpo hace tierra.
ADVERTENCIA: Las cajas para herramientas/gabinetes etiquetadas con
“Grounding Required” (requiere conexión a tierra) tienen una barra multicontacto
con un cordón de tres cables y un enchufe de conexión a tierra de tres espigas. El
enchufe debe conectarse a un tomacorrientes con conexión a tierra (ver figura).
Si la barra multicontacto tiene un problema eléctrico o se daña, la conexión a
tierra proporciona un camino de baja resistencia para alejar la electricidad del
usuario, reduciendo el riesgo de descarga eléctrica. La espiga de conexión a
tierra está conectada al sistema de conexión a tierra a través del cable verde
dentro del cordón de la barra multicontacto. El cable verde en el cordón tiene que
ser el único conectado al sistema de conexión a tierra de la barra multicontacto y
nunca jamás conectarse a un terminal con corriente eléctrica.
ADVERTENCIA: Los enchufes de la caja para herramientas/gabinete tienen
que coincidir con el tomacorriente. No intentes modificar el enchufe de ninguna
forma. No usar ningún enchufe adaptador con barras multicontacto de cajas para
herramientas/gabinetes que tengan conexión a tierra. Enchufes sin
modificaciones y tomacorrientes adecuados reducen el riesgo de descarga
eléctrica.
Tu barra multicontacto debe ser conectada en un
tomacorriente apropiado, que esté idamente
instalado y conectado a tierra de acuerdo con las
leyes y regulaciones.
PELIGRO: No te pares sobre este producto.
Puedes caerte o provocar que el producto se vuelque.
PRECAUCIÓN: No levantes este producto
directamente con un montacargas o lo remolques con
ningún dispositivo mecánico.
PELIGRO: No montes este producto en la cama de un
camión o sobre cualquier otro objeto en movimiento.
ADVERTENCIA: Mantén el producto sobre una
superficie nivelada. El producto puede volverse
inestable y volcarse si se almacena o mueve sobre una
superficie desnivelada.
PRECAUCIÓN: No sobrepases la capacidad máxima
de peso de los cajones ni de la cubierta levadiza de
madera. Consulta las especificaciones en la página 4.
PRECAUCIÓN: Transporta este producto sólo cuando
esté vacío. Asegúralo debidamente cuando vayas a
transportarlo.
PRECAUCIÓN: Quita la manos y objetos cuando bajes
la cubierta de madera para evitar pellizcos o
aplastamiento.
PRECAUCIÓN: Elimina todas las obstrucciones en las
áreas de la bandeja antes de bajar la cubierta de
madera para evitar dañar tus artículos o este producto.
PELIGRO: No muevas el producto antes de cerrar y
asegurar todos los cajones. Los cajones pueden abrirse
y provocar que el producto quede inestable y se
vuelque.

Garantía
3
El fabricante garantiza que este producto no presentará defectos materiales ni de fabricación durante tres (3) años a partir de la fecha
original de compra. Esta garantía es válida solo para el consumidor original y cubre solo productos en uso y servicio normales. Si se
detecta algún defecto en este producto, la única obligación y solución exclusiva del fabricante, a su entera discreción, será reparar o
reponer el producto, siempre y cuando el producto no haya sido dañado por mal uso, abuso, accidente, modificaciones, alteraciones,
negligencia o manejo indebido. Esta garantía no se aplicará a ningún producto que se detecte mal instalado, mal-montado, o usado de
cualquier forma sin cumplir las instrucciones adjuntas. Esta garantía no cubre fallas del producto por causa de accidente, mal uso,
abuso, negligencia, modificaciones o instalaciones defectuosas, ni cualquier otra falla no relacionada con defectos materiales o de
fabricación. Esta garantía no se aplica al acabado de ninguna parte del producto, como la superficie, y/o deterioro, que se considera
normal por el uso.
El fabricante no garantiza y rechaza específicamente cualquier garantía, explícita o implícita, de la idoneidad del producto para un
propósito en particular, que no sea la garantía establecida por este medio. El fabricante rechaza específicamente cualquier obligación y
no será responsable por ningún daño o pérdida, directos o indirectos, incluyendo, pero sin limitarse a, cualquier costo de mano de
obra/gastos relacionados con la reposición o reparación de dicho producto.
Comuníquese con el Equipo de Servicio al Cliente llamando al 1-888-HD-HUSKY o visite www.huskytools.com.
HUSKYTOOLS.COM
Para obtener asistencia, llama al 1-888-HD-HUSKY.

Pre-ensamblaje
HERRAMIENTAS NECESARIAS
HARDWARE INCLUDED
SPECIFICATIONS
AA
BB
Perno M6 x 15L 6
Arandela
CC Perno M8 x 15L
16
16
AA BB CC
DD Llave de 10 MM/13 MM 1
DD
Capacidad máxima (cajón) 100 lb (45.4 kg)
Capacidad máxima (cajones hondos inferiores) 200 lb (90.7 kg)
Capacidad máxima (cubierta levadiza de madera) 300 lb (136.1 kg)
Capacidad máxima (unidad completa) 1200 lb (544.3 kg)
4
Piez Descripción Cantida
EE
EE Perno M4 x 10L 4
FF
FF Tornillo 1/4 x 3/4 2
Gafas de
seguridad
Destornillador
Phillips
NOTA: No se muestra el tamaño real de los herrajes.
NOTA: Comienza el ensamblaje del producto cerca
de la ubicación final deseada para tu banco de
trabajo móvil. Este producto es pesado y puede ser
difícil de mover después del ensamblaje.

Pre-ensamblaje (continuación)
CONTENIDO DEL PAQUETE
5
A
B
C
D
E
F
G
J
I
K
H
Piez Descripción Cantidad
A Cubierta de madera 1
B Asa lateral 1
C Gabinete con ruedas 1
D Rueda giratoria con 2
E Corredera de cajón con clasificación para 45.4 kg (el par) 12
F Cajón 10
G Rueda fija 2
H Soporte para barra multicontacto 2
I Llave (juego) 1
J Cerradura 1
K Soporte de seguridad 2
HUSKYTOOLS.COM
Para obtener asistencia, llama al 1-888-HD-HUSKY.

Ensamblaje
Cómo colocar el asa lateral
Cómo instalar las ruedas
□
6
1
2
6
CC
B
C
D
DD
BB
G
3
Cómo fijar los soportes para barra multicontacto
□
4
Cómo fijar los soportes de seguridad (opcional)
□
K
AA
FF
B
AA
H
EE
□ Fija los soportes para barra multicontacto (H) al gabinete
usando cuatro pernos (EE).
□ Aprieta todos los pernos con un destornillador.
No aprietes demasiado los pernos para evitar daños al
acabado.
□ Fija el asa lateral (B) al gabinete usando cuatro pernos.
(AA).
□ Aprieta todos los pernos con la llave de 10 mm (DD).
No aprietes demasiado los pernos para evitar daños al
acabado.
NOTA: Los orificios en el gabinete están roscados y
no necesitan tuercas.
NOTA: Los orificios en el gabinete están roscados y no
necesitan tuercas?
PRECAUCIÓN: No aprietes demasiado los tornillos.
Advertencia: Podrían necesitarse dos o más personas
para este paso debido al peso del banco de trabajo.
NOTA: Este paso es opcional. El usuario puede decidir si
instala los soportes o n o
□ Asegúrate de que todos los cajones del gabinete estén firmemente
cerrados en su lugar, usando la llave (I) y la cerradura (J) del
gabinete con ruedas ©.
□ Coloca el gabinete con ruedas (C) con su parte posterior sobre el
material de empaque para proteger el acabado.
□ Instala las dos ruedas giratorias con freno (D) en el gabinete con
ruedas (C) usando cuatro pernos (CC) y arandelas (BB) por rueda.
Las ruedas giratorias con freno (D) deben instalarse en el mismo
lado que el asa lateral (B).
□ Instala las dos ruedas fijas (G) en el gabinete con ruedas (C)
usando cuatro pernos (CC) y arandelas (BB) por rueda.
□ Aprieta todos los pernos con la llave de 13 mm (DD).
□ Coloca nuevamente el gabinete con ruedas (C) en posición
vertical.
□ Fija los soportes de seguridad (K) al gabinete con dos
pernos (AA) y dos tornillos (FF) para el otro lado de la pared.
□ Aprieta todos los pernos con un destornillador y una llave.
No aprietes demasiado los pernos para evitar daños al
acabado.

Funcionamiento
Cómo cerrar y abrir la unidad
7
2
1
I
Cómo instalar los cajones
4
Cómo quitar los cajones
3
Cómo ajustar la altura de la superficie
de trabajo de la cubierta de madera
NOTA: Cuando la cubierta de madera se está bajando, a cierta altura el
movimiento se hace más lento para evitar pellizcos en las manos. E
incluso hay un espacio cuando está completamente bajada por razones
de seguridad.
ADVERTENCIA: No hay espacio para almacenaje en la bandeja
central. Usa las bandejas frontal y posterior sólo para almacenaje. No
retires artículos de las bandejas cuando se esté elevando o bajando la
cubierta de madera.
□ Extiende completamente el cajón y vacíalo.
□ En la corredera, levanta la palanca plástica de liberación de
una corredera y empuja hacia abajo la palanca plástica de
liberación de la otra corredera.
Hala con cuidado el cajón para que las correderas puedan
pasar por encima de los topes.
IMPORTANTE: Los cajones deben estar completamente
cerrados antes de cerrar o abrir la unidad.
□ Para cerrar la unidad, inserta la llave (I) en la cerradura (J) y
gírala un cuarto de vuelta hacia la izquierda. Retira la llave.
□ Para abrir la unidad, inserta la llave (I) en la cerradura (J) y
gírala un cuarto de vuelta hacia la derecha. Retira la llave.
□ Hala las correderas y el sujetador de ellas hacia afuera
hasta que queden completamente extendidas.
□ Sostén la corredera sobre el gabinete al alinearla con la
corredera en el cajón.
□ Inserta un lado ligeramente y repite para el otro lado.
□ Empuja lentamente el cajón hasta que esté completamente
cerrado y enganche en la corredera.
□ Abre el cajón y ciérralo para verificar que funciona bien.
HUSKYTOOLS.COM
Para obtener asistencia, llama al 1-888-HD-HUSKY.
□ Conectar a la electricidad antes de realizar la operación.
□ Para elevar la superficie de trabajo, mantén oprimido el botón de elevación
hasta alcanzar la altura deseada o hasta que llegue al máximo superior.
□ Para bajar la superficie de trabajo, mantén oprimido el botón de descenso
hasta alcanzar la altura deseada o hasta que descanse sobre el gabinete
con ruedas.
□ M1 y M2 son para memorizar la altura de trabajo. Para memorizar las
alturas favoritas como M1 o M2, eleva la superficie de trabajo hasta la
altura deseada y después mantén oprimido el botón M1 o M2 durante tres
segundos hasta que las luces rojas parpadeen 3 veces.
Cuando las luces se vuelven azules, la configuración se ha completado. La
configuración puede reajustarse si el usuario lo desea.

Mantenimiento
Cómo dar mantenimiento a las ruedas
Cómo dar mantenimiento a los cajones
.
Mantenimiento y limpieza
1
2
8
□ Este producto de acero ha sido revestido con cubierta granular industrial para un acabado duradero. Para ayudar a proteger este
acabado, no permitas que productos químicos agresivos, como aceite o grasa, permanezcan sobre la superficie pulvirrevestida.
Usa un limpiador de vidrio (Windex® o producto equivalente) para limpiar y dar mantenimiento a todas las superficies
pulvirrevestidas.
□ La cubierta de madera está hecha de caucho de Pará (también denominado Rubberwood) que tiene un revestimiento de poliuretano
para ayudar a proteger la cubierta contra la humedad. Puede limpiarse con la mayoría de los limpiadores del hogar, como Windex®.
□ El mecanismo de la manivela y los ejes están lubricados de fábrica y sellados dentro de la unidad. No requieren mantenimiento
normal de lubricación. Es normal que se escuchen crujidos leves al operar la manivela.
□ Engrasa las ruedas una vez al año usando grasa de alta
calidad para cojinetes de bola.
□ Limpia periódicamente la moldura del cajón y su interior
con un detergente suave y agua.
□ Quita la grasa y el aceite con un líquido estándar para
limpiar, no inflamable.
□ Se recomienda usar revestimientos de cajones para
proteger el acabado dentro de ellos y facilitar su limpieza.
Los revestimientos de cajones pueden comprarse en The
Home Depot.
□ Lubrica las correderas de los cajones dosveces al año con
grasa o equivalente.

Piezas de repuesto
9
E
A
B
D
G
J
I
H
K
Pie Descripción Cantida
A Cubierta de madera 1
B Asa lateral 1
D Rueda giratoria con frenos 2
E
Corredera de cajón con clasificación para 45.4 kg (el par) 12
G Rueda fija 2
H Soporte para barra multicontacto 2
I Llave (juego) 1
J Cerradura 1
K Soporte de seguridad 2
HUSKYTOOLS.COM
Para obtener asistencia, llama al 1-888-HD-HUSKY.

¿Preguntas, problemas o piezas faltantes?
Antes de regresar a la tienda, llama al Servicio al Cliente de Husky
de lunes a viernes entre 8:00 a.m. y 7:00 p.m., (Hora Estándar del Este)
y los sábados entre 9:00 a.m. y 6:00 p.m. (Hora Estándar del Este)
1-888-HD-HUSKY
HUSKYTOOLS.COM
Conserva este manual para uso futuro.
Table of contents
Languages:
Other Husky Tools Storage manuals

Husky
Husky HPRO72HUTCHBLK User manual

Husky
Husky HOTC6110BB1M User manual

Husky
Husky HOME2801B12 User manual

Husky
Husky HOTC5205JX1M User manual

Husky
Husky H52MWC10BLU User manual

Husky
Husky H61CH4P User manual

Husky
Husky HOTC8422BB1M User manual

Husky
Husky H72CH9HD User manual

Husky
Husky H27CH6MS User manual

Husky
Husky HOTC4609BJ5M User manual

Husky
Husky HOTC5209B11M User manual

Husky
Husky HOTC9624BB1M User manual

Husky
Husky HPRO72MWC20BRD User manual

Husky
Husky HPRO72TLOCKERBL User manual

Husky
Husky TSA4524 User manual

Husky
Husky H46X18MWC9BLK User manual

Husky
Husky H52CH6HDV3 User manual

Husky
Husky UACT-H-360121 User manual

Husky
Husky HOTC5213B1OS User manual

Husky
Husky WSH72FWB User manual