Hytera HM652GBTV User manual

Hytera Communications Corporation Limited
HM65X Digital Mobile Radio
User Manual

Preface
Welcome to the world of Hytera and thank you for purchasing this product. This manual includes a description of
the functions and step-by-step procedures for use.
To avoid bodily injury or property loss caused by incorrect operation, please carefully read the Safety Information
Booklet before use.
This manual is applicable to the following product:
HM65X Digital Mobile Radio (X may represent 2, 5, 6, 8, or 9)

Copyright Information
Hytera is the trademark or registered trademark of Hytera Communications Corporation Limited (the Company) in the
People's Republic of China (PRC) and/or other countries or areas. The Company retains the ownership of its
trademarks and product names. All other trademarks and/or product names that may be used in this manual are
properties of their respective owners.
The product described in this manual mayinclude the Company's computer programs stored in memory or other media.
Laws in PRC and/or other countries or areas protect the exclusive rights of the Company with respect to its computer
programs. The purchase of this product shall not be deemed to grant, either directly or by implication, any rights to
the purchaser regarding the Company's computer programs. The Company's computer programs may not be copied,
modified, distributed, decompiled, or reverse-engineered in any manner without the prior written consent of the
Company.
Disclaimer
The Company endeavors to achieve the accuracy and completeness of this manual, but no warranty of accuracy or
reliability is given. All the specifications and designs are subject to change without notice due to continuous
technological development. No part of this manual may be copied, modified, translated, or distributed in any manner
without the prior written consent of the Company.
We do not guarantee, for any particular purpose, the accuracy, validity, timeliness, legitimacy or completeness of the
third-party products and contents involved in this manual.
If you have any suggestions or would like to receive more information, please visit our website at:
https://www.hytera.com.

User Manual
Contents
i
Contents
Documentation Conventions......................................................................................................................1
1. Packing List..............................................................................................................................................2
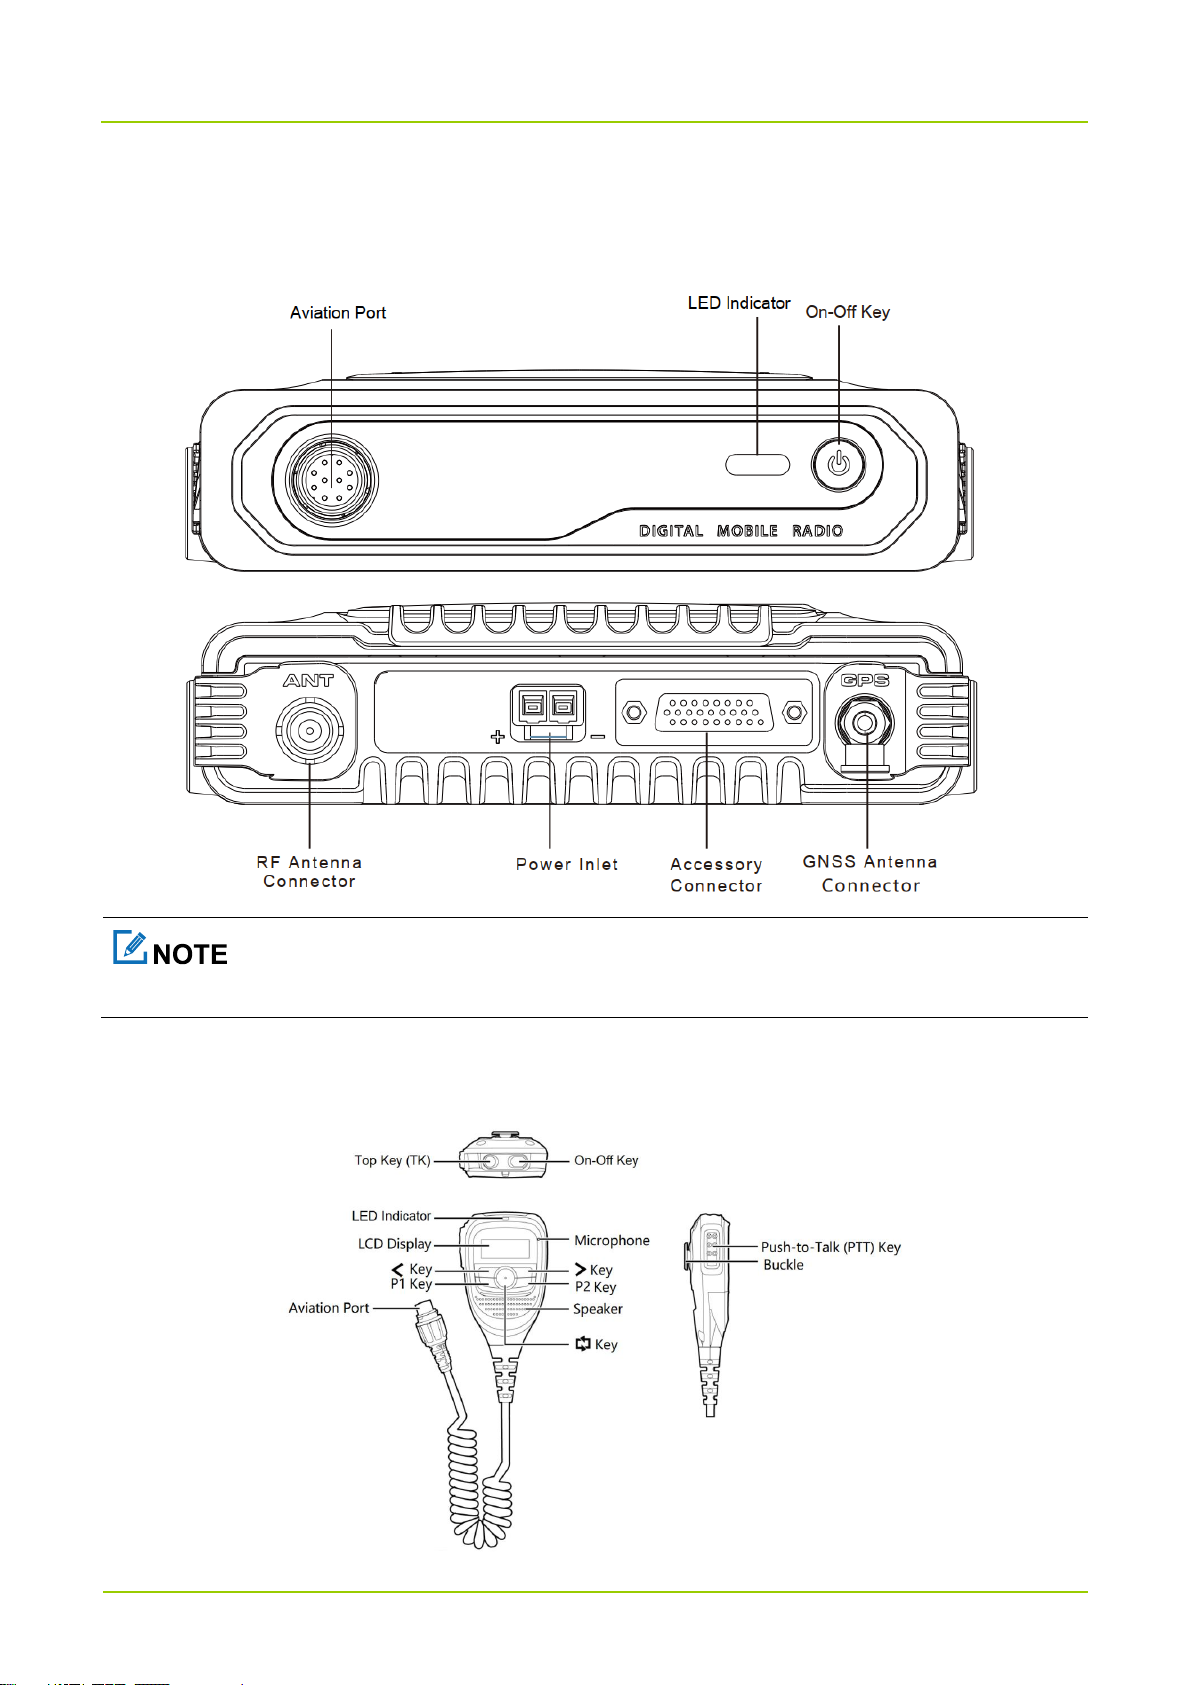
2. Product Layout......................................................................................................................................... 3
3. Installation ................................................................................................................................................4
3.1 Precautions...........................................................................................................................................4
3.2 Tools..................................................................................................................................................... 4
3.3 Parts ..................................................................................................................................................... 5
3.4 Procedure.............................................................................................................................................6
4. Basic Operations...................................................................................................................................... 7
4.1 Turn On or Off the HM65X...................................................................................................................7
4.2 Adjust the Volume ................................................................................................................................7
4.3 Switch Between Day and Night Modes................................................................................................7
4.4 Set the Backlight to Always On............................................................................................................7
4.5 Lock or Unlock the Key ........................................................................................................................7
4.6 Select the Zone .................................................................................................................................... 8
4.7 Select the Channel...............................................................................................................................8
5. Status Indications.................................................................................................................................... 9
5.1 LCD Icons.............................................................................................................................................9
5.2 LED Indicator......................................................................................................................................10
6. Call Services...........................................................................................................................................11
6.1 Calls on Digital Channel..................................................................................................................... 11
6.1.1 Make a Call .............................................................................................................................. 11
6.1.2 Answer a Call ........................................................................................................................... 11
6.1.3 End a Call................................................................................................................................. 11
6.2 Calls on Analog Channels..................................................................................................................12
6.2.1 Make a Call Without Signaling.................................................................................................12
6.2.2 Make a Call with Signaling....................................................................................................... 12
7. Basic Settings.........................................................................................................................................13
7.1 Power Level........................................................................................................................................13
7.2 Audio...................................................................................................................................................13
7.2.1 Microphone and Speaker.........................................................................................................13
7.2.2 Mic AGC ...................................................................................................................................14
7.2.3 AI-based Noise Cancellation.................................................................................................... 14
7.3 USB Path............................................................................................................................................14
7.4 Location.............................................................................................................................................. 14
7.4.1 Voice with Location ..................................................................................................................15
7.4.2 GPS Report..............................................................................................................................15

Contents
User Manual
ii
7.4.3 Quick GPS................................................................................................................................15
7.5 BT.......................................................................................................................................................15
7.5.1 Enable BT.................................................................................................................................16
7.5.2 Connect to a BT Device ........................................................................................................... 16
7.5.3 Switch the Audio Output Path ..................................................................................................16
8. Safety and Security................................................................................................................................ 17
8.1 Horn & Lights......................................................................................................................................17
8.2 Emergency .........................................................................................................................................17
8.2.1 Make an Emergency Call.........................................................................................................18
8.2.2 Answer an Emergency Call......................................................................................................18
8.2.3 End an Emergency Call ........................................................................................................... 18
8.3 Lone Worker.......................................................................................................................................18
8.4 Encryption...........................................................................................................................................19
8.5 Emergency Erase Data......................................................................................................................19
8.6 Radio Disable and Radio Enable .......................................................................................................19
9. Advanced PMR Features.......................................................................................................................20
9.1 One Touch Call................................................................................................................................... 20
9.2 Scan.................................................................................................................................................... 20
9.3 Roam..................................................................................................................................................20
9.4 Talk Around........................................................................................................................................20
9.5 Squelch Level.....................................................................................................................................21
9.6 Clarity Transmission...........................................................................................................................21
9.7 Priority Interrupt.................................................................................................................................. 21
9.8 Ignition Sense.....................................................................................................................................21
9.9 Public Address....................................................................................................................................22
9.10 XPT...................................................................................................................................................22
10. Troubleshooting...................................................................................................................................23
11. Care and Cleaning................................................................................................................................ 25
11.1 Product Care ....................................................................................................................................25
11.2 Product Cleaning..............................................................................................................................25
12. Optional Accessories .......................................................................................................................... 26
13. Abbreviations .......................................................................................................................................27

User Manual
Documentation Conventions
1
Documentation Conventions
Icon Conventions
Icon
Description
Indicates references that can further describe the related topics.
Indicates situations that could cause data loss or equipment damage.
Indicates situations that could cause major personal injury or even death.
Notation Conventions
Item
Description
Example
Boldface
Denotes menus, tabs, parameter names,
window names, dialogue names, and
hardware buttons.
To save the configuration, click Apply.
The Log Level Settings dialogue box appears.
Press the PTT key.
" "
Denotes messages, directories, file names,
folder names, and parameter values.
The screen displays "Invalid Battery!".
Open "PSS.exe".
Go to "D:/opt/local".
In the Port text box, enter "22".
>
Directs you to access a multi-level menu.
Go to File > New.
Italic
Denotes document titles.
For details about using the DWS, refer to
Dispatch Workstation User Guide.
Courier New
Denotes commands and their execution
results.
To set the IP address, run the following
command:
vos-cmd - m name IP

Packing List
User Manual
2
1. Packing List
Unpack carefully and check that you have received the following items. If any item is missing or damaged, contact
your dealer.
Item
Quantity (PCS)
Item
Quantity (PCS)
HM65X
1
Power Cord (with fuse)
1
Mounting Bracket
1
Self-tapping Screw (4.8 mm x 20 mm)
4
Locking Knobs
2
Self-tapping Screw (4 mm x 16 mm)
3
Palm Microphone
1
Documentation Kit
1
Microphone Hanger
1
/
/
Figures in this manual are only for reference.
Check whether the frequency band marked on the antenna label matches that on the HM65X label. If not,
contact your dealer.

User Manual
Product Layout
3
2. Product Layout
HM65X
The GNSS antenna is available only for the HM65X with the Location feature.
Palm Microphone
You can request your dealer to program the Top Key (TK), P1 key, and P2 key as shortcuts to assignable features.

Installation
User Manual
4
3. Installation
3.1 Precautions
Before installation, read the following guidelines carefully:
Before installation, ensure that the vehicle power supply has a negative ground with the voltage of 13.6±15% V.
Before installation, measure the length of screws protruding from the HM65X surface. During installation, drill
the holes on the vehicle according to the screw length to avoid damaging the vehicle wires or other components.
Use the antenna and power cord approved by the Company.
Use the mounting bracket approved by the Company. Otherwise, the accidental drop of the HM65X may injure
people in the vehicle.
Install the HM65X at a position where you can easily reach the front panel.
To facilitate wiring, keep sufficient space at the back of the HM65X.
When replacing the fuse for the DC power cord, ensure the new fuse shares the same specification with the old
one.
If any other communication devices such as repeaters are near the HM65X, keep the antenna of these devices at
least 10 meters away from that of the HM65X.
3.2 Tools
electric drill
Phillips screwdriver
T20 torx screwdriver

User Manual
Installation
5
3.3 Parts
No.
Part Name
No.
Part Name
1
HM65X
6
Self-tapping Screw (4 mm x 16 mm)
2
Locking Knobs
7
Microphone Hanger
3
Mounting Bracket
8
GNSS Antenna
4
Self-tapping Screw (4.8 mm x 20 mm)
9
Power Cord (with fuse)
5
Palm Microphone
10
RF Antenna
The RF antenna is optional.
The GNSS antenna is available only for the HM65X with the Location feature.

Installation
User Manual
6
3.4 Procedure
Install the HM65X.
a. Select a location on the vehicle.
b. Hold the mounting bracket to the location, and then mark the mounting holes.
c. Drill holes at the marks.
d. Use the screws (4.8 mm x 20 mm) to secure the mounting bracket.
e. Connect the RF antenna, GNSS antenna, and power cord to the HM65X.
f. Slide the HM65X into the mounting bracket, and then fasten the locking knobs.
Install the Palm Microphone.
a. Select a location on the vehicle where you can reach the Palm Microphone easily.
b. Hold the microphone hanger to the location, and then mark the mounting holes.
c. Drill holes at the marks.
d. Use the screws (4 mm x 16 mm) to secure the microphone hanger.
e. Align the triangle index on the Palm Microphone with the installation index on the HM65X.
f. Plug the aviation connector on the Palm Microphone into the aviation port on the HM65X, and then rotate
the connector clockwise to secure it.
g. Place the Palm Microphone on the hanger.

User Manual
Basic Operations
7
4. Basic Operations
4.1 Turn On or Off the HM65X
On the HM65X or the Palm Microphone, long press the On-Off key.
Upon connection to the power supply, the HM65X automatically turns on.
4.2 Adjust the Volume
You can adjust the volume through the Palm Microphone.
On the home screen, press the key to decrease the volume or the key to increase the volume.
Press the key to locate the cursor to , and then press the or key.
4.3 Switch Between Day and Night Modes
You can set the LCD display on the Palm Microphone to day or night mode.
On home screen, press the key to locate the cursor to Day Mode or Night Mode.
Press the key or the key to switch.
4.4 Set the Backlight to Always On
To facilitate operations on the Palm Microphone in low light conditions, you can set the backlight to be always on.
On home screen, press the key and key simultaneously.
Press the to locate the cursor to Lock Backlight or Unlock Backlight.
Press the key to select Lock Backlight.
Press the key to confirm.
4.5 Lock or Unlock the Key
To avoid misoperations, you can lock the key on the Palm Microphone.
On home screen, press the key and key simultaneously.
Press the key to select Lock or Unlock .
Press key to confirm.

Basic Operations
User Manual
8
4.6 Select the Zone
You can select a zone through the Palm Microphone.
On the home screen, press key to locate the cursor to the zone No., and then press the or key.
Press the preprogrammed Zone Up or Zone Down key.
4.7 Select the Channel
You can select a channel through the Palm Microphone. By default, you can switch to a channel only in the current
zone. Only with Cross-Zone Switch enabled, you can switch to a channel in another zone.
On the home screen, press key to locate the cursor to the channel No., and then press the or key.
Press the preprogrammed Channel Up or Channel Down key.
To direct to the preset channel, press the preprogrammed Preset Channel key.

User Manual
Status Indications
9
5. Status Indications
5.1 LCD Icons
You can learn about the operating status through the LCD display on the Palm Microphone.
Icon
Description
The HM65X detects no signal.
More bars indicate stronger signal.
The HM65X operates in low power mode.
The HM65X operates in high power mode.
An accessory is connected.
The Location feature is enabled, and valid positioning data has been received.
The Location feature is enabled, but no valid positioning data has been received.
The HM65X is scanning.
The HM65X stays on an active non-priority channel.
The HM65X stays on active Priority Channel 1.
The HM65X stays on active Priority Channel 2.
The HM65X stays on a site.
The HM65X is roaming.
The HM65X is in emergency mode.
The Scrambler or Encryption feature is enabled.
The HM65X is on a private call.
/
The HM65X is making or receiving a private call.
The HM65X is on a group call.
/
The HM65X is making or receiving a group call.
The HM65X is on an emergency group call.
/
The HM65X is making or receiving an emergency group call.

Status Indications
User Manual
10
Icon
Description
The HM65X is on an all call.
/
The HM65X is making or receiving an all call.
5.2 LED Indicator
You can learn about the operating status through the LED indicators on the HM65X and the Palm Microphone.
LED Indicator
Radio Status
Flashes green
The HM65X is being turned on.
Glows green
The HM65X is receiving.
Glows red
The HM65X is transmitting.
Flashes orange slowly
The HM65X is scanning or roaming.
Flashes orange rapidly
The HM65X is in emergency mode.
Glows orange
Call hang time: No voice is being transmitted or received during a call.
Within such a period, you can press and hold the PTT key and speak.
Flashes blue
Every 3s
The BT feature is enabled, but no BT device is connected.
Every 1.5s
A BT device is connected.
Every 0.1s
The BT feature is being disabled.
BT status is indicated only through the LED indicator on the HM65X.

User Manual
Call Services
11
6. Call Services
To ensure optimal voice quality on the receiving radio, keep the microphone 2.5 cm to 5 cm away from your mouth
during speaking.
6.1 Calls on Digital Channel
On the digital channel, you can make the following calls to the preset contacts.
Call Type
Description
Group Call
A call from an individual user in a group to all the other members in the group.
Private Call
A call from an individual user to another individual user.
All Call
A call from an individual user to all the other users on the current digital channel.
6.1.1 Make a Call
To make a call to the preset contact on a channel, do as follows:
a. Select a digital channel according to 4.7 Select the Channel.
b. Press and hold the PTT key.
To make a call to the preprogrammed contact, do as follows:
a. Press the preprogrammed One Touch Call key.
b. Press and hold the PTT key.
6.1.2 Answer a Call
You can answer a call without any operation.
6.1.3 End a Call
Automatic
The private call or group call ends when the call hang time expires.
Manual
The all call ends when the caller releases the PTT key.

Call Services
User Manual
12
6.2 Calls on Analog Channels
6.2.1 Make a Call Without Signaling
On an analog channel without signaling, you can make a call to all the other users on the channel.
Select an analog channel according to 4.7 Select the Channel.
Press and hold the PTT key.
6.2.2 Make a Call with Signaling
On an analog channel with signaling, you can initiate a call to a specific contact on the channel.
To configure the signaling, contact your dealer.
HDC1200 (compatible with MDC1200) and two-tone signaling are available.
The method to make a call with signaling is the same, regardless of signaling types.
Select an analog channel according to 4.7 Select the Channel.
Press and hold the PTT key or the preprogrammed One Touch Call key.

User Manual
Basic Settings
13
7. Basic Settings
7.1 Power Level
To adjust the power level to high or low, press the preprogrammed Power Level Adjust key.
7.2 Audio
7.2.1 Microphone and Speaker
The HM65X features no microphone or speaker, so you need to connect an audio accessory to the HM65X.
You can switch the audio modes of the microphone and speaker only when you connect the following accessories to
the HM65X simultaneously:
Palm Microphone (connected to the aviation port)
Optional audio accessory (connected to the accessory connector)
Microphone
Option
Description
Operation
Follow PTT
When you transmit voice through the PTT key on the Palm
Microphone, the HM65X uses the microphone on the Palm
Microphone.
When you transmit voice through the optional audio accessory, the
HM65X uses the microphone on the optional audio accessory.
Press the
preprogrammed Mic
Set Switch key.
Only Internal
The HM65X uses only the microphone on the Palm Microphone.
Only External
The HM65X uses only the microphone on the optional audio accessory.
Speaker
Option
Description
Operation
Only Internal
The HM65X uses only the speaker on the Palm Microphone.
Press the
preprogrammed SPK
Set Switch key.
Only External
The HM65X uses only the speaker on the optional audio accessory.
External First
When the optional audio accessory is connected, the HM65X uses the
speaker on the optional audio accessory. Otherwise, the HM65X uses
the speaker on the Palm Microphone.

Basic Settings
User Manual
14
7.2.2 Mic AGC
Mic AGC allows the transmitting HM65X to control the voice output gain within a proper range during transmission,
so as to provide improved voice with proper volume for the receiving party. This feature ensures stable voice even in
noisy environment.
To enable Mic AGC, contact your dealer.
7.2.3 AI-based Noise Cancellation
AI-based Noise Cancellation allows the HM65X to automatically cancel out ambient noise when receiving or
transmitting voice. This feature enhances the voice clarity.
To enable or disable AI-based Noise Cancellation, press the preprogrammed AI-based Noise Cancellation key.
To configure AI-based Noise Cancellation, contact your dealer.
7.3 USB Path
You can select a USB path for communication between the HM65X and peripheral devices. For details, see the
following table:
Option
Description
Operation
Rear Port First
When both aviation port and accessory connector are connected to
peripheral devices, the accessory connector is used as the USB path.
To switch the USB path,
press the preprogrammed
USB Path Switch key.
Only Front Port
Only the aviation port can be used as the USB path.
Only Rear Port
Only the accessory connector can be used as the USB path.
7.4 Location
Location allows you to collect the position information of the HM65X through satellites.
The Location feature is available only for the HM65X with GPS, BDS, or GLONASS.
To enable Location, contact your dealer.

User Manual
Basic Settings
15
7.4.1 Voice with Location
Voice with Location allows the HM65X to report its position information when making a private call, a group call, or
an emergency call.
To send voice with location, press the PTT key.
To enable Voice with Location, contact your dealer.
You can ask your dealer to set the HM65X to send the position information only once or periodically in a
preset interval.
7.4.2 GPS Report
GPS Report allows the HM65X to report its position information to the control center.
Manual
Press the preprogrammed GPS Report key
Automatic
To make the HM65X automatically report location, contact your dealer. The trigger conditions can be set to power-
on, power-off, interval time, or distance.
7.4.3 Quick GPS
Based on GPS standard time, Quick GPS divides the GPS upload time into several equal-length time slices. These
time slices are assigned to the HM65X with different configurations for periodic upload and single upload. Each
HM65X uses the same GPS upload time length to upload GPS data, improving upload efficiency and reliability.
If your dealer configures Quick GPS to a digital channel, the channel will report the quick GPS data only.
7.5 BT
It is recommended that you use the BT device approved by the Company.
If the BT earpiece of other makes is used, use it with the BT Ring PTT produced by the Company. Otherwise,
the earpiece cannot transmit the voice.
To enable BT, contact your dealer.
BT is a wireless technology that supports short-distance communications and data exchange between devices. You
can connect the HM65X to a BT device through the built-in BT module.
This manual suits for next models
7
Table of contents
Other Hytera Radio manuals

Hytera
Hytera TM-600 User manual

Hytera
Hytera PDC7 Series User manual

Hytera
Hytera PD66Xi Um Series User manual

Hytera
Hytera MD61X User manual

Hytera
Hytera MD65X User manual

Hytera
Hytera PDC760 User manual

Hytera
Hytera PD3 Series Installation and operation manual

Hytera
Hytera PTC760 User manual

Hytera
Hytera HP56 Series User manual

Hytera
Hytera DMR User manual

Hytera
Hytera TC-500 User manual

Hytera
Hytera PTC680FXB1 User manual

Hytera
Hytera HM65X User manual

Hytera
Hytera PD752i User manual

Hytera
Hytera PNC380S User manual

Hytera
Hytera PD605 User manual

Hytera
Hytera MNC360 User manual

Hytera
Hytera HM682 User manual

Hytera
Hytera HP6 0X User manual

Hytera
Hytera MD62 Series User manual