iPECS LIP-7016D User manual

LIP-7016D
&
7024D
Users Guide

LIP-7016D/7024D User Guide
TABLE OF CONTENTS
1. INTRODUCTION............................................................................................1
1.1 General.............................................................................................. 1
1.2 Feature Information........................................................................... 1
1.3 Feature Groupings ............................................................................ 1
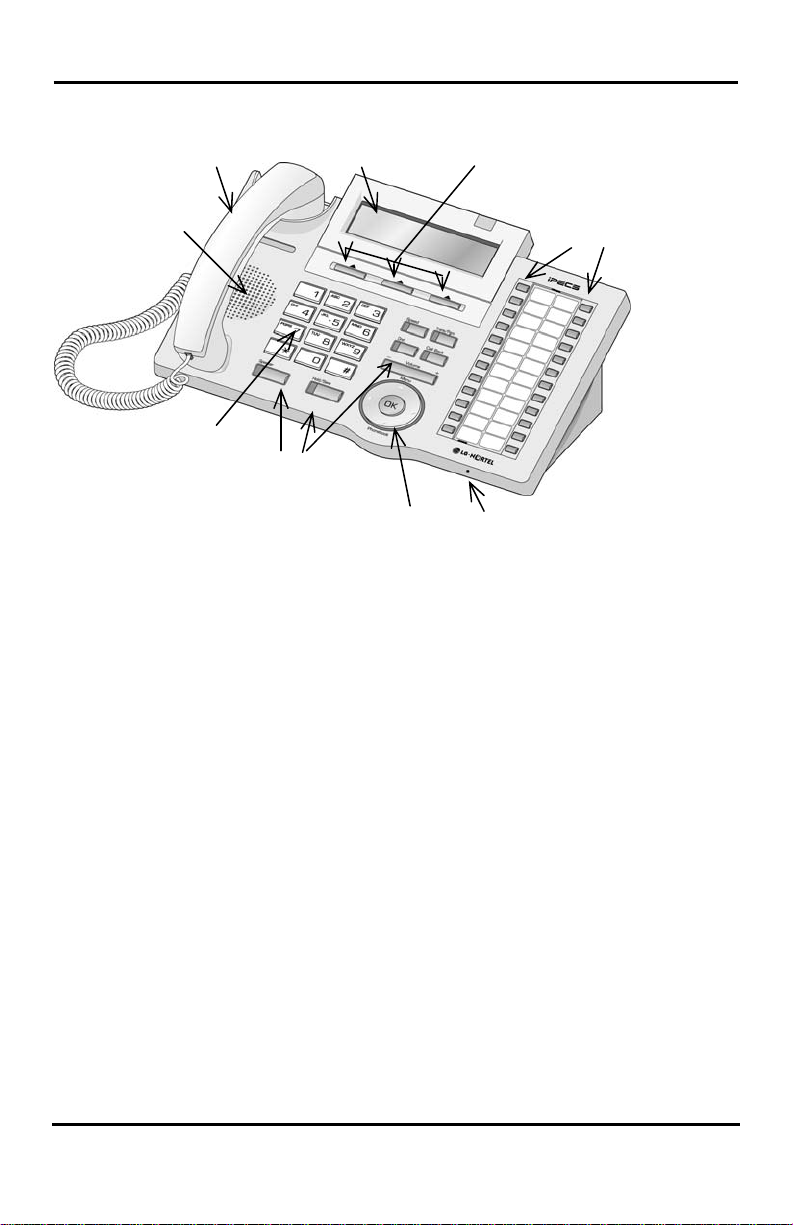
1.4 iPECS LIP-7016D & 7024D Phone Description................................ 2
1.5 LCD Operation .................................................................................. 5
1.6 Using the Speakerphone................................................................... 5
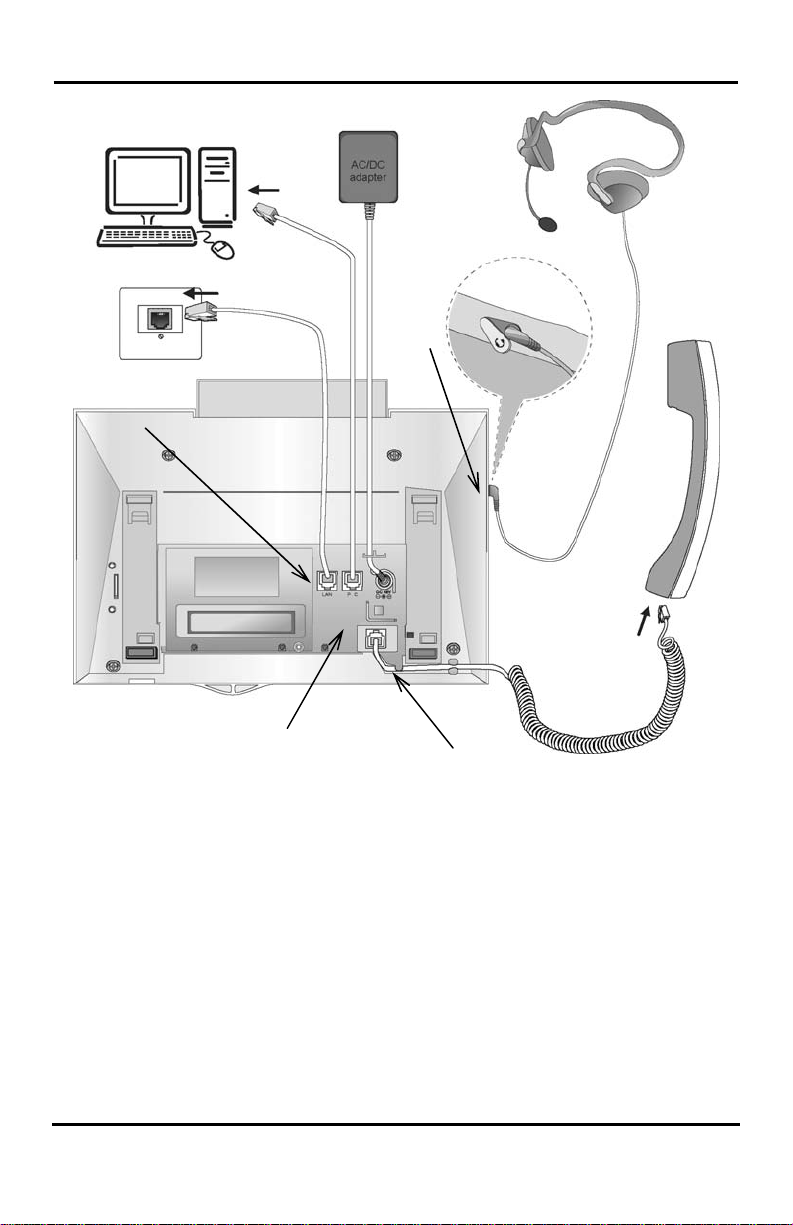
1.7 Using a Bluetooth Wireless Headset................................................. 6
2. RECEIVING CALLS .......................................................................................7
2.1 Answering a Call While Idle .............................................................. 7
2.2 Responding to a Call While Busy...................................................... 8
2.3 Using Answering Machine Emulation (AME) .................................... 8
2.4 Differential Ring Signals.................................................................... 9
2.5 Answering Calls at Night ................................................................. 10
2.6 Answering Calls to Other Stations .................................................. 10
2.7 Using Do-Not-Disturb (DND) to Block Incoming Calls .................... 10
2.8 Forwarding Calls ............................................................................. 11
2.8.1 Forwarding calls to another Station or Voice Mail ................ 11
2.8.2 Forwarding calls to an external number................................ 12
2.8.3 Forwarding callers to a Text Message.................................. 14
3. PLACING A CALL .......................................................................................15
3.1 Internal Calls ................................................................................... 15
3.1.1 Placing Intercom calls ........................................................... 15
3.1.2 Using Camp-On when calling a busy station ........................ 15
3.1.3 Leaving a Message Wait....................................................... 16
3.2 External Calls .................................................................................. 16
3.2.1 Placing external CO/VoIP calls............................................. 16
3.2.2 Waiting for the next available CO/IP line .............................. 17
3.2.3 Account Codes: Tracking External calls for billing................ 17
3.2.4 Disable dialing from your phone ........................................... 18
3.2.5 Temporarily override dialing restrictions at a phone............. 18
3.3 Using Automated Dialing................................................................. 19
3.3.1 Using Last Number Redial (LNR) ......................................... 19
3.3.2 Using and Entering Save Number Dial ................................. 19
3.3.3 Using System Speed Dial Numbers...................................... 19
3.3.4 Using and Entering Station Speed Dial Numbers................. 20
3.3.5 Using Dial by Name and Entering your Name ...................... 21
3.3.6 ACNR: To retry a busy external number until answered ...... 22
4. TRANSFER,CONFERENCE &OTHER CALL HANDLING.................................23
i

LIP-7016D/7024D User Guide
4.1 Call Transfer: Sending a call to a different destination ................... 23
4.2 Call Hold: Placing a call in a waiting state ...................................... 23
4.3 Broker Call: Switching between two calls........................................ 24
4.4 Joining Multiple People in a Conference......................................... 24
4.4.1 Setting up a Conference Room............................................. 25
4.5 Call Park: Placing a call on Hold to Page ....................................... 25
4.6 Two-Way Record: Recording a call................................................. 26
5. GET YOUR MESSAGES &SEND SMS.........................................................27
5.1 Responding to a Station Message Waiting Indication..................... 27
5.2 Responding to a CLI Message indication ....................................... 28
5.3 Getting Voice Mail Messages.......................................................... 28
5.4 Sending and Receiving Short Text Messages ................................ 29
6. REMOTE SYSTEM ACCESS.........................................................................31
6.1 Direct Inward System Access (DISA).............................................. 31
6.2 Mobile Phone Extension ................................................................. 31
7. MISCELLANEOUS FEATURES......................................................................33
7.1 Call Log ........................................................................................... 33
7.2 Background Music and Music on Hold............................................ 34
7.3 Using Internal, External and Meet-Me Paging ................................ 34
7.4 Push-To-Talk (PTT) Page ............................................................... 35
7.5 Wake-Up Alarm ............................................................................... 35
7.6 Alarm/Door Bell ............................................................................... 36
7.7 Power Fail Transfer......................................................................... 36
7.8 System Voice Memo ....................................................................... 37
7.9 Hot Desk.......................................................................................... 38
8. WORKING WITH PBX, CENTREX &ISDN FEATURES ...................................39
8.1 Access PBX or Centrex features..................................................... 39
8.2 Access the ISDN Network ............................................................... 39
8.2.1 Using the Keypad facility to access ISDN features............... 39
8.2.2 Using ISDN Supplementary Services ................................... 40
8.2.3 Activating ISDN Caller ID Restriction.................................... 40
9. SETTING FEATURES &FLEX BUTTONS .......................................................41
9.1 Entering Station Program Data ....................................................... 41
9.2 Assigning Features to Flex Buttons ................................................ 41
10. APPENDIX AFLEXIBLE NUMBERING PLAN.................................................42
11. APPENDIX BUSER PROGRAM CODES .......................................................45
ii

LIP-7016D/7024D User Guide
1. Introduction
1.1 General
Your telephone is connected to an advanced-technology, highly-versatile,
fully-featured telecom system designed to make office communications
easy and productive. Employing state-of-the-art Voice over Internet
Protocol (VoIP) technology, voice and data converge on a single IP
packet network. Because each iPECS Phone is an IP appliance, it can
be moved easily throughout the office LAN and maintain normal
operation.
1.2 Feature Information
We have taken every effort to make this user guide simple and
straightforward. The guide starts with the simpler operations of the
iPECS Phone Speakerphone, moves on to receiving and placing calls,
and then to more advanced features. Each section includes a brief and
basic description of each feature and step-by-step operations.
The operations shown in this guide use the system’s base default
Numbering Plan. Your Numbering Plan may be different. Some
features may not be available for you to access or may be subject to
certain limitations based on the set-up of the system.
Under certain operation conditions this equipment cannot be relied upon
to make emergency calls. Alternative arrangements should be made for
access to the emergency services.
1.3 Feature Groupings
Every effort has been taken to divide the features into a logical and
consistent sequence so that features can be quickly located.
Features have been divided into groups, Receiving Calls, Placing Calls
etc. Within each group, features are arranged according to the difficulty
of operation and frequency of use.
1

LIP-7016D/7024D User Guide
1.4 iPECS LIP-7016D & 7024D Phone Description
The iPECS LIP-7016D and LIP-7024D Phones incorporate the latest in
VoIP technology and user interface to provide you with a cost effective,
simple to use, productive communications tool. It includes a large 3-line
24-character per line LCD. The bottom line of the display is an
interactive menu accessed with the 3 Soft buttons just below the display.
The Navigation button in the lower center of the Phone allows you to
move through the menu choices when more than three selections are
available.
Features and functions of your iPECS are accessed either using the
Fixed or Flexible buttons or by selecting a menu item using the Soft
buttons. In the remainder of this User Guide, the Fixed or Flexible
buttons are shown with a box surrounding the BUTTON designation while
Soft button menu selections are shown with a double underline.
iPECS LIP-7016D
iPECS LIP-7024D
2

LIP-7016D/7024D User Guide
3
Interactive
LCD
Handset
Flex buttons
3 Soft buttons
Navigation
button
Microphone
S
p
eake
r
Fixed Feature buttons:
Speaker
Hold/Save
Speed
Trans/Pgm
DND
Call Back
Volume
Dial pad
iPECS LIP-7016D/7024D Diagram

LIP-7016D/7024D User Guide
iPECS Phone
headset
j
ack
iPECS Phone
LAN connection
iPECS Phone to
PC connection
iPECS Phone
handset connection
iPECS LIP-7016D/7024D Connections
iPECS Phone LCD, Speakerphone & Related Features
4

LIP-7016D/7024D User Guide
1.5 LCD Operation
The Liquid Crystal Display (LCD) of the iPECS LIP-7016D and LIP-
7024D has three lines of 24 characters each. The LCD is used to
convey information to you. It provides the date, time and station number
on the display while idle. It will also provide called/calling name/number
display, feature status and an interactive menu to guide you through
feature access and User Program selections.
1.6 Using the Speakerphone
Activate the iPECS Speakerphone at any time (except for Paging) in
place of lifting the handset to receive or place calls. Place calls using
On-hook dialing with the Speakerphone.
In addition, you may switch between the handset and Speakerphone
during a call. By keeping the handset Off-hook, the Group Listen
feature is activated, which provides incoming audio over the speaker
with outgoing audio from the handset. This permits a local ‘group’ to
listen to both sides of the conversation without interfering with the
conversation.
While in a conversation using the Speakerphone, Mute the microphone
using the Mute Soft button. When Mute is active, the Mute Soft button
toggles to Speak, which is used to turn off Mute.
With Auto Speaker Select, activating or accessing a feature by pressing
its button will activate the Speakerphone automatically.
When using a Headset, the SPEAKER button controls the ON/OFF-hook
state for the phone.
OPERATION
To activate the Speakerphone to answer or place a call:
•Press SPEAKER, the phone goes off-hook with audio from the
speaker and to microphone.
To control the volume of the Speakerphone or handset:
•Press the ▼VOLUME ▲button.
To Mute the microphone:
•Select the Mute Soft button.
To turn off Mute (turn the microphone ON):
•Press the Speak Soft button.
To activate Group Listen while on an active handset call:
•Press the SPEAKER button.
5

LIP-7016D/7024D User Guide
1.7 Using a Bluetooth Wireless Headset
The iPECS LIP-7024D may be equipped with the BTU (Bluetooth Unit)
option that lets you use a Wireless headset such as a Jabra BT-200, BT-
250 or Plantronics M3000. Using a headset permits you to move freely
around the phone within approximately 10 meters and maintain a
conversation. Before using the headset, the headset must be “paired”
with the BTU, and then the headset must be enabled for use. Operation
of the iPECS LIP-7024D with the headset is the same as with the
Speakerphone; merely use the Speaker button to go ON and OFF-hook.
NOTE—during the pairing operation, the headset and phone should
be as close as possible but not more than 1 meter apart.
OPERATION
To pair the wireless headset to the BTU:
•Press the TRANS/PGM button,
•Dial 3,
•Press the HOLD/SAVE button.
To enable/disable the wireless headset:
•Press the TRANS/PGM button,
•Dial 4,
•Press the HOLD/SAVE button.
To unpair the headset:
•Press the TRANS/PGM button,
•Dial 3,
•Press the HOLD/SAVE button.
6

LIP-7016D/7024D User Guide
2. Receiving calls
2.1 Answering a Call While Idle
There are 3 basic types of incoming calls; internal/external ringing calls,
Intercom Voice Announce calls, and Hold recalls.
Your phone may be assigned Ringing Line Preference; calls that ring
are answered by lifting the handset. Otherwise, you must press the
flashing Flex button.
External calls to an iPECS Phone will appear under the CO/IP line or a
LOOP button
External calls are from CO lines or VoIP channels that are programmed
to ring at your phone. For external calls, Delay Ring may be assigned
allowing others to answer the call before the call rings at your phone.
Calls can be forwarded in some manner from another user; if providing
call coverage for other users, you may also receive Station Call
Coverage calls.
Calls placed on Hold, including Transfers, parked calls, etc. will recall if
left on hold for too long.
ICM Voice Announce calls are answered based on the ICM Signaling
mode at the receiving phone; in Hands-free (HF) mode, after the splash
tone and announcement, speak normally into the microphone. In the
Privacy (PV) mode, lift the handset to respond. The ICM Signaling
mode can be assigned in Station Programming.
The LCD will display the calling number or, if available, the name of the
station or CO/VoIP line, CO Line Name Display.
OPERATION
To answer a call ringing at your phone:
•Lift the handset and press the flashing Flex button (as needed), the
call will be connected.
To respond to an Intercom Voice Announce call:
•In HF mode signaling, simply speak as normal into the microphone,
OR
•In PV mode signaling, lift the handset to respond.
7

LIP-7016D/7024D User Guide
2.2 Responding to a Call While Busy
While you are busy on another call, you may receive Muted Ring, Camp-
On tones, or Voice-Over announcements. Muted Ring is provided over
the speaker of your Phone indicating a Call Waiting. You also may
receive Camp On tones, a burst of tones on top of the existing call, as
an indication of another call waiting.
While busy, certain stations can activate Voice-Over to your phone. In
this case, audio is received from both the active call and the Voice Over
announcement at the same time.
Respond to any of these Off-hook Signals in one of several ways; place
the existing call on Hold and respond to the new incoming call, activate
One-time DND,send a Silent Text Message, or ignore the new call.
Silent Text Message requires a TEXT MESSAGE button, and cannot be
sent to a SLT or other non-display terminal.
The Attendant or Secretary may use Intrusion to announce a call while
you are busy.
OPERATION
To answer a Call Waiting:
•Press HOLD/SAVE and/or,
•Press the flashing CO/IP LINE button.
To activate One-time DND:
•Press the DND button.
To send a Silent Text Message:
•Press the programmed TEXT MESSAGE button,
•Select the desired message to send.
2.3 Using Answering Machine Emulation (AME)
When a call is connected to your voice mail, you can screen the call as
with a normal Answering Machine. The caller’s voice is played over your
speaker while the message is being recorded. There are two methods of
notification and call screening provided, Ring or Speaker mode.
Ring mode—the AME (Answering Machine Emulation) Flex button will
flash to notify you of a call. You may press the Flex button to hear the
caller as the voice message is stored.
Speaker mode—when the call is sent to the voice mailbox, the caller’s
voice is automatically broadcast over the speaker of your iPECS Phone.
You may terminate screening, leaving the caller in voice mail to record a
message, talk with the caller and record the conversation in the mailbox,
or answer the call and disconnect the Voicemail. The AME feature is
only available when using the iPECS VMIM/VSF Voice Mail; a MUTE and
AME button are required.
8

LIP-7016D/7024D User Guide
OPERATION
To assign an AME button:
Ring Mode –
•TRANS/PGM + FLEX + 564 + 0 + HOLD/SAVE
Speaker Mode –
•TRANS/PGM + FLEX + 564 + 1 + HOLD/SAVE
To screen a call in Ring mode:
•Press the flashing AME button, the caller’s voice is broadcast over
the station speaker and stored in the voice mailbox (in the Speaker
mode, broadcast is automatic).
To stop the voice broadcast and leave the caller in Voice Mail:
•Press the illuminated SPEAKER button.
To talk with the caller and record the conversation in Voice Mail:
•Press the MUTE button.
To answer the call and cancel the voice message recording:
•Press the illuminated AME button, the caller is connected and the
Voice Mail disconnected.
2.4 Differential Ring Signals
When multiple phones in a small area ring, it can be difficult to tell which
are ringing. The iPECS Phone has 14 Ring Tones available for
differentiating ring from one phone to another. Four of the tones are
stored in the phone’s permanent memory; the remaining ten tones are in
the system’s memory. Four of these ten can be downloaded into the
phone memory for use as the 5th to 8th Ring Tone.
OPERATION
To download a Ring Tone from System memory:
•Press TRANS/PGM,
•Dial 1 for Ring Tones,
•Dial 5 for Ring Tone download,
•Dial the phone’s memory location to receive the tone (5-8),
•Dial tone number 0-9, tone is heard,
•Press HOLD/SAVE to download.
To select a Ring Tone from phone memory:
•Press the TRANS/PGM button,
•Dial 1 for Ring Tones,
•Dial 1 or 2 for Internal or External ring,
•Dial tone number 1-8,
•Press HOLD/SAVE to make the selection.
9

LIP-7016D/7024D User Guide
2.5 Answering Calls at Night
In the Night mode, Loud Bell Control may be used to send ring signals
to external bells. You may answer these calls with Universal Night
Answer (UNA).
OPERATION
To answer a call ringing during night mode over an external bell:
•Lift the handset,
•Dial 567 (UNA code).
2.6 Answering Calls to Other Stations
When nearby stations are ringing, you may pick-up (answer) the call.
Select to answer a call ringing at a specific station (Directed Call Pick-
Up) or you may choose to answer the oldest call ringing to your station
group (Group Call Pick-Up). Assign a Flex button with the Group Call
Pick-Up code (566) for one-touch access.
NOTE—Pick-Up will not answer calls on the ringing station’s
Private Line unless the line appears on your phone.
OPERATION
To answer a call ringing at another station:
•Lift the handset,
•Dial 7 (Directed Call Pick-Up code),
•Dial the Intercom Number of the ringing station; the call will be
connected.
To answer a call ringing at a station in your group:
•Lift the handset,
•Dial 566 (Group Call Pick-Up code), the call is connected.
2.7 Using Do-Not-Disturb (DND) to Block Incoming Calls
When you need quiet, activate Do-Not-Disturb and the phone will block
incoming calls. Internal callers will receive a fast busy tone and the
display will show the DND status. Activate Do-Not-Disturb while busy
(One-Time DND); DND will be active only for the duration of the present
call and requires a DND button.
When an Executive activates DND, calls are forwarded to the paired
Secretary automatically.
The Attendants and Secretary may be able to activate DND Override
and Intrude on an active call. The Attendants may also cancel DND at
other stations.
10

LIP-7016D/7024D User Guide
OPERATION
To toggle DND ON and OFF:
•Press the DND button.
2.8 Forwarding Calls
2.8.1 Forwarding calls to another Station or Voice Mail
Incoming calls may be diverted to other resources of the system.
Resources include other stations, VMIM/VSF Voice Mail and External
Voice Mail. Your LCD and the LCD of the forward receiver will both
indicate the forward status.
Call Forward can be activated from your phone or from a different station
(Call Forward, Remote). You may define the conditions or ‘type of
forward’ as below:
1: Unconditional—all calls to the station, except recalls, are
forwarded.
2: Busy—Immediately forwards all calls, except recalls, when the
station is busy.
3: No Answer—forwards all calls to the station, except recalls, when
the station does not answer within the No Answer timer.
4: Busy/No Answer—forwards calls if the station is busy or does not
answer within the No Answer timer.
When you forward calls from a different station, you may need to enter
your Authorization Code.
Calls on a Private Line will not forward except to a station with an
appearance of the Private Line or to Voice Mail.
OPERATION
To activate Call Forward from your phone to another phone or internal
system resource:
•Lift the handset,
•Press the Fwd Soft button,
•Dial the type of forward code 1-4,
•Dial the destination number.
To deactivate Call Forward from your phone:
•Press the Fwd Soft button.
11

LIP-7016D/7024D User Guide
To activate Call Forward for your phone from a different phone (Call
Forward, Remote):
•Lift the handset,
•Press the Fwd Soft button,
•Dial 0 (Remote Call Forward code),
•Dial your Authorization code (Station number & Password),
•Dial the ‘type of forward’ code 1-4,
•Dial the destination number.
To deactivate Call Forward, Remote:
•Lift the handset,
•Press the Fwd Soft button,
•Dial 0 (Remote Call Forward code),
•Dial your Authorization code (Station number & Password),
•Press the # key.
2.8.2 Forwarding calls to an external number
Forward calls to an external destination; calls can be forwarded from an
internal station or a remote location. You may define the conditions or
‘type of forward’ as listed below:
1: Unconditional—all calls to the station, except recalls, are
forwarded.
2: Busy—Immediately forwards all calls to the station, except recalls,
when station is busy.
3: No Answer—forwards all calls to the station, except recalls, when
the station does not answer within the No Answer timer.
4: Busy/No Answer—forwards calls if the station is busy or does not
answer within the No Answer timer.
When you forward calls from a different station or a remote location, you
may need to enter your Authorization Code. In addition, from a remote
location, you must access the system through a DISA enabled CO line.
OPERATION
To activate Call Forward, Off Premise (forward to an external number)
from your phone:
•Lift the handset,
•Press the Fwd Soft button,
•Dial the type of forward code 1-4,
•Press SPEED,
•Dial Speed Dial bin number,
•Replace the handset, return to idle.
12

LIP-7016D/7024D User Guide
To activate Call Forward, Off Premise (forward to an external number)
from a different phone:
•Lift the handset,
•Press the Fwd Soft button,
•Dial the Remote Call Forward code 0,
•Dial your Authorization code (Station number & Password),
•Dial the type of forward code 1-4,
•Press SPEED,
•Dial Speed Dial bin number,
•Replace the handset, return to idle.
To activate Call Forward, Off Premise (forward to an external number)
from a remote location:
•Lift the handset,
•Dial the telephone number of a DISA assigned CO line,
•While receiving dial-tone, dial the Call Forward feature code 554,
•Dial your Authorization Code (Station number & Password),
•Dial the type of forward code 6-9,
•Dial Speed Dial bin number,
•Replace the handset, return to idle.
13

LIP-7016D/7024D User Guide
2.8.3 Forwarding callers to a Text Message
Using an iPECS Phone, the system can be setup to return a ‘Text
Message’ to internal callers. When calling your Station, internal callers
will automatically receive the selected message or you can send a text
message you select in response to an internal call, Silent Text Message.
There are 11 Custom Display Messages each up to 24 characters.
Ten can be assigned by the Attendant and one assigned by you.
In addition, there are ten fix Pre-Defined Text Messages; some allow
auxiliary input for time, date, etc. (as shown in message list).
Message 01: LUNCH RETURN AT hh:mm
Message 02: ON VACATION
RETURN AT DATE mm:dd
Message 03: OUT OF OFFICE
RETURN AT TIME hh:mm
Message 04: OUT OF OFFICE
RETURN AT DATE mm:dd
Message 05: OUT OF OFFICE
RETURN UNKNOWN
Message 06: CALL (enter up to 17 digits)
Message 07: IN OFFICE STA xxxx
Message 08: IN MEETING
RETURN AT TIME hh:mm
Message 09: AT HOME
Message 10: AT BRANCH OFFICE
OPERATION
To activate Custom or Pre-Defined Message Forward:
•Press TRANS/PGM,
•Dial User Program feature code 51,
•Dial the two-digit text Message code (00-20),
•Dial any auxiliary input for messages 01-04 and 06-08,
•Press HOLD/SAVE, forward confirmed.
To cancel activated Message:
•Press the Fwd Soft button.
To program the Station Custom Message (00) at your station:
•Press TRANS/PGM,
•Dial User Program feature code 52,
•Enter Message contents, up to 24 characters, Refer to Station
Speed Dial Character entry chart
•Press HOLD/SAVE, message saved.
14

LIP-7016D/7024D User Guide
3. Placing a call
3.1 Internal Calls
3.1.1 Placing Intercom calls
You can place calls to other stations in the system over the Intercom.
The call will ring, or for an ICM Voice Announce call, a splash tone will
be heard. Ring or Voice Announce is normally determined by settings at
the called station but you may change this by dialing ‘#’ after placing the
call. By changing the mode, a Voice Announce call will ring or a ringing
ICM call will allow Voice Announce (toggle).
You can assign a Flex button for Direct Station Selection/Busy Lamp
Field (DSS/BLF). A DSS/BLF button lets you call the other station with a
single button press. The button LED displays the other station’s status,
ON, is busy, OFF is idle.
When you go off-hook, you may connect to another station or system
resource automatically. This Prime Line Preference may be immediate
or delayed allowing you to take other actions during the delay.
Otherwise, you may press another Flex button before going off-hook to
override Prime Line Preference.
If you go off-hook and take no action, Intercom dial-tone will time-out and,
after receiving Howler Tone, your phone will be placed out-of-service in
Intercom Lock-Out. You must hang-up to return to an idle state.
OPERATION
To place an Intercom call:
•Lift the handset,
•Dial the Intercom number of the desired station,
•On answer or Splash tone, speak to the called party.
3.1.2 Using Camp-On when calling a busy station
If your called party is busy, you may activate Camp-On, Callback or
Voice Over to the station. With Camp-On, wait off-hook for the called
station to answer. With Callback, the system will call you when the busy
station goes idle. After you answer, the system calls the previously busy
station.
If you are the Attendant or Secretary, you may activate Intrusion. You
may also use Step Call; dial the next station by dialing just the last digit
of the Intercom number.
15

LIP-7016D/7024D User Guide
OPERATION
To Camp-On (wait off-hook) for a busy station:
•Press * and await an answer.
To request a Callback (wait on-hook) for a busy station:
•Press CALL BACK and hang-up.
To make a Voice Over announcement to a busy station:
•Dial #, after splash-tone, speak.
3.1.3 Leaving a Message Wait
If the called user does not answer or is in DND mode, you may leave a
Message Wait. The called user will receive a Message Wait indication;
the LED of the CALL BACK button will flash.
OPERATION
To activate Message Waiting:
•Press the CALL BACK button and hang-up.
3.2 External Calls
3.2.1 Placing external CO/VoIP calls
External calls are placed on CO/IP lines. These ‘lines’ are accessed
either by a button on the iPECS Phone assigned as a CO/IP line or by
dial codes. The CO/IP lines are grouped for different types of calls, local,
long distance, etc. Using the CO/IP line group code, you will be able to
access any line from the group. A Flex button on the iPECS Phone
assigned as a LOOP button lets you access a line from a group. Dial
codes for access to CO/IP lines are:
Individual CO/IP line access
88 + Line number (01-42 for iPECS-100 or 001-200 for iPECS-300 &
600).
CO/IP Group access
801-820 for iPECS-100 or 801-872 for iPECS-300 & 600
Any CO/IP Line access
9
When dialing on a CO line, which uses pulse style signals, you may
activate Dial Pulse to Tone Switchover changing to DTMF style dialing
for banking services, etc.
When placing an IP call, you must dial an IP address using ‘*’ in place of
the dot.
16

LIP-7016D/7024D User Guide
If Least Cost Routing is set-up, the number you dial will be analyzed
and the system will place the call on the least expensive route.
You may be assigned Dialing and/or CO/IP Line Access Restrictions,
in which case you will receive error tone if you attempt to dial or access a
restricted number/CO/IP line. CO/IP line and Station Class Of Service
(COS), which establish dialing restrictions, may vary during Day and
Night operation (Day/Night COS).
You may need to enter an Authorization code before placing calls, in
which case you will receive a second dial tone.
Your external calls may be subject to Call Time Restrictions, you will
receive a Call Warning Tone prior to disconnect.
NOTE—In the event of an emergency, assigned Emergency
numbers (ex., a 911 call) may be dialed from any station in the
System, regardless of a Station’s dialing restrictions (COS).
OPERATION
To place an external call:
•Lift the handset,
•Select/Dial the CO/IP line/group,
•Dial the desired number.
3.2.2 Waiting for the next available CO/IP line
If all the lines connected to your system are busy, you will receive an All
Trunks Busy signal. You may request to be notified when a line becomes
free.
OPERATION
To activate a queue if the selected/dialed line is busy:
•Select/dial a busy CO/IP line button,
•Press the CALL BACK button,
•Return to an idle state by going on-hook; when the line comes
available, the Station will be notified with ringing.
3.2.3 Account Codes: Tracking External calls for billing
In some cases, you or your company may desire to track calls for billing
or other purposes. You may enter an Account Code, which is output
from the system to a printer in the SMDR report. You must have an
Account Code Flex button, see Assigning features to Flex buttons.
17
This manual suits for next models
1
Table of contents
Other iPECS Telephone manuals

iPECS
iPECS iPECS 7016D User manual

iPECS
iPECS LDP-9030D User manual

iPECS
iPECS LIP-8004D User manual

iPECS
iPECS LDP-9030D User manual

iPECS
iPECS LIP-8012E User manual

iPECS
iPECS LDP-9008D User manual

iPECS
iPECS LIP-8008E User manual

iPECS
iPECS LIP-7004N User manual

iPECS
iPECS LDP-9200 series User manual

iPECS
iPECS LIP-8012D User manual

iPECS
iPECS LIP-9010 User manual

iPECS
iPECS LDP-9240D Specification sheet

iPECS
iPECS LIP-8012D User manual

iPECS
iPECS LIP-7004N User manual

iPECS
iPECS 9010 User manual

iPECS
iPECS LDP-7000 Series User manual

iPECS
iPECS LIP-8004D Service manual

iPECS
iPECS LIP-9071 User manual

iPECS
iPECS LIP-8004D User manual

iPECS
iPECS WIT-400HE User manual