manuals.online logo
Brands
  1. Home
  2. •
  3. Brands
  4. •
  5. IRSAP
  6. •
  7. Heater
  8. •
  9. IRSAP THE RADIATOR COMPANY Uxbridge User manual

IRSAP THE RADIATOR COMPANY Uxbridge User manual

The Radiator Company
Units 13 - 14 Charlwoods Road
East Grinstead
West Sussex
RH19 2HU
All products must be inspected once removed from the packaging and The Radiator Company notied
within 28 days of delivery of any scratches, blemishes or other damage.
The Radiator Company will then replace the radiator.
Imperfect radiators should therefore not be tted and The Radiator Company will not accept responsibility
for replacement of scratched or damaged radiators once they have been tted. This includes any
consequential loss or cost of tting.
If The Radiator Company are not notied within 28 days of the date on the signed delivery note then it
will be deemed that The Radiator Company have fully complied with its obligations and claims will not be
considered.
Failure to comply with any of the above may invalidate any claims.
We recommend that after you check the product on delivery that it is stored in its packaging to prevent damage
prior to installation. The Radiator Company cannot accept responsibility for items damaged after delivery.
Terms & Conditions
Guarantees & Liabilities
As we are not the manufacturers of this product we will take all reasonable endeavours to make over to you
the benet of any warranty or guarantee given by the manufacturer, which is usually ve years on most of our
range. (Copies of specic guarantees for any of our products are available on request).
The guarantees in all cases are subject to the products being installed in accordance with British and or
European standards as well as these tting instructions. The guarantees in all cases are restricted to the free
of charge replacement or repair of the failed product only. Our liability will under no circumstances extend
beyond the repair or replacement of the product supplied by us. Claims for either labour in replacement or
damage to property are not admissible. Any goods that are returned, in the event
of a problem, will belong to The Radiator Company.
Technical Specications
4 Column cast iron radiator perfect for any
period property.
Please read these instructions and terms and
conditions carefully prior to installation.
Failure to do so may invalidate the warranty.
Materials Cast iron.
Connections ½" ow and return bottom opposite end.
Test pressure 10.3 Bar
Testing authority EN442
Maximum operating pressure 6 Bar
Maximum working temperature 110ºC
Packaging Paper pulp channels, corrugated cardboard & polythene sleeve.
Uxbridge
Fittings Instructions
10
Y
e
a
r
G
u
a
r
a
n
t
e
e
Y
e
a
r
G
u
a
r
a
n
t
e
e
Please Note: We strongly recommend ushing the heating system post installation of new
radiators and then adding the correct quantity and type of inhibitor for use with your radiator
and system to prevent corrosion. Damage caused to systems not protected by a suitable
inhibitor will not be covered by manufacturer’s guarantee.
THE
RADIATOR
COMPANY
UXB_IR_1.0
PLEASE NOTE: Systems using micro bore pipework must have adequate pressure and ow
rates for the number and style of radiators on the system.
If you have any questions please contact us: 01342 302250, www.theradiatorcompany.co.uk A brand of , Italy’s leading manufacturer of design led radiators
w
1
For radiators up to 10 sections
you should have
• 1 Radiator
• 4 x 0.5” bushes
• 1 Manual Airvent
• 1 Blanking Plug
• Wall ties (if specied)
Marking Wall Ties
5
Contents
2
Joining Sections If Required
3
Uxbridge Diagrams
The Radiator Company prides itself on selecting products from
manufacturers who exercise tight quality control measures. We
only select models that exceed british manufacturing standards
for cast iron radiators and surpass requirements of our stringent
selection process. All of our products are well packaged and
should reach you in perfect condition. Just in case however, we
offer a 10 year no quibble guarantee for all cast iron radiators.
Please carefully unpack and inspect this
radiator and all ttings. The Radiator
Company must be notied of any shortages
or damage within 28 days of delivery. For
further information please see terms and
conditions on back page.
If you require joining sections, please see the separate
instructions provided.
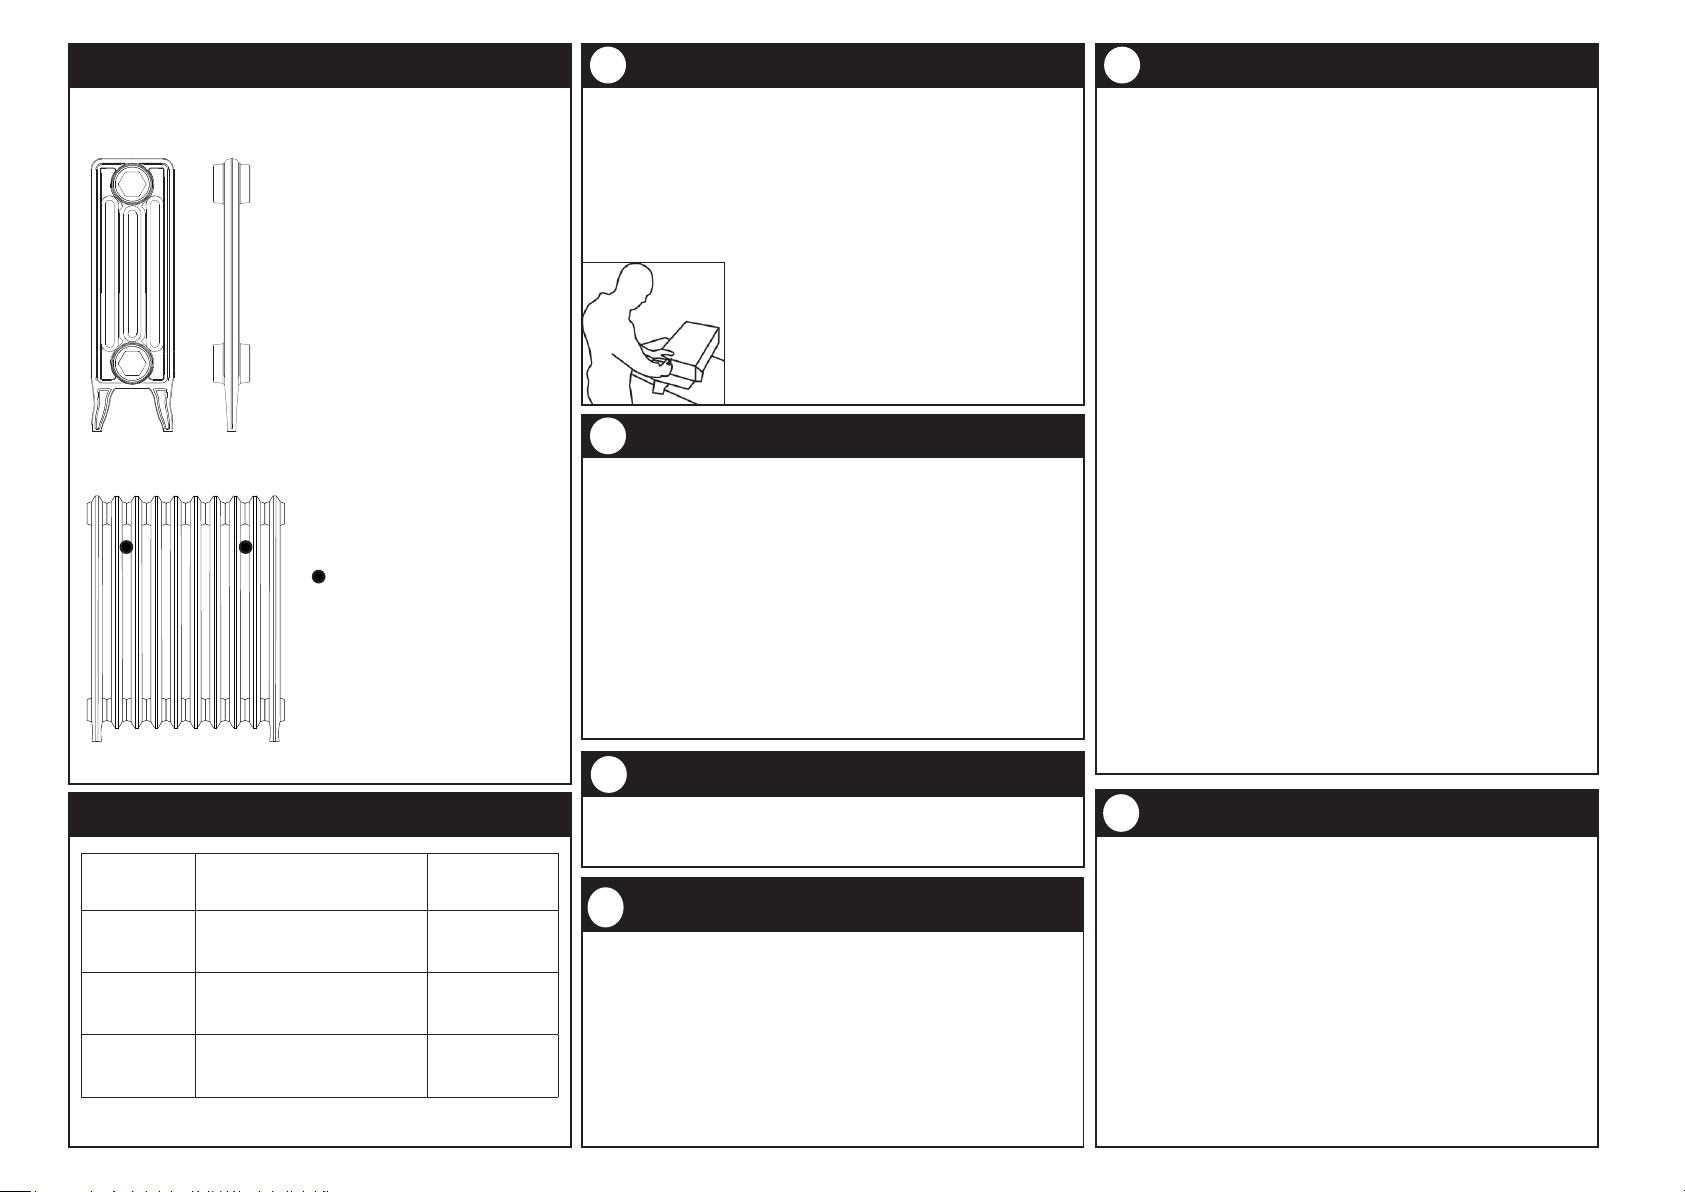
Pipe Centres
Please refer to Fig 1
With the radiator in place, mark the positions for the wall
ties, which can be placed on the second section in from the
side (please see image to the left of this page.)
When placing the radiator in place for installation,
consideration needs to be taken for the width of the feet
as this will affect how far the radiator will sit from the wall/
skirting board.
Double check the markings then move the radiator out of
the way, then using a suitable drill bit and plugs, fix the
wall ties to the wall.
Wall ties can be screwed into wood or used in masonry
with a suitable wall plug.
Inspect
For radiators over 10 sections you
should have
• 1 Radiator (separated)
• 1 Joining key, if requested
• 2 Nipples per join in sealed bag
• 2 Gaskets per join in sealed bag
• 4 End bush gaskets in a sealed bag
• Wall ties (if specied)
All bushes will be screwed hand-tight
into the radiator.
Fitting Bushes IMPORTANT NOTE
4
Cast Iron radiators have specific left and right hand threaded
bushes and these can be easily damaged if forced or incorrectly
fitted (this will inevitably cause leaks). Bushes require a dry fit
connection only; you must not use any Compound materials
(e.g. Jet Blue) or Plumbers Hemp. If you choose you may use
up to 4 turns of PTFE tape making sure the sealing faces are
clean and free from any debris (the tape should be applied
in the direction of the thread and no more than this amount
should be used as this may cause leaks to occur)
Uxbridge 4 Column Cast Iron Radiator with footed ends
6
In accordance with Part L1 2006 of the Building Regulations
and BS7593:1992 code of practice for the treatment of hot
water and central heating systems, we strongly recommend
ushing the heating system post installation of new radiators
and then adding the correct quantity and type of inhibitor
for use with your radiator and system to prevent corrosion.
Damage caused to systems not protected by a suitable
inhibitor will not be covered by manufacturer’s guarantee.
The manufacturer recommend using a vortex type lter to
separates any potential particulates before reaching the
boiler.
Commission
Fig 1
= Wall Tie Positions
Section
Height
Pipe centres
left to right
Pipe centres
from wall
455mm 60.5mm x number of sections
+ 32mm bushes + valves 104mm-119mm
650mm
750mm
61mm x number of sections
+ 32mm bushes + valves 104mm-119mm
800mm 56mm x number of sections
+ 32mm bushes + valves 104mm-119mm
750mm High, sections 61mm
800mm High, sections 56mm
455mm High, sections 60.5mm
650mm High, sections 61mm
Cast Iron Joining Instructions
Please note: that after manufacture these radiators are pressure tested and cleaned
inside, they may, therefore, contain a small amount of water. If handling on a nished oor
ensure that adequate protective material is in place before working on the radiators.
A minimum of two people are required to join these sections to ensure safe handling of
the radiators and to facilitate an effective water tight seal.
You will need: two nipples, 2 gaskets per join, appropriate size joining key, extension rod
for extra torque, bushes and gaskets.
Cast Iron radiators have specic left and right hand threaded bushes and these
can be easily damaged if forced or incorrectly tted (this will inevitably cause
leaks). Bushes require a dry t connection only; you must not use any Compound
materials (e.g. Jet Blue) or Plumbers Hemp. It is important for the faces and
anges of the bushes to be free from and rust/residue/particulates.
To facilitate the joining process the radiator sections must be raised off the ground, (on a
rm at surface) to allow the joining key to turn freely. The radiators should not be placed
upright or on end when joining.
1.
Before joining the radiators together please remove the
plastic bungs, radiators have colour coded plastic inserts to
aid in joining the correct end.
2.
Position all sections to be joined the correct way up; place
the end with a rough casting nish along the join at the
bottom and the end with the smooth cast nish at the top.
The radiators also need to be the correct way round; ensure
the same trade mark or manufacturers stamp are all facing
the same way. (Image 1 & 2)
3.
Top smooth edge
Image 1
Bottom rough edge
Image 2
Clean the surfaces to be joined using a small blade or similar to remove any dirt or
deposits from the face and screw thread.
4.
The radiator sections and joining nipples have one left and one right hand thread the
Nipples must be inserted correctly to avoid cross threading.
5.
Fit a graphite joining gasket over each nipple; push them
carefully onto the nipple, making sure they do not tear, until
they sit in the groove in the middle of the nipple. (image 3)
Image 3
Having identied the correct insertion direction, using 1
hand turn only screw in a pair of nipples into the end of one
radiator (screwing the nipple in further at this stage may
cause problems obtaining a water tight seal.) (Image 4) Image 4
Offer up the second radiator, making sure that the two
nipples enter the second section evenly.
Measure the distance required for the key to identify how far
in you need to place the key and then insert the key through
the open end of the water way to locate the lug within the
rst nipple to be joined. (Image 5) Image 5
Image 6
The two nipples should now be tightened alternatively
to keep the radiators parallel. The key should be kept in
a central position in the waterway whilst turning. Tighten
the rst nipple with 2 turns only, pulling the two sections
together. Repeat the process alternating between nipples,
until both sections are joined hand tight.
Once the joins have been hand tightened both will need
extra torque applied to make a water tight seal. To obtain
this use a metal extension rod to apply greater leverage.
(image 6)
Once the joins are satisfactorily tightened you can t the
blanking plugs, bushes and gaskets. Please note these items
are also left and right handed to avoid cross threading.
6.
7.
8.
9.
10.
11.
12.
If you have any questions please contact us: 01342 302250, www.theradiatorcompany.co.uk A brand of , Italy’s leading manufacturer of design led radiators

Other IRSAP Heater manuals

IRSAP WINGS 500 User manual

IRSAP

IRSAP WINGS 500 User manual

IRSAP The Radiator Company Ottimo User manual

IRSAP

IRSAP The Radiator Company Ottimo User manual

IRSAP The Radiator Company Ovali User manual

IRSAP

IRSAP The Radiator Company Ovali User manual

IRSAP RELAX HYBRID REHM092A Service manual

IRSAP

IRSAP RELAX HYBRID REHM092A Service manual

IRSAP 986M0421 User manual

IRSAP

IRSAP 986M0421 User manual

IRSAP SOUL User manual

IRSAP

IRSAP SOUL User manual

IRSAP BELLA 550 User manual

IRSAP

IRSAP BELLA 550 User manual

IRSAP 1096M0723 User manual

IRSAP

IRSAP 1096M0723 User manual

IRSAP ARES User manual

IRSAP

IRSAP ARES User manual

IRSAP TESI3 Elettrico User manual

IRSAP

IRSAP TESI3 Elettrico User manual

IRSAP THE RADIATOR COMPANY ISEO TRC-IS-O30 User manual

IRSAP

IRSAP THE RADIATOR COMPANY ISEO TRC-IS-O30 User manual

IRSAP 1234M0620 User manual

IRSAP

IRSAP 1234M0620 User manual

IRSAP JAZZ User manual

IRSAP

IRSAP JAZZ User manual

IRSAP Supplies4Heat SHERWOOD User manual

IRSAP

IRSAP Supplies4Heat SHERWOOD User manual

IRSAP TESI3 EF User manual

IRSAP

IRSAP TESI3 EF User manual

IRSAP 1009M0622 User manual

IRSAP

IRSAP 1009M0622 User manual

IRSAP SOUL DX 1054 User manual

IRSAP

IRSAP SOUL DX 1054 User manual

IRSAP Relax Twin Power User manual

IRSAP

IRSAP Relax Twin Power User manual

IRSAP 715M0118 User manual

IRSAP

IRSAP 715M0118 User manual

IRSAP ARES Series User manual

IRSAP

IRSAP ARES Series User manual

IRSAP 1095M0518 User manual

IRSAP

IRSAP 1095M0518 User manual

IRSAP The Radiator Company Lupin Electric User manual

IRSAP

IRSAP The Radiator Company Lupin Electric User manual

IRSAP Step E 775 User manual

IRSAP

IRSAP Step E 775 User manual

IRSAP THE RADIATOR COMPANY Athena User manual

IRSAP

IRSAP THE RADIATOR COMPANY Athena User manual

Popular Heater manuals by other brands

Russell Hobbs CH-01F User instructions

Russell Hobbs

Russell Hobbs CH-01F User instructions

SPT SH-1960B Instructions for use

SPT

SPT SH-1960B Instructions for use

Frico Tiger Original instructions

Frico

Frico Tiger Original instructions

Yoer GLOSSO CH03 manual

Yoer

Yoer GLOSSO CH03 manual

Burda Perfectclime RELAX DARK IRC IP55 Series Installation and operating instructions

Burda

Burda Perfectclime RELAX DARK IRC IP55 Series Installation and operating instructions

Fagor RP-1009 manual

Fagor

Fagor RP-1009 manual

Toyostove WC-105R Type D Operation and maintenance instructions

Toyostove

Toyostove WC-105R Type D Operation and maintenance instructions

Jetfire J8 operating & maintenance manual

Jetfire

Jetfire J8 operating & maintenance manual

TMC Therm 50 instructions

TMC

TMC Therm 50 instructions

Tylo SENSE SPORT 2/4 user guide

Tylo

Tylo SENSE SPORT 2/4 user guide

Space-Ray PGR 40-N5 Installation and operation instructions

Space-Ray

Space-Ray PGR 40-N5 Installation and operation instructions

Ortech HS-CH 1500W instruction manual

Ortech

Ortech HS-CH 1500W instruction manual

ARDES AR4P07A Instructions for use

ARDES

ARDES AR4P07A Instructions for use

SMUKEE LL-5312 user manual

SMUKEE

SMUKEE LL-5312 user manual

Lithion HOMEGRID Stack'd Series Reference manual

Lithion

Lithion HOMEGRID Stack'd Series Reference manual

Claudgen HE6351 Installation, operation and maintenance instructions

Claudgen

Claudgen HE6351 Installation, operation and maintenance instructions

EDM Product 07121 instruction manual

EDM Product

EDM Product 07121 instruction manual

NuTone 192 Specification sheet

NuTone

NuTone 192 Specification sheet

manuals.online logo
manuals.online logoBrands
  • About & Mission
  • Contact us
  • Privacy Policy
  • Terms and Conditions

Copyright 2025 Manuals.Online. All Rights Reserved.