Joie spin 360 signature User manual

spin 360™signature
ECE R44.04 Group 0+/1(0-18kg)
This child restraint is approved
to CNS 11497 and UN ECE
regulation 44, 04 series of
amendments.
Please read all the instructions
in this manual before installing
and using the product.
ECE R44.04: B1,C,D
ECE R44.04: ISOFIX

2
Welcome to Joie™
Congratulations on becoming part of the Joie family! We are so excited
to be part of your journey with your little one. While traveling with the
Joie spin 360TM child restraint you are using a high quality, fully certified
safety Group 0+/1 child restraint. Please carefully read this manual and
follow each step to ensure a comfortable ride and best protection for
your child.
If vehicle is equipped with ISOFIX, the vehicle lower anchor points
may be visible at the vehicle seat crease. See your vehicle owner’s
manual for exact locations, anchor identification, and requirements
for use.
To use this child restraint with the ISOFIX connections according to
the CNS 11497 and UN ECE R44.04 Regulation, the child should weigh
under 18kg (approximately 4 years old or under).
Base
Please read all the instructions in this manual before installing and us-
ing the product.
! IMPORTANT: KEEP FOR FUTURE REFERENCE.
PLEASE READ CAREFULLY.
Please keep the instruction manual in the
storage compartment at the bottom of
the base as right figure.
For warranty information, please visit our
website at joiebaby.com
Parts List
Fig. 1.1 Head Support
Fig. 1.2 Seat Pad
Fig. 1.3 Buckle
Fig. 1.4 Adjustment Webbing
Fig. 1.5 Recline Adjustment
Button
Fig. 1.6 Load Leg
Fig. 1.7 Load Leg Indicator
Fig. 1.8 Load Leg Adjustment
Button
Fig. 1.9 Rotating Button
Fig. 1.10 Shoulder Strap
Fig. 1.11 Infant Insert
Fig. 1.12 Head Support
Adjustment Lever
Fig. 1.13 ISOFIX Connector
Fig. 1.14 ISOFIX Adjuster
Button
Fig. 1.15 ISOFIX Guides
Fig. 1.16 Summer Seat Soft
Goods
Please make sure there are no missing parts. Please contact the
retailer if anything is missing.
1
2
3
4
9
8
10
13
12
5
6
714
15
11
16

1 2
WARNING
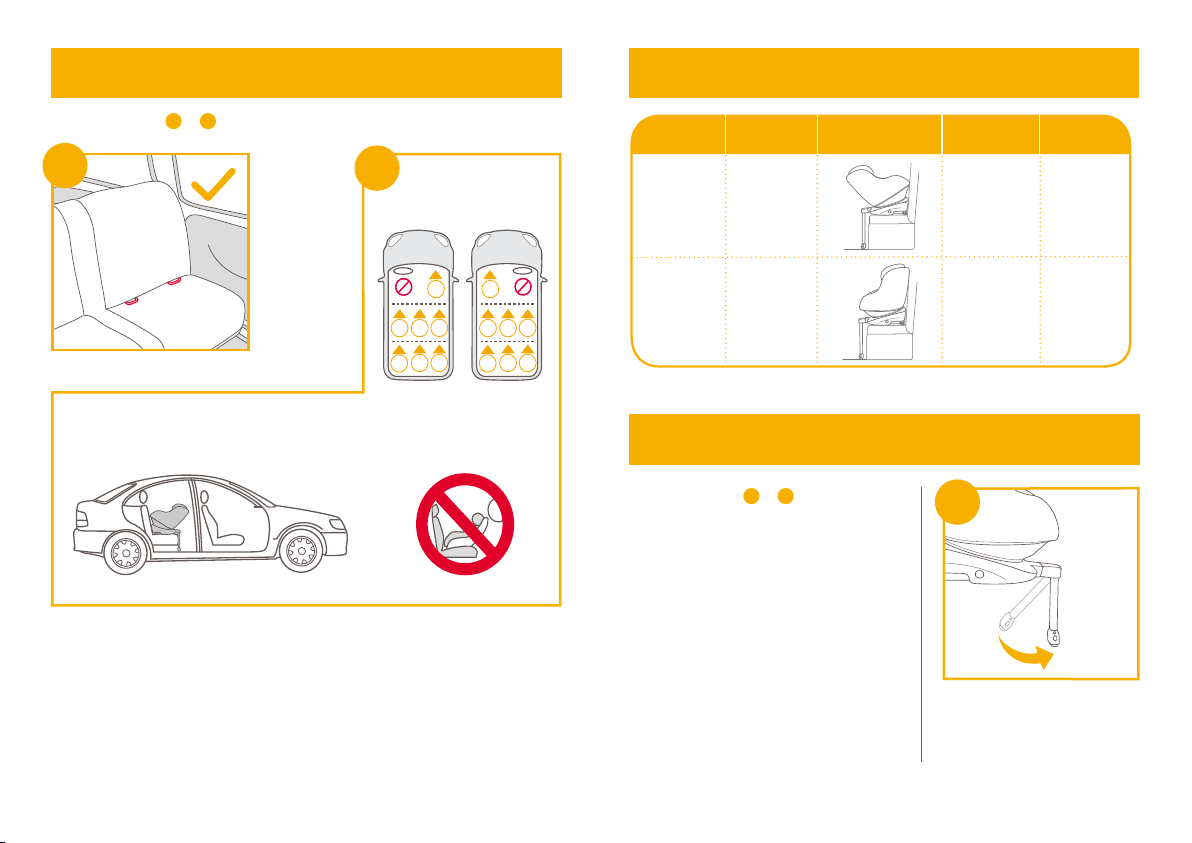
!The child should weight under 18kg (approximately 4
years old or under).
!DO NOT use forward facing mode before the child’s
weight exceeds 9kg. Keep your child rearward
facing as long as possible as rearward facing is the
safest position.
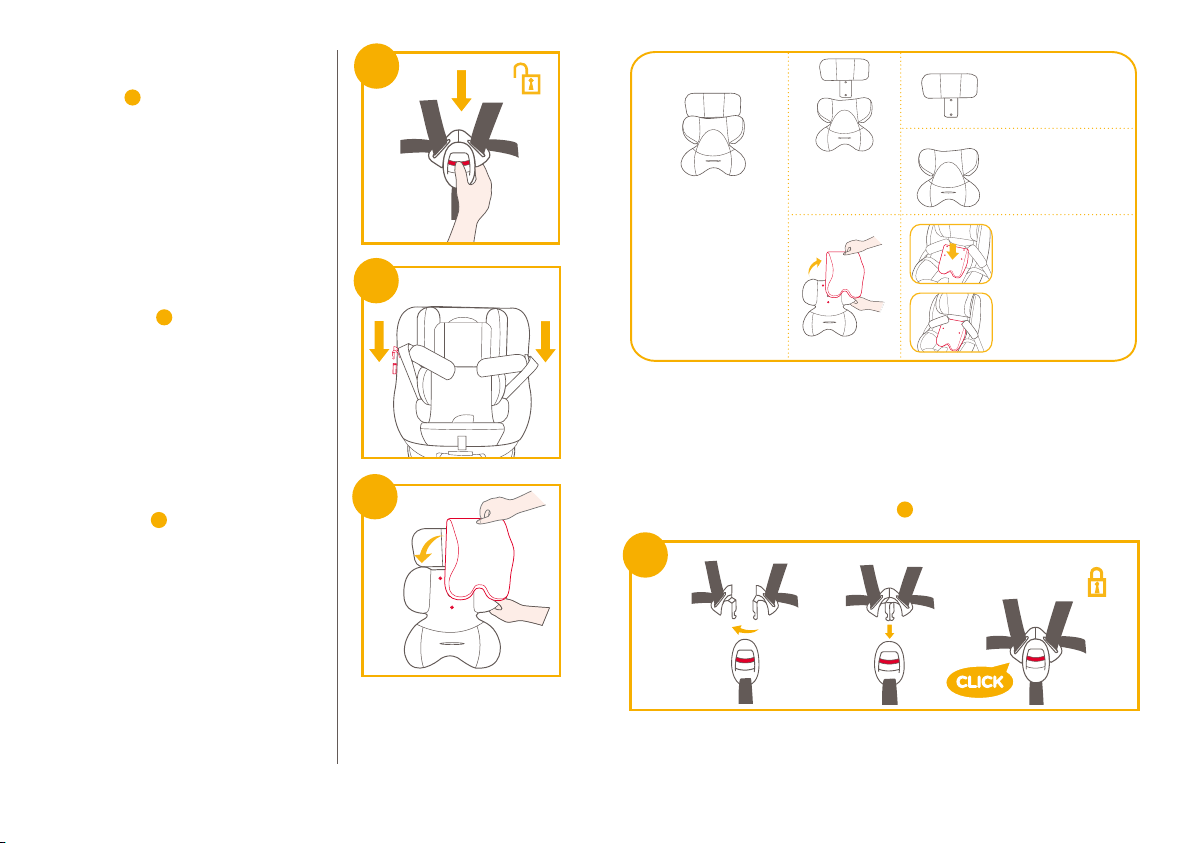
!Any straps holding the restraint to the vehicle
shouldbe tight, that any straps restraining the child
shouldbe adjusted to the child’s body, and that
straps should not be twisted.
!After your child is placed in this child restraint,
thesafety belt must be used correctly, and ensure
that any lap strap is worn low down, so that the
pelvis is firmly engaged.
!The child restraint should be changed when it
hasbeen subject to violent stresses in an accident.
An accident can cause damage to the child restraint
that you cannot see.
!Concern the danger of making any alterations or
additions to the device without the approval of the
Type Approval Authority, and a danger of not follow-
ing closely the installation instructions provided by
the child restraint manufacturer.
!Please keep this child restraint away from sunlight,
otherwise it may be too hot for the child’s skin.
WARNING
!Child is not left in the child restraint system
unattended.
!Any luggage or other objects liable to cause injuries
in the event of a collision shall be properly secured.
!The child restraint shall not be used without the soft
goods.
!The soft goods should not be replaced with any other
than the one recommended by the manufacturer,
because the soft goods constitutes an integral part
of the restraint performance.
!DO NOT use another manufacturers soft goods with
this child restraint. See your retailer for Joie replace-
ment parts only.
!DO NOT use any load bearing contact points other
than those described in the instructions and marked
on the child restraint.
!NO child restraint can guarantee full protection from
injury in an accident. However, proper use of this
child restraint will reduce the risk of serious injury or
death to your child.
!DO NOT install or use this child restraint without
following the instructions and warnings in this
manual or you may put your child at serious risk of
injury or death.

3 4
WARNING
!DO NOT use this child restraint if it is damaged or
has missing parts.
!DO NOT have your child in swaddled clothes when
using this child restraint in rear facing or forward facing
mode, because this may prevent your child from
being properly and securely fastened by the shoulder
harnesses and the harnesses between thighs.
!DO NOT leave this child restraint unsecured in your
vehicle because an unsecured child restraint can be
thrown around and may injure occupants in a sharp-
turn, sudden stop, or collision. Remove it if not in
regular use.
!NEVER install this child restraint on any vehicle seat
equipped with safety airbags when used in rear
facing mode.
!NEVER use a second-hand child restraint or a child
restraint whose history you do not know because
they may have structural damage that endangers
your child’s safety.
!DO NOT use this child restraint as a regular chair as it
tends to fall down and could injure the child.
!DO NOT put anything other than the recommended
soft goods in this child restraint.
!DO NOT carry this child restraint with a child in it.
WARNING
!Do not allow the child restraint harness or buckles to
become trapped or caught in the vehicle seat or
door.
!Remove this child restraint from the vehicle seat
when it is not in use for a long period of time.
!To avoid suffocation, remove plastic bag and
packaging materials before using this product. The
plastic bag and packaging materials should then be
kept away from babies and children.
!Consult the retailer for issues concerning mainte-
nance, repair and part replacement.
!Do not place any objects in the load leg area in front
of your base.
!DO NOT install this child restraint on the front vehicle
seat.
!Frequently check the ISOFIX guides for dirt and clean
them if necessary. Reliability can be effected by
ingress of dirt, dust, food particles etc.
!DO NOT install this child restraint under the following
conditions:
1. Vehicle seats with lap belt or 3-point-belt.
2. Vehicle seats facing sideways or rearward with
respect to the running direction of the vehicle.
3. Vehicle seats movable during installation.

5 6
Emergency
In case of emergency or accidents, it is most important to have your
child taken care of with first aid and medical treatment immediately.
Product Information
For Installation with ISOFIX System
1. This is an ISOFIX CHILD RESTRAINT SYSTEM. It is approved to
CNS 11497 and UN ECE 44, 04 series of amendments for general
use in vehicles fitted with ISOFIX anchorages systems.
2. It will fit vehicles with positions approved as ISOFIX positions (as
detailed in the vehicle handbook), depending on the category of the
child restraint and of the fixture. If in doubt, consult either the infant
child restraint manufacturer or vehicle manufacturer.
3. The ISOFIX size class for which this device is intended is B1,C,D.
Allison Baby UK Ltd.
Venture Point, Towers Business Park,
Rugeley, Staffordshire, WS15 1UZ
Product spin 360TM child restraint
Model C1416
Suitable for Child weighing under 18kg
(approximately 4 years old or under)
Materials Plastics, metal, fabrics
Mass Group 0+/
I
Net Weight 11.95kg
Product Size 550mmx450mmx925-1215mm
Date Please see detailed date on label (year / month / day)
Patent No. Patents pending
Made in China
Distributor Chickabiddy Co., Ltd
Address 5th FL, 186, Nanking E. Rd, Sec. 4, Taipei,
Taiwan 10595
Tel. 0800-001-256 / 02-25781188
Website www.chick.com.tw

7 8
Concerns on Installation
1
24
3
57
6
1
24
3
57
6
1
2
3
A
I
R
B
A
G
2
1
see images 1- 2
寶寶體重
安裝模式
未滿18kg
安裝圖示 參考年齡 座椅段位
後向
安裝模式
前向
安裝模式
9-18kg
未滿4歲限定使用第1段
1-4歲1-5
Child's
Weight
Installation
Mode Installation Reference
Age
Recline
Position
<18kg
9 - 18kg
Rear
facing
mode
Forward
facing
mode
Approx
birth
to
4 years
Approx
1 year
to
4 years
Limit to use
the first
position
Position
1-5
Choose the Installation Mode
Installing the Base
3
see images 3- 12
! After placing the base on the vehicle
seat, pull the load leg downward to
floor.

910
41
! Insert ISOFIX guides to assist with
installation. 4-1
! There are 10 adjustable positions for
ISOFIX. Press the ISOFIX adjuster
button to extend the ISOFIX. 5
! Make sure that both ISOFIX
connectors are securely attached to
their ISOFIX anchor points. The
colors of the indicators on both
ISOFIX connectors should be
completely green. 6-1
! If a tighter install or increased cabin
space is required, then press the
ISOFIX adjuster button 5-1 and
push to adjust. 6
5
1
2
1
6
!After attaching the ISOFIX, pull the
load leg downward to floor. When
the load leg indicator shows green,
the load leg is installed correctly.
!Squeeze the load leg releasing
button, then adjust the load leg
length. 7
!The load leg has 14 positions.
When the load leg indicator shows
red this means the load leg is in the
wrong position. 8
!Make sure the load leg is in full
contact with the vehicle floor pan.
Red means it is installed
incorrectly. 8
!Check to make sure the base is
securely installed by pulling on
both ISOFIX connectors.
!The ISOFIX connectors must be
attached and locked onto the
ISOFIX anchor points. 9-1
!The load leg must be installed
correctly with green indicator. 9-2
Please refer to rear facing mode and
recline positions mode in section to
use the child restraint.
7
8
9
1
2

11 12
11
1
2
12
Removing the base
To remove from the vehicle press
the ISOFIX adjuster button 10 -1 and
pull the base back from the seat.
10 -2
Then press and release the
connectors from the vehicle’s
ISOFIX. 11
To prevent damage during transit,
press the ISOFIX adjuster button
12 -1 and fold the connector
completely. 12 -2
see images 13 - 14
Squeeze the recline adjustment
button 13 , to adjust the child
restraint to the proper position. The
recline angles are shown as 14
Recline Adjustment
13
10
1
2
1
2
14
Height Adjustment
for Head Support and Shoulder Harnesses
Please recheck the load leg position
after reclining.
Limit to use the most reclined
position (1st position) with rear
facing mode.
There are 5 recline positions for rear
facing mode and 5 recline positions
for forward facing mode.
see images 15 - 17
1. Please adjust the head support
and check if the shoulder
harnesses are at the correct
height according to 15
!When used rear facing, the
shoulder harness height must be
even with child’s shoulders. 15
!When used forward facing, the
shoulder harness height must be
even with child’s shoulders. 15
15

13 14
2. Squeeze the head support
adjustment lever 16 , meanwhile
pull up or push down on the head
support until it snaps into one of
the 6 positions. The head support
positions are shown as 17 .
16
17
1
2
Using in the Rear Facing Mode
(Rearward Facing Mode/for Child under 18kg
/infant - 4 years old)
Reference age Newborn - 4 years old
Recline position Limit to use the first position
see images 3- 9
!Please install the child restraint on
the rear vehicle seat, and then put
the child in the child restraint.
see images 18 - 27
1. Press the ISOFIX adjuster button
18 -1 and pull the base back from
the vehicle seat.
18
1
2
2. Press the rotating button to rotate
for easier side loading/unloading
of the child, then rotate back to
desired direction. 19 &21
3. If a tighter install or increased
cabin space is required, then
press the ISOFIX adjuster button
20 -1 and push to adjust. 20 -2
!The ISOFIX connectors must be
attached and locked onto the
ISOFIX anchor points. 21 -1
!The load leg must be installed
correctly with green indicator.
21 -2
Securing Child
After the child is placed into the
seat, check whether the Shoulder
Harness Straps are at proper height.
1. Press the webbing adjustment
button, while pulling out the
shoulder harnesses to the proper
length. 22
19
22
21
2
1
20
1
2

15 16
2. Unlock the buckle of the
harnesses by pressing the red
button.
23
3. Fix the buckles on the both sides
of seat to make placing the child
in rear facing mode more
convenient.
24
4. Use Infant insert is for children’s
protection.
25
23
25
24
5. Place the child into the child restraint and pass both arms through
the harnesses.
!After the child is seated, recheck whether the shoulder harnesses
are at the proper height.
6. Engage the buckle. Please refer to 26
Detach the snaps on
the head support to
remove the head
portion of the insert.
We recommend using the full
infant insert while the baby
is 0-6 months or until they
outgrow the insert. The infant
insert increases side impact
protection.
Remove the head support
portion of the infant
insert when the child’s
head no longer fits
comfortably.
Remove the body
portion of the infant
insert when the infant’s
shoulders no longer fit
comfortably.
Remove the infant insert
cushion by detaching the
snaps to allow more space
when the infant does not
fit comfortably. The cushion
can be used separately
without being attached to
the insert to bolster the
infant's back for more
comfort.
1
2
26

17 18
7. Pull down the adjustment
webbing and adjust it to the
proper length to make sure your
child is properly secured. 27
!Make sure the space between the
child and the Shoulder Harness
Straps is about the thickness of
one hand.
8. If steps 22 &23 &24 are taken when
arriving at your destination whilst
removing the child, then the
harness will be positioned so that
it is out of the way and ready for
loading upon your return to the
vehicle.
see images 3- 9
!Please install the child restraint on
the vehicle seat, and then put the
child in the child restraint.
27
Using in the Forward Facing Mode
(Forward Facing Mode/for Child between
9-18kg / 1 -4 years old)
Reference age 1 - 4 years old
Recline position Position 1-5
31
2
1
see images 28 - 35
1. Press the ISOFIX adjuster button
28 -1 and pull the base back from
the vehicle seat. 28 -2
2. Press the rotating button to rotate
for easier side loading/unloading
of the child, then rotate forwards
to desired direction. 29 &31
3. If a tighter install or increased
cabin space is required, then
press the ISOFIX adjuster button
30 -1 and push to adjust. 30 -2
!The ISOFIX connectors must be
attached and locked onto the
ISOFIX anchor points. 31 -1
!The load leg must be installed
correctly with green indicator.
31 -2
28
1
2
29
30
1
2

19 20
Securing Child
After the child is placed into the seat,
check whether the Shoulder Harness
Straps are at proper height.
1. Press the webbing adjustment
button, while pulling out the
shoulder harnesses to the proper
length. 32
2. Unlock the buckle of the harnesses
by pressing the red button. 33
3. Fix the buckles on the both sides
of seat to make placing the child in
forward facing mode more
convenient.
34
4. When installing the child restraint in
the forward facing mode, do not use
the infant insert.
5. Place the child into the child
restraint and pass both arms
through the harnesses. Engage
the buckle.
32
33
34
!After the child is seated, recheck
whether the shoulder harnesses
are at the proper height.
6. Pull down the adjustment webbing
and adjust it to the proper length to
make sure your child is properly
secured. 35
!Make sure the space between the
child and the Shoulder Harness
Straps is about the thickness of
one hand.
7. If steps 32 &33 &34 are taken when
arriving at your destination whilst
removing the child, then the
harness will be positioned so that
it is out of the way and ready for
loading upon your return to the
vehicle.
35
see images 36 - 42
Press the red button to disengage the
buckle. 36
Follow steps 37 - 42 to detach soft
goods.
To attach seat pad soft goods or
summer seat soft goods, please follow
the steps above in reverse order.
Detach Soft Goods
goods
36

21 22
38
39
41 42
37
40
! After removing the wedge from the insert, please store it somewhere
that the child cannot access it.
! Please wash the seat cover and inner padding with cold water under
30°C.
! Do not iron the soft goods.
! Do not bleach or dry clean the soft goods.
! Do not use undiluted detergents, gasoline or other organic solvent to
wash the child restraint or base. It may cause damage to the child
restraint.
! Do not wring out the seat cover and inner padding to dry. It may
leave the seat cover and inner padding with wrinkles.
! Please hang dry the seat cover and inner padding in the shade.
! Please remove the child restraint and base from the vehicle seat if
not in use for a long period of time. Put the child restraint in a cool,
dry place where your child cannot access it.
! Do not tamper with the harness connectors during cleaning.
Care and Maintenance
goods

23 24
23
恭喜您
恭喜您成為Joie家族的一員﹗很高興能與您的寶寶共度行車旅程。乘坐本產
品時,您的寶寶享受的是一台高品質和通過安全標準及歐盟安全標準檢測的
0+組/
Ι
組 兒 童 安 全 座 椅。
請仔細研讀並依照本說明書的指示操作,如此才能保障並提供您的寶寶一個
安全又舒適的行車旅程。
本兒童安全座椅適用於有ISOFIX固定裝置的汽車,因本兒童安全座椅是依
安全標準CNS 11497和歐盟安全標準ECE R44去 做 測 試 和 認 證 的。這台 兒
童安全座椅適用於體重18kg(約4歲 ) 以 下 的 寶 寶。
底座
安裝和使用本產品前,請先閱讀說明書全文。
﹗重要︰請仔細閱讀並妥善保存本說明書,以便日後參考。
請依圖示將說明書存放在底座背面的說明書儲存槽內。
產品組件及各部位名稱
1頭靠
2座墊
3安全扣
4調整織帶
5背靠調整按鈕
6支撐腳
7支撐腳指示器
8支撐腳調整按鈕
9 旋轉按鈕
10 肩帶護片
11 小座墊
12 頭靠調整手把
13 ISOFIX連接器
14 ISOFIX調整按鈕
15 ISOFIX導向器
16 夏天版座布
請確認產品組件是否有遺漏,如有遺漏,請聯繫銷售商。
1
2
3
4
9
8
10
13
12
5
6
714
15
11
16

25 26
警告 警告
! 本兒童保護裝置適用於體重18公斤(約4歲)以下的兒童。
! 重要-在寶寶體重超過9kg之 前,不 要 前 向 使 用。
! 任何束縛兒童之織帶應根據兒童身體進行調節,且此織帶不應
扭 曲。
! 將寶寶放在本兒童保護裝置後,必須正確的扣合及使用兒童安全
座椅安全帶,並確保腰部織帶能有效束縛骨盆部位。
! 本兒童保護裝置若於意外中遭受劇烈撞擊後,不可繼續使用,
應立即更換兒童保護裝置。意外可能導致兒童保護裝置產生潛
在 危 險。
! 請勿在兒童保護裝置上進行未經驗證許可之改裝或增加其他裝
置以及未依兒童保護裝置製造商提供之安裝說明使用,以免造成
受傷或死亡。
! 請讓座椅遠離日光,以免產品溫度過高對兒童的皮膚造成傷害。
! 在無人照料下,不得讓兒童留在兒童保護裝置內。
! 任 何 行 李 或 其 他 可 能 在 碰 撞 中 造 成 傷 害 之 物 品 應 適 當 牢 固。
! 當本兒童保護裝置沒有座布時,請勿使用,因座布為兒童保護裝
置束縛性能之整體構成要件。
! 請勿使用非本製造商推薦的座布,否則會影響兒童安全 座椅的總
體 性 能。
! 請勿使用其它廠商生產的兒童保護裝置座墊。請與銷售商聯繫只
可使用Joie配件更換零件。
! 不要使用非說明書中所述以及兒童約束系統中所標示的其他受
力 點。
! 沒有任何兒童保護裝置可以保證100%遠離傷亡,然而正確的使
用本兒童保護裝置可 以 降 低 寶 寶 傷 亡 的 機 率。
! 請勿在未閱讀或了解本兒童保護裝置說 明 書 及 汽 車 說 明 書 之 前,
使用或安裝本兒 童 保 護 裝 置,因 為 可能會導致嚴重受傷或死亡的
危 險。
! 本兒童保護裝置如有任何損壞或零件缺失時,請勿繼續使用。
! 請勿讓您的寶寶穿著過大的衣物,所穿的衣物必須能讓兒童保護
裝置的安全帶適當而安全地扣在寶寶兩腿之間。
! 請勿將未使用ISOFIX固定裝置固定住的兒童保護裝置留在車
內,以免緊急剎車時,傷害到其他乘客。若不經常使用兒童保護裝
置時,請將其搬離汽車座椅。
! 後向使用時,嚴禁將本兒童保護裝置裝置於有空 氣囊的座位上
使 用。
! 請勿使用二手兒童保護裝置或來歷不明的兒童保護裝置,因 為
它們可能會有危害寶寶安全的潛在危險。
! 請勿將本兒童保護裝置當作平常的椅子使用,會容易翻倒造成
傷 害。
! 請勿在兒童保護裝置內 放 置 其 他 內 墊 物 品。
! 請勿搬運乘坐著兒童的兒童保護裝置。
! 請勿讓汽車車門卡住兒童保護裝置的 任 何 組 件。
! 長期不使用兒童保護裝置時,請將其搬離汽車座椅。
! 使用本產品前,請取掉PE袋和包裝材料,並放到嬰兒和兒童觸摸
不 到 的 地 方。
! 有關零件更換或維修問題,請向銷售商查詢。
! 請勿將任何物品置於支撐腳附近。
! 兒童保護裝置不能安裝於前座之位置。
! 請時常查看ISOFIX導向器是否有髒汙,必要時請清洗導向器。
髒汙、灰塵、食物殘渣等會影響產品安裝的穩定性。
! 以下汽車座椅不能安裝本兒童保護裝置:
1. 不具備ISOFIX固定裝置的汽車座椅。
2
. 相對於汽車的行駛方向,橫向或後向 的 汽 車 座 椅。
3
. 安裝時不穩定的 汽 車 座 椅。

27 28
緊急情況處理
遇緊急事故時,需將安全帶剪斷,迅速將乘坐的兒童移離現場。
產品資訊
用ISOFIX固定器系統安裝
1. 此為ISOFIX兒童保護裝置,符合安全標準CNS 11497及歐盟
標準ECE R44。適用於裝有ISOFIX固 定 器 系 統 的 汽 車 座 椅。
2.
本兒童保護裝置適用於車輛配有經認可之ISOFIX安 裝 位 置。
(請參照車輛使用手冊)請依此兒童保護裝置之種類及ISOFIX
尺 度 等 級,安 裝 於 附 有 ISOFIX固定器之車輛座椅上。
若
有疑問,請洽兒童保護裝置製造商或車輛使用手冊。
3.
此兒童保護裝置適用ISOFIX尺度等級為︰B1、C和D級。
Allison Baby UK Ltd.
Venture Point, Towers Business Park,
Rugeley, Staffordshire, WS15 1UZ
產品名稱 車用兒童保護裝置
產品型號 C1416
適用範圍 18公 斤(約4歲 )以 下 的 寶 寶
主要材質 塑 膠、五 金、布
質量等級 0+/
I
淨 重 11.95公斤
產品尺寸 550mmx450mmx925-1215mm
製造日期 詳見產品上貼紙日期(年/月/日)
專利號碼 專利申請中
產 地 中國
委 製 商 巧兒宜國際股份有限公司
(進口商)
地 址 台北市內湖區瑞光路431號2樓
電 話 02-27973000
統一編號 52603333
代 理 商奇哥股份有限公司Chickabiddy Co., Ltd
地 址台北市南京東路四段186號5樓
服 務 專 線 0800-001-256 / 02-25781188
統一編號04222671
網 址 www.chick.com.tw

29 30
見圖 1- 2
安裝注意事項
1
24
3
57
6
1
24
3
57
6
1
2
3
A
I
R
B
A
G
2
1
寶寶體重
安裝模式
未滿18kg
安裝圖示 參考年齡 座椅段位
後向
安裝模式
前向
安裝模式
9-18kg
未滿4歲限定使用第1段
1-4歲1-5
Child's
Weight
Installation
Mode Installation Reference
Age
Recline
Position
<18kg
9 - 18kg
Rear
facing
mode
Forward
facing
mode
Approx
birth
to
4 years
Approx
1 year
to
4 years
Limit to use
the first
position
Position
1-5
安裝模式選擇
安裝底座
3
見圖 3- 12
! 展 開 底 座 支 撐 腳。

31 32
41
! 將ISOFIX導向器固定到ISOFIX固定
點上 4,ISOFIX導向器既可防
止汽車座椅表面被刮破,又可為
ISOFIX連接器安裝導向。
! 按壓底座的ISOFIX收合按鈕,拉出
ISOFIX連接器 5
! 請確定左右兩邊的ISOFIX連接器都
已固定到ISOFIX固定點上且兩個
ISOFIX連接器上的指示器應顯示綠色
6-1
! 按壓兩側ISOFIX調整按鈕 5-1,將
底座前後移動至合適位置 6
5
1
2
1
6
!將底座置於合適的汽車座椅,將支
撐腳延伸到地面。支撐腳正確安裝
時,支撐腳指示器顯示綠色,否則
顯示紅色。
!按壓支撐腳調整按鈕可將支撐腳向
上調整 7
!支撐腳有14個調整段位,支撐腳指
示器顯示紅色時,表示支撐腳
處於錯誤段位,請重新操作至正確
位置為止 8
!請確保支撐腳與汽車地面完全 接
觸。支撐腳正確安裝時支撐腳指示
器顯示綠色 8
!同時往外拉兩邊的ISOFIX連接器,
以確保底座正確安裝。
!ISOFIX連接器須鎖定在ISOFIX固定
點上 9-1
!底座支撐腳須正確固定,並以綠色
顯示 9-2
請參考後向與前向使用模式安裝兒
童安全座椅。
7
8
9
1
2

33 34
11
1
2
12
移除底座
移除底座時,按壓兩側ISOFIX調整
按鈕10 -1,將 底 座 向 外 拉 10 -2
按壓兩側ISOFIX連接器上的第二
道安全鎖與釋鎖按鈕,然後將底
座向外拉即可 11
按壓ISOFIX調整 按鈕收合ISOFIX
連接器12
見圖 13 - 14
按壓座椅背靠調整按鈕13 ,即可滑動
兒童安全座椅本體,並將兒童安全座
椅角度調至適當位置,角度調整後如
14 所示。
座椅背靠角度調整
13
10
1
2
1
2
14
頭靠及肩帶高度調整
請在座椅調整後再次檢查支撐腳是
否正確安裝。
後向限定使用最傾斜檔位(第1檔)
前向使用和後向使用的背靠角度有5
個段位。
見圖 15 - 17
1.調整頭靠位置,並且檢查肩帶是否
在適當位置 15
!當使用前向模式和後向模式時,
肩帶高度需與寶寶的肩膀相同或
略高於寶寶的肩膀15
15

35 36
2.按壓頭靠調整手把16 ,同時上下
滑動頭靠到合適高度,頭靠高
度共有6個段位,調整如 17 所示。
16
17
1
2
見圖 3- 9
!請先將此兒童安全座椅安裝到汽
車座椅上,再讓寶寶乘坐。
見圖 18 - 27
1.按壓兩側ISOFIX調整按鈕 18 -1,
將底座向外拉 18 -2
18
1
2
19
22
21
2
1
20
1
2
安裝兒童安全座椅
後向使用(未 滿 18kg/0-4歲的寶寶)
參考年齡 新生兒- 4歲
座椅段位 限定使用第1段
2.按壓旋轉按鈕旋轉座椅到要求的
方向 19 &21
3.按壓兩側ISOFIX調整按鈕
20 -1,將底座前後移動至合適
位置 20 -2
! ISOFIX連接器須鎖定在ISOFIX固
定點上21 -1
! 底座支撐腳須正確固定,並以綠
色顯示21 -2
寶寶乘坐
當寶寶放入座椅後,請確認肩帶高度
是否調整在適當位置。
1.按壓織帶調整按鈕,同時將肩帶拉
出至適當長度22
Other manuals for spin 360 signature
1
Table of contents
Other Joie Car Seat manuals

Joie
Joie i-Quest signature User manual

Joie
Joie i-Spin 360 E User manual

Joie
Joie i-Gemm2 User manual

Joie
Joie I1404C User manual

Joie
Joie Signature i-Traver User manual

Joie
Joie elevate R129 User manual

Joie
Joie trillo shield User manual

Joie
Joie stages isofix User manual

Joie
Joie i-Spin Safe R User manual

Joie
Joie Tilt Locking Clip User manual