manuals.online logo
Brands
  1. Home
  2. •
  3. Brands
  4. •
  5. Knoll
  6. •
  7. Indoor Furnishing
  8. •
  9. Knoll Antenna Telescope User manual

Knoll Antenna Telescope User manual

Other manuals for Antenna Telescope

2

Other Knoll Indoor Furnishing manuals

Knoll k. bench User manual

Knoll

Knoll k. bench User manual

Knoll Stroke 665/420 User manual

Knoll

Knoll Stroke 665/420 User manual

Knoll 6TD00034 User manual

Knoll

Knoll 6TD00034 User manual

Knoll Pixel KYXW7236 User manual

Knoll

Knoll Pixel KYXW7236 User manual

Knoll Hipso User manual

Knoll

Knoll Hipso User manual

Knoll k.stand Electric User manual

Knoll

Knoll k.stand Electric User manual

Knoll Pixel KFXW4818 User manual

Knoll

Knoll Pixel KFXW4818 User manual

Knoll Pop Up User manual

Knoll

Knoll Pop Up User manual

Knoll k.stand Electric User manual

Knoll

Knoll k.stand Electric User manual

Knoll Pixel KYPW8436C User manual

Knoll

Knoll Pixel KYPW8436C User manual

Knoll SL-Base User manual

Knoll

Knoll SL-Base User manual

Knoll Islands 6TD00061 User manual

Knoll

Knoll Islands 6TD00061 User manual

Knoll Islands 6TD00062 User manual

Knoll

Knoll Islands 6TD00062 User manual

Knoll Tone Electric User manual

Knoll

Knoll Tone Electric User manual

Knoll Antenna Telescope User manual

Knoll

Knoll Antenna Telescope User manual

Knoll Antenna Telescope Parts list manual

Knoll

Knoll Antenna Telescope Parts list manual

Knoll Tone TBZES User manual

Knoll

Knoll Tone TBZES User manual

Knoll k.stand Electric User manual

Knoll

Knoll k.stand Electric User manual

Knoll Pixel KTXW7230 User manual

Knoll

Knoll Pixel KTXW7230 User manual

Knoll Generation User manual

Knoll

Knoll Generation User manual

Knoll 400 User manual

Knoll

Knoll 400 User manual

Knoll Islands Collection 6TD00064 User manual

Knoll

Knoll Islands Collection 6TD00064 User manual

Knoll Hipso User manual

Knoll

Knoll Hipso User manual

Knoll KCXA4818 User manual

Knoll

Knoll KCXA4818 User manual

Popular Indoor Furnishing manuals by other brands

Homelegance California 1662PEK-1CK Assembly instruction

Homelegance

Homelegance California 1662PEK-1CK Assembly instruction

Osmond Ergonomics FLO instructions

Osmond Ergonomics

Osmond Ergonomics FLO instructions

OVE ELOISE 42 installation manual

OVE

OVE ELOISE 42 installation manual

overstock MF286255 Assembly instructions

overstock

overstock MF286255 Assembly instructions

Sonoma 160-801 Assembly instructions

Sonoma

Sonoma 160-801 Assembly instructions

BOLERO Wicker Side Chair CF158 Care Instructions

BOLERO

BOLERO Wicker Side Chair CF158 Care Instructions

Coaster 4799N Assembly instructions

Coaster

Coaster 4799N Assembly instructions

Stor-It-All WS39MP Assembly/installation instructions

Stor-It-All

Stor-It-All WS39MP Assembly/installation instructions

Lexicon 194840161868 Assembly instruction

Lexicon

Lexicon 194840161868 Assembly instruction

Next AMELIA NEW 462947 Assembly instructions

Next

Next AMELIA NEW 462947 Assembly instructions

impekk Manual II Assembly And Instructions

impekk

impekk Manual II Assembly And Instructions

Elements Ember Nightstand CEB700NSE Assembly instructions

Elements

Elements Ember Nightstand CEB700NSE Assembly instructions

JWA CARY 68429 Assembly instruction

JWA

JWA CARY 68429 Assembly instruction

VIPACK AMORI AMKB9014 Assembly instructions

VIPACK

VIPACK AMORI AMKB9014 Assembly instructions

Rowico SANNA Assembly instructions

Rowico

Rowico SANNA Assembly instructions

Southern Enterprises CK556000TX Assembly instructions

Southern Enterprises

Southern Enterprises CK556000TX Assembly instructions

hygena 314/5041 Assembly instructions

hygena

hygena 314/5041 Assembly instructions

VINNOVA Kinsley 536060S manual

VINNOVA

VINNOVA Kinsley 536060S manual

manuals.online logo
manuals.online logoBrands
  • About & Mission
  • Contact us
  • Privacy Policy
  • Terms and Conditions

Copyright 2025 Manuals.Online. All Rights Reserved.

Antenna®Telescope™
Installation Instructions and
Parts Manual
Knoll Ofce
Antenna Telescope Installation Instructions
2ANTENNA®TELESCOPE™
©2021 Knoll Inc.
Contents
INTRODUCTION
Using the Antenna® Telescope™
Installation Instructions and Parts Manual 4
DUAL TABLES
Telescope Dual Table Bases with Beam (with or without Dual Utility Trays)
- Standard Electric 5
Telescope Dual Table Bases with Beam (with or without Dual Utility Trays)
- Extended Electric 15
Telescope Dual Table Bases with Mixed or Fixed Base 24
SINGLE SIDED TABLES
Telescope Single Sided Table Bases with Beam
(with or without Utility Tray), Stand-Alone Application 27
Telescope Single Sided Table Bases with Beam
(with or without Utility Tray), Side by Side Application 37
120 DEGREE TABLES
Telescope 120˚ Triad with Beam
(with or without Dual Utility Trays) 41
RETURNS
Telescope Return Bases 54
Y-BASE TABLES
Telescope Y-Base Adjustable Height Tables 61
END PANELS
Telescope End Panels for Dual Tables 67
Telescope End Panels for Single Sided Table 71
SCREENS
Telescope Fixed Center Screen, Fabric 76
Telescope Fixed Center Screen,
Glass, Laminate or Veneer 79
POWER AND CABLE MANAGEMENT
Telescope Power Strip 83
Telescope 120 Power Strip 86
Telescope Z-Managers 89
Telescope Hinged Cleat Plate Covers 94
Telescope Hinged Cleat Plate Covers for 120 Degree Application 96
Telescope Communications Mounting Plate 99
Telescope Dual Utility Tray Covers 102
Antenna Telescope Installation Instructions
3ANTENNA®TELESCOPE™
©2021 Knoll Inc.
POWER RATING - 120VAC, 60Hz, 3.2A.
WARNING - RISK OF INJURY
Max Load includes the weight of the table top(s). Loading is to be uniformly distributed.
Max Load (2-Leg Stations) 265 lbs / 120 kg.
Max Load (3-Leg Stations) 397 lbs / 180 kg.
WARNING - RISK OF ELECTRIC SHOCK.
Furnishing may have multiple cords. Make sure all cords are unplugged before any servicing or cleaning.
WARNING - RISK OF ELECTRIC SHOCK.
Connect this furnishing to a proper outlet only.
WARNING - RISK OF FIRE AND SHOCK
Use only SJT type 18 AWG cords.
WARNING - To reduce the risks of burns, fire, electric shock, or injury to persons: Use this motorized
device only as an electrically height adjustable table desk, in accordance with Operating Instructions.
IMPORTANT SAFETY INSTRUCTIONS
Read all Instructions before using the Knoll Antenna® Telescope™ Motorized Table.
Perform all Installation Steps sequentially as described in this Manual.
DANGER - To reduce the risk of electric shock:
1. Unplug all Telescope power cords from the electrical outlet before cleaning.
WARNING - To reduce the risks of burns, fire, electric shock, or injury to persons:
1. Unplug all Telescope power cords from outlets before installing or removing component parts.
2. Close supervision is necessary when this furnishing is used by, or near children, invalids, or disabled persons.
3. Use this furnishing only for its intended use as described in these instructions. Do not use attachments not recommended by the
manufacturer.
4. Never operate this furnishing if it has a damaged cord or plug, if it is not working properly, if it has been dropped, damaged, or
water-damaged. Return the furnishing to a service center for examination and repair.
5. Keep all Telescope cords away from heated surfaces.
6. Do not use outdoors.
7. Wiring (cord) channels should not be used for routing extension cords.
8. Flexible cords of accessories or portable furnishings should not be routed across one complete unit of work surface to another.
9. Electrically interconnected furnishings must be mechanically interconnected.
10. While routine maintenance checks & fastener adjustments are recommended, there are no user-serviceable component parts in
the Telescope Motorized Table. Contact your Knoll Dealer or go to www.knoll.com for repair service guidance.
GROUNDING INSTRUCTIONS
Double Insulatedor class 2 electrical products that have been designed not to require a safety connection to electrical earth (These products
must NOT have a safety connection to Earth)
CAUTION - These Telescope Motorized Height Adjustable Table configurations may have multiple power supply cords. Do not
unplug only one power supply cord during movement, testing or repair of such configurations.
SAVE THESE INSTRUCTIONS
Antenna Telescope Installation Instructions
4ANTENNA®TELESCOPE™
©2021 Knoll Inc.
Using the Antenna®Telescope™
Installation Instructions and Parts Manual
An Overview
Each section of the Installation Instructions
and Parts Manual contains information to
guide you through Antenna®Telescope™
installations and to help you determine which
parts you may need to order as replacements
or to supplement reconfigurations.
Each page contains the
following sections:
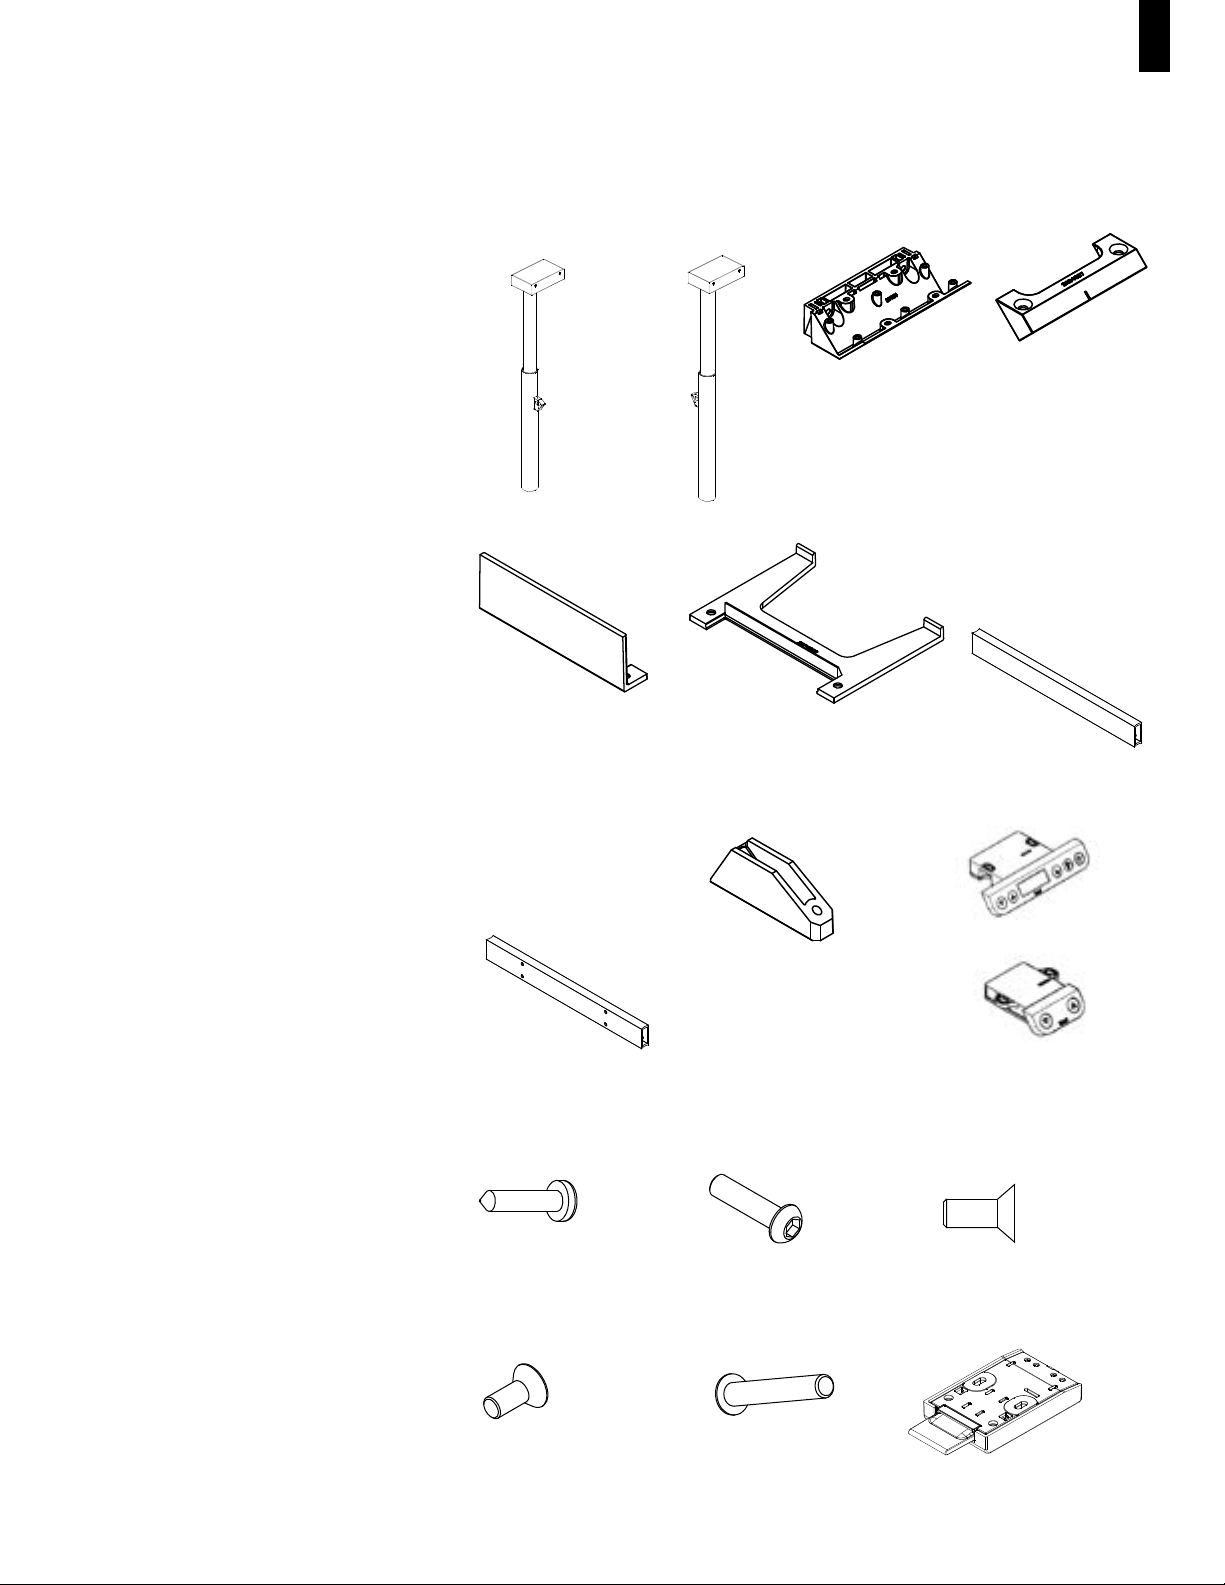
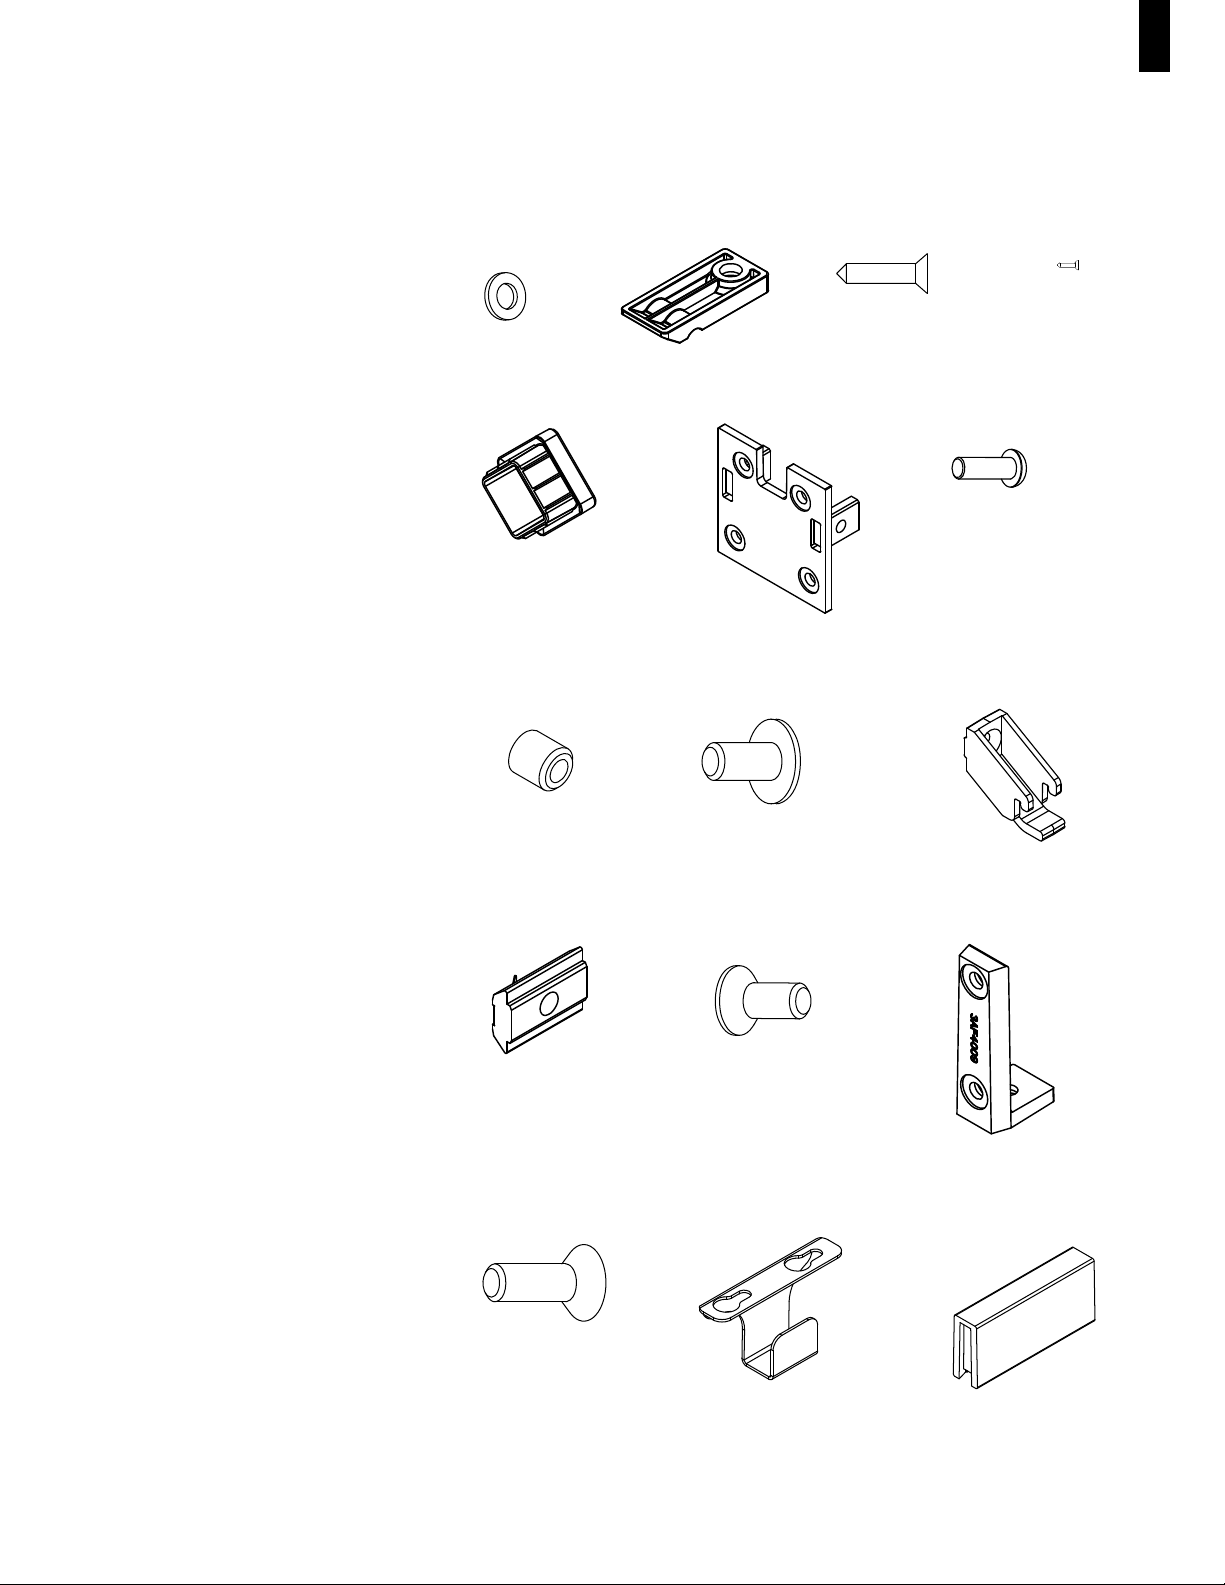
The Parts List section contains a lettered
list of the essential component parts
required for the application’s installation.
Items required that may vary in size, (i.e.
worksurfaces or rails), have not been lettered,
and replacements should be ordered
directly from the Price List or by contacting
Field Services for the correct part.
The Tools Needed section contains
a list of the installation tools that will be
required on site for the proper installation
of the application or configuration.
A Graphic Section has been included,
to the right of the Parts List, depicting
images of the component parts with
lettered codes that correspond to those
in the Parts List. Each part is shown with
its associated part number above.
NOTE: Part numbers with an asterisk, i.e.
*, after the number require a paint finish
code to be added to the end of the pattern
number to be orderable as a replacement
part. Please refer to the Finish Code listing at
the end of this page for the available codes.
NOTE: Part numbers with empty brackets,
i.e. (_), after the pattern number indicate
that a laminate or veneer finish code must
be added to the end of the pattern number
to be orderable as a replacement part.
Please refer to the Finish Code listing in the
Antenna™ Workspaces Price List for the
available finish codes for those products.
Please note that not all parts are
available in all finishes. Finish options
available for component parts match
those available when ordered with the
complete items’ pattern number per the
Antenna™ Workspaces Price List.
The Steps section details step-by-
step instructions for the installation of
the application selected. Each step
includes references to the lettered items
noted in the Parts List at the top of the
page and in the graphic section.
A Drawings section follows the steps
section providing detailed assembled
and exploded drawings to further
assist in installation and in determining
replacement parts required.
How to Order Parts
1. Look in this document’s bookmarks
to locate the configuration which
best fits the application.
2. Go to the page where that application
is described and thoroughly review all
installation instructions to determine
the part number(s) needed.
3. Unless otherwise noted, the standard
package quantity is one (1). When
ordering products where the quantity
per package is listed, please indicate
the number of packages required in
the quantity column of your order.
4. Be sure to add "KR" to the
beginning of each part number.
5. Be sure to include any finish
codes required to complete
the pattern number(s).
6. Complete a Knoll Service order,
which can be sent to your Knoll
Customer Service Representative.
If you have any questions about the
contents of this manual, please call
your Customer Service Representative
or Field Service at 800-343-5665.
Paint Finish Codes:
111T - Jet Black
112T - Brown
113T - Dark Grey
114T - Folkstone Grey
115T - Medium Grey
116T - Sandstone
117T - Soft Grey
118T - Bright White
611T - Beige Metallic Mist
612T - Medium Metallic Grey
613T - Silver
130T - Dark Red
131T - Slate Blue
Introduction
Antenna Telescope Installation Instructions
5
©2021 Knoll Inc.
Telescope Dual Table Bases with Beam
(with or without Dual Utility Trays) - Standard Electric
Pattern Numbers Represented:
Telescope Base, Standard Electric, with Beam
and Dual Trays, Standalone, YBTESBTS_
Telescope Base, Standard Electric, with
Beam and Dual Trays, End, YBTESBTE_
Telescope Base, Standard Electric, with Beam
and Dual Trays, Intermediate, YBTESBTI_
Telescope Base, Standard Electric, with
Beam Only, Standalone, YBTESBNS_
Telescope Base, Standard Electric, with
Beam Only, End, YBTESBNE_
Telescope Base, Standard Electric, with
Beam Only, Intermediate, YBTESBNI_
Parts List:
Right Hand Column Leg (A)
Left Hand Column Leg (B)
Horizontal Rail Cradle (C)
Cradle Clamp Bracket (D)
Housing Cover (E)
Transformer Shelf (F)
Starter Crossbar (G)
Mid Crossbar (H)
Pull Block (I)
Handset Control Switch (J)
#6 x 5/8" Wood Screw (K)
5/16-18 x 1 1/4" Button Head Hex Machine Screw (L)
1/4-20 x 5/8" Flat Head Phillips Machine Screw (M)
5/16-18 x 3/4" Flat Head Hex Machine Screw (N)
5/16-18 x 2" Button Head Hex Machine Screw (O)
(A) Right Hand Leg
3AF4020*
(E) 3AF4003*
(I) 3AF4060
(M) 7189140
(B) Left Hand Leg
3AF4021*
(F) 3AF4002*
(J) Handset Control Switch
(N) 4A22216
(C) 3AF4004*
(G) Starter crossbar
(varies – G1 beam, G2
beam with tray
G1: 3AF409103*
G2: 3AF409105*
(H) Mid crossbar (varies-
H1 beam, H2 beam with
tray)
H1: 3AF409104*
H2: 3AF409106*
(K) 7528496
(O) 4A22214
(D) 3AB4007*
(L) 4A22212
J2 Standard up/down:
3AF4102
J1 Digital: 3AF4103
(P) Toggle Handset:
3AF4248
DUAL TABLE BASES
Antenna Telescope Installation Instructions
6
©2021 Knoll Inc.
Telescope Dual Table Bases with Beam
(with or without Dual Utility Trays) - Standard Electric
Parts List, con't:
Washer (P)
Spacer (Q)
#12 X 3/4" Flat Head Black Wood Screw (R)
#14 x 1" Flat Head Wood Screw (S)
Rail End Caps (T)
Center Beam Mounting Plate (U)
1/4-20 x 3/4" Button Head Machine Screw (V)
M8-1.25 x 8mm Hex Set Screw (W)
1/4 -20 x 5/8" Flanged Button Head Hex
Machine Screw (X)
Utility Tray Bracket (Y)
M6-1 Spring Nut (Z)
M6 – 1 x 14mm Flat Head Machine Screw (AA)
Dovetail Linking Bracket (BB)
1/4 -20 x 3/4" Flat Head Machine Screw (CC)
Wire Hanger (DD)
Connector Link (EE)
iDrive Cable Kit: (Varies)
31"= KRAE4027
47"= KRAE4028
63"= KRAE4029
78"= KRAE4030
Power Supply w/ Splitter: KR3AF5045
Power Cord: KR68005498
Splitter: KR3AF5044
Rails
Tops
Center Beam
Dual Utility Trays
Tools Needed:
Power Driver
Phillips #2 and #3
Allen Wrench
Rubber Mallet
5/32", 3/16", 1/4" hex bit sockets
Ratchet Torque Wrench (150 in-lb) for 3/16" Hex Bit Socket
4mm Allen Wrench
Level (or laser level)
(Q) 3AB401252 (R) 7196440 (S) 7434100
(P) 4A22215
(T) 3AB4000* (U) 3AF4017* (V) 7283140
(W) 4A22218
(Z) 3AB402196
(CC) 7418440
(X) 4A22222
(AA)
3AB405640
(DD) 3AF4090
(Y) 3AF4048*
(BB) 3AF4009
(EE) 3AF4010*
DUAL TABLE BASES
Antenna Telescope Installation Instructions
7
©2021 Knoll Inc.
Telescope Dual Table Bases with Beam
(with or without Dual Utility Trays) - Standard Electric
Dual Table Assembly With Beam
and Dual Utility, End Position, Plan View
Dual Table Assembly With Beam
and Dual Utility
DUAL TABLE BASES
Antenna Telescope Installation Instructions
8
©2021 Knoll Inc.
Telescope Dual Table Bases with Beam
(with or without Dual Utility Trays) - Standard Electric
Desk Rails
Upper Housing Box
CAUTION
Provided cords on this tray shall
not be routed across or through
more than either one complete unit.
Dual Utility Tray
Center Beam
Column Leg
Assembly
Crossbar
Dual Table Assembly With Trays and Beam, End Position
Exploded View
!
DUAL TABLE BASES
Antenna Telescope Installation Instructions
9
©2021 Knoll Inc.
Telescope Dual Table Bases with Beam
(with or without Dual Utility Trays) - Standard Electric
STEPS
Note: Before assembly, determine if table
is “standalone", “end", or “intermediate" in
application.
PREPARE LEGS & CROSSBARS:
1. Attach (2) Horizontal Rail Cradles (C) to the
upper housing boxes on the Right Hand
and Left Hand Column Leg Assemblies
(A/B), with (2) 5/16-18 x 1 1/4" button head
hex machine screws (L) per cradle.
2. Attach a Housing Cover (E) to the short
end of each housing, using (2) 1/4-20 x
5/8" flat head Phillips machine screws (M)
per cover.
3. Attach a Transformer Shelf (F) to the
opposite side of each housing, using (2)
1/4-20 x 5/8" flat head Phillips machine
screws (M) per shelf.
Note: Do not attempt to rotate the outer
column tube unless the column is moving
either upward or downward. If it is
necessary to orient the welded column
bracket, you must first, temporarily
connect a power supply and handset.
Then plug the power supply to building
power. Depress the Up button to run the
column upward, ONLY while the column
is running, rotate the outer column tube to
orient the bracket as shown in the above
image. Lower the column and disconnect
the power supply from the building power,
then from the leg.
Exploded Table Base With Beam and
Dual Utility Trays Assembly, Steps 1-3
Step 1
Step 3
Step 2
1/4-20 x 5/8"
Flat Head Phillips
Machine Screw (M)
Left Hand Column
Leg Assembly (B)
Right Hand Column
Leg Assembly (A)
Housing
Cover (E)
5/16-18 x 1 1/4" Button Head
Hex Machine Screw (L)
Horizontal Rail
Cradle (C)
Transformer Shelf (F)
1/4-20 x 5/8"
Flat Head Phillips
Machine Screw (M)
DUAL TABLE BASES
Antenna Telescope Installation Instructions
10
©2021 Knoll Inc.
Telescope Dual Table Bases with Beam
(with or without Dual Utility Trays) -
Standard Electric
4. Determine requirement for Starter
Crossbars (G) and/or Mid Crossbars (H),
based on table application.
Note: The Starter Crossbars will have
holes on the inside of them to accept the
legs and beam (and utility trays, where
specified). Mid Crossbars will have holes
on both sides; i.e., the inside has holes for
the legs and beam (and utility trays where
specified), and the outside has holes for
linking brackets.
5. For each required crossbar (G/H), place
a Pull Block (I) into each end, and attach
securely with (2) 5/16-18 x 3/4" flat head
hex machine screws (N) per pull block in
the underside of the crossbar.
CONNECT BEAM TO CROSSBARS
6. Ensure the crossbars are oriented right
side up and so the insides are facing one
another. Attach a Center Beam Mounting
Plate (U) to the inside of each crossbar,
using (4) 1/4-20 x 3/4" button head
machine screws (V) per plate. Insert M8-1
1/4 x 8mm hex set screws (W) into both
tabs on the sides of both plates (U), such
that the hex recesses are outward.
7. Ensure the Center Beam is oriented
correctly (the top of the beam has a slot
within a deep recess, the bottom of the
beam has a slot within a wide recess),
mate the beam to one of the mounting
plates (U), and secure by tightening the set
screws (W) with a 4mm hex driver. Repeat
for the other end.
8. Turn the large beam/crossbar “I" assembly
upside down. Position the (4) legs upside
down as well, and in their relative positions
at the ends of the crossbars.
CONNECT CROSSBARS TO LEGS
9. With the legs upside down, connect the
leg assemblies to the crossbars by sliding
the ends of the crossbars onto the welded
column brackets, and joining with (2) 5/16-
18 x 3/4" flat head hex machine screws
(N), loosely, into each bracket. Do not
tighten at this time. Allow the screws to
seat in the counter sinks and perform the
next steps.
10.Place a washer (P) on a 5/16-18 x 2"
button head hex machine screw (O) and
insert it into the bottom of the crossbar at
an angle to penetrate the pull block and
thread into the column bracket. Torque
screw to 150 in. lbs. (17 Nm). Repeat for
the three other crossbar ends. Tighten
the (4) pairs of flat head machine screws
previously left loose. Turn assembly right
side up.
Exploded Table Base With Beam and
Dual Utility Trays Assembly, Steps 4-10
Pull Block (I)
Center Beam
Center Beam
M8-1 1/4 x 8mm
Hex Set Screw (W)
1/4-20 x 3/4" Button
Head Machine
Screw (V)
Center Beam
Mounting Plate (U)
Starter or Mid
Crossbar (G/H)
Starter Crossbar (G)
or Mid Crossbar (H)
5/16-18 x 3/4" Flat
Head Hex Machine
Screw (N)
5/16-18 x 2" Button Head
Hex Machine Screw (O)
Washer (P)
Starter Crossbar (G)
5/16-18 x 3/4"
Flat Head
Hex Machine
Screw (N)
Step 5 Connecting Beam to
Crossbar Detail, Steps 6 & 7
Steps 9 & 10
DUAL TABLE BASES