manuals.online logo
Brands
  1. Home
  2. •
  3. Brands
  4. •
  5. Kohler
  6. •
  7. Bathroom Fixture
  8. •
  9. Kohler 72660 Series User manual

Kohler 72660 Series User manual

BEFORE YOU BEGIN
กอนเริ่มการติดตั้ง
INSTALLATION INSTRUCTIONS
ขอแนะนําการติดตั้ง
ระยะการติดตั้ง ROUGH-IN DIMENSIONS
836416-X2-B 4
836416-X2-B 1
มาตรฐานผลิตภัณฑ STANDARD APPLICABLE
ผลิตภัณฑผลิตภายใตมาตรฐานผลิตภัณฑอุตสาหกรรม (มอก.)
Special model meets or exceeds the following at date
of manufacture: TIS
*Dimensions are approximate.
*ขนาดระยะแสดงคาโดยประมาณ
*Unit: mm
*หนวย: มม.
CARE AND CLEANING
การดูแลรักษาและทําความสะอาด
For best results, keep the following in mind when
caring for your product:
Always test your cleaning solution on an
inconspicuous area before applying to the entire
surface.
Wipe surfaces clean and rinse completely with
water immediately after applying cleaner. Rinse and
dry any overspray that lands on nearby surfaces.
Do not allow cleaners to soak on surfaces.
Use a soft, dampened sponge or cloth. Never use
an abrasive material such as a brush or scouring
pad to clean surfaces.
•The ideal cleaning technique is to rinse thoroughly
and blot dry any water from the surface after each
use.
•
•
•
•
เพื่อการดูแลรักษาและทําความสะอาดผลิตภัณฑของทาน
อยางมีประสิทธิภาพ โปรดปฏิบัติตามคําแนะนําดังนี้
• ทดสอบน้ำยาทําความสะอาดกับพื้นผิวผลิตภัณฑในบริเวณ
ที่ไมเปนที่สังเกตกอนใชนํ้ายาทําความสะอาด
• หลังจากที่ใชนํ้ายาทำความสะอาด เช็ดทำความสะอาดและ
ลางนํ้าออกทันที จากนั้นเช็ดใหแหง
• หามแชนํ้ายาทำความสะอาดบนพื้นผิวผลิตภัณฑ
• ใชฟองนํ้าหรือผานุมทำความสะอาดพื้นผิวผลิตภัณฑ หามใช
วัสดุหยาบ เชน แปรงหรือแผนขัด
• ขอแนะนำในการดูแลพื้นผิวผลิตภัณฑคือ ลางนํ้าสะอาดใหทั่ว
และเช็ดคราบนํ้าบนพื้นผิวผลิตภัณฑหลังจากการใชงานทุกครั้ง
72660X วาลวปรับทางน้ำพรอมฝกบัวสายออน
Deck-Mount Handspray & Diverter
All information is based on the latest product
information available at the time of publication.
Kohler Co. reserves the right to make changes in
product characteristics, packaging, or availability at
any time without notice.
Please leave these instructions for the consumer.
They contain important information.
NOTES:
1. Shut off the main water supply.
2. Carefully read entire instructions before begining
installation.
3. Observe local plumbing codes.
4. This faucet have diverter function only. It must be
installed in conjunction with a bath faucet(purchased
separately) that has both on/off and hot/cold mixing
control.
5. The minimum inlet water pressure for the diverter is
0.05MPa(0.5bar).
6. The highest working pressure for handspray is
0.5MPa(5bar). If it exceeds 0.5MPa(5bar), a
pressure reducer is needed. The highest water and
environment temperature is 60°C. Please keep
handspray, showerhead and the shower arm away
from heater, or it may become damaged and cause
injury to the user.
G1/2"
Ø122
79
255
58 58
G1/2" G1/2"
28 28
MAX/ไมเกิน.32
44
79
วาลวปรับทางน้ำพรอมฝกบัวสายออน
ขอมูลในคูมือนี้มาจากขอมูลผลิตภัณฑลาสุดที่มีอยูในชวงเวลาการ
จัดพิมพ บริษัทฯขอสงวนสิทธิ์ในการเปลี่ยนแปลงขอมูลผลิตภัณฑ
บรรจุภัณฑที่มีอยูโดยมิตองแจงใหทราบลวงหนา
คูมือนี้มีขอมูลสำคัญ โปรดมอบเอกสารใหกับเจาของผลิตภัณฑ
ขอสังเกต:
1. ปดวาลวทางน้ำเขา
3. ตรวจสอบระบบสุขาภิบาล
5. แรงดันน้ำไมต่ำกวา 0.05 เมกะปาสคาล(0.5 บาร)
4. กอกน้ำรุนมีวาลวเปลี่ยนทางน้ำเทานั้น โดยตองติดตั้ง
คูกับกอกอางอาบน้ำ(จำหนายแยก)
ทีี่มีทั้งระบบควบคุมการเปด/ปดและน้ำรอน/น้ำเย็น
2. โปรดอานคูมือกอนการติดตั้ง
6. แรงดันน้ำสูงสุดสำหรับหัวฝกบัวคือ 0.5 เมกะปาสคาล
(5 บาร) หากมากกวา0.5 เมกะปาสคาล ตองใชตัวลดแรงดันน้ำ
อุณหภูมิน้ำสูงสุดที่ 60°C โปรดเก็บ ฝกบัว
ใหหางจากเครื่องทำความรอนซึ่งอาจทำให
ผลิตภัณฑเสียหายหรือผูใชงานไดรับบาดเจ็บ
836416-X2-B 2
836416-X2-B 3
INSTALLATION
HANDLE OPERATION
When the bath faucet is open and water is flowing from
the bath spout, press the diverter down to change flow
to the handspray.
How To Install The Diverter
For optional spout, install spout shank
according to the spout installation
instructions. If possible, do not install
plated finished portion of the spout until
all other installation and construction is
complete. Put the washer(2) into the
nut(1), and then thread the nut to one
of the ports of the center Tee(3) until
tight(Remove the two hoses and put
them away).
1
3
2
Remove the knob(4), escutcheon(5),
base nut(6), rubber washer(7) from the
shank(8) of the body assembly in turn.
Place the body assembly(10) through
mounting hole from bottom of the deck
or bath tub. Put the rubber washer(7)
on the shank(8), and then thread nut(6)
with flange side down on the shank.
Wrench tight the nut(9).
Thread the escutcheon(5) on base
nut(6) until it contacts the deck or bath
tub. Then thread the knob(4) on the
diverter assembly.
4
5
6
7
8
9
10
11
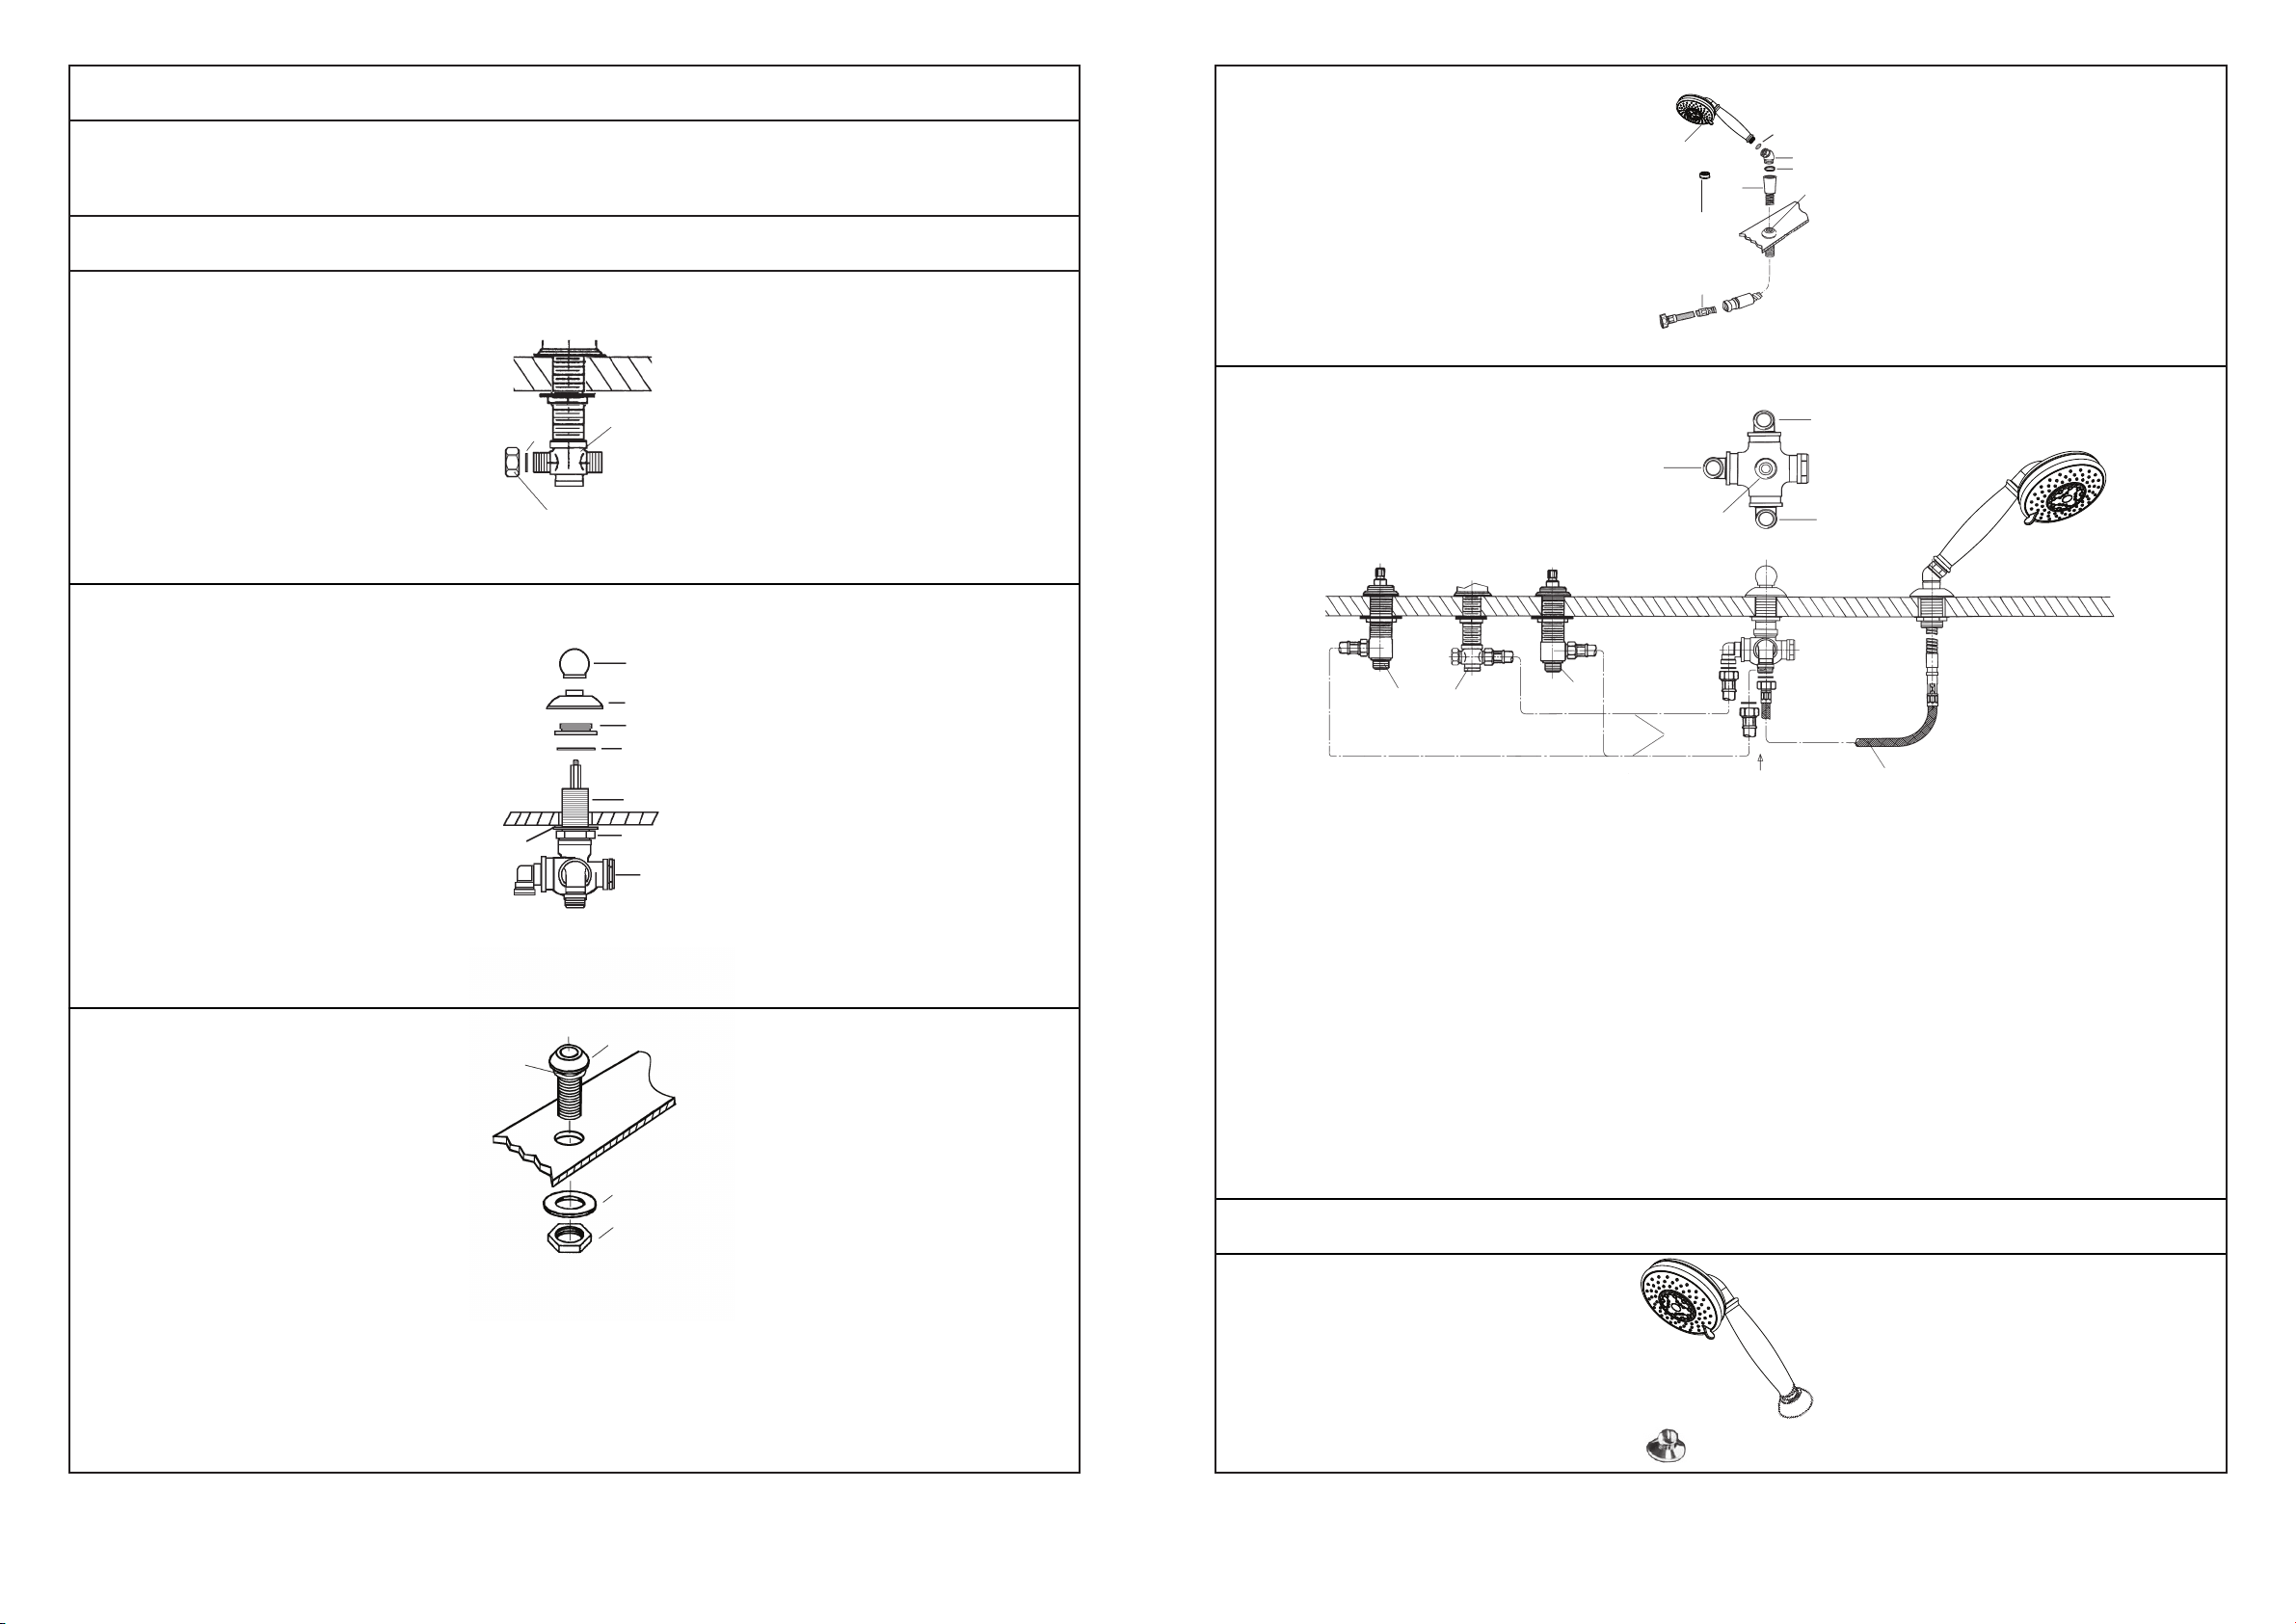
How To Install The Handspray
Remove the nut(15), washer(14). Put
the rubber washer(13) into the groove
of the escutcheon(12). Place the shank
into the hole. From underside, install
the washer(14) and nut(15) to the
shank. Then tighten the nut firmly.
15
14
12
13
Slide the hose(20) through the hose
guide(21), and attach to the hose(22).
Put the flow restrictor into handspray
inlet. Put the washer(17) into the elbow
assembly(18), and then thread them to
the handspray(16). Put the washer(19)
into the connector of the hose and
thread them to the elbow assembly.
17
16 18
19
20 21
Flow Restricter
22
ทดสอบการติดตั้ง INSTALLATION CHECKOUT
Put the fiber washer into connecting nut of the
hose(22). Then thread the nut to the handspray port
of the diverter. Put the fiber washer into each
connecting nut of the hose(23, length 1m). Then
connect the center Tee(3) to spout port of the
diverter, and connect the side bodies(24) to the hot or
cold port of the diverter(The hot and cold ports are
interchangeable). Tighten all the connecting nut.
To ensure the water flow smoothly and the hand
spray can be drawn out easily, the hose should avoid
kinking, twisting. To ease installation, you may back
off center Tee up to 180 degree.
Note: The hoses(23) should only be used here.
A
A View
มุม A
Handspray
ฝกบัว
Spout
กอกน้ำ
Hot(Cold)
น้ำรอน(น้ำเย็น)
Cold(Hot)
น้ำเย็น(น้ำรอน)
22
23
24 24
3
Ensure all coupling nuts are tight. Turn
on main water supply and check for
leaks. Repair as required.
Gently rotate the panel of the
handspray through the botton to get
three different flows.
การใชงานมือบิด
เมื่อเปดกอกลงอางอาบน้ำและน้ำไหลออกจากกอก
ใหกดวาลวเปลี่ยนทางน้ำลงเพื่อใหน้ำไหลเขาฝกบัว
การติดตั้ง
วิธีติดตั้งชุดวาลวเปลี่ยนทางน้ำ
สำหรับการติดตั้งหัวกอกน้ำใหติดตั้งเกลียว
หัวกอกน้ำตามคูมือแนะนำการติดตั้งกอกน้ำ
หากเปนไปได
ยังไมประกอบหัวกอกน้ำกระทั้งติดตั้งประกอบ
อุปกรณอื่นๆ ใหเสร็จเรียบรอย สวมแหวนรอง(2)
เขากับนอต(1) และขันนอต
เขากับขอตอที่หนึ่งของขอตอสามทาง(3) ใหแนน
(ถอดสายน้ำดีทั้งสองเสนออก)
ถอดกานดึง(4), ฐานรอง(5), นอต(6),
แหวนรองยาง(7) ออกจากเกลียว(8)
ของชุดกระบอกวาลว
วางชุดกระบอกวาลว(10)
เขากับรูกอกจากดานลางของอางอาบน้ำ
หรือขอบอาง สวมแหวนรองยาง(7) เขากับเกลียว(8)
จากนั้นขันนอต(6) โดยหันสวนที่เปนหนาแปลน
ลงบนเกลียว จากนั้นใชประแจขันนอต(9) ใหแนน
ขันฐานรอง(5) เขากับนอต(6)
จนกระทั้งติดกับพื้นผิว จากนั้นขันกานดึง(4)
เขากับชุดวาลวเปลี่ยนทางน้ำ
วิธีติดตั้งฝกบัว
ถอดนอต(15), แหวนรอง(14) สวมแหวนรองยาง(13)
เขากับรองดานใตของฐานรอง(12)
สวมกานเก็บชุดฝกบัวเขากับรูกอก
จากดานลางของอางอาบน้ำสวมแหวนรอง(14)
และนอต(15) เขากับกานเก็บชุดฝกบัว
จากนั้นขันใหแนน
สวมสายน้ำดี(20) ผานฐานรอง(21)
และประกอบเขากับสายน้ำดี(22)
ตัวลดแรงดันน้ำ
สวมตัวลดแรงดันน้ำ
เขากับทางน้ำของฝกบัว สวมแหวนรอง(17)
เขากับของอ(18) และจากนั้นขันเขากับฝกบัว(16)
สวมแหวนรอง(19) เขากับขอตอของสายน้ำดี
และของอ
สวมแหวนรองไฟเบอร เขากับนอตของสายน้ำดี(22)
จากนั้นขันนอตเขากับขอตอฝกบัวของวาลวเปลี่ยนทางน้ำ
สวมแหวนรองไฟเบอร เขากับนอตของสายน้ำดี(23, ความยาว 1
เมตร) จากนั้นประกอบสายน้ำดีเขากับขอตอสามทาง(3)
และเชื่อมตอเขากับขอตอกอกน้ำของวาลเปลี่ยนทางน้ำ
ประกอบสายน้ำดีเขากับกระบอกวาลวและเชื่อมตอเขากับขอตอ
ทอน้ำรอนหรือน้ำเย็นของวาลวเปลี่ยนทางน้ำ(ขอตอน้ำรอนและ
น้ำเย็นสามารถสับเปลี่ยนกันได)
จากนั้นขันนอตตามขอตอทุกตัวใหแนน
ตรวจสอบใหแนใจวา น้ำไหลปกติและดึงฝกบัวออกได
อยางสะดวก หลีกเหลี่ยงการดัด,งอหรือหมุนสายน้ำดี
เพื่อความสะดวกในการติดตั้งใหกลับขอตอสามทางใหได 180 องศา
ขอสังเกต ตองใชสายน้ำดี(23) กับสวนนี้เทานั้น
ตรวจสอบใหแนใจวานอตทุกตัวขันแนน
จากนั้นเปดวาลวน้ำ เพื่อตรวจสอบการรั่วซึม
ซอมแซมหากเกิดการรั่วซึม
คอยๆหมุนหัวฝกบัว
เพื่อปรับหัวฉีดไดสามแบบ
836416-X2-B 5
การรับประกันสินคา LIMITED WARRANTY
Kohler (Thailand) Public Company Limited warrants to the original
products, which are purchased from authorized distributors and dealers
within Kingdom of Thailand only, to be free of defects in material and
workmanship.
Within the below mentioned periods from the date of purchase,
Kohler(Thailand) Public Company Limited will at its election, repair,
replace or make appropriate adjustment where company’s inspection
disclose any such defect occurring in normal usage and maintenance
but is not responsible for labor charges, removal charges, installation,
or other incidental or consequential costs. In no event shall the liability of
Kohler(Thailand) Public Company Limited exceed the purchase price
of the product. This warranty applies only to Kohler Faucets installed in
Thailand.
• Ceramic Valve(leak/drip)
- Lifetime Limited Warranty* for residential use
- and Five (5) Years for commercial use
• Finish Five(5) Years
• Fitting Five(5) Years
• Automatic faucet One(1) Year
• Hygiene spray(leak/drip Five(5) Years for selected models
from hygiene spray body) only
• Shower Five(5) Years
• Bathroom accessories Five(5) Years
This limited warranty DOES NOT COVER the defect or damage caused
by accident, natural disasters such as fire, flood, or earthquake, misuse
or abuse of products. Improper care and cleaning will avoid the warranty.
Consumers are responsible for the cost of service parts and service
fee for such cases.
To ensure continuous product quality and performance, as well as
product durability and lifetime, without any damage to the product,
consumers should purchase and use only genuine service parts and
after-sales services from Kohler (Thailand) Public Company Limited or
company’s authorized service centers, distributors, or dealers only.
*KOHLER® Faucet Lifetime Limited Warranty
Kohler (Thailand) warrants its faucets manufactured after January 1,
1997, to be leak and drip free during normal residential use for as long as the
original consumer purchaser owns his or her home. If the faucet should
leak or drip during normal use, Kohler (Thailand) will, free of charge;
replace
the new cartridge necessary to put the faucet in good working
condition.
Kohler (Thailand) also warrants all other aspects of the faucet or
accessories (“Faucet”)**to be free of defects in material and workmanship
during normal residential use for as long as the original consumer
purchaser owns his or her home. If a defect is found in normal residential
use, Kohler (Thailand) will, at its election, repair, provide a replacement
part or product, or make appropriate adjustment. Damage to a product
caused by accident, misuse, or abuse is not covered by this warranty.
Improper care and cleaning will also void the warranty.
Proof of purchase (original sales receipt) must be provided to
Kohler(Thailand) with all warranty claims. Kohler (Thailand) is not respon-
sible for labor charges, installation, or other incidental or consequential
costs. In no event shall the liability of Kohler (Thailand) exceed the
purchase price of the Faucet.
Important: Never use cleaners containing abrasive cleansers, ammonia,
bleach, acids, waxes, alcohol, solvents or other products not recom-
mended for chrome. This will void the warranty.
To obtain warranty service, please contact your dealers or contact the
KOHLER (Thailand) Call Center, together with proof of purchase at;
Call Center
KOHLER (Thailand) Public Company Limited
16th Floor, Jasmine City Building
2 Soi Sukhumvit 23, Sukhumvit Road,
Wattana, Bangkok 10110
Tel: 02204-6222 Fax: 0-2204-6224
Email: [email protected]
COPYRIGHT ©2014 BY KOHLER (THAILAND) PUBLIC COMPANY
LIMITED
SERVICE PARTS
อุปกรณประกอบและอะไหล
836416-X2-B 6
Call Center: +(66) 2204 6222
e-mail: [email protected]
**ระบุรหัสวัสดุเคลือบผิว/สีในการสั่งซื้อผลิตภัณฑ
**Color code must be specified when ordering
72660X วาลวปรับทางน้ำพรอมฝกบัวสายออน
Deck-Mount Handspray & Diverter
1080713
Diverter Assembly
ชุดวาลวเปลี่ยนทางน้ำ
833226
Hose
สายน้ำดี
898324**
Hose
สายฝกบัว
834428
Hose
สายน้ำดี
897637**
Elbow Assembly
ของอ
880110
Body and
Diverter Assy
ชุดวาลวและ
วาลวเปลี่ยนทางน้ำ
865140**
Knob
กานดึง
870973
O-Ring
โอริง
38676
O-Ring
โอริง
864706
Body Extension
สลักเกลียว
864503
Seat
ฐานรอง
864342
Nut
นอต
864342
Nut
นอต
865076
Base Nut
นอต
880060
Body Assembly
กระบอกวาลว
871572
Washer
แหวนรอง
830915
Steel Washer
แหวนรองโลหะ
830915
Steel Washer
แหวนรองโลหะ
871021
Rubber Washer
แหวนรองยาง
864909
Shank
กานเก็บชุดฝกบัว
831289
Washer
แหวนรอง
831289
Washer
แหวนรอง
831289
Washer
แหวนรอง
865141**
Escutcheon
ฐานรอง
1172476
Guide
แหวนนำรอง
865051**
Escutcheon
ฐานรอง
1202353**
Handspray
ฝกบัว
1218903
Water Flow Restrictor
ตัวลดแรงดันน้ำ
วาลวปรับทางน้ำพรอมฝกบัวสายออน

Other Kohler Bathroom Fixture manuals

Kohler K-R10434 Assembly instructions

Kohler

Kohler K-R10434 Assembly instructions

Kohler K-R99254X-4CD Assembly instructions

Kohler

Kohler K-R99254X-4CD Assembly instructions

Kohler K-2075 Assembly instructions

Kohler

Kohler K-2075 Assembly instructions

Kohler K-701802T-FMSW User manual

Kohler

Kohler K-701802T-FMSW User manual

Kohler QUICK-RELEASE QUIET-CLOSE K-17608T User manual

Kohler

Kohler QUICK-RELEASE QUIET-CLOSE K-17608T User manual

Kohler K-13688 Assembly instructions

Kohler

Kohler K-13688 Assembly instructions

Kohler K-691 Assembly instructions

Kohler

Kohler K-691 Assembly instructions

Kohler K-31500X Assembly instructions

Kohler

Kohler K-31500X Assembly instructions

Kohler C3-125 Assembly instructions

Kohler

Kohler C3-125 Assembly instructions

Kohler K-13680 Operating manual

Kohler

Kohler K-13680 Operating manual

Kohler K-7223 User manual

Kohler

Kohler K-7223 User manual

Kohler K-701800T-FMSW User manual

Kohler

Kohler K-701800T-FMSW User manual

Kohler Mariposa K-1239-HB Quick start guide

Kohler

Kohler Mariposa K-1239-HB Quick start guide

Kohler LOURE 98452T-CP User manual

Kohler

Kohler LOURE 98452T-CP User manual

Kohler STERLING 72141110 User manual

Kohler

Kohler STERLING 72141110 User manual

Kohler Symbio K-1315-H User manual

Kohler

Kohler Symbio K-1315-H User manual

Kohler KARAT K-17399 User manual

Kohler

Kohler KARAT K-17399 User manual

Kohler C3 K-4737T Assembly instructions

Kohler

Kohler C3 K-4737T Assembly instructions

Kohler K-817 User manual

Kohler

Kohler K-817 User manual

Kohler K-7710 Assembly instructions

Kohler

Kohler K-7710 Assembly instructions

Kohler NEW ELOSIS K-77218T-R User manual

Kohler

Kohler NEW ELOSIS K-77218T-R User manual

Kohler K-11050 Assembly instructions

Kohler

Kohler K-11050 Assembly instructions

Kohler ENGLEFIELD SAPPHIRE User manual

Kohler

Kohler ENGLEFIELD SAPPHIRE User manual

Kohler K-1014-H2 Assembly instructions

Kohler

Kohler K-1014-H2 Assembly instructions

Popular Bathroom Fixture manuals by other brands

Spectrum Brands Pfister Park Avenue G89-XFE Maintenance & Care Guide

Spectrum Brands

Spectrum Brands Pfister Park Avenue G89-XFE Maintenance & Care Guide

Fackelmann 82951 Instructions for mounting and use

Fackelmann

Fackelmann 82951 Instructions for mounting and use

Swiss Madison Concorde SM-BD229 installation instructions

Swiss Madison

Swiss Madison Concorde SM-BD229 installation instructions

Hans Grohe AXOR Starck 10720 Series Assembly instructions

Hans Grohe

Hans Grohe AXOR Starck 10720 Series Assembly instructions

Salvatori ANIMA TOILET ROLL HOLDER manual

Salvatori

Salvatori ANIMA TOILET ROLL HOLDER manual

PEERLESS P284510LF manual

PEERLESS

PEERLESS P284510LF manual

AREBOS AR-HE-SD40LT manual

AREBOS

AREBOS AR-HE-SD40LT manual

VADO AXCES IRLO AX-IRO-100M/CC-CP Instruction booklet

VADO

VADO AXCES IRLO AX-IRO-100M/CC-CP Instruction booklet

sanindusa unisan ALFA PLUS Assembling instructions

sanindusa

sanindusa unisan ALFA PLUS Assembling instructions

Aquaris 1052-CH installation manual

Aquaris

Aquaris 1052-CH installation manual

Cooke & Lewis Timor quick start guide

Cooke & Lewis

Cooke & Lewis Timor quick start guide

Alcoa Alumax Bath Enclosures STIKSTALL 792 Series installation instructions

Alcoa

Alcoa Alumax Bath Enclosures STIKSTALL 792 Series installation instructions

Triton Omnicare Installation and operating instructions

Triton

Triton Omnicare Installation and operating instructions

GRE AR1030 instruction manual

GRE

GRE AR1030 instruction manual

DURAVIT 2nd floor 2F 856C Mounting instructions

DURAVIT

DURAVIT 2nd floor 2F 856C Mounting instructions

Fackelmann LINO 80102 Instructions for mounting and use

Fackelmann

Fackelmann LINO 80102 Instructions for mounting and use

Hans Grohe Pulsify S Unica 900 24382 0 Series Assembly instructions

Hans Grohe

Hans Grohe Pulsify S Unica 900 24382 0 Series Assembly instructions

Tres Tres-Clasic 24235301 quick start guide

Tres

Tres Tres-Clasic 24235301 quick start guide

manuals.online logo
manuals.online logoBrands
  • About & Mission
  • Contact us
  • Privacy Policy
  • Terms and Conditions

Copyright 2025 Manuals.Online. All Rights Reserved.