KOKEN LM-101B User manual

Obstetric Assistant
Model Set
(Obstetric Model - Vulva II)
LM-101B
Instruction Manual
Thank you for purchasing the LM-101B Obstetric Assistant Model Set(Obstetric Model - Vulva II).
Please read this instruction manual carefully to ensure correct use of the product,
and store it in a safe place for easy access.
KOKEN CO., LTD.
1-4-14 Koraku, Bunkyo-ku, Tokyo 112-0004 JAPAN
URL:http://www.kokenmpc.co.jp
E-mail:[email protected]
C-1-1004-1-01-01

10000

1
Handling and Safety Precautions
These precautions should be strictly observed in order to ensure safe,
long-term use of the product.
The following precautions should be observed particularly strictly:
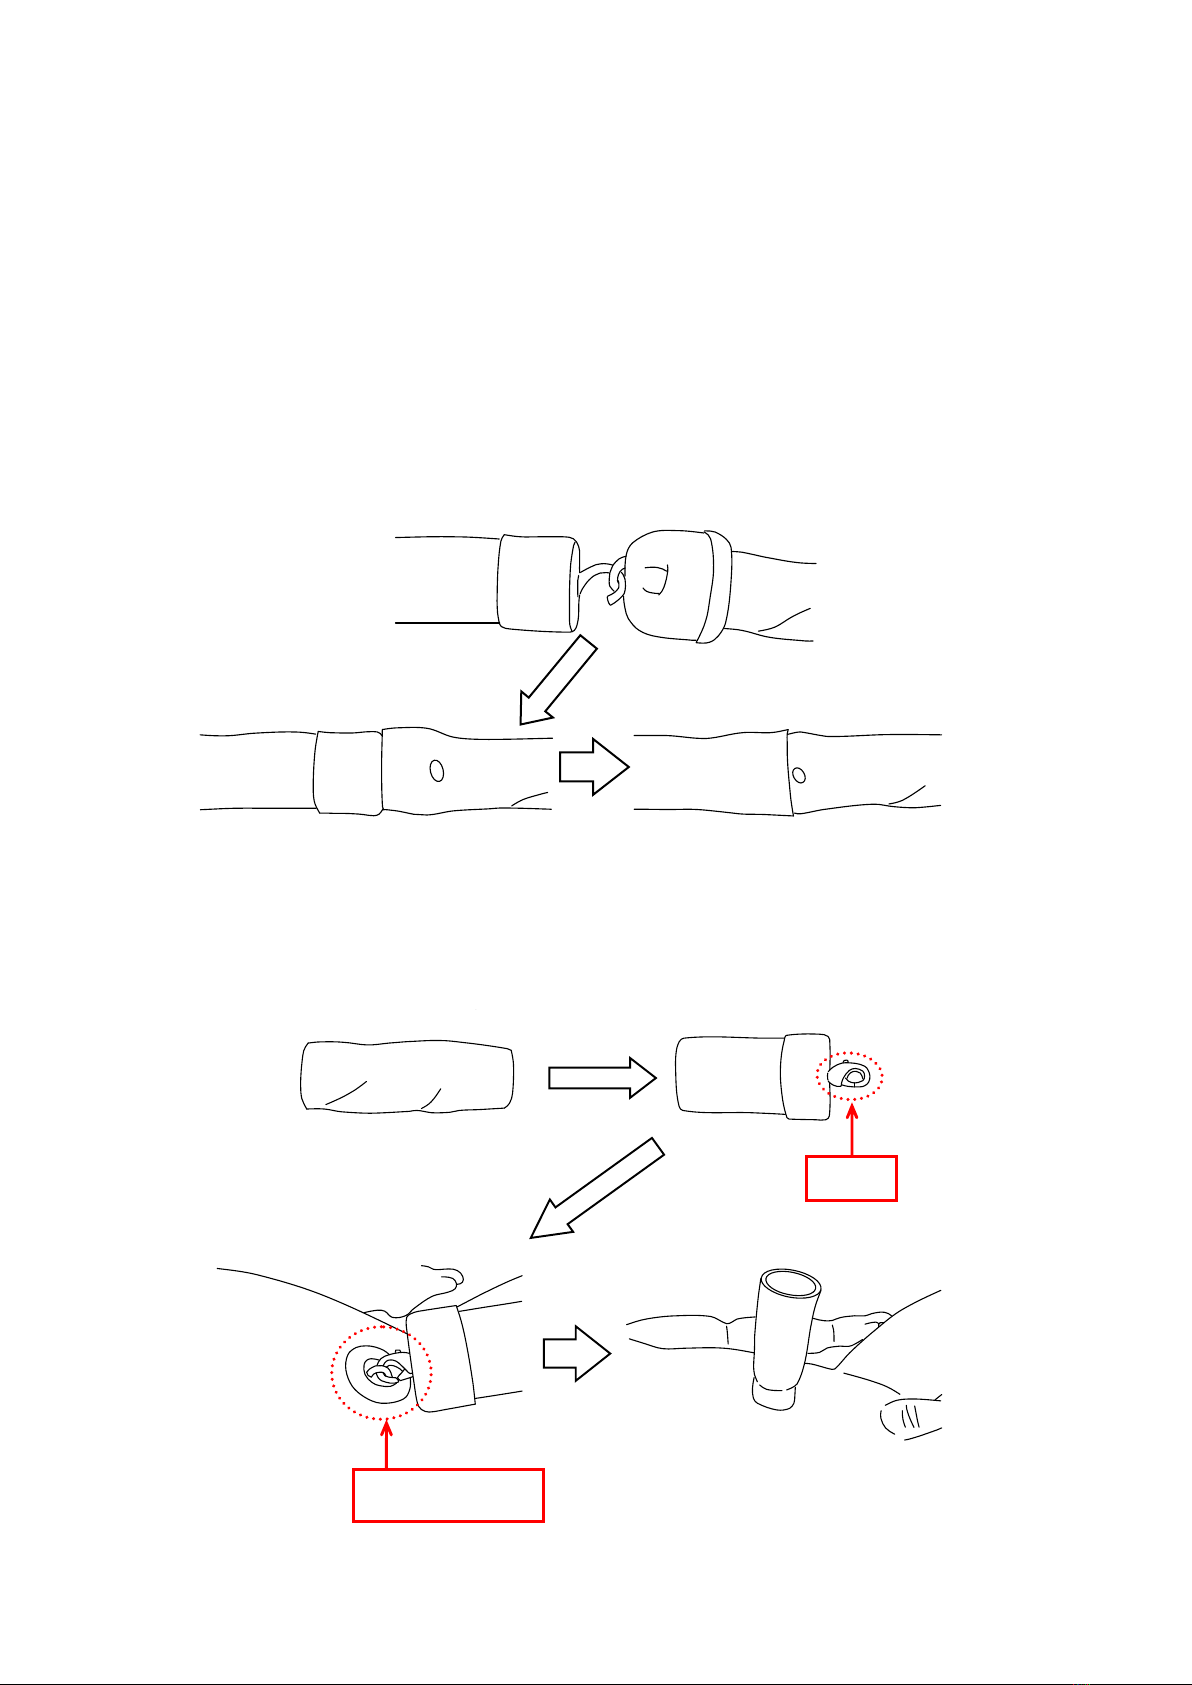
Obstetric model - vulva II and the umbilical cord kit (for tying and cutting)
1. This model is made with a special material to simulate the texture of human skin. Please handle
it with the same care that you would exercise when working with a human body. Pulling it with
excessive force or subjecting it to strong impact, such as dropping it, may cause damage.
2. The material of this model has a distinct odor, which fades with time. This odor is not harmful
to the human body and does not indicate poor quality. There may also be a baby powder smell
remaining on the product, as baby powder is applied to the models during fabrication.
3. Wear disposable gloves when handling the model.
4. Use glycerin to lubricate the models. Be sure to apply a sucient amount of lubricant (glycerin)
to the model before use. Koken is not responsible for deterioration or damage occurring from
use of lubricants other than glycerin. Use commercially available glycerin if you run out of the
glycerin provided with the model.
5. Placing objects directly on top of the model or placing the model on uneven surfaces may result
in deformation.
6. Do not use rubbing alcohol, thinners, benzene or other similar organic solvents on the model, as
doing so may cause damage.
7. Do not use oil-based inks, pencil, chalk, or paints on the model, as they will soak into the material
and cannot be removed.
8. If the surface becomes sticky after washing the model, generously apply baby powder to the
model to reduce friction.
9. The model may lose its shape after a long period of time. Check the shape of the model around
3 years after purchase. If it is deformed to the extent that functioning is aected, please consider
ordering a replacement.
10. Air bubbles or impressions in the model that may remain from the fabrication process do not
aect the strength of the material, as the material used is highly tear-resistant.
11. This model is washable. After washing, wipe o the remaining water with a soft, dry gauze or
cloth, and pat baby powder all over the model. (Do not clean the model with rubbing alcohol,
thinners, benzene or other similar organic solvents.)

2
12. Storing the model for an extended time in a high or low temperature environment may result
in deformation. Exposure to direct sunlight or UV rays may also alter its shape or color. Store the
model in a 0-50°C environment, in a place where it will not be exposed to direct sunlight or UV
rays.
13. Oil may leak from the model. For proper storage, wrap the model in paper towels, gauze, or
another type of cloth, and place it in the re-sealable plastic bag that came with the kit.
Fetal model and placenta model
1. Please handle this model with the same care that you would exercise when working with a
human body. Excessive force may result in damage to the model.
2. When delivering the placenta, avoid pulling too strongly on the umbilical cord.
3. Using the umbilical cord clip on the placenta model umbilical cord may cause it to tear. Use the
umbilical cord clip on the umbilical cord for tying and cutting.
4. Clamping the placenta model umbilical cord tightly with hemostatic forceps or clamping with
the base of the grip may tear the model. When using hemostatic forceps on the placenta model
umbilical cord, clamp lightly and avoid using the base of the grip.
Donotusethebaseofthe
gripforclamping.
Placentamodelumbilicalcord
*Donotusetheumbilicalcordcliphere.
Whenusinghemostaticforceps,clamp
lightlyandavoidusingthebaseofthegrip.
Umbilicalcordfortyingand
cutting
*Donotuseanumbilicalcordclip
otherthanthisparticularpart.

3
1. The contents of this instruction manual are subject to change without notice.
2. This instruction manual may not be reproduced in part or in its entirety without permission.
3. Please contact the manufacturer in the event that any errors or omissions are found in the contents of
this instruction manual.
4. This product should be used only as described in this instruction manual. In particular, the product
should not be used in any way that contravenes the precautions noted in the instruction manual.
5. Wash smudges or marks o the model with water. To clean stubborn smudges or marks, wash
with a neutral solvent diluted with water. After washing, wipe o the remaining water with a
soft, dry gauze or cloth.
*Do not clean the model with rubbing alcohol, thinners, benzene or other similar solvents.
6. Dropping the model or subjecting it to strong impact could cause damage.
7. Store the model in a place where it will not be exposed to direct sunlight or UV rays.

4
Table of Contents
1. OutlineandFeatures
2. PartsoftheObstetricAssistantModelSet
3. Usingtheset
4. CaringfortheModel
5. Specications
6. AccessoriesandOptionalItems

5
1. Outline and Features
Outline
This set allows trainees to practice a series of obstetric assistance techniques, such as protection of
the perineum and inspection of the fetus and placenta.
Features
・ The obstetric model - vulva II is made with a highly elastic and durable material that
decreases resistance and reduces the amount of force needed to extract the fetus during
delivery, enabling smooth practice.
(Use glycerin to lubricate.)
・ Protection of the perineum can be practiced.
・ Breech extraction can also be practiced as one type of emergency response.
・ The umbilical cord is soft and slides away from scissors when being cut, so that each one
can be used multiple times to practice tying and cutting. The fetal model and placenta
model can be attached to practice the entire sequence of steps from delivering the fetus to
tying the umbilical cord, cutting the umbilical cord, and delivering the placenta.
・ The placental membrane laceration part can be detached into three parts for inspection of
the placenta and checking whether or not the membrane is intact.

6
2.Parts of the Obstetric Assistant Model Set
flfififlfi
Fetal model
Placenta model
Main body
Obstetric model - vulva II
Fixing screws
Umbilical cord
Umbilical cord connector

7
- 6 -
3. Using the set
3-1. Attaching the obstetric assistant model - vulva II
Place the obstetric assistant model - vulva II on the main body, and secure it in place with
the fixing screws. (Rotate the screws with a flat-head screwdriver.)
3-2. Attaching the fetal model and placenta model
1.
Hold the umbilical cord for tying and cutting and roll down the end that has a hole in
it. A string loop will appear.
2.
Roll down the end of the umbilical cord attached to the placenta model (LM-0634)
until a hook appears on the end.
String loop
3. Using the set
3-1.Attachingtheobstetricmodel-vulvaII
Place the obstetric model - vulva II on the main body, and secure it in place with the fixing
screws. (A at-head screwdriver is required.)
3-2.Attachingthefetalmodelandplacentamodel
1. Hold the umbilical cord and roll down the end with a hole until a string loop appears.
2. Roll down the end of the umbilical cord attached to the placenta model (LM-0634) until a hook
appears on the end.
- 6 -
3. Using the set
3-1. Attaching the obstetric assistant model - vulva II
Place the obstetric assistant model - vulva II on the main body, and secure it in place with
the fixing screws. (Rotate the screws with a flat-head screwdriver.)
3-2. Attaching the fetal model and placenta model
1.
Hold the umbilical cord for tying and cutting and roll down the end that has a hole in
it. A string loop will appear.
2.
Roll down the end of the umbilical cord attached to the placenta model (LM-0634)
until a hook appears on the end.
String loop

8
3. Place the hook of the placenta model on the string loop of the umbilical cord. Unfold the
edges of the ends that were rolled down so that the end of the umbilical cord of the placenta
model covers the umbilical cord.
*If the umbilical cord is not partially covered by the umbilical cord of the placenta model, they
may come apart during delivery.
*Make sure the parts are not lubricated when attaching them together, as it will be dicult
to slide the umbilical cord of the placenta model over the umbilical cord if they are lubricated
with glycerin or another lubricant during this step.
4. Roll down the end of the umbilical cord connector with a hook attached so that the hook is
visible, then attach the hook to the umbilical ring on the fetal model (LM-0633). After attaching
the hook, unfold the end.
- 7 -
3.
Place the hook of the placenta model on the string loop of the umbilical cord for
tying and cutting. Unfold the edges of the ends that were rolled down so that the end
of the umbilical cord of the placenta model covers the umbilical cord for tying and
cutting.
*If the umbilical cord for tying and cutting is not partially covered by the
umbilical cord of the placenta model, they may come apart during delivery.
*Make sure the parts are not lubricated when attaching them together, as it will
be difficult to slide the umbilical cord of the placenta model over the umbilical
cord for tying and cutting if they are lubricated with glycerin or another
lubricant during this step.
4.
Roll down the end of the umbilical cord connector with a hook attached so that the
hook is visible, then attach the hook to the umbilical ring on the fetal model
(LM-0633). After attaching the hook, unfold the end.
Hook
Umbilical ring

9
5. Roll down the end of the umbilical cord connector with the clip so that the clip is visible, then
clamp it onto the umbilical cord. After clamping them together, unfold the end of the umbilical
cord connector and roll it over the umbilical cord for tying and cutting.
*If the umbilical cord is not partially covered by the umbilical cord connector, they may come
apart.
6. Assembly is now complete. To re-attach the umbilical cord after it is cut o, start the procedure
again from step 5.
*Apply a sufficient amount of glycerin to both the fetal and the placenta models when
practicing delivery.
*Air bubbles or impressions in the model that may remain from the fabrication process do not
aect the strength of the material, as the material used is strongly tear-resistant.
- 8 -
5.
Roll down the end of the umbilical cord connector with the clip so that the clip is
visible, then clamp it onto the umbilical cord for tying and cutting. After clamping
them together, unfold the end of the umbilical cord connector and roll it over the
umbilical cord for tying and cutting.
*If the umbilical cord for tying and cutting is not partially covered by the
umbilical cord connector, they may come apart.
6.
Assembly is now complete. To re-attach the umbilical cord for tying and cutting
after it is cut off, start the procedure again from step 5.
*Apply a sufficient amount of glycerin to the fetal model and placenta model
when practicing delivery.
*Air bubbles or impressions in the model that may remain from the
fabrication process do not affect the strength of the material, as the material
used is strongly tear-resistant.
Clip

10
3-3.Applyinglubricant
Apply a generous amount of glycerin to the backside of the obstetric model - vulva II, the head
and shoulders of the fetal model, and the placenta model.
3-4.Holdingthefetalmodel
Hold down the back of the head of the fetal model with your index nger to keep it from facing
upwards. The gures below show one way to hold the model.
- 9 -
3-3. Applying lubricant
Apply a generous amount of glycerin to the backside of the obstetric assistant model -
vulva II, to the head and shoulders of the fetal model, and to the placenta model.
3-4. Holding the fetal model
Hold down the back of the head of the fetal model with your index finger to keep it from
facing upwards. The figures below show one way to hold the model.

11
4. Caring for the Model
4-1.Cleaningthemainbody
To clean smudges or marks o the main body, wipe with a towel or cloth moistened with water.
*Do not wash the main body.
4-2.Cleaningthefetalmodelandplacentamodel
Both the fetal model and the placenta model can be washed normally in water.
After washing, wipe o all the remaining water with a soft, dry gauze or cloth.
4-3.Cleaningtheobstetricmodel-vulvaII
1. Rub the surface lightly while washing o the lubricant (glycerin) applied during practice with
water.
*Do not clean the model with rubbing alcohol, thinners, benzene or other similar solvents.
*When washing the model, do not dig your nails into the surface or apply strong force.
This may result in damage.
2. Wipe o the lubricant along with dirt or smudges, and all the remaining water with gauze or a
soft cloth. Then, pat baby powder all over the model.
*Water remaining on the model after washing may cause mold to develop. Make sure to
thoroughly wipe o all the water.
3. Wrap the model in the included paper towels, or in gauze or another type of cloth, and place
it in the re-sealable plastic bag that came with the kit. Store it in a 0-50°C environment where
it will not be exposed to direct sunlight or UV rays.

12
Product name
Quantity
Size
Length Width Height Weight
Obstetric model - vulva II
(primipara type)
1 Approx. 17 cm Approx.17 cm Approx. 8cm
Approx. 600g
Head circumference Height Weight
Fetal model
Main body
1 Approx. 30 cm Approx. 40 cm Approx. 2030 g
Diameter Umbilical cord
length Weight
Placenta model 1 Approx. 19 cm Approx. 51 cm Approx. 660 g
Total length Diameter Weight
Umbilical cord
(for tying and cutting)
3 Approx. 12 cm Approx. 1.4 cm Approx. 16 g
Total length Diameter Weight
Umbilical cord connector 1 Approx. 4 cm Approx. 1.6 cm Approx. 7 g
Fixing screw 2
Accessories
Product name Quantity
Cloth cover for main body 1
Glycerin 1
Instruction manual 1
Optional items
Product name Product No.
Umbilical cord kit
(1 umbilical cord connector, 1 umbilical cord) LM-101D
Umbilical cord for replacement (10 pcs) LM-101E
Obstetric model - vulva II (primipara type) LM-101P
Obstetric model - vulva II (multipara type) LM-101M
Obstetric model - vulva II set (primipara and mutipara type) LM-101S
Length Width Height Weight
1 Approx. 30 cm Approx.51 cm Approx.28cm
Approx. 2.8kg
5. Specications
6. Accessories and Optional Items
Table of contents
Other KOKEN Science Education Product manuals

KOKEN
KOKEN LM-103 User manual

KOKEN
KOKEN LM-017 User manual

KOKEN
KOKEN LM-095N User manual

KOKEN
KOKEN LM-109FA User manual

KOKEN
KOKEN Colonoscopy Lower GI Endoscopy Simulator Type... User manual

KOKEN
KOKEN LM-055 User manual

KOKEN
KOKEN LM030 User manual

KOKEN
KOKEN LM-101D User manual

KOKEN
KOKEN LM-024 User manual

KOKEN
KOKEN LM-114H-CE User manual

KOKEN
KOKEN LM-101K User manual

KOKEN
KOKEN LM-104 User manual

KOKEN
KOKEN LM-025 User manual

KOKEN
KOKEN LM-110 User manual

KOKEN
KOKEN LM-026M User manual

KOKEN
KOKEN LM-078 User manual

KOKEN
KOKEN LM-094B User manual

KOKEN
KOKEN LM-068 User manual

KOKEN
KOKEN LM-089 User manual

KOKEN
KOKEN Maternity Model Type II User manual