Koso TNT-B User manual

Installation description
2-1
Please proceed as follows
❶
❷
❸
❶
❸
❷
❹
❺
❹
❺
NOTE Please refer to the icon to disassemble. And install according to
the reverse order of disassembly.
Bracket Bushing (Accessories 2)
Collar (Accessories 3)
LCD Meter (Accessories 1)
M5nut(Accessories 5)
M5 washer(Accessories 4)
Accessories
1
1 2 3
5M5 nut X3
4M5 washer X3Collar X1
Bracket Bushing X2
LCD Meter X1
NOTE Contact your local distributor, if the items received in the box are not the same as the items listed above.
●
Thank you for purchasing the TNT-B meter for Yamaha Bolt
®
. Before installing, please read the instruction carefully and keep it for future reference.
●For installation, please follow the steps described in manual. Any damage caused by wrong installation shall be imputed tothe users.
●Don't break or modify the wire. To avoid the short circuit, please don't pull the wire when installing.
●Do not disassemble or change any parts excluding the manual description.
●The interior examination or maintenance should be executed by our professionals.
Attention!
◎MARK MEANING:
Some processes must be followed to avoid the damage tothe vehicle.
Some processes must be followed to avoid the affection caused by wrong installation.
Some processes must be followed to avoid damages to yourself or the public.
WARNING!
CAUTION!
NOTE You could get the installation details from the information behind the mark.
PRESS THE
BUTTON
ONCE
PRESS THE
BUTTON 3
SECONDS
FLASH LIGHT ON

2-3
Wiring installation instructions
Original main wire
Installation description
2-2
Please proceed as follows
Bracket Bushing (Accessories 2)
Collar (Accessories 3)
M5 washer(Accessories 4)
❶
❷
LCD Meter (Accessories 1)
❸
❹
M5 nut(Accessories 5)
❺
❶
❹
❸
❺
❷
NOTE Please refer to the icon to disassemble. And install according to
the reverse order of disassembly.
wh051ba15a
2-4
1 2 3
3.Wrap up insulation tape on waterproof cover,
wiring PVC pipe and the gap between the
waterproof cover and original waterproof
cover,as shown in the red circled part.
❶
❶
❷
❷
1.Push the waterproof cover of the KOSO
BOLT Meter❶untiltheconnector❷is
exposedoutsidethecover.
2.❶plug the connector in with the vehicle
main harness connector.❷The pull back the
waterproof cover to fully cover the both
connectors & vehicle main harness connector).
waterproof cover from KOSO BOLT
Meter needs to be overlapped with vehicle
main harness rubber connector cover.
Actual wire installation precautions
NOTE

3-3
Main menu functions
●
●
In the total mileage screen, press the SELECT
button once to switch to Trip A screen.。
●Trip A screen, press the SELECT button
once to switchto Trip B screen.
● Hold the
SELECT button for 3 seconds
to clear the Trip A recordings.
3-2
Function, setting instructions
Display range:0 ~ 360 km (0 ~ 225 miles)
Display unit:1 km (mile)
Display range:<0.5sec
Setting range:30 ~ 360 km (19 ~ 225 miles)
when above (including) setting
value, warning light will light on
Setting unit:1 km (mile)
Display range : 0 ~ 360 km (0 ~ 225 miles)
Display range:0 ~ 999,999 km (miles)
Display unit:1 km (mile)
Display range:0 ~ 9,999.9 km (miles)
Display unit:0.1 km (mile)
Setting range:Close / 500 ~ 16,000 km
(300 ~ 10,000 miles)
Setting unit:100 km (miles)
Display range : 0 ~ 9999.9 km (miles)
Display unit : 0.1 km (mile)
Setting range:50 ~ 200%
Setting unit:1%
Display range
:
- (No display), N, 1 ~ 5 gear level
Display range:< 0.5 sec
Display range
:
- (No display), N, 1 ~ 5 gear level
Record gear level when at maximum RPM
Display range:0 ~ 8,000 RPM
Display unit:100 RPM
Display range:<0.5 sec.
Setting range:1,000 ~ 8,000 RPM
when above (including) setting
value, warning light will light on
Setting unit:100 RPM
Display range : 0 ~ 8,000 RPM
Display unit : 100 RPM
●
Speedometer
○
Display interval
○
Overspeed warning
setting
○
Max.speed record
○
Odometer
○
Trip meter
A/B
○
Motor oil maintenance
○
Fuel reserve tripmeter
●
Tire percentage
●
Gear meter
○
Display interval
○
Max. gear level record
●RPM
○
Display interval
○
Shift light warning
setting
○
Digital tachometer
Display unit
:
˚C ,˚F , switchable
Display range
:-30 ~ 225
˚C
(-22 ~ 437
˚F
)
Display unit
:1
˚C
(
˚F
)
Display range
:<0.5 sec
Setting range
:60 ~ 225
˚C
(140 ~ 437
˚F
)
when above(including) setting
value,warning light will lit.
Setting unit
:1
˚C
(
˚F
)
Display range
:-30 ~ 225
˚C
(-22 ~ 437
˚F
)
speeding warning light,RPM shift light,over heat
warning light,Low volt warning,Fuel warning,
oil maintenance,Highest gear
Lit. (L), Slow flash (S), Flash (F)
Display range
:(ON) / (OFF) / Flash
Setting range
:12 / 24 hour format
Setting range
:8.0 ~ 18.0 V
Setting unit
:0.1V
Setting range
:1 - 5 (
darkest
) ~ 5 - 5 (
brightest
)
Setting unit
:
Each level represents
20%
Setting range
:
red, orange, yellow, green, blue,
light blue, purple, white, loop switch
DC 12 V
-10 + 60
˚C
JIS D 0203 S2
94.7 x 94.7 x 69.2 mm
Around
217 g
Round
(red light),
High beam
(blue light),
Check Engine
(yellow light),
Turn signals
(green light),
Immobilizer system indicator light
(red light),
Oil
(red light), ABS (yellow light)
Setting range
:Close (OFF) / Open (ON)
●
Thermometer
○
Engine temperature
meter
○
Display interval
○
Overheat warning
setting
○
Max. temperature record
●Round indicator
○Warning cause
○Warning method
●
Fuel meter
●Clock
●Under voltage warning
●
Back light brightness
○
Back light color
●
Operating voltage
○
Operating temperature
○
Specification
○
Meter Size
○
Meter Weight
○
Indicator
●ABS
indicator setting
Motor oil maintenance mileage
●
Display range
:
User settings
(500 ~ 16000 km /
300 ~ 10000 miles) ~ -999 km (miles),
decrease according tothe increase
in total mileage
●
Display unit
:
1 km (mile)
Clock
●
Display range
:12 / 24 hour format
Engine temp.
●
Display range
:-30 ~ 225
°C (
-22 ~ 437
°F)
Voltmeter
●
Display range
:8 ~ 18 V
Speedometer
●
Speedometer
:0~360
km
(0~225
miles
)
●
Display unit
:1
km (mile)
Tachometer
●
Display range
:
0 ~ 8,000
RPM
Gear meter
●
Display range
:
off,
highest gear,
N and highest gear, show all (N / 1 ~ 5)
Indicator
●Round
●
High beam
●
Engine Check
●ABS
Fuel Level
●
Display range
:ON / OFF / Flash
Odometer
●
Display range
:000000 ~ 999999 km (miles)
returns to zero upon exceed
●
Setting unit
:1 km (mile)
Trip meter A/B
●
Display range
:0000.0 ~ 9999.9 km (miles)
returns to zero upon exceed
●
Setting unit
:0.1 km (mile)
Fuel reserve tripmeter
(TRIP-F)
●
Display range
:0000.0 ~ 9999.9 km (miles)
returns to zero upon exceed
●
Display unit
:0.1 km (mile)
Max. speed record
●
Display range
:0 ~ 360 km (0 ~ 255 miles)
●
Display unit
:1 km (mile)
Max. RPM
●
Display range
:0 ~ 8,000 RPM
●
Display unit
:100 RPM
Max. temperature record
●
Display range
:
-30~225 °C (-22 ~ 437 ºF)
●
Display unit
:0.1 km (mile)
Max gear level record
●
Display range
:
- (No display), N, 1 ~ 5 gear level
●
Record gear level when at maximum RPM
●
Turn signal
●
Immobilizer system
●
Oil
Basic function instruction
3-1
When the engine switch is on OFF condition,
hold the
SELECT button
for 3 seconds
to
enter settings.
(Please refer to video operation settings)

YAMAHA BOLT multifunction chronograph - setting screen operation setting
Scan the QR code to connect the operation video
4-1
Setting screen operation settings
●If fuel volume warning symbol is displayed,
press the SELECT button to switch to fuel
reserve screen.
●
●Hold the SELECT button for 3 seconds to
clear the Trip B recordings.
Trip B screen, press the SELECT button
once to switch to the mileage maintenance
screen.
●In the temperature screen, press the SELECT
button once to switch to the voltage screen.
●In the Max. Speed record display
screen, press the SELECT button
once to return to total mileage screen.
●Hold the SELECT button for 3 seconds
toclear the Max. Speed Record display.
FF
F
◦
◦
◦
In the 0 second, start
holding the button.
In the 3rd second, the
inform feature will blink
once.
On the 8th second,
the mileage maintenance
record is cleared.
◦During 4 ~ 7 seconds,
releasing the button will
cancel the process.
●In the mileage maintenance screen, press
the SELECT button once to switch to the
clock screen.
●Mileage maintenance will count down from
setting value, when it reaches 0, the screen
will blink to indicate the mileage reached.
●Hold the SELECT button for 8 seconds to
clear the mileage maintenance recordings.
●In the clock screen, press the SELECT
button once to switch to the temperature
screen.
●Hold the SELECT button for 3 seconds
to enter the time setting screen.
●In the voltage screen, press the SELECT
button once to switch to the Max. Speed
Record display screen.
When main switch is turned on, the fuel
volume warning symbol will automatically
switch to fuel reserved screen.
When finished refuel, the fuel volume warning
symbol will disappear. If do not clear out
reserved fuel manually, it will automatically
clear out the reserved fuel after driving a
certain distance.
In fuel reserved screen, press the
SELECT
button
to switch to MAX record screen.
Hold the
SELECT button
for 3 seconds
to clear out fuel reserved records.
Motor oil maintenance mileage
●
Display range
:
User settings
(500 ~ 16000 km /
300 ~ 10000 miles) ~ -999 km (miles),
decrease according tothe increase
in total mileage
●
Display unit
:
1 km (mile)
wh051ba15a
●
P.S.

4-2
Tire percentage settings
●
●
● In tire percentage screen, press and
hold the SELECT button for 3 seconds
to enter settings screen.
Cursor's order :
hundred > ten > digit
NOTE
EX. The new tire circumference is
2180 mm. The calculation equation
is as below.
The new tire circumference
2180 mm ÷ the original tire
circumference 2080 mm X (100%) =
The setting value (105 %).
Press and hold the SELECT button for
3 secondsand release it until it move
to the setting digital you want.
●You could define the valve
as the starting point and
measure the wheel
circumference with a
measuring tape.
P.S.
Press the SELECT button to change the
value.
●EX. The tire percentage setting is changed
from 100 % to 105 %.
Setting range : 50 ~ 200 .
NOTE
Press the SELECT button to enter the
gear learning setting screen.
Please reset this setting value when you
change a different size tire.
4-3
Gear level learning settings
●Press the
SELECT button once
to choose
turn on or off the gear indicator display.
If any changes happen to tires
circumference
then the gear indicator
will need to re-learn the gear positioning.
NOTE
Setting range : ON、OFF 。
NOTE
●
●
●
●
●
When switching gear or tire size, can adjust the tire percentage (%) parameter to calibrate speed.
1. When switching tire size
Tire percentage (%)
= X 100 =105
2180
2080
Tire percentage (%)
= X 100 = 95 %
1976
2080
Standard
1976mm2080mm2180mm Tire size from
small to large
Tire size from
large to small
Note Press and hold the SELECT button for
3 seconds to quit the learning and return
to the previous screen.
Press the SELECT button once to start the
gear learning.
● In gear learning screen, press and
hold
the SELECT button for 3 seconds
to enter
settings screen.
When gear level display is "ON", hold the
SELECT button for 3 seconds to enter gear
level learning screen.
When gear level display is "OFF", hold the
SELECT button for 3 seconds to return to
gear level learning setting screen.
EX. Setting gear display from "OFF" to "ON".
EX. When chronograph display LEArN,
it will blink.
P.S.

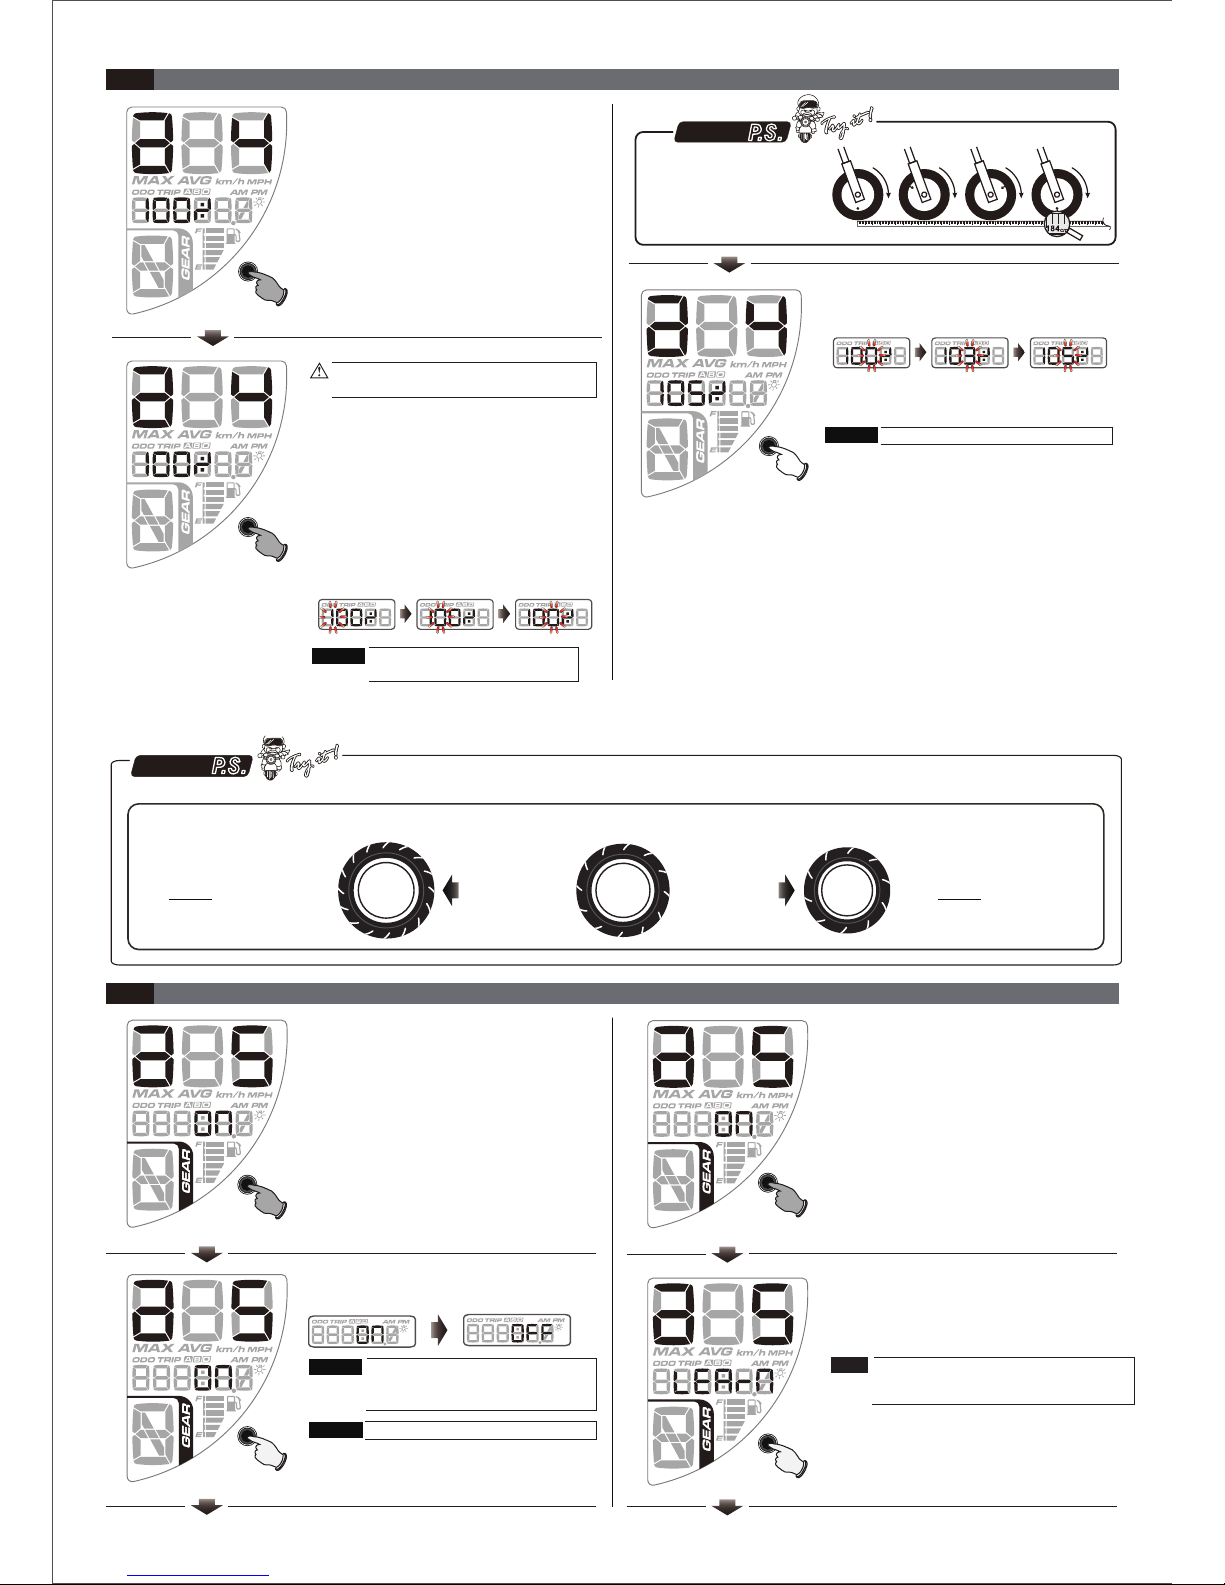
The meter doesn’t work
when the power is on.
The meter shows wrong
information.
The following situation do not indicate malfunction of the meter. Please check the following points before taking it in for repair.
Troubleshooting
5
●
The power is not supplied properly to the
meter.
→
Make sure the wiring harness is connected
correctly. The wiring and fuse might be
broken.
→
The battery is too old to supply enough
DC 9V power to make the meter work.
● Please confirm wire is connected properly,
if displays error code, please refer to the
original manual.
Speed, RPM or temperature
does not display or displays
error.
Fuel meter does not display
or displays error.
●
Please confirm the wiring is properly connected.
if displays error code, please refer to the
original manual.
●
Please confirm the wiring is properly connected,
if unable to display, please check if the vehicle
fuel signal wire is broken.
Trouble Check item Trouble Check item
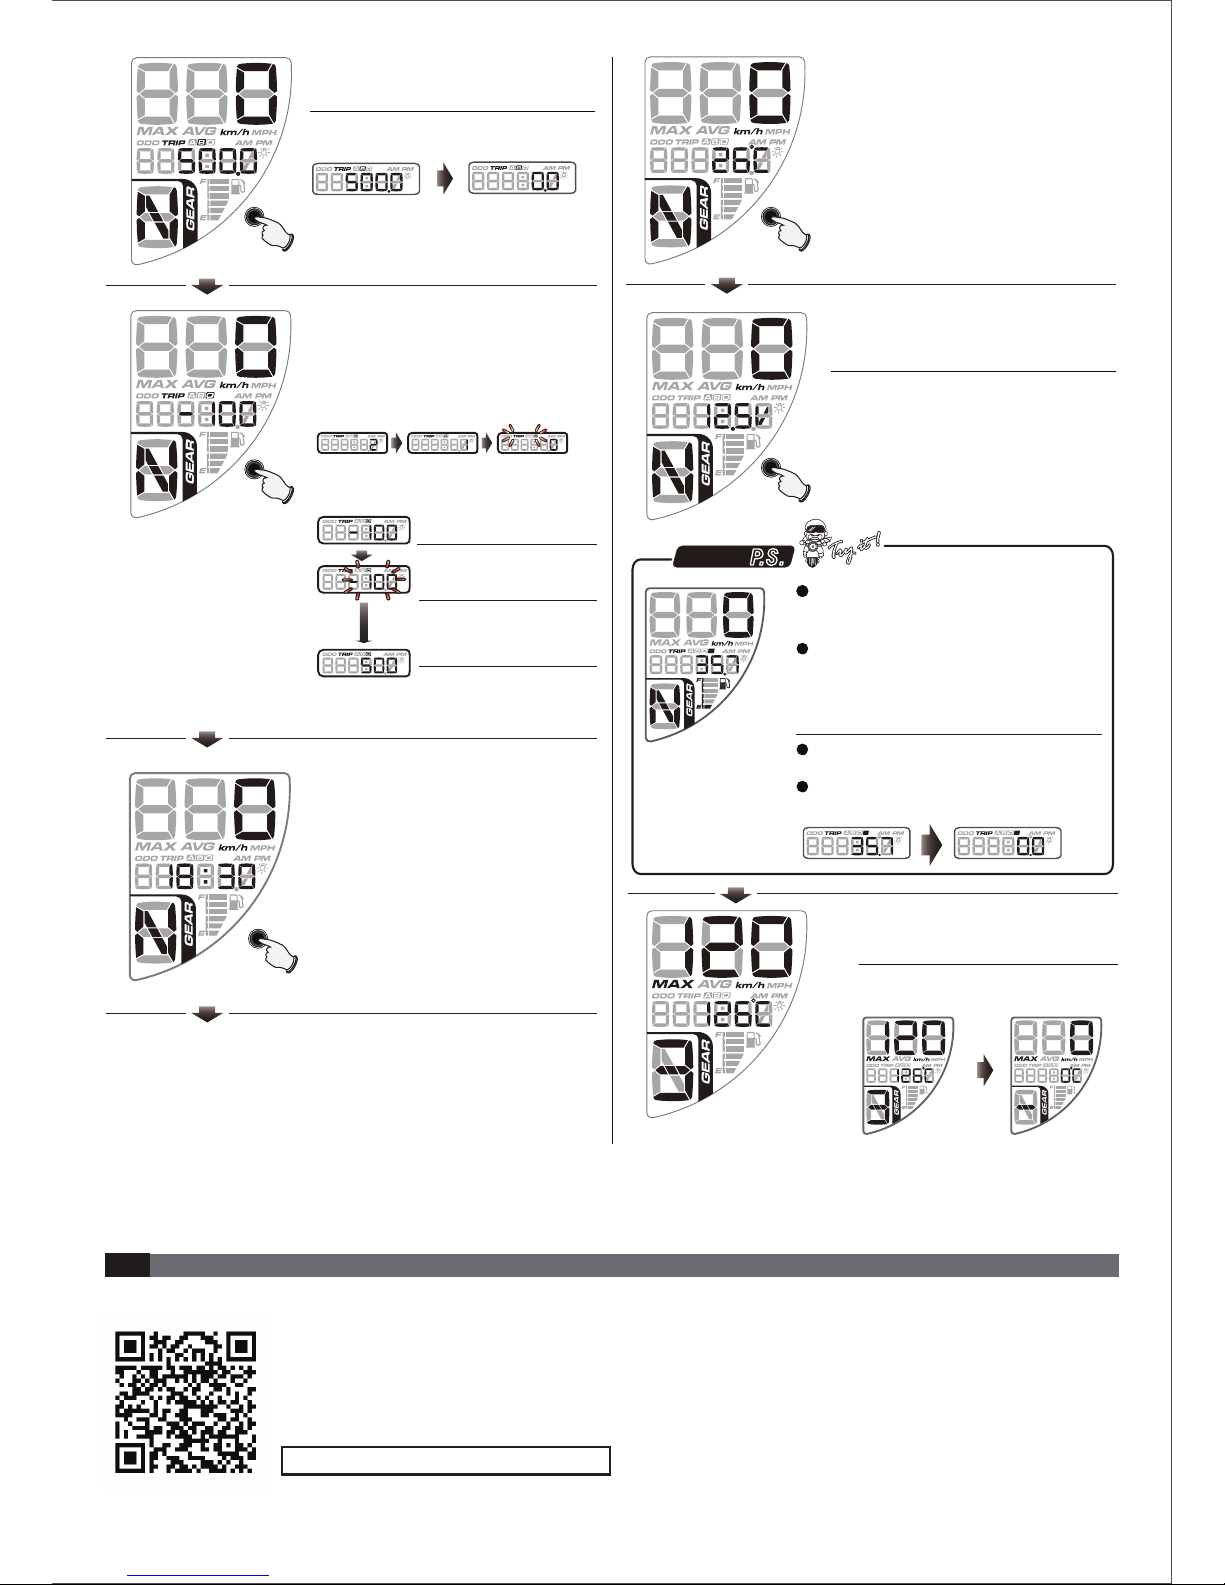
●Start the riding when "GO" is flashing.
●Press the SELECT button once to start
the gear learning.
●
● During actual gear level learning, please select a road that is wide
and is a more straight distance with no traffic lights for more accurate
settings and traffic safety.
●When the number 3 is flashing, put the
motorcycle in 3rd gear and start riding
slowly until the meter detects the correct
gear. Once the meter has detected 3rd
gear, the screen will automatically switch
to number 4.
●When the number 4 is flashing, put the
motorcycle in 4th gear and start riding
slowly until the meter detects the correct
gear. Once the meter has detected 4th
gear, the screen will automatically switch
to number 5.
When the number 1 is flashing, put the
motorcycle in 1st gear and start riding
slowly until the meter detects the
correct gear. Once the meter has
detected 1st gear, the screen will
automatically switch to number 2.
●When the number 2 is flashing, put the
motorcycle in 2nd gear and start riding
slowly until the meter detect the correct
gear. Once the meter has detected the
2nd gear, the screen will automatically
switch to number 3.
The main screen now displays the
number 5, slow down and wait until the
meter goes back to the main screen.
Note Pressthe SELECT button to quit
the learning and return to the
previous screen.
※If the problems still can’t be solved, please contact your local distributor to get assistance.
wh051ba15a
P.S.
Table of contents
Other Koso Measuring Instrument manuals
Popular Measuring Instrument manuals by other brands

Decagon Devices
Decagon Devices AquaLab 4TE Installation Qualification/Operational Qualification Protocols and Instructions

Rice Lake
Rice Lake Revolution Synergy Series Technical manual

Daewoo
Daewoo D-60 user manual

Bushnell GOLF
Bushnell GOLF PRO X3 user manual

Bender
Bender CMD420-DM manual

Kovan
Kovan KPM3 instruction manual