Kramer TP-185 User manual

Kramer Electronics, Ltd.
USER MANUAL
Model:
TP-185
8 Channel UXGA/Audio/RS-232 to CAT 5 Transmitter

Contents
i
Contents
1Introduction 1
2Getting Started 1
2.1 Quick Start 2
3Overview 3
3.1 Shielded Twisted Pair/Unshielded Twisted Pair 3
4Defining the TP-185 8 Channel UXGA/Audio/RS-232 to CAT 5 Transmitter 4
5Installing the TP-185 in a Rack 6
6Connecting and Configuring the TP-185 7
6.1 Connecting the TP-185 7
6.2 Connecting to the TP-185 via an RS-232 Connection 8
6.3 Connecting to the TP-185 via an RS-485 Connection 8
6.4 Connecting Multiple TP-185 Units via the RS-485 Bus 9
7Setting the DIP-switches on the TP-185 10
7.1.1 Setting the RS-485 Bus Termination 10
7.1.2 Enabling and Disabling the Reply Feature 10
7.1.3 Setting the Reply Source or Machine Number 11
7.1.4 Setting the RS-232/RS-485 Baud Rate DIP-switches 12
7.1.5 Selecting Hardware/Software Mode 12
8Wiring the Twisted Pair RJ-45 Connectors 13
9Technical Specifications 14
10 Default Communication Parameters 14
10.1 Kramer Communication Protocol 2000 15
Figures
Figure 1: TP-185 Front and Rear Panels 4
Figure 2: Connecting the TP-185, 8 Channel UXGA/Audio/RS-232 to CAT 5 Transmitter 7
Figure 3: Connecting Multiple TP-185 Units via RS-485 9
Figure 4: TP-185 DIP-switch RS-485 Termination 10
Figure 5: TP-185 Reply Enable and Disable DIP-switch 10
Figure 6: TP-185 Reply Source or Machine Number DIP-switches 11
Figure 7: TP-185 Baud Rate DIP-switches 12
Figure 8: TP-185 Baud Rate Hardware/Software DIP-switch 12
Figure 9: CAT 5 Pinout 13

KRAMER: SIMPLE CREATIVE TECHNOLOGY
Contents
ii
Tables
Table 1: TP-185 Front and Rear Panel Features 5
Table 2: Hardware Mode Reply Source DIP-switch Setting 11
Table 3: Software Mode RS-485 Machine Number DIP-switch Setting 11
Table 4: Serial Port Baud Rate DIP-switch Setting 12
Table 5: UTP Connector Pinout 13
Table 6: Technical Specifications of the TP-185 14
Table 7: TP-185 Communication Parameters 14
Table 8: Protocol Command Definition 15
Table 9: Instruction Codes for the TP-185 16
Table 10: Sample TP-185 Control Commands 16

Introduction
1
1
1 Introduction
Welcome to Kramer Electronics! Since 1981, Kramer Electronics has been providing
a world of unique, creative, and affordable solutions to the vast range of problems
that confront the video, audio, presentation, and broadcasting professional on a daily
basis. In recent years, we have redesigned and upgraded most of our line, making the
best even better! Our 1,000-plus different models now appear in 11 groups1
Congratulations on purchasing your TP-185,8 Channel UXGA/Audio/RS-232 to
CAT 5 Transmitter, which is ideal for the following typical applications:
that are
clearly defined by function.
•Transmission of video, audio and RS-232 signals for extended distances over
standard STP/UTP cables
•Multimedia and presentation source and acceptor selection
The package includes the following items:
•TP-185, 8 Channel UXGA/Audio/RS-232 to CAT 5 Transmitter
•Power cord2, rack “ears” and this user manual3
2 Getting Started
We recommend that you:
•Unpack the equipment carefully and save the original box and packaging
materials for possible future shipment
•Review the contents of this user manual
•Use Kramer high performance high-resolution cables4
1 GROUP 1: Distribution Amplifiers; GROUP 2: Switchers and Routers; GROUP 3: Control Systems; GROUP 4: Format/Standards
Converters; GROUP 5: Range Extenders and Repeaters; GROUP 6: Specialty AV Products; GROUP 7: Scan Converters and Scalers;
GROUP 8: Cables and Connectors; GROUP 9: Room Connectivity; GROUP 10: Accessories and Rack Adapters; GROUP 11: Sierra
Products
2 We recommend that you use only the power cord that is supplied with this machine
3 Download up-to-date Kramer user manuals from http://www.kramerelectronics.com
4 The complete list of Kramer cables is available from http://www.kramerelectronics.com

KRAMER: SIMPLE CREATIVE TECHNOLOGY
Getting Started
2
2.1 Quick Start
This quick start chart summarizes the basic setup and operation steps.

Overview
3
3
3 Overview
The TP-185 is a high performance, 8 channel VGA/UXGA1
In particular, the TP-185, 8 Channel UXGA/Audio/RS-232 to CAT 5 Transmitter
features:
, audio and RS-232 to CAT 5
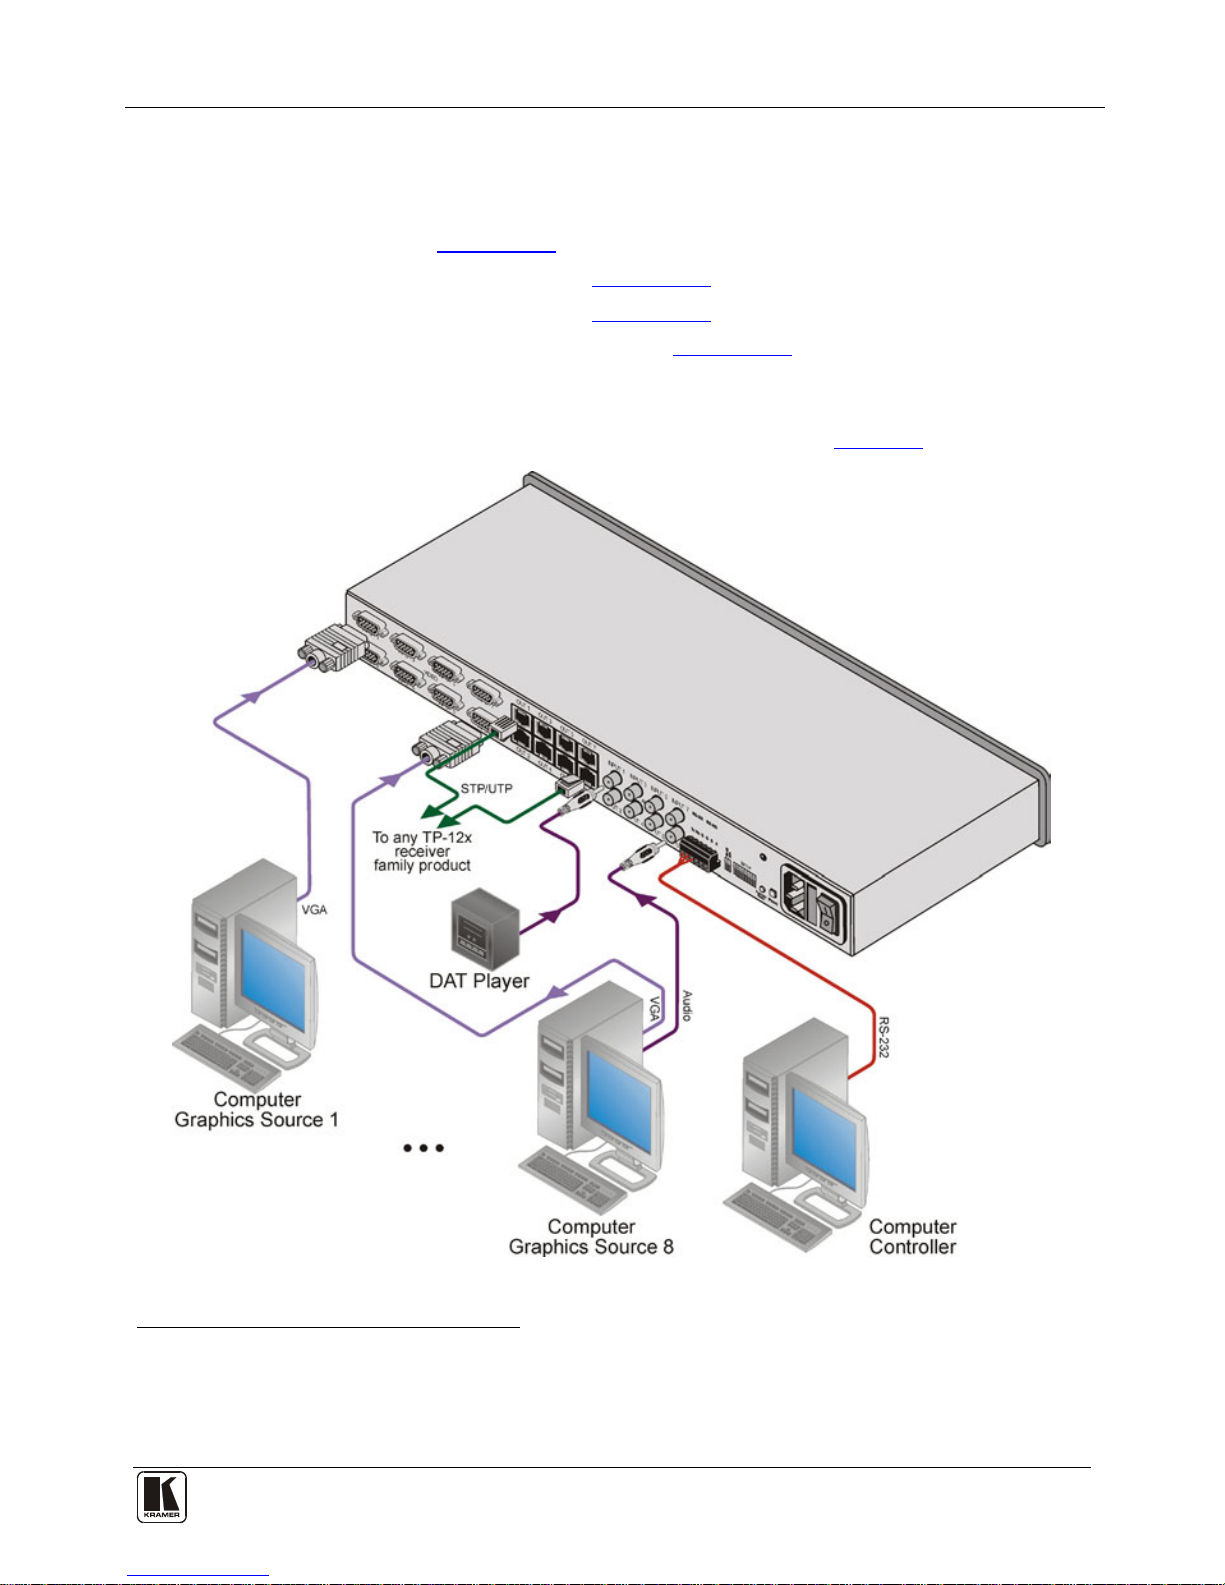
transmitter for high resolution video, stereo unbalanced audio and RS-232 signals. The
CAT 5 outputs can be connected to any Kramer compatible TP receiver, for example, the
TP-126. The TP-185 can also route data from the RS-232 or RS-485 port to any of the
CAT 5 outputs.
•Eight UXGA video inputs
•Eight stereo unbalanced audio inputs on 3.5mm mini jacks
•Eight RJ-45 STP/UTP outputs
•Transmission of RS232/RS-485 data from one input to any or all of the eight
CAT 5 outputs, and one reply from the selected output
The TP-185 can differentiate between RS-232/RS-485 commands that control the unit
itself and commands that are destined for end-user equipment (see Section 7.1.5.2
The TP-185 is dependable, rugged, and fits into one vertical space (1U) of a standard
19” professional rack.
).
To achieve the best performance:
•Use only good quality connection cables2
•Do not secure the cables in tight bundles or roll the slack into tight coils
to avoid interference, deterioration
in signal quality due to poor matching, and elevated noise levels (often
associated with low quality cables)
•Avoid interference from neighboring electrical appliances that may adversely
influence signal quality, and position your Kramer TP-185 away from
moisture, excessive sunlight and dust
3.1 Shielded Twisted Pair/Unshielded Twisted Pair
We recommend that you use Shielded Twisted Pair (STP) cable. There are different levels
of STP cable available, and we advise you to use the best quality STP cable that you can
afford. Our non-skew-free cable, Kramer BC-STP is intended for analog signals where
skewing is not an issue. For cases where there is skewing, our UTP skew-free cable Kramer
BC-XTP, may be used. Bear in mind though, that we advise using STP cables where
possible, since the compliance to electromagnetic interference was tested using those
cables. Although Unshielded Twisted Pair (UTP) cable might be preferred for long range
applications, the UTP cable should be installed far away from electric cables, motors and so
on, which are prone to create electrical interference.
However, since the use of UTP cable might cause inconformity to electromagnetic
standards, Kramer does not commit to meeting the standard with UTP cable.
1 Up to and including WUXGA 1920 x 1200 resolution
2 Available from Kramer Electronics on our Web site at http://www.kramerelectronics.com

KRAMER: SIMPLE CREATIVE TECHNOLOGY
Defining the TP-185 8 Channel UXGA/Audio/RS-232 to CAT 5 Transmitter
4
4 Defining the TP-185 8 Channel UXGA/Audio/RS-232 to CAT 5 Transmitter
Figure 1 and Table 1 define the front and rear panels of the TP-185, 8 Channel UXGA/Audio/RS-232 to CAT 5 Transmitter.
Figure 1: TP-185 Front and Rear Panels

Defining the TP-185 8 Channel UXGA/Audio/RS-232 to CAT 5 Transmitter
5
5
Table 1: TP-185 Front and Rear Panel Features
#
Feature
Function
1 POWER LED Lights green when the unit is turned on
1
2
VIDEO INPUT 15-pin HD
Connectors Connect to the VGA/UXGA video sources (from 1 to 8)
3 OUT STP/UTP RJ-45
Connectors Connect to the TP receivers (from 1 to 8)
4 AUDIO INPUT 3.5mm
Mini Jacks Connect to the unbalanced stereo audio sources (from 1 to 8)
5 RS-485 TERM DIP-switch Sets the termination of the RS-485 bus2: ON for RS-485 bus termination with 120Ω
(default), OFF for no RS-485 bus termination (see Section 7.1.1
6 )
SETUP DIP-switch
Reply DIP-switch 1 Enables and disables the Reply feature (see Section 7.1.2
Address DIP-switches 2,
3 and 4
)
Determines the reply source (hardware mode) or machine
number (software mode) see
Baud Rate DIP-switches
5, 6 and 7
Section 7.1.3
Determines the serial port baud rate (see Section 7.1.4
Hardware/Software
DIP-switch 8
)
Determines whether the data transmission path is set by
software or hardware (see Section 7.1.5
7 )
AC Mains Connector Connect to the AC mains power
8 AC Mains Fuse AC mains power fuse
9 AC Mains Power Switch Turns the unit power ON or OFF
10 RS-232 Terminal Block Connect to a PC or remote controller (see Section 6.4
11 )
RS-485 Terminal Block Pins B (–) and A (+) are for RS-485; Pin G (Ground)may be connected to the shield of
the cable if required (see Section 6.3
12 )
FACTORY RESET Button Press and hold while powering up the unit to reset the data transmission setup to its
factory default value3(see Section 10
13 )
PROG Button For service use only
1 See item 9
2 The first and the last units on the RS-485 line should be terminated (on). Other units should be unterminated (off), see Section 7.1.1
3 Turn the unit off using the power switch and then turn it on while pressing the Factory Reset button. The unit will power up and load
its memory with the factory default definitions

KRAMER: SIMPLE CREATIVE TECHNOLOGY
Installing the TP-185 in a Rack
6
5 Installing the TP-185 in a Rack
This section describes what to do before installing in a rack and how to rack mount
the TP-185.

Connecting and Configuring the TP-185
7
7
6 Connecting and Configuring the TP-185
This section comprises connecting:
•The TP-185 (see Section 6.1
•To the TP-185 via RS-232 (see
) Section 6.2
•To the TP-185 via RS-485 (see )
Section 6.3
•Multiple TP-185 units via RS-485 (see )
Section 6.4
6.1 Connecting the TP-185
)
To connect1the TP-185, as illustrated in the example2in Figure 2:
Figure 2: Connecting the TP-185, 8 Channel UXGA/Audio/RS-232 to CAT 5 Transmitter
1 You do not need to connect all inputs and outputs
2 Switch off the power on each device before connecting it to your TP-185. After connecting your TP-185, switch on its power and then
switch on the power on each device. DO NOT push in the rear panel Flash Program PROG button , it is only used for upgrading to the
latest Kramer firmware

KRAMER: SIMPLE CREATIVE TECHNOLOGY
Connecting and Configuring the TP-185
8
1. Connect up to eight VGA/WUXGA computer graphics sources (for example,
multimedia computers) to the Video INPUT 15-pin HD connectors.
2. Connect up to eight unbalanced stereo audio sources (for example, the audio
source of the computer or a DAT player) to the eight AUDIO INPUT 3.5mm
mini jacks.
3. Connect the eight OUT STP/UTP connectors to up to eight TP receivers.
4. If required, you can connect a PC and/or controller to the:
RS-232 terminal block (see Section 6.2
RS-485 terminal block (see )
Section 6.3 and Section 6.4
5. Connect the power cord )
1(not shown in Figure 2).
6.2 Connecting to the TP-185 via an RS-232 Connection
To connect the RS-232 port on the TP-185 to an RS-232 device:
1. Connect the RS-232 Tx pin on the TP-185 to pin 2 (9-pin D-sub) on the
RS-232 device
2. Connect the RS-232 Rx pin on the TP-185 to pin 3 (9-pin D-sub) on the
RS-232 device
3. Connect the RS-232 G pin on the TP-185 to pin 5 (9-pin D-sub) on the
RS-232 device
6.3 Connecting to the TP-185 via an RS-485 Connection
You can operate the TP-185 via the RS-485 port from a distance of up to 1200m
(3900ft) using a PC equipped with a card that provides an RS-485 port.
To connect a PC or controller to the RS-485 port on the unit:
1. Connect the pins on the following ports:
Connect the A(+) pin on the RS-485 port of the PC to the A
pin on the RS-485 port on the rear panel of the TP-185
Connect the B(–) pin on the RS-485 port of the PC to the B pin
on the RS-485 port on the rear panel of the TP-185
If required, connect the GND pin2
2. If this is the only TP-185 on the RS-485 bus, set the RS-485 TERM
DIP-switch (see
on the RS-485 port of the
PC to the G (ground) pin on the rear panel of the TP-185
Section 7.1.1
) to ON (for RS-485 line termination with
120Ω).
1 We recommend that you use only the power cord that is supplied with this machine
2 For RS-485 communication, the ground is usually not connected between the devices. When using a shielded cable, the shield may be
grounded on one side

Connecting and Configuring the TP-185
9
9
6.4 Connecting Multiple TP-185 Units via the RS-485 Bus
You can connect up to 8 TP-185 units via the RS-485 bus with control from a PC or
serial controller.
To connect up to 8 TP-185 units via RS-485 (see Figure 3):
1. Connect the RS-485 terminal block of the first TP-185 to the RS-485 terminal
block of the second TP-185, and so on (see Section 6.3
2. Set each TP-185 Machine number to be a unique number (see
), connecting all the
TP-185 units via the RS-485 terminal blocks. Section 7.1.3
3. On the first and last TP-185 physical devices on the RS-485 bus, set the
RS-485 TERM DIP-switch ON (terminating the RS-485 line at 120Ω, see
).
Section 7.1.1
4. On all other TP-185 units, ensure that the RS-485 Term DIP-switch is OFF.
).
Figure 3: Connecting Multiple TP-185 Units via RS-485

KRAMER: SIMPLE CREATIVE TECHNOLOGY
Setting the DIP-switches on the TP-185
10
7 Setting the DIP-switches on the TP-185
The DIP-switches on the TP-185 perform the following functions:
•RS-485 termination
•Reply enable/disable
•Reply machine number
•Baud rate
•Hardware/software mode
Moving a DIP-switch down turns the switch on, moving it up turns the switch off.
Note: Changing any DIP-switch requires that you cycle power on the TP-185
7.1.1 Setting the RS-485 Bus Termination
The DIP-switch sets the RS-485 bus termination. Only the first and last physical
device on the RS-485 bus must be terminated, all other devices must be
un-terminated.
Figure 4: TP-185 DIP-switch RS-485 Termination
When DIP-switch 1 is:
•OFF, the unit is un-terminated (default)
•ON, the unit is terminated
Note: DIP-switch 2 is not used.
7.1.2 Enabling and Disabling the Reply Feature
DIP-switch 1 enables and disables the Reply feature.
Figure 5: TP-185 Reply Enable and Disable DIP-switch

Setting the DIP-switches on the TP-185
11
11
When DIP-switch 1 is:
•Up, Reply is disabled (default)
•Down (ON), Reply is enabled
7.1.3 Setting the Reply Source or Machine Number
DIP-switches 2, 3 and 4 set either the reply source (in Hardware mode Table 2) or
machine number (in Software mode Table 3).
Figure 6: TP-185 Reply Source or Machine Number DIP-switches
Table 2: Hardware Mode Reply Source DIP-switch Setting
Reply Source DIP-switch
2 3 4
Reply is taken from output 1 (default) OFF OFF OFF
Reply is taken from output 2 ON OFF OFF
Reply is taken from output 3 OFF ON OFF
Reply is taken from output 4 ON ON OFF
Reply is taken from output 5 OFF OFF ON
Reply is taken from output 6 ON OFF ON
Reply is taken from output 7 OFF ON ON
Reply is taken from output 8 ON ON ON
Note: When there is more than one TP-185 attached to the RS-485 bus only one unit
can have a reply path set.
Table 3: Software Mode RS-485 Machine Number DIP-switch Setting
Machine Number DIP-switch Machine Number DIP-switch
2 3 4 2 3 4
1 OFF OFF OFF 5 OFF OFF ON
2 ON OFF OFF 6 ON OFF ON
3 OFF ON OFF 7 OFF ON ON
4 ON ON OFF 8 ON ON ON
When there is more than one TP-185 attached to the RS-485 bus each unit must have
a unique machine number.

KRAMER: SIMPLE CREATIVE TECHNOLOGY
Setting the DIP-switches on the TP-185
12
7.1.4 Setting the RS-232/RS-485 Baud Rate DIP-switches
DIP-switches 5, 6 and 7 set the serial port baud rate in both Hardware and Software
modes according to Table 4.
Note: In a multiple device configuration, all devices must be set to the same baud
rate.
Figure 7: TP-185 Baud Rate DIP-switches
Table 4: Serial Port Baud Rate DIP-switch Setting
Baud Rate DIP-switch Baud Rate DIP-switch
5 6 7 5 6 7
1200 OFF OFF OFF 19200 OFF OFF ON
2400 ON OFF OFF 38400 ON OFF ON
4800 OFF ON OFF 57600 OFF ON ON
9600 (default) ON ON OFF 115200 ON ON ON
7.1.5 Selecting Hardware/Software Mode
DIP-switch 8 sets the operating mode to either Hardware or Software mode.
Figure 8: TP-185 Baud Rate Hardware/Software DIP-switch
When the DIP-switch is:
•OFF, the unit is set to Hardware mode (default)
•ON, the unit is set to Software mode
7.1.5.1 Hardware Mode
In Hardware mode, the:
•RS-232 data is passed from any input to all outputs
•TP-185 routes the reply from the output port defined by the DIP-switches 2, 3
and 4 (see Section 7.1.2). For reliable operation, only one port can be defined

Wiring the Twisted Pair RJ-45 Connectors
13
13
7.1.5.2 Software Mode
In Software mode, the TP-185 routes the data and reply based on the Protocol 2000
commands received from the PC or other device connected to any of the inputs.
The following example illustrates a typical command sequence. The destination and
return paths to and from the end-user device are set (TP-185 control commands),
then an end-user device command is sent to the defined destination. The TP-185
differentiates between the two types of commands and acts accordingly.
The sequence is as follows:
1. Set destination path for command
2. Set return path
3. Send end-user command sequence
8 Wiring the Twisted Pair RJ-45 Connectors
Table 5 and Figure 9 define the TP pinout using a straight pin-to-pin cable with
RJ-45 connectors. When using STP cable, connect/solder the cable shield to the RJ-45
connector shield. Table 5: UTP Connector Pinout
EIA /TIA 568B
Figure 9: CAT 5 Pinout
PIN
Wire Color
1 Orange / White
2 Orange
3 Green / White
4 Blue
5 Blue / White
6 Green
7 Brown / White
8 Brown
Pair 1 4 and 5
Pair 2 1 and 2
Pair 3 3 and 6
Pair 4 7 and 8

KRAMER: SIMPLE CREATIVE TECHNOLOGY
Technical Specifications
14
9 Technical Specifications
Technical specifications of the TP-185 are shown in Table 6.
Table 6: Technical Specifications1
INPUTS:
of the TP-185
8 UXGA on 15-pin HD connectors (VGA through WUXGA)
8 unbalanced stereo audio 3.5mm mini jacks
OUTPUTS: 8 TP on RJ-45 connectors
RESOLUTION: Up to WUXGA (1920 x 1200)
RANGE: Up to 100m (328ft)
MAX. OUTPUT LEVEL: VIDEO: 1.6Vpp AUDIO: 2.3Vpp
CONTROLS: RS-232 3 pin terminal block
RS-485 3 pin terminal block
SERIAL BAUD RATE: Up to 19200kbps
SERIAL MODE: Full-duplex
BANDWIDTH: AUDIO: 20Hz to 20kHz @0.5dB
S/N RATIO: AUDIO: <-80dB
TOTAL GAIN: Audio: 0dB
COUPLING: Audio: AC
AUDIO THD + NOISE: Audio: <0.03%
POWER CONSUMPTION: 100-240V AC, 16VA
OPERATING
TEMPERATURE: 0° to +55°C (32° to 131°F)
STORAGE
TEMPERATURE: –45° to +72°C (–49° to 162°F)
HUMIDITY: 10% to 90%, RHL non-condensing
DIMENSIONS: 48.26cm x 19.1cm x 1U (19" x 7.52" x 1U)W, D, H
WEIGHT: 3.8kg (8.4lbs) approx
ACCESSORIES: Power cord, Windows®-based control software, rack “ears”
10 Default Communication Parameters
Table 7 Table 7: TP-185 Communication Parameters
lists the TP-185 default communication parameters.
RS-232
Protocol 2000
Baud Rate: 9600
Data Bits: 8
Stop Bits: 1
Parity: None
Command Format: HEX
Example (Output 1 to Input 1): 0x01, 0x81, 0x81, 0x81
1 Specifications are subject to change without notice

Default Communication Parameters
15
15
10.1 Kramer Communication Protocol 2000
The RS-232/RS-485 Protocol 2000 uses four bytes of information as shown in
Table 8. The data rate is set by the DIP-switches (see Table 4), with no parity, 8 data
bits and 1 stop bit.
Table 8: Protocol Command Definition
MSB
LSB
DESTI-
NATION
INSTRUCTION
0
D
N5
N4
N3
N2
N1
N0
7 6 5 4 3 2 1 0
1st byte
INPUT
1
I6
I5
I4
I3
I2
I1
I0
7 6 5 4 3 2 1 0
2nd byte
OUTPUT
1
O6
O5
O4
O3
O2
O1
O0
7
6
5
4
3
2
1
0
3rd byte
MACHINE NUMBER
1 OVR X M4 M3 M2 M1 M0
7
6
5
4
3
2
1
0
4th byte
1st BYTE: Bit 7 – Defined as 0.
D – “DESTINATION”: 0 - for sending information to the switchers (from the PC);
1 - for sending to the PC (from the switcher).
N5…N0 – “INSTRUCTION”
The function that is to be performed by the switcher(s) is defined by the INSTRUCTION (6 bits). Similarly, if a function is performed
via the machine’s keyboard, then these bits are set with the INSTRUCTION NO., which was performed. The instruction codes are
defined according to the table below (INSTRUCTION NO. is the value to be set for N5…N0).
2nd BYTE: Bit 7 – Defined as 1.
I6…I0 – “INPUT”.
When switching (ie. instruction codes 1 and 2), the INPUT (7 bits) is set as the input number which is to be switched. Similarly, if
switching is done via the machine’s front-panel, then these bits are set with the INPUT NUMBER which was switched. For other
operations, these bits are defined according to the table.
3rd BYTE: Bit 7 – Defined as 1.
O6…O0 – “OUTPUT”.
When switching (ie. instruction codes 1 and 2), the OUTPUT (7 bits) is set as the output number which is to be switched. Similarly, if
switching is done via the machine’s front-panel, then these bits are set with the OUTPUT NUMBER which was switched. For other
operations, these bits are defined according to the table.
4th BYTE: Bit 7 – Defined as 1.
Bit 5 – Don’t care.
OVR – Machine number override.
M4…M0 – MACHINE NUMBER.
Used to address machines in a system via their machine numbers.
For a single machine controlled via the serial port, always set M4…M0 = 1, and make sure that the machine itself is configured as
MACHINE NUMBER = 1.
When several machines are controlled from a single serial port, they
are usually configured together with each machine having an individual machine number. If the OVR bit is set, then all machine
numbers will accept (implement) the command, and the addressed machine will reply.

KRAMER: SIMPLE CREATIVE TECHNOLOGY
Default Communication Parameters
16
Table 9: Instruction Codes for the TP-185
INSTRUCTION DEFINITION FOR SPECIFIC INSTRUCTION NOTE
# DESCRIPTION INPUT OUTPUT
2C CONTROLS THE STATUS OF A PORT 0–close
1–open Output bit:
O0–O5 = output # or 0 for all outputs
O6–0 = Tx; 1 = Rx
1, 2, 4, 5
2D READS THE STATUS OF A PORT 0–open Output bit:
O0–O5 = output #
O6–0 = Tx; 1 = Rx
2, 3, 4, 5
Note: All values in the table are hexadecimal, unless otherwise stated.
NOTES on Table 9:
NOTE 1 – When the PC sends this command, if the instruction is valid the unit replies by sending the PC the same 4 bytes that it was
sent (except for the first byte where the Destination bit is set high).
NOTE 2 – If O6 = 0 (Tx) – This command defines/reads the definition of the output # (1, 2 or3) to pass the RS-232/Direct command
from any input. In this case the instruction does not modify previously set output numbers, allowing the setting of multiple outputs for
the Direct command. If O6 = 1 (Rx), the command defines/reads the definition of the output # (1, 2 or 3) to pass the reply from the
output to inputs. In this case, the instruction resets a previously set output number, preventing the setting of multiple outputs for the
reply.
NOTE 3 – The reply to this command is as follows: The same command and output codes as were sent are returned, and the input is
assigned the value of the parameter that was read. The reply is per the definitions in command 44.
NOTE 4 – At initial power-on or on reception of command 44 or 45, any received bytes are analyzed to see whether it is a command 44
or 45. If not, it is transmitted to the output based on the existing setup. If the analyzed bytes are a command 44 or 45, the unit waits for
the other 3 bytes and interprets them as a Protocol 2000 command. The command is executed if relevant to this machine number or
discarded if not.
NOTE 5 – This command works only when the unit is configured for Software mode.
Table 10: Sample TP-185 Control Commands
Command Description Reply
2C 80 80 81
Close all output ports for direct command
6C 80 80 81
2C 80 C0 81
Close all output ports for reply command
6C 80 C0 81
2C 81 82 81
Open port 2 for direct command
6C 81 82 81
2C 81 C1 81 Open port 1 for reply command 6C 81 C1 81
2D 80 81 81 Check status of port 1 for direct command. Port is closed 6D 80 81 81
2D 80 82 81 Check status of port 2 for direct command. Port is open 6D 81 82 81
2D 80 C1 81
Check status of port 1 for reply command. Port is open
6D 81 C1 81
2D 80 C2 81
Check status of port 2 for reply command. Port is closed
6D 80 C2 81

17
Table of contents
Other Kramer Transmitter manuals

Kramer
Kramer 610T User manual

Kramer
Kramer TP-583T User manual

Kramer
Kramer TP-594Txr User manual

Kramer
Kramer TP-114 User manual

Kramer
Kramer TP-121EDID User manual

Kramer
Kramer PT-571HDCP User manual

Kramer
Kramer VP-300THD User manual

Kramer
Kramer PT-571 User manual

Kramer
Kramer TP-15 User manual

Kramer
Kramer TP-121EDID User manual

Kramer
Kramer WP-871xr User manual

Kramer
Kramer TP-112HD User manual

Kramer
Kramer SID-X2N Installation and operation manual

Kramer
Kramer TOOLS TP-104 User manual

Kramer
Kramer WP-110xl User manual

Kramer
Kramer TP-580TD User manual

Kramer
Kramer TA-110HD User manual

Kramer
Kramer TP-551N User manual

Kramer
Kramer VA-1USB-T User manual

Kramer
Kramer Cobra TS2 User manual