Kruger FTX13011PRO User manual

GB I
F
D
E
P NLS NSF
ISTRUZIONI PER L’USO
OPERATING INSTRUCTION
INSTRUCTIONS D’UTILISATION
BEDIENUNGSANLEITUNG
INSTRUCCIONES PARA EL USO
HANDLEIDING
INSTRUÇÕES DE UTILIZAÇÃO
BRUKSANVISNING
INSTRUKTIONSBOK
KÄYTTÖOHJEET
IDROPULITRICE A FREDDO AD ALTA PRESSIONE
HIGH PRESSURE COLD WATER POWERWASHER
NETTOYEUR A EAU FROIDE A HAUTE PRESSION
HOCHDRUCK-KALTWASSER-REINIGUNGSGERÄT
HIDROLIMPIADORA EN FRÍO DE ALTA PRESIÓN
GEBRUIKSAANWIJZING
MÁQUINA DE LAVAR A FRIO DE ALTA PRESSÃO
VANNRENSER MED KALDT VANN OG HŘYT TRYKK
AGGREGAT FÖR KALL HÖGTRYCKSTVÄTT
KORKEAPAINEKYLMÄVESIPESURI
FTX13011PRO
FTX15014PRO
FTX20015PRO
FTX21515TS
FTX22018TS

Fig. 1
Fig. 4
Fig. 7
Fig. 10
Fig. 2
Fig. 5
Fig. 8
Fig. 11
Fig. 3
Fig. 6
Fig. 9
Fig. 12
ChemicalChemical
A
C
0
1
0
1
B
A

3
Fig. 13
Fig. 16
Fig. 19
Fig. 14
Fig. 17
Fig. 20
Fig. 15
Fig. 18
B
C
Fig. 21
Fig. 22

4
FTX13011PRO FTX15014PRO FTX20015PRO FTX21515TS FTX22018TS
Alimentazione
Power supply
-
v
Hz
1
230/240
50
3
400/415
50
3
400/415
50
3
400/415
50
3
400/415
50
Potenza assorbita
Absorbed power
kW
W
2,8
2800
4,7
4700
7,5
7500
6,5
6500
7,5
7500
Pressione
Pressure
bar
psi
120
1750
150
2200
200
2900
200
2900
200
2900
Portata
Flowrate
l/h
gph
540
144
780
210
900
240
860
228
1050
276
Serbatoio detergente
Discaling tank
l
gal
15
4
15
4
15
4
15
4
15
4
Serbatoio anticalcare
Discaling tank
l
gal
Tubo alta pressione
High pressure hose
m
ft
8
26,2
8
26,2
8
26,2
8
26,2
8
26,2
Cavo elettrico
Power cable
m
ft
5
16,4
5
16,4
5
16,4
5
16,4
5
16,4
Spinta lancia
Lance thrust N23 35 50 48 60
Rumorosità Lp dB (A)
Noise Lw dB (A)
81
95
77
91
74
88
79
93
74
88
Peso
Weight
kg
lb
43
95
55
121
61
134
46
101
50
110
Dimensioni
Dimensions
cm
in 80x60x88

5
Le istruzioni più importanti sono contras-
segnate dal simbolo:
Complimenti! Desideriamo ringraziarLa
per l’acquisto di questa idropulitrice, Lei ha dimostrato di non accettare compromessi: Lei vuole il meglio.
Abbiamo preparato questo manuale per consentirLe di apprezzare appieno le qualità e le elevate prestazioni che questa
idropulitrice Le offre.
Le raccomandiamo di leggerlo in tutte le sue parti prima dell’utilizzo.
Il marchio CE sulla Sua idropulitrice, dimostra la conformità del prodotto alle Normative Europee in ambito di Sicurezza.
Le proponiamo inoltre una vasta gamma di macchine per la pulizia quali:
ASPIRATORI, LAVASCIUGA PAVIMENTI, MOTOSPAZZATRICI nonché una completa gamma di ACCESSORI, PRODOT-
TICHIMICI DETERGENTI adatti per la pulizia di ogni tipo di superficie.
Chieda al Suo Rivenditore il catalogo completo dei nostri prodotti.
Il testo è stato attentamente controllato tuttavia, eventuali errori di stampa dovranno
essere comunicati al costruttoreSi riserva inoltre allo scopo di migliorare il prodotto,
il diritto di apportare modifiche per l’ aggiornamentodi questa pubblicazione senza
preavviso.E’ inoltre vietata qualsiasi riproduzione, anche parziale del presente libretto,
senza l’autorizzazione del costruttore
PREPARAZIONE DELL’ IDROPULITRICE
Montaggio della lancia (Fig. 1)
Montaggio della lancia (Fig. 2)
Collegamento idrico (Fig. 3)
Collegamento elettrico (Fig. 4)
Continuare la lettura del presente libretto
senza collegare l’ idropulitrice alla rete
elettrica ed idrica.
CLASSIFICAZIONE
L’utente deve rispettare le condizioni di utilizzo dell'
idropulitrice previste dalle Norme vigenti, in particolare
deve attenersi alla descritta classificazione:
La idropulitrice ai fini della protezione contro la scossa
elettrica è un apparecchio di Classe I.
L’idropulitrice viene regolata in fabbrica e tutti i dispo-
sitivi di sicurezza in essa contenuti sono sigillati. E’
vietato alterare la loro regolazione.
L’idropulitrice deve essere sempre utilizzata su un
terreno consistente e in piano, inoltre non deve essere
spostata durante il suo funzionamento o quando
allacciata alla rete elettrica.
L’ idropulitrice viene considerata apparecchio ad
installazione fissa.
Il non rispetto di questa prescrizione puó essere causa
di pericolo. L’idropulitrice non deve essere utilizzata
in presenza di atmosfera corrosiva o potenzialmente
esplosive (vapori o gas).
L’allacciamento elettrico deve essere effettuato da
tecnici qualificati in grado di operare nel rispetto delle
norme vigenti (per l’Italia attenersi a quanto previsto
dalla legge 46/90) e in accordo alle istruzioni del
costruttore.
Un errato allacciamento può causare danni a persone,
animali o cose , nei confronti dei quali il costruttore
non puó essere considerato responsabile.
Le idropulitrici con potenza inferiore a 3 kW sono
dotate di spina per il collegamento alla rete elettrica.
In questo caso verificare che la portata elettrica del-
l’impianto e delle prese di corrente siano adeguate
alla potenza massima dell’apparecchio indicata in
targa (kW).
In caso di dubbio rivolgersi a personale professional-
mente qualificato.
In caso di incompatibilità tra la presa e la spina del-
l’apparecchio, fare sostituire la presa con altra di tipo
adatto da personale professionalmente qualificato.
Prima di collegare l’ idropulitrice accertarsi che i dati
di targa siano rispondenti a quelli della rete di distri-
buzione elettrica.
Non utilizzare prolunghe per alimentare l’idropuli-
trice.
PREFAZIONE
Il presente libretto deve essere letto prima di proce-
dere alla installazione, messa in funzione e utilizzo
dell'idropulitrice.
Il presente libretto costituisce parte integrante del
prodotto.
Esso è formato da due parti, una è di colore giallo.
Leggere attentamente le avvertenze ed istruzioni
contenute nel presente libretto inquanto forniscono
importanti indicazioni riguardanti la SICUREZZA
D'USO e MANUTENZIONE facendo particolare
attenzione alle norme generali di sicurezza contenute
nell' allegato giallo.
CONSERVARE CON CURA QUESTO LIBRETTO
PER OGNI ULTERIORE CONSULTAZIONE.
Il contenuto del presente libretto deve essere portato a
conoscenza dell’ utilizzatore dell’ idropulitrice e di chi
effettua le operazioni di manutenzione ordinaria.

6
DESTINAZIONE D'USO
L'apparecchio è destinato esclusivamente alla pulizia
di macchine, veicoli, edifici, utensili e superfici in ge-
nere idonee ad essere trattate con getto di soluzione
detergente ad alta pressione compresa tra 25 a 190
bar. (360 - 2755 PSI).
Questo apparecchio è stato progettato per essere usato
con detergenti forniti o consigliati dal costruttore. L'uso
di altri detergenti o sostanze chimiche può influire sulla
sicurezza dell'apparecchio.
Questo apparecchio dovrà essere destinato solo all'uso
per il quale è stato espressamente progettato.
Ogni altro uso è da considerarsi improprio e quindi
irragionevole.
La sicurezza elettrica dell' idropulitrice è assicurata
soltanto quando la stessa è correttamente collegata ad
un efficace impianto di messa a terra come previsto
dalle vigenti norme di sicurezza elettrica (per l’Italia
attenersi a quanto previsto dalla legge 46/90).
E’ necessario verificare questo fondamentale requisito
di sicurezza , in caso di dubbio, richiedere un controllo
accurato dell’impianto da parte di personale profes-
sionalmente qualificato.
Il costruttore non può essere considerato responsabile
per eventuali danni causati dalla mancanza di messa
a terra dell’impianto.
L’idropulitrice deve essere collegata alla rete di alimen-
tazione elettrica mediante interruttore omnipolare con
apertura dei contatti di almeno 3 mm e caratteristiche
elettriche idonee all’apparecchio. (Questo requisito non
è applicabile alle idropulitrici provviste di spina con
potenza inferiore a 3 kW).
L’ idropulitrice è disinserita dalla rete di alimentazione
elettrica solo staccando la spina o spegnendo l’inter-
ruttore omnipolare sull’impianto.
Le idropulitrici con dispositivo “Total stop”
devono considerarsi spente con interruttore
omnipolare in posizione “O” o con la spina
scollegata dalla presa di corrente.
Esempi di usi irragionevoli sono:
- Lavaggi di superfici non idonee ad essere trattate
con getto ad alta pressione.
- Lavaggio di Persone, animali, apparecchi elettrici
e dell'apparecchio stesso.
- Utilizzo di detergenti o sostanze chimiche non
idonee.
- Bloccare il grilletto (leva) della lancia in posizione
di erogazione.
Il costruttore non può essere considerato responsabile
per eventuali danni derivati da usi impropri, erronei
ed irragionevoli.
Le idropulitrici in materia di sicurezza vengono costrui-
te in accordo alle norme vigenti.
Assicurarsi all'atto di acquisto che il
prodotto sia provvisto di targhetta.
In caso contrario avvertire imme-
diatamente il costruttore e/o il rivenditore.
Gli apparecchi sprovvisti di targhetta non
devono essere usati pena la decadanza di
ogni responsabilità da parte del costrutto-
re. Prodotti sprovvisti di targhetta devono
essere ritenuti anonimi e potenzialmente
pericolosi.
RIEMPIMENTO DEL SERBATOIO DETERGENTE
Scegliere fra la gamma dei prodotti consigliati quello
adatto al lavaggio da effettuare e diluirlo con acqua
(fig. 6) secondo le prescrizioni riportate sulla confe-
zione del prodotto.
Riempire la tanica detergente con il prodotto diluito
(fig. 7).
Richiedete al vostro rivenditore il catalogo dei de-
tergenti che possono essere utilizzati in funzione del
tipo di lavaggio da effettuare e del tipo di superficie
da trattare.
Dopo l'uso di un detergente il circuito di aspirazione
deve essere risciacquato con acqua pulita, (fig. 12).
OPERAZIONI PRELIMINARI
DISIMBALLAGGIO
Dopo aver disimballato l'apparecchio assicurarsi
dell'integrità dell'idropulitrice.
In caso di dubbio non utilizzare l'idropulitrice.
Rivolgersi al proprio rivenditore.
Gli elementi dell’ imballo (sacchetti, scatole, chiodi,
ecc.) non devono essere lasciati alla portata dei bam-
bini in quanto potenziali fonti di pericolo, e devono
essere smaltiti o conservati nel rispetto delle normative
ambientali nazionali.
MONTAGGIO DI PARTI STACCATE DELLA
MACCHINA
La macchina viene assemblata dal costruttore per quan-
to relativo alle sue parti fondamentali e di sicurezza.
Per motivi di imballaggio e trasporto alcuni elementi se-
condari della idropulitrice vengono forniti smontati.
Sarà cura dell'utente il montaggio di queste parti in ac-
cordo alle istruzioni fornite in ogni kit di montaggio.
TARGHETTA DI IDENTIFICAZIONE:
La targhetta di identificazione con le principali caratte-
ristiche tecniche della vostra idropulitrice è posizionata
sul carrello ed è sempre visibile (fig. 5).

7
DISPOSITIVI DI COMANDO E CONTROLLO
Prima dell' allacciamento alla rete di alimen-
tazione idrica ed elettrica è necessario cono-
scere la funzione dei dispositivi di comando
e controllo dell' idropulitrice.
Effettuare questa operazione seguendo quanto de-
scritto nel manuale istruzioni facendo riferimento alle
figure relative.
IMPORTANTE.
L'idropulitrice deve funzionare con acqua
pulita.Acque sporche o sabbiose, prodotti
chimici corrosivi, diluenti provocano gravi
danni all'idropulitrice.
Il non rispetto di quanto sopra libera il costruttore da
ogni responsabilità e rappresenta uso negligente del
prodotto.
ALLACCIAMENTO ALLA RETE DI ALIMENTA-
ZIONE ELETTRICA
L'allacciamento alla rete dell'idropulitrice, deve essere
eseguito da tecnici qualificati in grado di operare nel
rispetto delle norme e leggi vigenti.
Controllare che la tensione di rete disponibile sul-
l'impianto corrisponda alla tensione per cui è pre-
disposta l' idropulitrice rilevabile dalla targhetta di
identificazione.
Il cavo elettrico deve essere protetto contro schiaccia-
menti accidentali.
Non utilizzare l’ idropulitrice con il cavo di alimenta-
zione danneggiato.
L'uso di qualsiasi apparecchio elettrico
comporta l'osservanza di alcune regole
fondamentali:
- non toccare l'apparecchio con mani o piedi ba-
gnati
- non usare l'apparecchio a piedi nudi o con indu-
menti non adeguati
- non tirare il cavo di alimentazione o l'apparecchio
stesso per staccare la spina dalla presa di corrente.
(Per idropulitrici con potenza inferiore ai 3Kw
dotate di spina).
La idropulitrice ai fini della protezione contro la scossa
elettrica è un apparecchio di Classe I.
Il non rispetto di quanto sopra libera
il costruttore da ogni responsabilità
e rappresenta uso negligente del
prodotto.
ALLACCIAMENTO ALLA RETE IDRICA
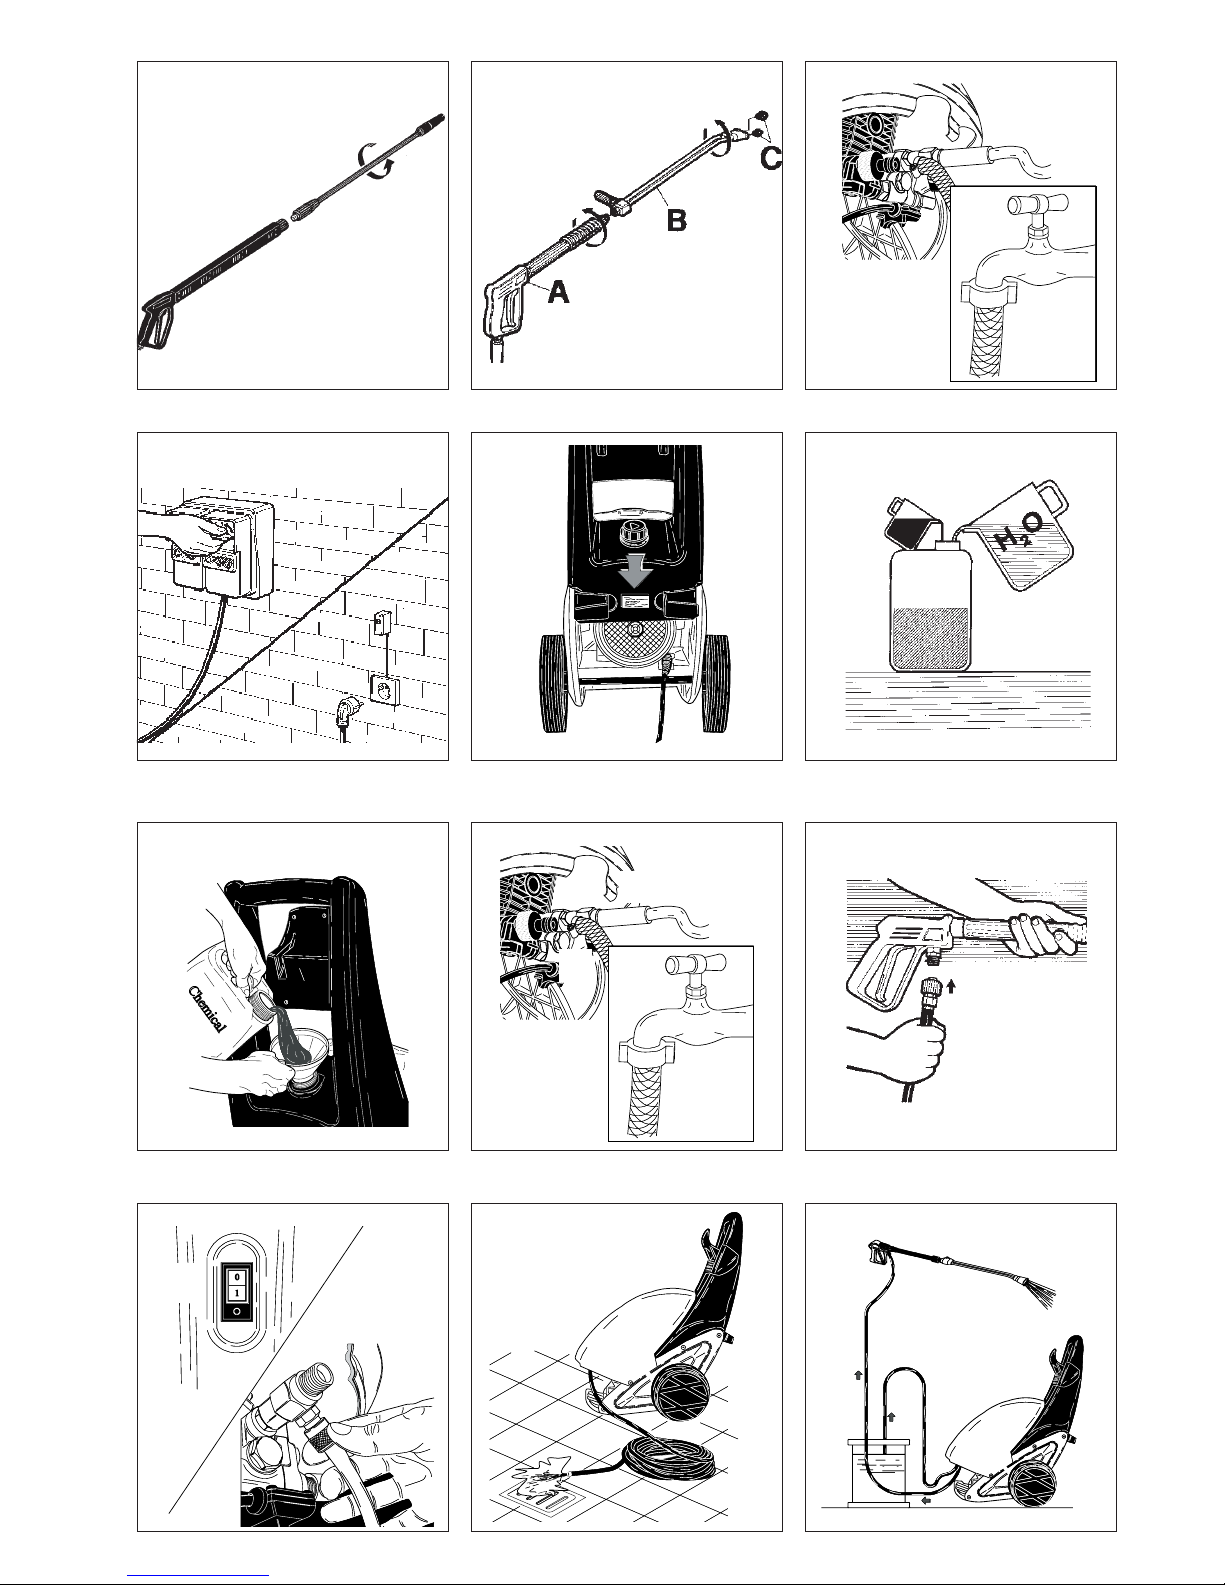
Collegare il tubo di alimentazione alla rete (fig 8A) e
al raccordo della idropulitrice (fig 8B).
Verificare che la rete idrica fornisca la quantità e la
pressione d'acqua sufficienti al funzionamento della
idropulitrice 2 ÷ 8 BAR. (29÷116 PSI).
Temperatura massima acqua di alimentazione 50
°C. (122 °F).
Collegare il tubo alta pressione alla idropulitrice (fig.
8C). e alla lancia (fig. 9).
L'idropulitrice non deve essere utilizzata da
bambini, adolescenti o persone incapaci (in
stato di ebbrezza).
Utilizzare solamente accessori originali che offrono ga-
ranzia di un funzionamento sicuro dell'apparecchio.
Il tubo flessibile di collegamento tra lancia e idropu-
litrice non deve essere danneggiato. In caso di dan-
neggiamento sostituirlo immediatamente. Il tubo deve
riportare la pressione ammessa, la data di produzione,
e la casa produttrice.
Tubi, giunti e accoppiamenti per alta pressione sono
importanti ai fini della sicurezza dell'idropulitrice.
Utilizzare solamente ricambi originali approvati dal
costruttore.
Non utilizzare l'idropulitrice quando sono presenti
persone e/o animali nel suo raggio d'azione.
I getti ad alta pressione possono essere pericolosi se
soggetti ad uso non corretto. Il getto non deve essere
diretto verso persone e/o animali, apparecchiature
elettriche o verso l'apparecchio stesso.
Il getto d'acqua in alta pressione genera una forza di
reazione sulla lancia. Tenere ben salde le impugnature
della lancia.
L'utilizzo della idropulitrice deve essere valutato in fun-
zione del tipo di lavaggio che deve essere effettuato.
Proteggersi contro l'eiezione di corpi solidi o sostanze
corrosive utilizzando indumenti protettivi adeguati
(guanti, occhiali ecc.).
L’utilizzo della idropulitrice deve essere valutato in fun-
zione della zona nella quale si effettua il lavaggio. (es.:
industrie alimentari, industrie farmaceutiche, ecc.)
Dovranno essere rispettate le relative norme e condi-
zioni di sicurezza.
La idropulitrice ai fini della protezione contro la scossa
elettrica è un apparecchio di Classe I.
Non dirigere il getto contro voi stessi o altri per pulire
indumenti o calzature.
Durante l’uso è vietato bloccare il grilletto (leva) della
lancia in posizione di erogazione.
Prima di effettuare qualsiasi operazione di pulizia e/o
manutenzione, separare l’idropulitrice dalla rete di
alimentazione elettrica ed idrica.
Periodicamente, almeno una volta all’anno, fare ispe-
zionare i dispositivi di sicurezza da un nostro centro
di assistenza tecnica.
Periodicamente, almeno una volta all’ anno, fare
analizzare la sicurezza dell’ Idropulitrice da un nostro
centro di assistenza tecnica.
AVVERTENZE GENERALI DI INSTAL-
LAZIONE ED USO

8
Non utilizzare l’ idropulitrice con il cavo di alimenta-
zione danneggiato.
In caso di danneggiamento del cavo, per la sua sosti-
tuzione, rivolgersi esclusivamente ad un nostro centro
di assistenza tecnica.
Il cavo di alimentazione non può essere sostituito
dall’utente.
Il cavo di alimentazione elettrica non deve mai essere
in tensione meccanica ed il suo percorso deve essere
protetto contro schiacciamenti accidentali.
L'uso di qualsiasi apparecchio elettrico comporta
l'osservanza di alcune regole fondamentali:
- non toccare l'apparecchio con mani o piedi ba-
gnati
- on usare l'apparecchio a piedi nudi o con indu-
menti non adeguati
- non tirare il cavo di alimentazione o l'apparecchio
stesso per staccare la spina dalla presa di corrente.
(Per idropulitrici con potenza inferiore ai 3Kw
dotate di spina).
In caso di guasto e/o di cattivo funzionamento
dell’idropulitrice spegnerla (scollegandola dalla rete
di alimentazione elettrica mediante l’ interruttore
omnipolare o scollegando la spina dalla presa per
idropulitrici con potenza inferiore ai 3 Kw, e idrica) e
non manometterla.
Rivolgersi ad un nostro centro di assisten-
za tecnica. Il non rispetto di quanto sopra
previsto, libera il costruttore da ogni re-
sponsabilità e rappresenta uso negligente
del prodotto.
ARRESTO DELL' IDROPULITRICE
1) Dopo l'uso con detergente, risciacquare il circuito
di aspirazione; infilare il tubo di aspirazione (fig. 12)
detergente in una tanica di acqua pulita e far funzio-
nare la pompa per 1 minuto a rubinetto dosaggio
completamente aperto e lancia in fase erogazione
detergente.
2) Arrestare l’ idropulitrice con l’ interruttore di accen-
sione in pos. “O” (fig. 10A).
3) Scaricare la pressione del tubo A.P. premendo la
leva della pistola.
4) Scollegare l’ idropulitrice dalla rete elettrica me-
diante l’ interruttore omnipolare o scollegando la spina
dalla presa di corrente.
5) Chiudere rubinetto di alimentazione acqua (fig.
8A).
Quando si abbandonl’ idropulitrice, anche
temporaneamente, bisogna spegnerla,
intervenendo sull’ interruttore omnipolare o
staccando la spina dalla presa di corrente.
Le idropulitrici con dispositivo “Total stop” devono
considerarsi spente con interruttore omnipolare in
posizione “O” o con la spina scollegata dalla presa
di corrente.
Quando l’ idropulitrice non viene utilizzata chiudere il
dispositivo di sicurezza dell’ impugnatura (fig. 13).
Far funzionare l’ idropulitrice a secco provoca gravi
danni alle guarnizioni di tenuta della pompa.
IMPORTANTE!
Per eliminare eventuali impurità o bolle
d'aria dal circuito idraulico, effettuare il
primo avviamento dell'idropulitrice senza
lancia, lasciando uscire l'acqua per alcuni
secondi.
Eventuali impurità potrebbero intasare
l'ugello ed impedirne il funzionamento
(Fig. 11).
USO DELLA IDROPULITRICE
PANNELLO COMANDI
A- Interruttore di accensione
B - Rubinetto dosaggio detergente (se disponibile).
AVVIAMENTO DELL' IDROPULITRICE
1) Aprire rubinetto di alimentazione acqua (fig.
8A).
2) Collegare l’ idropulitrice alla rete elettrica mediante
interruttore omnipolare o collegando la spina alla
presa di corrente.
3) Avviare l’ idropulitrice con l’ interruttore di ac-
censione in pos. “I” (fig. 10A).
Il getto d’ acqua in alta pressione genera una forza di
reazione sulla lancia. Tenere ben salde le impugnature
della lancia.
4) Premere la leva dell' impugnatura, ed iniziare il
lavaggio.
Le idropulitrici dotate di sistema “Total stop” avviano
ed arrestano il motore quando si aziona o si rilascia
la leva sull’ impugnatura della lancia.
Non bloccare la leva dell’ impugnatura in posizione
di erogazione.
USO DELL'UGELLO REGOLABILE MULTIREG.
(Fig. 14)
La selezione della pressione deve essere
effettuata a pistola chiusa.
Lavaggio a bassa pressione e aspirazione
detergente.
Spostare l'ugello in avanti.

9
CONSIGLI PER L' USO DI DETERGENTI
Questa idropulitrice è stata progettata per essere usata
con detergenti forniti o consigliati dal costruttore.
L'uso di altri detergenti o sostanze chimiche può influire
sulla sicurezza dell' idropulitrice.
1) Per la compatibilità con l’ ambiente, si consiglia di
utilizzare il prodotto detergente in maniera ragione-
vole, secondo le prescrizioni riportate sulla confezione
del prodotto.
2) Scegliere fra la gamma dei prodotti consigliati,
quello adatto al lavaggio da effettuare e diluirlo con
acqua secondo le prescrizioni riportate sulla confezio-
ne del prodotto o sul catalogo dei detergenti più adatti
al tipo di idropulitrice a freddo o a caldo.
3) Richiedete al vostro rivenditore il catalogo dei
detergenti.
FASI OPERATIVE PER UN CORRETTO LAVAG-
GIO CON L' USO DEI DETERGENTI
1) Preparare la soluzione detergente più adatta allo
sporco e alla superficie da lavare.
2) Azionare l'idropulitrice, aprire il rubinetto deter-
gente (se presente), attivare il comando di aspira-
zione del detergente presente sulla lancia (fig. 14) e
cospargere la superficie da lavare agendo dal basso
verso l' alto.
Lasciare reagire per alcuni minuti.
REGOLAZIONE DELLA PRESSIONE.
Il presente capitolo riguarda solo i modelli
provvisti del dispositivo "Regolatore di pres-
sione". Il dispositivo regolatore di pressione, fig. 16
permette di regolare la pressione di lavoro. Ruotando la
manopola C in senso antiorario (B) (minimo) si ottiene
così una riduzione della pressione di esercizio.
USO DELLA LANCIA DOPPIA (fig. 15).
La doppia lancia permette di selezionare il getto
d'acqua a bassa e alta pressione. La selezione della
pressione viene fatta con la pistola in pos. 1.
Alta pressione pos. 2. Bassa pressione e aspirazione
detergente pos. 3.
SOLO QUANTO AUTORIZZATO NEL PRESENTE
LIBRETTO ISTRUZIONI PUO' ESSERE ESEGUITO A
CURA DELL' UTILIZZATORE.
QUALSIASI ALTRO INTERVENTO E' VIETATO
Per le operazioni di manutenzione alla pompa alta
pressione, alle parti elettriche e a tutte le parti aventi
funzione di sicurezza è necessario rivolgersi al nostro
Centro di Assistenza.
Prima di eseguire qualsiasi manutenzione scollegare
l'idropulitrice dalla rete elettrica(mediante interruttore
omnipolare o scollegando la spina alla presa di corren-
te) ed idrica chiudendo il rubinetto di alimentazione
(Vedi capitoli allacciamento alla rete elettrica ed
idrica). A manutenzione ultimata prima di ricollegare
l'idropulitrice alla rete elettrica ed idrica, assicurarsi
che tutti i pannelli di chiusura siano stati rimontati
correttamente e fissati con le viti previste.
La non osservanza della prescrizione
puó essere causa di pericolo di
folgorazione.
MANUTENZIONE
PRECAUZIONI CONTRO IL GELO
L' idropulitrice non deve essere esposta al
gelo.
A fine lavoro o per soste prolungate, qualora l'idro-
pulitrice venisse lasciata in ambienti esposti al gelo è
obbligatorio l'uso di antigelo per prevenire gravi danni
al circuito idraulico.
3) Risciacquare accuratamente tutta la superficie
procedendo dall' alto verso il basso con acqua ad
alta pressione.
4) Dopo l'uso con detergente, risciacquare il circuito
di aspirazione; infilare il tubo di aspirazione (fig.
12) detergente in una tanica di acqua pulita e far
funzionare la pompa per 1 minuto, e lancia in fase
erogazione detergente.
Utilizzo dei detergenti
I detergenti non devono seccare
sull’oggetto da pulire.
Il regolatore del detergente (Fig. 21) si utilizza per la
regolazione della quantità di detergente da erogare.
Riempire con detergente il serbatoio (Fig. 7) avendo
cura di diluirlo secondo le relative indicazioni.
Quando è selezionata l’alta pressione il
detergente NON può essere erogato! (Fig.
22)
Lavaggio ad alta pressione congetto d'ac-
qua concentrato.
Ruotare l'ugello in senso antiorario.
Lavaggio ad alta pressione con getto d'ac-
qua a ventaglio.
Ruotare in senso orario.

10
SOSTITUZIONE UGELLO ALTA PRESSIONE.
Periodicamente è necessario la sostituzione dell' ugello
alta pressione montato sulla lancia essendo questi un
componente soggetto a normale usura in funzionamen-
to. L' usura è generalmente identificabile da un calo
della pressione di funzionamento dell' idropulitrice.
Per l'eventuale sostituzione rivolgersi al fornitore e/o
rivenditore per istruzioni.
OPERAZIONI PER L'USO DI ANTIGELO (fig.
17).
1- Chiudere l'alimentazione idrica (rubinetto),
scollegare il tubo di alimentazione e far funzionare
l'idropulitrice fino al completo svuotamento.
2- Arrestare l’ idropulitrice con l’ interruttore di ac-
censione in pos. “0” (fig. 10A).
3- Preparare un recipiente con la soluzione del
prodotto antigelo.
4- Immergere il tubo di alimentazione nel recipiente
con la soluzione antigelo.
5- Avviare l’ idropulitrice con l’ interruttore di
accensione in pos. “I”.
6 - Far funzionare l'idropulitrice fino alla fuoriuscita
dell'antigelo dalla lancia.
7- Far aspirare antigelo anche dall'aspirazione del
detergente.
8 - Arrestare l'idropulitrice e scollegarla dall' alimen-
tazione elettrica. Mediante interruttore omnipolare o
scollegando la spina dalla presa di corrente.
L’antigelo è un prodotto che puo’ causare
danni da inquinamento ambientale; pertanto
per l’ uso devono essere attentamente seguite
le istruzioni riportate sulla confezione del prodotto.
(Non disperdere nell’ ambiente.)
CONTROLLO LIVELLO E CAMBIO OLIO POM-
PA.
Controllare periodicamente il livello dell'olio della
pompa alta pressione tramite la spia (fig. 18 A) o l'asta
di controllo livello (fig. 18 B).
Qualora l'olio si presenti lattiginoso, chiamare subito
l'assistenza tecnica.
Cambiare l'olio dopo le prime 50 ore di lavoro e,
successivamente ogni 500 ore o una volta all'anno.
Agire come segue:
1) Svitare il tappo di scarico situato sotto la pompa
(fig. 18C).
2) Svitare il tappo con l'asta di controllo livello (fig.
18).
3) Lasciare sgocciolare completamente l' olio in un
recipiente consegnandolo ad un centro di raccolta
autorizzato per lo smaltimento.
4) Avvitare il tappo di scarico ed introdurre l'olio dal
foro superiore (fig. 19A) fino al livello indicato sulla
spia (fig. 19B).
Per le idropulitrici senza tappo scarico olio,
richiedere l’ intervento dell’ assistenza tec-
nica per la sostituzione.
Usare esclusivamente olio SAE 15 W40.
PULIZIA FILTRO ACQUA
Periodicamente pulire il filtro d'acqua e liberarlo da
eventuali impurità (fig. 20).
TABELLA RIEPILOGATIVA MANUTENZIONE
ORDINARIA A CURA DELL' UTENTE.
Descrizione operazioni:
Controllo cavo elettrico-tubi-rac-
cordi alta pressione Ad ogni uso
1° cambio olio pompa A.P. Dopo 50 ore
Cambi successivi olio pompa
A.P. Ogni 500 ore
Pulizia filtro acqua Ogni 50 ore
Descrizione operazioni:
Sostituzione guarnizioni pompa
A.P. Ogni 500 ore
Sostituzione ugello lancia Ogni 200 ore
Taratura e verifica dei dispositivi
di sicurezza. 1 volta all'anno
TABELLA RIEPILOGATIVA MANUTENZIONE
STRAORDINARIA A CURA DEL CENTRO DI
ASSISTENZA.
IMPORTANTE:
I tempi indicati sono per condizioni normali di
funzionamento. Per impieghi gravosi diminuire gli
intervalli di ogni operazione.
Per la manutenzione e/o riparazione
utilizzare solo ricambi originali che offro-
no le maggiori caratteristiche di qualità,
affidabilità e sicurezza. Il mancato uso di
ricambi originali libera il costruttore da
ogni responsabilità e le trasferisce a chi
esegue l’ intervento.
ACCANTONAMENTO
In caso di accantonamento per lungo periodo è neces-
sario scollegare le fonti di alimentazione, svuotare il/i
serbatoi contenenti i liquidi di funzionamento e prov-
vedere alla protezione di quelle parti che potrebbero
risultare dannegiate in seguito al deposito di polvere.
Ingrassare le parti che si potrebbero danneggiare in
caso di essicazione quali i tubi di condotta.

11
TRATTAMENTO DEI RIFIUTI DELLE APPAREC-
CHIATURE ELETTRICHE ED ELETTRONICHE.
Smaltire il prodotto seguendo le norme vigenti
relative allo smaltimento differenziato presso
centri di raccolta dedicati.
Non trattare come semplice rifiuto urbano.
Per qualsiasi informazione necessaria contattare il co-
struttore all’indirizzo indicato nel libretto istruzioni.
Il prodotto risponde ai requisiti richiesti dalle nuove
direttive introdotte a tutela dell’ambiente e che deve
essere smaltito in modo appropriato al termine del
suo ciclo di vita.
In occasione della rimessa in funzione verificare che
non vi siano crepe o tagli nei tubi di collegamento
idrico. Olii e prodotti chimici devono essere smaltiti in
accordo alle leggi vigenti.
ROTTAMAZIONE
Allorché si decida di non utilizzare più l' idropulitrice,
si raccomanda di renderla inoperante asportando il
cavo di alimentazione dell'energia elettrica.
Si raccomanda inoltre di rendere innocue quelle parti
dell' idropulitrice suscettibili di costituire un pericolo,
specialmente per i bambini che potrebbero servirsi dell'
idropulitrice fuori uso per i propri giochi.
Essendo l' idropulitrice un rifiuto speciale, smontare e
dividere in parti omogenee, smaltire quindi secondo
le leggi vigenti.
Non utilizzare come pezzi di ricambio le
parti smontate da rottamare.
IMPORTANTE: Per la manutenzione e/o riparazione
utilizzare solo ricambi originali che offrono le maggiori
caratteristiche di qualità, affidabilità e sicurezza. Il
mancato uso di ricambi originali libera il costruttore
da ogni responsabilità.
Inconvenienti Causa Rimedio
Ruotando l'interruttore l' idro-
pulitrice non parte. Assenza di collegamento elettrico.
Intervento protezione termica.
Intervento interruttore omnipolare.
Controllare la tensione di rete (vedere
caratteristiche tecniche).
Ripristinare (In caso di ulteriore interven-
to consultare l' assistenza tecnica).
Ripristinare (In caso di ulteriore interven-
to consultare l' assistenza tecnica).
Non c'è erogazione di getto. Collegamento rete idraulica difettoso.
Filtro acqua intasato.
Rubinetto di rete chiuso.
Rubinetto detergente aperto.
Controllare.
Pulirlo.
Aprirlo.
Chiuderlo.
La pompa gira ma non rag-
giunge la pressione nomi-
nale.
Filtro alimentazione acqua intasato.
Collegamento rete idraulica difettoso.
Valvola di regolazione pressione impo-
stata su minimo
Ugello lancia usurato.
Dispositivo aspirazione detergente su
lancia aperto.
Valvole sporche o usurate
Pulirlo.
Controllare.
Regolare.
Richiedere intervento Centro di Assi-
stenza.
Chiuderlo.
Richiedere intervento Centro di Assi-
stenza.
A lancia aperta la pressione
scende e sale. Ugello intasato o deformato.
Alimentazione insufficiente. Pulirlo o richiedere intervento Centro di
Assistenza.
Controllare.
Aspirazione detergente insuf-
ficiente. Rubinetto chiuso.
Detergente esaurito.
Comando sulla lancia non azionato
Aprirlo.
Riempire la tanica con detergente.
Posizionare il comando sulla lancia.
Presenza di acqua nell’olio. Anelli di tenuta paraolio usurati. Richiedere intervento Centro di Assi-
stenza.
Perdite d’ acqua dalla te-
stata. Guarnizioni di tenuta usurate. Richiedere intervento Centro di Assi-
stenza.
INCONVENIENTI - RIMEDI
Prima di qualsiasi operazione scollegare l' idropulitrice dalla rete elettrica mediante interruttore omnipolare o
scollegando la spina dalla presa di corrente ed idrica.

12
The text has been carefully checked, however any misprints should be notified to the
manufacturer.
The manufacturer also reserves the right to alter and update this publication without
prior notice for the sake of product improvement.
All reproductions of this manual, in whole or in part, are forbidden without the manu-
facturer's authorization.
The most important instructions
are marked with the symbol:
Congratulations! We wish to thank you
for buying this cleaner. You have shown that you do not accept compromises: you want the best.
We have prepared this manual to enable you to fully appreciate the qualities and high performance that this cleaner can
offer you.
Please read it completely before using the machine.
The CE mark on your cleaner shows that it has been constructed in compliance with the European Standards on safety.
We can also offer you a wide range of cleaning machines such as:
VACUUM CLEANERS, FLOOR CLEANERS, FLOOR SWEEPERS and a complete range of ACCESSORIES, CHEMICALS and
DETERGENTS suitable for cleaning all kinds of surfaces.
Ask your Dealer for the complete catalogue of our products.
PREPARING THE CLEANER
Fitting the lance (Fig. 1)
Fitting the lance (Fig. 2)
Water circuit connection (Fig. 3)
Electrical connection (Fig. 4)
Continue reading this manual without
connecting the cleaner to the power mains
and the water supply.
CLASSIFICATION
he user must observe the conditions of use of the
appliance prescribed by the Rules, and particularly he
must respect the following classification:
As for the protection against electric shock, the
H.P.cleaner belongs to CLASS I.
The H.P. cleaner is factory set and all its safety devices
are sealed. It is forbidden to alter their adju-
stment values.
The H.P. cleaner must be always used on a firm and
flat ground, furthermore it must not be moved while it
is working or connected to the electric supply.
The water cleaner is considered as a fixed device.
Failure to observe this prescription may cause danger
for the user.
The H.P. cleaner must not be used in the presence
of corrosive or potentially explosive atmospheres.
(vapours or gas)
The electric connection must be performed by qualified
technicians who are able to work in observance of the
governing rules (as far as Italy is concerned please refer to
the law 46/90) and of the manufacturer’s instructions.
A wrong electric connection may cause damage to per-
sons, animals or things, and the manufacturer cannot
be considered responsible for these.The H.P. cleaners
with power lower than 3 kW are equipped with a plug
for connection to the electric supply.
In this case please check if the electric power system and
the electric sockets are compatible with the max. power
of the appliance indicated on the plate. (kW)
In case of doubt, please apply to qualified personnel.
If the socket and the plug of the machine are not com-
patible, have the plug replaced with a suitable type by
qualified personnel.
Before connecting the machine make sure that the
data indicated on the plate correspond to those of the
electric supply.
Do not use extensions to feed the H.P. cleaner.
INTRODUCTION
This manual must be read before installing, setting
up and using the cleaner. The manual is an integral
part of the product. It is composed of two parts, one
of which is yellow.
Read the warnings and instructions in this manual
carefully as they provide important indications as to
SAFETY IN USE and MAINTENANCE, paying
special attention to the general rules for safety listed
in the yellow booklet.
KEEP THIS MANUAL CAREFULLY FOR FUTURE
CONSULTATION.
The contents of this booklet must be brought to the
attention of persons using or carrying out routine
maintenance on this water cleaner.

13
INTENDED USE
This appliance is intended exclusively for cleaning
machines, vehicles, buildings and general surfaces sui-
table for treatment with a high pressure jet of detergent
solution between 25 and 190 bar (360 - 2755 PSI).
This appliance has been designed for use with the
detergents supplied or recommended by the manufac-
turer. The use of other detergents or chemicals may
influence the safety of the appliance.
This appliance must be used only for the purpose for
which it was specifically designed.
All other uses are to be considered incorrect and
therefore unreasonable.
The electric safety of this machine may be assured only
when it is properly connected to an efficient grounding
system in accordance with the governing laws for
electric safety. (As far as Italy is concerned, please
refer to the law 46/90).
It is necessary to check this essential safety requisite.
In case of doubt, ask for accurate control of the power
system by qualified personnel.
The manufacturer may not be considered responsible
for damages occurred because of the lack of the
grounding system.
The H.P. cleaner must be connected to the electric
supply by means of an omnipolar switch with opening
contacts of at least 3 mm. This switch must have electric
features which are consistent with the appliance. (This
requisite does not apply to H.P. cleaners with plug and
electric power lower than 3 kW).
The appliance is disconnected from the electric supply
only by pulling out the plug or switching off the om-
nipolar switch.
Water cleaners with the “Total Stop” device
should be considered as off when the omni-
polar switch is in the “O” position or the plug
is unplugged from the socket.
Examples of unreasonable use:
- Washing surfaces not suitable for cleaning with a
high pressure jet.
- Washing people, animals, electric equipment or
the machine itself.
- Using unsuitable detergents or chemicals.
- Blocking the trigger (lever) of the lance in delivery
position.
The manufacturer cannot be held responsible for any
damage due to improper, incorrect or unreasonable
use. As far as safety rules are concerned, the cleaners
are manufactured according to the European Standard
EN 60 335-1 (General standard) and EN 600335 2
79 (Specific standard).
When buying your cleaner, ensure
that it has an identification plate. If
there is no plate, inform the manu-
facturer and/or the dealer immediately.
Machines without a plate must not be used
and the manufacturer declines all respon-
sibility for them. Products without a plate
must be considered anonymous and poten-
tially dangerous.
FILLING THE DETERGENT TANK.
From the range of recommended products, choose the
one most suited to the washing job to be done (fig. 6)
and dilute it with water according to the instructions
on the pack.
Fill the detergent tank with the diluted product (fig.
7).
Ask your dealer for the catalogue of the detergents that
can be used depending on the type of washing job to
be done and the type of surface to be treated.
After using a detergent, the detergent intake circuit must
be flushed out with clean water (fig.12).
PRELIMINARY OPERATIONS
UNPACKING.
After unpacking, ensure that the cleaner is undama-
ged.
If in doubt, do not use the machine.
Contact your dealer.
Packaging (bags, boxes, nails, etc) is potentially dan-
gerous and should be kept out of reach of children. It
should be disposed of or retained in respect of national
environmental legislation.
FITTING THE SEPARATE PARTS OF THE MA-
CHINE.
All the fundamental parts and safety devices of the
machine are assembled by the manufacturer.
For reasons of packing and transport, some secondary
cleaner parts are supplied separately.
The user must fit these parts as explained in the instruc-
tions supplied in each assembly kit.
DATA PLATE:
The data plate bearing the main technical characte-
ristics of your cleaner is located on the trolley and is
always visible (fig. 5).

14
COMMAND AND CONTROL DEVICES.
Before connecting the machine to the water
supply and to the power mains, it is essential
to know the function of the cleaner's command and
control devices.
IMPORTANT.
The cleaner must operate with clean water.
Dirty or sandy water, corrosive chemicals
and solvents can cause severe damage to
the cleaner.
Failure to respect the above absolves the manufactu-
rer of all liability and represents negligent use of the
product.
ELECTRICAL CONNECTION
Connection of the cleaner to the mains must be car-
ried out by skilled technicians able to ensure that all
regulations in force are complied with use in respect
of current standards and legislation.
Ensure that the mains voltage available is the same as
the voltage at which the cleaner is supposed to work;
this is indicated on the identification plate.
The electric cable must be protected from accidental
crushing.
Do not use the machine if the supply cable is dama-
ged. The use of any electric appliance requires the
respect of some basic rules:
- Do not touch the appliance with wet or damp hands
or feet.
- Do not use the appliance bare-footed or with
unsuitable clothing.
- Do not pull the supply cable or the appliance itself
in order to disconnect the plug from the
electric supply. (For water cleaners rated at less
than 3 kW fitted with plug).
As for the protection against electric shock, the
H.P.cleaner belongs to CLASS I.
Failure to observe the above war-
ning frees the manufacturer from
all responsibility and constitutes
negligent use of the product.
WATER CIRCUIT CONNECTION
Connect the feed hose to the mains (fig. 8A) and to the
hosetail on the cleaner (fig. 8B).
Check that the pressure and quantity of the water
supplied by the mains are sufficient for the cleaner to
work properly: 2 to 8 BAR (29 to 116 PSI).
Maximum temperature of feeding water 50°C
(122°F).
Connect the high pressure hose to the cleaner (fig. 8C)
and to the lance (fig. 9).
The H.P. cleaner must not be used by children,
teen-agers or incapable persons (under the
influence of alcohol, etc.)
Use only original accessories that can allow safe
working of the appliance.
The flexible hose connecting the lance to the H.P.
cleaner must not be damaged.
In case of damage, replace it immediately.
Hoses, connections and fittings for high pressure
systems are very important to guarantee the safety of
the H.P. cleaner. Use only original spare parts which
have the manufacturer’s approval.
Do not use the H.P. cleaner when persons or animals
are in its field of action.
High pressure jets may be dangerous if not properly
used.
The jet must never be directed at persons or animals,
electric appliances or at the appliance itself.
The high pressure water jet causes a reaction power
on the lance. Hold the lance grip vigorously.
The use of the H.P. cleaner must be considered
according to the kind of washing which must be
performed.
Protect yourself against the ejection of solid materials
or corrosive substances by means of adequate protec-
tive clothing. (Gloves, goggles, etc.)
The use of the H.P. cleaner must be considered accor-
ding to the place where the washing is performed (for
example: food plants, pharmaceutical plants, etc.)
Pertinent rules and safety conditions must be fol-
lowed.
As for the protection against electric shock, the
H.P.cleaner belongs to CLASS I.
Do not direct water jets at your own or other people’s
body in order to clean clothes or shoes.
While working it is forbidden, to stop the trigger (lever)
of the lance in delivery position.
Before starting any cleaning or maintenance operation,
disconnect the machine from the electric and water
supply networks.
Periodically, at least once a year, have the safety
devices checked by one of our service centres.
At least once a year, have the safety of the water clea-
ner checked by our technical service centre.
Do not use the machine if the supply cable is dama-
ged.
For the replacement of the damaged cable apply exclu-
sively to one of our technical service centres.
The supply cable of this appliance must not be replaced
by the user.
GENERAL WARNINGS ABOUT
INSTALLATION AND USE

15
The electric power cable must never be under mecha-
nical tension and must be protected against accidental
crushing.
The use of any electric appliance requires the respect
of some basic rules:
- Do not touch the appliance with wet or damp hands
or feet.
- Do not use the appliance bare-footed or with
unsuitable clothing.
- Do not pull the supply cable or the appliance itself
in order to disconnect the plug from the electric
supply. (For water cleaners rated at less than 3
kW fitted with plug).
In case of damage or malfunction, switch off the
appliance (disconnecting it from the water main and
from the electricity main via the omnipolar switch or
by unplugging the plug in the case of water cleaners
rated at less than 3 kW)
Apply to one of our technical service cen-
tres.
Failure to observe the above warning frees
the manufacturer from all responsibility and
constitutes negligent use of the product.
STOPPING THE CLEANER
1) After using with detergent, flush out the intake circuit;
place the detergent suction hose (fig. 12) in a tank of
clean water and let the pump run for 1 minute with the
dosing tap turned fully on and the lance in detergent
delivery condition.
2) Stop the water cleaner with the ON/OFF switch in
the “O” position (fig. 10A).
3) Discharge the pressure from the H.P. hose by pres-
sing the trigger on the gun.
4) Disconnect the water cleaner from the mains electri-
city supply via the omnipolar switch or by unplugging
the plug from the socket.
5) Turn off the water supply tap (fig. 8A).
If the water cleaner is left, even temporarily,
turn it off by using the omnipolar switch or by
unplugging the plug from the socket.
Water cleaners with the “Total Stop” device should
be considered as off when the omnipolar switch is in
the “O” position or the plug is unplugged from the
socket.
When the water cleaner is not used, close the safety
device on the handle (fig. 13).
Dry use of the water cleaner causes serious damage
to pump gaskets.
IMPORTANT!
To eliminate any impurities or air bubbles
from the water circuit we advise starting
the cleaner for the first time without the
lance and letting the water run out for a
few seconds.
Impurities could block the nozzle and cause
malfunction (Fig. 11).
USING THE CLEANER
CONTROL PANEL
A- On/off switch
B- Detergent control tap (if available).
STARTING THE CLEANER
1) Turn on the water supply tap (fig. 8A).
2) Connect the water cleaner to the mains electricity
supply via the omnipolar switch or by plugging the
plug into the socket.
3) Start the water cleaner with the ON/OFF switch
in the “I” position (fig. 10A).
The high pressure water jet generates a reaction force
in the lance. Keep a firm grip on the lance handle.
4) Press the trigger on the gun and begin washing.
In water cleaners with the “Total Stop” system, the motor
starts and stops when the lever on the lance handle is
actioned or released.
Do not block the handle lever in the delivery position.

16
USING THE MULTIREG ADJUSTABLE
NOZZLE.(FIG. 14)
Pressure must be selected with the gun
switched off.
Low pressure washing and detergent suc-
tion.
Move the nozzle forward.
Washing at high pressure with a concentra-
ted jet of water
Turn the nozzle in an anti-clockwise direction.
Washing at high pressure with a fan-shaped
jet of water
Turn the nozzle in a clockwise direction.
ADVICE ON USING DETERGENTS
This cleaner has been designed for use with the
detergents supplied or recommended by the manu-
facturer.
The use of other detergents or chemicals may influence
the safety of the cleaner.
1) For environmental compatibility, we recommend a
reasonable use of detergents, according to the instruc-
tions on the pack.
2) From the range of recommended products, choose
the one most suited to the washing job to be done and
dilute it with water according to the instructions on the
pack or in the catalogue of the detergents most suited
for the type of hot or cold water cleaner.
3) Ask your dealer for the detergents catalogue.
OPERATING PHASES FOR CORRECT CLEA-
NING WITH DETERGENTS.
1) Prepare the solution of detergent at the concentration
most suitable for the type of dirt and the surface that
is to be washed.
REGULATING PRESSURE.
This chapter concerns only those models
provided with the “pressure regulating”
device. The pressure regulator, fig. 16, allows the
operator to adjust the working pressure. When knob
C is turned in an anti-clockwise direction (B) (minimum),
the working pressure is reduced.
USE OF THE DOUBLE LANCE (fig. 15).
The double lance allows the operator to select a low
or high pressure jet. The pressure is selected with the
gun in pos. 1. High pressure: pos. 2. Low pressure
and detergent intake: pos. 3.
ONLY THE OPERATIONS AUTHORIZED IN THIS
INSTRUCTIONS MANUAL MAY BE CARRIED OUT
BY THE USER.
ALL OTHER OPERATIONS ARE FORBIDDEN.
For maintenance of the high pressure pump, the
electrical parts and all parts with a safety function, you
must apply to our technical service centre.
Disconnect the machine from the power and water
supply before carrying out any maintenance jobs.
Close the water supply tap (see chapters on connecting
to the electricity and water mains). Once maintenance
has been completed, ensure that the closing panels
have been correctly reassembled and anchored with
the screws provided before reconnecting the cleaner
to the mains.
Failure to do so may cause a risk of
electric shock.
MAINTENANCE
RECAUTIONS AGAINST FROST.
The cleaner must not be exposed to frost.
If the cleaner is left in premises where it is exposed to
frost, when work is over or for storage, antifreeze must
be used to prevent serious damage to the hydraulic
circuit.
2) Start the cleaner, turn on the detergent tap (if
present), switch on the detergent suction control on
the lance (fig. 14) and spray the dirty surface with the
diluted product, working from bottom to top.
Let it react for a few minutes.
3) Rinse the whole surface well from top to bottom at
high pressure.
4) After using with detergent, flush out the intake circuit;
place the detergent suction hose (fig. 12) in a tank of
clean water and let the pump run for 1 minute with the
dosing tap turned fully on and the lance in detergent
delivery condition.
The detergents must not be al-
lowed to dry on the object to be
cleaned.
ADDITION OF DETERGENT
Thedetergent adjustment knob (Fig. 21) is used to
increase/decrease detergent flow.
Fill the detergent tank (Fig. 7) with detergent, di-lute
as recommended.
When high pressure is selected, the deter-
gent CANNOT be delivered! (Fig. 22)

17
CHANGING THE HIGH PRESSURE NOZZLE.
The high pressure nozzle fitted on the lance must be
changed from time to time, as this component is subject
to normal wear during use. Wear may generally be
detected by a drop in the working pressure of the
cleaner. To replace it, consult your supplier and/or
dealer for instructions.
OPERATIONS FOR USING ANTIFREEZE (fig.
17).
1) Turn off the water supply (tap), disconnect the hose
and run the cleaner until it is completely empty.
2) Stop the water cleaner with the ON/OFF switch in
the “O” position (fig.10A).
3) Prepare a container with the solution of antifree-
ze.
4) Immerse the tube in the container with the anti-
freeze solution.
5) Start the water cleaner with the ON/OFF switch in
the “I” position.
6) Start the cleaner and let it run until antifreeze comes
out through the lance.
7)Suck up antifreeze with the detergent intake system
too.
8)Switch off the cleaner and disconnect the electric
power by switching off the omnipolar switch,via the
omnipolar switch or by unplugging the plug from the
socket.
Anti-freeze may cause environmental pollu-
tion. Always follow the instructions given on
the pack. (Dispose of carefully.)
CHECKING PUMP OIL LEVEL AND OIL CHAN-
GE.
From time to time check the oil level in the high pressure
pump by means of the sight glass (fig. 18A) or the
dipstick (fig. 18B).
If the oil has a milky appearance, call the technical
service centre immediately.
Change the oil after the first 50 hours' work and sub-
sequently every 500 hours or once a year.
Proceed as follows:
1) Unscrew the drain cap situated under the pump
(fig. 18C).
2) Unscrew the cap with the dipstick (fig. 18).
3) Let all the oil drain off into a container and deliver it
to an authorized oil collection and disposal centre.
4) Replace the drain screw and pour fresh oil in throu-
gh the filling cap on top (fig. 19A) until it reaches the
level indicated on the sight glass (fig. 19B).
For water cleaners without oil drain bung,
contact our technical service centre for re-
placement.
Use only SAE 15 W40 oil.
CLEANING THE WATER FILTER
Clean the water intake filter regularly and free it from
any impurities (fig. 20).
TABLE OF ROUTINE MAINTENANCE TO BE
PERFORMED BY THE USER.
Description of operations:
Check power cable - pipes - high
pressure connectors: Each use
Ist oil change in H.P. pump: After 50 hours
Subsequent changes in H.P.
pump: Every 500
hours
Clean water filter Every 50 hours
Description of operations:
Change seals on H.P. pump: Every 500 hours
Change lanze nozzle: Every 200 hours
Calibrate and check the safety
devices: Once a year
TABLE OF EXTRAORDINARY MAINTENANCE
TO BE PERFORMED BY THE TECHNICAL
SERVICE CENTRE.
IMPORTANT:
These intervals refer to normal working conditions.
For heavy duty use decrease the interval for each
job.
For maintenance and/or repairs, use
only original spare parts which offer the
greatest characteristics of quality and
reliability. Failure to use original spare
parts absolves the manufacturer from
all liability and transfers it to the person
carrying out the operation.
PERIODS OF INACTIVITY
If the machine is to remain inactive for a long period,
disconnect the supply sources, drain the tank(s) of all
the operating fluids and protect any parts that could
be damaged by the accumulation of dust.
Grease the parts that could be damaged by drying out,
such as the supply hoses.

18
TREATMENT OF WASTE FROM ELECTRIC/
ELECTRONIC EQUIPMENT
Dispose of the product in accordance with
current regulations concerning differentia-
ted waste disposal in dedicated waste di-
sposal areas.
Do not treat as simple urban waste.
For any information please contact the manufactu-
rer at the address specified in the user manual.
The product complies with the requirements of the
new directives introduced for the environmental sa-
feguard and must be disposed of appropriately at
the end of its life cycle.
When bringing back into use, ensure that there are no
cracks or cuts in the water supply hoses.
Oil and chemical products must be disposed of accor-
ding to current legislation.
SCRAPPING
If you decide that the cleaner is no longer to be used,
render it inoperative by removing the electric power
cable. Ensure that all parts of the cleaner that could be
a source of danger are made harmless, especially for
children who might use the old cleaner for play. As the
cleaner is considered special waste, dismantle it and
divide the material according to type, then dispose of
them as required by the legislation in force.
Do not use parts dismantled for scrap as
spare parts.
IMPORTANT:
For maintenance and/or repairs, use only original
spare parts which offer the greatest characteristics of
quality and reliability. Failure to use original spare
parts frees the manufacturer from all responsibility.
FAULTS CAUSES REMEDIES
When the switch is turned the
cleaner does not start. Faulty electric connection.
Thermal protection has tripped.
The omnipolar switch has tripped.
Check the mains voltage.
Reset (if it trips again, apply to the
technical service centre).
Reset (if it trips again, apply to the
technical service centre).
No jet delivered. Faulty water circuit connection.
Clogged water filter.
Mains tap turned off.
Detergent tap turned on.
Check it.
Clean it.
Turn it on.
Turn it off.
The pump turns but does not
reach the rated pressure. Water intake filter blocked.
Faulty water circuit connection.
Pressure regulation valve is set at
minimum.
Lance nozzle is worn.
Detergent intake device on the lance is
turned on.
Dirty or worn valves.
Clean it.
Check it.
Regulate it.
Apply to our technical service centre.
Turn it off.
Apply to our technical service centre.
When the lance is turned on
the pressure falls and rises. The nozzle is clogged or deformed.
Insufficient supply.
Clean or consult our technical service
centre.
Check it.
Insufficient detergent suction. Tap turned off.
No detergent in the tank.
Control on the lance not switched on.
Turn it on.
Fill the detergent tank.
Set the control on the lance.
Presence of water in oil. Oil seal rings worn. Apply to our technical service centre.
Water leaks from head. Gaskets worn. Apply to our technical service centre..
TROUBLE-SHOOTING
Before carrying out any operations, disconnect the cleaner from the power (via the omnipolar switch or by
unplugging the plug from the socket) and water supply.

19
Les instructions les plus importantes sont
signalées par le symbole :
Compliments ! Nous tenons à vous remercier...
pour l'achat de ce nettoyeur haute pression. Vous avez démontré que vous n'acceptez pas de compromis : Vous voulez ce
qui se fait de mieux. Nous avons préparé ce manuel pour vous permettre d'apprécier pleinement les qualités et les hautes
performances que ce nettoyeur haute pression vous garantit. Nous vous recommandons d'en lire attentivement chaque
partie avant de l'utiliser. La marque CE sur votre nettoyeur haute pression garantit que la construction a été effectuée dans
le respect des Normes européennes en matière de sécurité.
Nous vous proposons par ailleurs une vaste gamme de machines pour le nettoyage telles que :
ASPIRATEURS, ASPI-LAVEURS POUR SOLS, MOTOBALAYEUSES ainsi qu'une gamme complète d' ACCESSOIRES et de
PRODUITS CHIMIQUES DETERGENTS indiqués pour le nettoyage de tous les types de surfaces.
Demandez à votre détaillant le catalogue complet de nos produits.
Le texte a été attentivement contrôlé ; toutefois les éventuelles erreurs d'impression
devront être communiquées au constructeur. Celui-ci se réserve le droit, dans le but
d'améliorer le produit, d'apporter toute modification
pour la mise à jour de ce manuel sans préavis. Enfin toute reproduction, même partiel-
le, du présent manuel est interdite en l'absence d'autorisation du constructeur.
PREPARATION DU NETTOYEUR HAUTE
PRESSION.
Montage de la lance (Fig. 1)
Montage de la lance (Fig. 2)
Raccordement hydraulique (Fig. 3)
Branchement électrique. (Fig. 4)
Continuer la lecture de ce livret sans bran-
cher le nettoyeur haute pression au secteur
et au réseau de distribution d'eau.
CLASSIFICATION
L’usager doit respecter les conditions d’utilisation de la
machine prévues par les normes ; en particulier, il doit
se conformer à la classification décrite ci-dessous.
Pour ce qui concerne la protection contre la décharge
électrique, le nettoyeur haute pression est un appareil
de Classe I.
Le nettoyeur haute pression est réglé à l’usine et tous
les dispositifs de sécurité qu’il contient sont scellés. Il
est interdit de modifier leur réglage.
Le nettoyeur haute pression doit toujours être utilisé
sur un terrain ferme et plat et ne doit pas être déplacé
durant son fonctionnement ou quand il est branché au
réseau électrique.
Le nettoyeur haute pression est considéré comme un
appareil à installation fixe.
Le non respect de cette prescription peut se révéler
dangereux.
Le nettoyeur haute pression ne doit pas être utilisé en
cas d’atmosphère corrosive ou potentiellement explo-
sive (vapeurs ou gaz).
Le branchement électrique doit être effectué par des
techniciens qualifiés travaillant dans le respect des
normes en vigueur (pour l’Italie, se conformer aux
dispositions de la loi 46/90) et en accord avec les
instructions du constructeur.
Une erreur dans le branchement peut causer des
dommages à des personnes, à des animaux ou à des
choses, dommages pour lesquels le constructeur ne
peut être tenu pour responsable.
Les nettoyeurs haute pression ayant une puissance
inférieure à 3 kW sont pourvus d’une fiche de bran-
chement au réseau électrique.Dans ce cas, vérifier que
la puissance électrique de l’installation et des prises de
courant sont compatibles avec la puissance maximum de
l’appareil indiquée sur la plaque signalétique (kW).
En cas de doute, s’adresser à des techniciens qualifiés.
En cas d’incompatibilité entre la prise et la fiche de
l’appareil, faire remplacer la prise avec un type de
prise adéquat par des techniciens qualifiés.
Avant de brancher l’appareil, s’assurer que les données
de la plaque signalétique correspondent à celles du
réseau électrique.
Ne pas utiliser de rallonges pour alimenter le nettoyeur
haute pression.
PREFACE
Ce livret doit être lu avant de procéder à l'installation,
à la mise en service et à l'utilisation du nettoyeur haute
pression.
Il constitue partie intégrante du produit.
Il se compose de deux parties, dont une de couleur
jaune.
Lire attentivement les avertissements et les instructions
contenus dans ce manuel car ils fournissent d'impor-
tantes indications sur la SECURITE D'EMPLOI et
l'ENTRETIEN, et prêtent une attention particulière
aux normes générales de sécurité contenues dans la
notice jaune.
CONSERVER SOIGNEUSEMENT CE LIVRET
POUR POUVOIR LE CONSULTER ULTERIEU-
REMENT.
Le contenu de ce livret doit être porté à la connaissance
de l’utilisateur du nettoyeur haute pression et de qui
effectue les opérations d’entretien courant.

20
EMPLOIS DU NETTOYEUR HAUTE
PRESSION
L'appareil est destiné exclusivement au nettoyage des
machines, des véhicules, des bâtiments, des outils et,
de manière générale, des surfaces pouvant être traitées
avec un jet de solution détergente à une pression com-
prise entre 25 et 190 bars (360 - 2755 PSI).
Cet appareil a été conçu pour être utilisé avec des
détergents fournis ou conseillés par le constructeur.
L'emploi d'autres détergents ou d'autres substances
chimiques peut nuire à la sécurité de l'appareil.
Cet appareil devra être destiné exclusivement à l'usage
pour lequel il a été spécifiquement conçu.
Tout autre emploi doit être considéré comme inadéquat
et donc déraisonnable.
La sécurité électrique de cet appareil n’est assurée
que lorsque celui-ci est correctement branché à une
installation de mise à la terre en état, conformément aux
normes de sécurité électrique en vigueur (pour l’Italie,
se conformer aux dispositions de la loi 46/90).
Il est nécessaire de vérifier cette condition de sécurité
fondamentale ; en cas de doute, demander à des
techniciens qualifiés d’effectuer un contrôle rigoureux
de l’installation.
Le constructeur ne peut être tenu pour responsable en
cas de dommages éventuels causés par le manque de
mise à la terre de l’installation.
Le nettoyeur haute pression doit être branché au secteur
par un interrupteur omnipolaire avec une ouverture
des contacts d’au moins 3 mm et des caractéristiques
électriques appropriées à l’appareil (cette condition
n’est pas applicable aux nettoyeurs haute pression mu-
nis de fiche ayant une puissance inférieure à 3 kW).
Pour débrancher l’appareil du réseau électrique, il suffit
d’enlever la fiche de la prise de courant ou d’étein-
dre l’interrupteur omnipolaire sur l’installation.
Les nettoyeurs haute pression avec dispositif
“Total stop” sont éteints quand l’interrupteur
omnipolaire est en position “O” ou quand la
fiche est débranchée de la prise de courant.
Exemples d'emplois déraisonnables :
- Lavages de surfaces non appropriées à un traite-
ment avec un jet à haute pression.
- Lavage de personnes, d'animaux, d'appareils
électriques et de l'appareil lui-même.
- Utilisation de détergents ou de substances chimi-
ques non adéquats.
- Bloquer le cran (levier) de la lance en position de
sortie du liquide.
Le constructeur ne peut être tenu pour responsable des
éventuels dommages causés par un usage inadéquat,
incorrect ou déraisonnable.
En matière de sécurité, les nettoyeurs haute pression
sont construits conformément à la Norme européenne
EN 60 335-1 (norme générale) et EN 600335 2 79
(norme spécifique).
S'assurer au moment de l'achat que
le produit est muni de la plaquette. Si
ce n'est pas le cas, avertir immédiate-
ment le constructeur et/ou le détaillant.
Les appareils qui ne sont pas munis de la
plaquette ne doivent pas être utilisés : dans
le cas contraire, le constructeur serait déga-
gé de toute responsabilité.
Les produits qui ne sont pas munis de
plaquette doivent être considérés comme
anonymes et potentiellement dangereux.
REMPLISSAGE DU RESERVOIR DETERGENT.
Choisir dans la gamme des produits conseillés le déter-
gent le plus approprié au type de lavage à effectuer
et le diluer avec de l'eau (fig. 6) en se conformant aux
indications reportées sur l'emballage du produit.
Remplir le bidon du détergent avec le produit dilué
(fig. 7).
Demander à votre détaillant le catalogue des détergents
qui peuvent être utilisés en fonction du type de lavage
à effectuer et du type de surface à traiter.
Après l'emploi d'un détergent, le circuit d'aspiration
doit être rincé avec de l'eau propre (fig. 12).
OPERATIONS PRELIMINAIRES
DEBALLAGE.
Après avoir déballé l'appareil, s'assurer que le net-
toyeur haute pression est intact. En cas de doute, ne
pas utiliser le nettoyeur haute pression.
S'adresser au détaillant.
Les éléments de l’emballage (sachets, boîtes, clous, etc.)
ne doivent pas être laissés à la portée des enfants car
ils sont une source potentielle de danger et doivent être
mis au rebut ou conservés dans le respect des normes
nationales pour la protection de l’environnement.
MONTAGE DES PIECES DETACHEES DE L'AP-
PAREIL.
L'appareil est assemblé par le constructeur pour ce qui
concerne ses parties fondamentales et de sécurité.
Pour des motifs d'emballage et de transport, certains
éléments secondaires du nettoyeur haute pression sont
fournis démontés.
Il reviendra à l'utilisateur de monter ces pièces con-
formément aux instructions fournies dans chaque lot
de montage.
PLAQUETTE SIGNALETIQUE.
La plaquette signalétique indiquant les principales
caractéristiques techniques de votre nettoyeur haute
pression est placée sur le chariot et est toujours visible
(fig. 5).
This manual suits for next models
4
Table of contents
Languages:
Other Kruger Pressure Washer manuals

Kruger
Kruger KX130 User manual

Kruger
Kruger KH15010CP User manual

Kruger
Kruger KH1510F User manual

Kruger
Kruger modular 140 User manual

Kruger
Kruger KH20015CSP User manual

Kruger
Kruger KKH20015CP User manual

Kruger
Kruger KH4014F User manual

Kruger
Kruger K101EX User manual

Kruger
Kruger KH12011CI User manual

Kruger
Kruger KH2020F User manual