manuals.online logo
Brands
  1. Home
  2. •
  3. Brands
  4. •
  5. Kwikset
  6. •
  7. Door Lock
  8. •
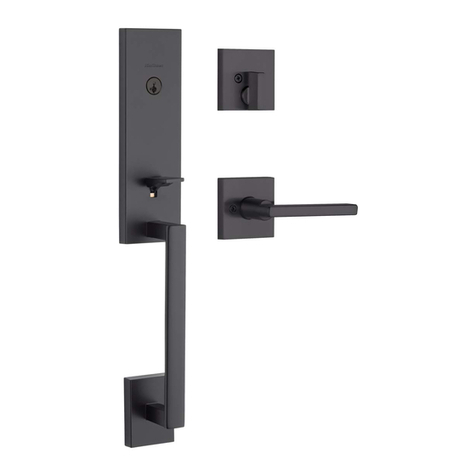
  9. Kwikset Camino Pull User manual

Kwikset Camino Pull User manual

Interior
Interior
Exterior
Exterior
The mounting plate
should be pre-installed
on the interior. If
removed, re-install.
La placa de montaje debe
ser pre-instalada en el
interior. Si se removio,
reinstale la placa.
Install the deadbolt.
Instale el cerrojo.
A
B
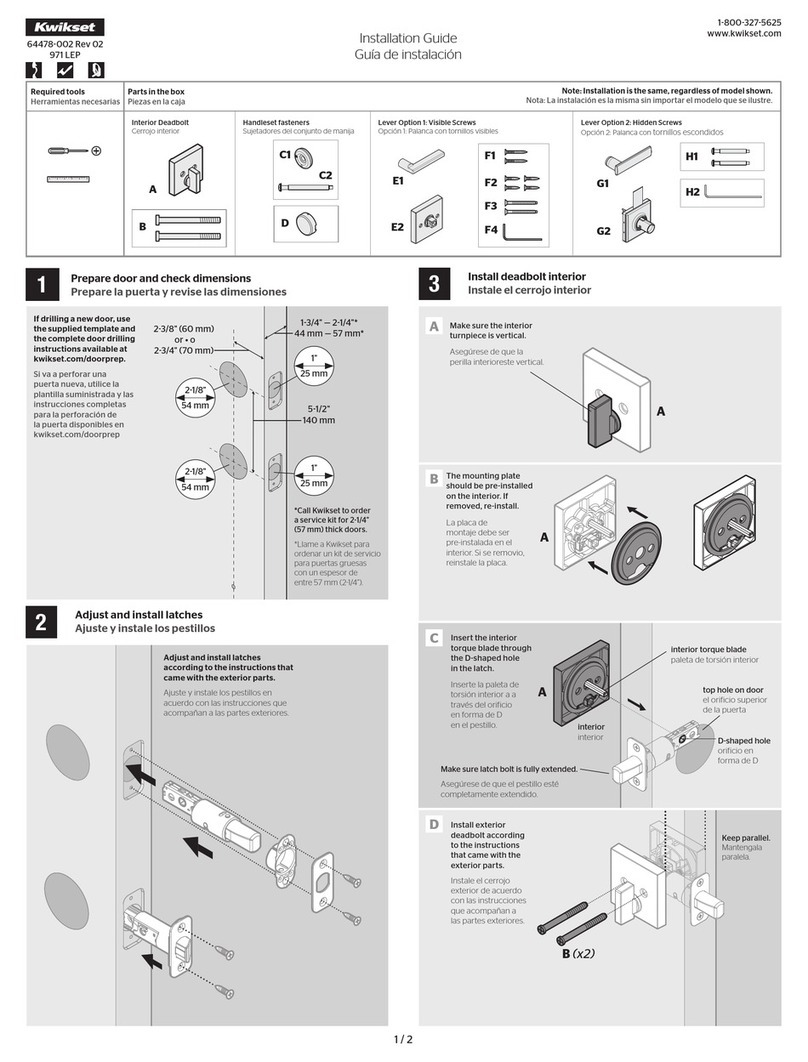
Installation Guide
Guía de instalación
64485002 Rev 02
819 / 973 Dmy
18003275625
www.kwikset.com
Parts in the box
Piezas en la caja
Required tools
Herramientas necesarias
If drilling a new door, use the
supplied template and the complete
door drilling instructions available
at kwikset.com/doorprep
Si va a perforar una puerta nueva,
utilice la plantilla suministrada y
las instrucciones completas para
la perforación de la puerta estan
disponibles en kwikset.com/doorprep
Fold the supplied template along the fold
line and place on the exterior side of your
door so that the holes in the template are
aligned with the holes in your door.
Doble la plantilla suministrada a lo largo
de la línea de pliegue y coloquela sobre
el borde exterior de su puerta de manera
que los oriicios en la plantilla queden
alineados con los oriicios de su puerta.
Through door
A través de la puerta
23/8" (60 mm)
or • o
23/4" (70 mm)
13/4" — 21/4"*
44 mm — 57 mm*
51/2"
140 mm
21/8"
54 mm
21/8"
54 mm
Exterior
Exterior
Exterior
Exterior
Exterior
Exterior
7/16"
11.11 mm
*Call Kwikset to order
a service kit for 21/4"
(57 mm) thick doors.
*Llame a Kwikset para
pedir un kit de servicio
para puertas gruesas
con un espesor de
entre 57 mm (21/4”).
Deadbolt
Cerrojo
Handleset
Conjunto
de manija
Lever Option 1: Visible Screws
Opción 1: Palanca con tornillos visibles
Lever Option 2: Hidden Screws
Opción 2: Palanca con tornillos escondidos
A
B
DG1
G2
J1
J2
C
E1
E2
F
H1 K1
H2
K2
H3
H4
B
B
C (x2)
A
If you already have the bottom hole drilled
in your door, conirm that its location falls
between the highest and lowest holes at
the bottom of the template. If it does not fall
within this range, drill a new hole in step 3.
If the bottom hole is not drilled, use the
template to mark the location of the new hole
on your door. Make sure it is aligned with the
other holes in the door. Drill a new hole in step
3 at the 91/8" (232 mm) mark on the template.
Si el oriicio inferior está perforado de
antemano en su puerta, conirmar que está
alineado con uno de los oriicios inferiores
de la plantilla. Si no cae dentro de este rango
perforar un nuevo oriicio en el paso 3.
Si el oriicio inferior no se perfora, utilice la
plantilla para marcar la ubicación del oriicio
nuevo en la puerta. Asegúrese de que el
oriicio está alineado con los otros oriicios en
la puerta. Perfore un nuevo oriicio en el paso 3
en la marca de 232 mm (91/8") en la plantilla.
Note: Installation is the same, regardless of model shown.
Nota: La instalación es la misma sin importar el modelo que se ilustre.
1 / 2
A
B
Prepare door and check dimensions
Prepare la puerta y revise las dimensiones
1Drill new bottom hole (if needed)
Perfore un nuevo oriicio inferior (si es necesario)
3
Conirm bottom hole location
Conirme la ubicación del oriicio inferior
2
Install deadbolt
Instale el cerrojo
4
Tighten the
pre-installed
set screw.
Apriete los
tornillos
preinstalados.
G2
H3 (x2)
A
D
Insert the bottom post
through the bottom
hole in the door.
Secure the handleset
with the washer, screw,
and screw cover.
Inserte el poste
inferior en el oriicio
inferior de la puerta.
Fije el conjunto de manija
con la arandela, el tornillo,
y la tapa del tornillo.
A B
Post is adjustable and can be moved
to any position within the slot.
El poste es ajustable y se puede mover a
cualquier posición dentro de la ranura.
F
G1
J1
J2
J2
J2
E2
E1
H4
clockwise
horario
Pull on paper insert to separate
rose cover and lever base.
Tire de la tapa de papel para separar
la roseta y la base de la palanca.
Install rose cover.
Instale la roseta.
Tighten the pre-
installed set screw.
Apretar el tornillo
preinstalado
clockwise
horario
©2018 Spectrum Brands, Inc.
Install lever.
Instale la palanca.
Install lever.
Instale la palanca.
Install lever base.
Instale la base de la palanca.
E1
WARNING: This Manufacturer advises that no lock can provide complete security by itself. This lock may be defeated by forcible or technical means, or evaded by entry elsewhere
on the property. No lock can substitute for caution, awareness of your environment, and common sense. Builder’s hardware is available in multiple performance grades to suit the
application. In order to enhance security and reduce risk, you should consult a qualiied locksmith or other security professional.
ADVERTENCIA: El fabricante se permite informar que ningún bloqueo solo puede ofrecer una seguridad completa. Este bloqueo puede ser puesto fuera por la fuerza o por
medios técnicos o evitarse mediante el uso de otra entrada en la propiedad. Sin bloqueo puede reemplazar el seguimiento de su entorno y el sentido común. Diferentes grados de
materiales de instalación están disponibles para diferentes aplicaciones. Con el in de aumentar la seguridad y reducir el riesgo, usted debe consultar a un cerrajero caliicado u otro
profesional de la seguridad.
Register your product at www.kwikset.com/productregistration
Rate your product at www.kwikset.com/reviews
Registre su producto en www.kwikset.com/productregistration
Clasiique su producto en www.kwikset.com/reviews
Loosen the pre-installed set screw.
Aloja el tornillo de ijación preinstalado.
H4
counterclockwise
antihorario
2 / 2
B
C
A
B
C
D
E
K1 (x2)
K2
or
o
Install lever base.
Instale la base de la palanca.
Install handleset
Instale el conjunto de manija
Remove lever or knob (if needed)
Retire la palanca o perilla (si es necesario)
Option 2 (Hidden screws)
Opción 2 (Tornillos escondidos)
Option 1 (Visible screws)
Opción 1 (Tornillos visibles)
Install lever
Instale la palanca
5
6
7

Other Kwikset Door Lock manuals

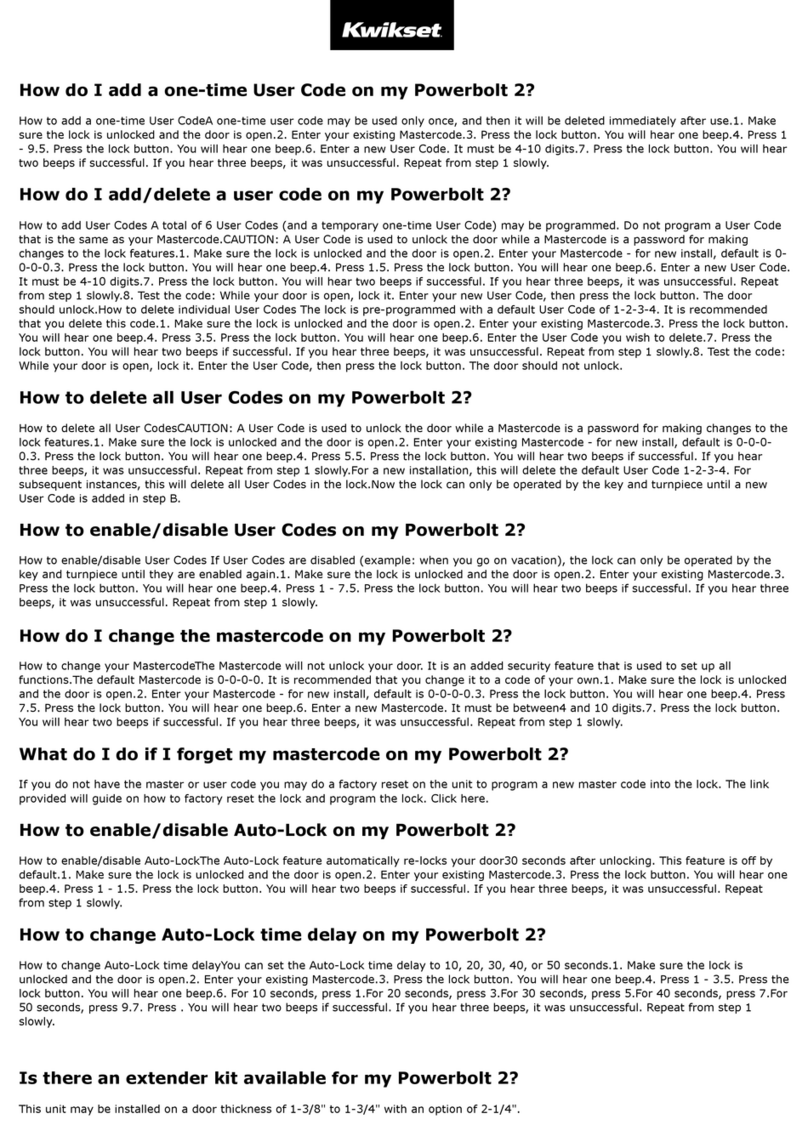
Kwikset 506KNL 3 User manual

Kwikset

Kwikset 506KNL 3 User manual

Kwikset SMARTCODE User manual

Kwikset

Kwikset SMARTCODE User manual

Kwikset 907 15 SMT User manual

Kwikset

Kwikset 907 15 SMT User manual

Kwikset Smartcode 914 Operating instructions

Kwikset

Kwikset Smartcode 914 Operating instructions

Kwikset CP/BP 49726 / 02 User manual

Kwikset

Kwikset CP/BP 49726 / 02 User manual

Kwikset 699 FN User manual

Kwikset

Kwikset 699 FN User manual

Kwikset 62883-002 User manual

Kwikset

Kwikset 62883-002 User manual

Kwikset 62822/01 User manual

Kwikset

Kwikset 62822/01 User manual

Kwikset 971MRL SQT 15 User manual

Kwikset

Kwikset 971MRL SQT 15 User manual

Kwikset Powerbolt 2 User manual

Kwikset

Kwikset Powerbolt 2 User manual

Kwikset 62822 / 01 User manual

Kwikset

Kwikset 62822 / 01 User manual

Kwikset 62892-002 User manual

Kwikset

Kwikset 62892-002 User manual

Kwikset 44594/01 User manual

Kwikset

Kwikset 44594/01 User manual

Kwikset Premis User manual

Kwikset

Kwikset Premis User manual

Kwikset 816 User manual

Kwikset

Kwikset 816 User manual

Kwikset 69926-001 User manual

Kwikset

Kwikset 69926-001 User manual

Kwikset SMARTCODE 917 User manual

Kwikset

Kwikset SMARTCODE 917 User manual

Kwikset Kevo User manual

Kwikset

Kwikset Kevo User manual

Kwikset 159 User manual

Kwikset

Kwikset 159 User manual

Kwikset Combo 690 CP User manual

Kwikset

Kwikset Combo 690 CP User manual

Kwikset 00883351666312 User manual

Kwikset

Kwikset 00883351666312 User manual

Kwikset Prismo 740PSK RDT 15 SMT User manual

Kwikset

Kwikset Prismo 740PSK RDT 15 SMT User manual

Kwikset Powerbolt2 User manual

Kwikset

Kwikset Powerbolt2 User manual

Kwikset WEISER Tavaris 800TVH LIP 26 SMT User manual

Kwikset

Kwikset WEISER Tavaris 800TVH LIP 26 SMT User manual

Popular Door Lock manuals by other brands

Iseo KW13398 Use and maintenance instructions

Iseo

Iseo KW13398 Use and maintenance instructions

M-LOCKS E-Pass EP1750 Series Mounting instructions

M-LOCKS

M-LOCKS E-Pass EP1750 Series Mounting instructions

Remock Lockey RLMGS3131 user guide

Remock Lockey

Remock Lockey RLMGS3131 user guide

Roto Safe C 600 manual

Roto

Roto Safe C 600 manual

Schlage AD-300 instructions

Schlage

Schlage AD-300 instructions

Drumm GEMINY Europe Assembly instructions

Drumm

Drumm GEMINY Europe Assembly instructions

Sylvan SL43E installation instructions

Sylvan

Sylvan SL43E installation instructions

Siemens Codoor CD3500 Installation & user manual

Siemens

Siemens Codoor CD3500 Installation & user manual

Dato L-B200 user manual

Dato

Dato L-B200 user manual

iSecus S1 Tuya BLE user manual

iSecus

iSecus S1 Tuya BLE user manual

Lamp ET-48 installation manual

Lamp

Lamp ET-48 installation manual

Command access ARLP-UL-M-KIT Insert Instructions

Command access

Command access ARLP-UL-M-KIT Insert Instructions

Spectrum Brands SD004: SD005 Assembly instructions

Spectrum Brands

Spectrum Brands SD004: SD005 Assembly instructions

RUDO P Series manual

RUDO

RUDO P Series manual

Iseo Push Sirena Assembling and maintenance instructions

Iseo

Iseo Push Sirena Assembling and maintenance instructions

Alarm Lock TAIL PIECES Samples manual

Alarm Lock

Alarm Lock TAIL PIECES Samples manual

Stanley QEL 200 EL Series user guide

Stanley

Stanley QEL 200 EL Series user guide

Dorma MUNDUS PREMIUM PT 60 Mounting instruction

Dorma

Dorma MUNDUS PREMIUM PT 60 Mounting instruction

manuals.online logo
manuals.online logoBrands
  • About & Mission
  • Contact us
  • Privacy Policy
  • Terms and Conditions

Copyright 2025 Manuals.Online. All Rights Reserved.