組立て前の注意(2)BEFORE YOU BEGIN (2)
5
ビスがきかない
The threads are stripped.
しめすぎ
Overtightened.
4
●ビスの種類 Types of screws:
ビス Screw セットビス
Set Screw
TPビス
Self-tapping (TP) Screw
●サイズ例
How size of screw is given:
3x12mm ビス
Screw
3mm
12mm
TPビスは、部品にネジを切りながらしめつけるビスです。しめこ
みが固い場合がありますが、部品が確実に固定されるまでしめこん
でください。ただし、しめすぎるとネジがきかなくなりますので、
部品が変形するまでしめないでください。
Self-tapping (TP) screws cut threads into the parts when being
tightened. Excessive force may permanently damage parts when
tightening TP screws. It is recommended to stop tightening when
the part is securely attached or when some resistance is felt after
the threaded portion enters the plastic.
このキットには、形のちがうビスや長さがちがうビスが多く入ってい
ます。原寸図で確かめてから組立ててください。ビス類は多めに入っ
ているものがありますので、予備としてお使いください。
This kit contains many screws in and other hardware different metric
sizes and shapes. For your reference, the figures in the manual
show actual sizes. (Some screws are extras.)
CH-2 CH-1
BATT.
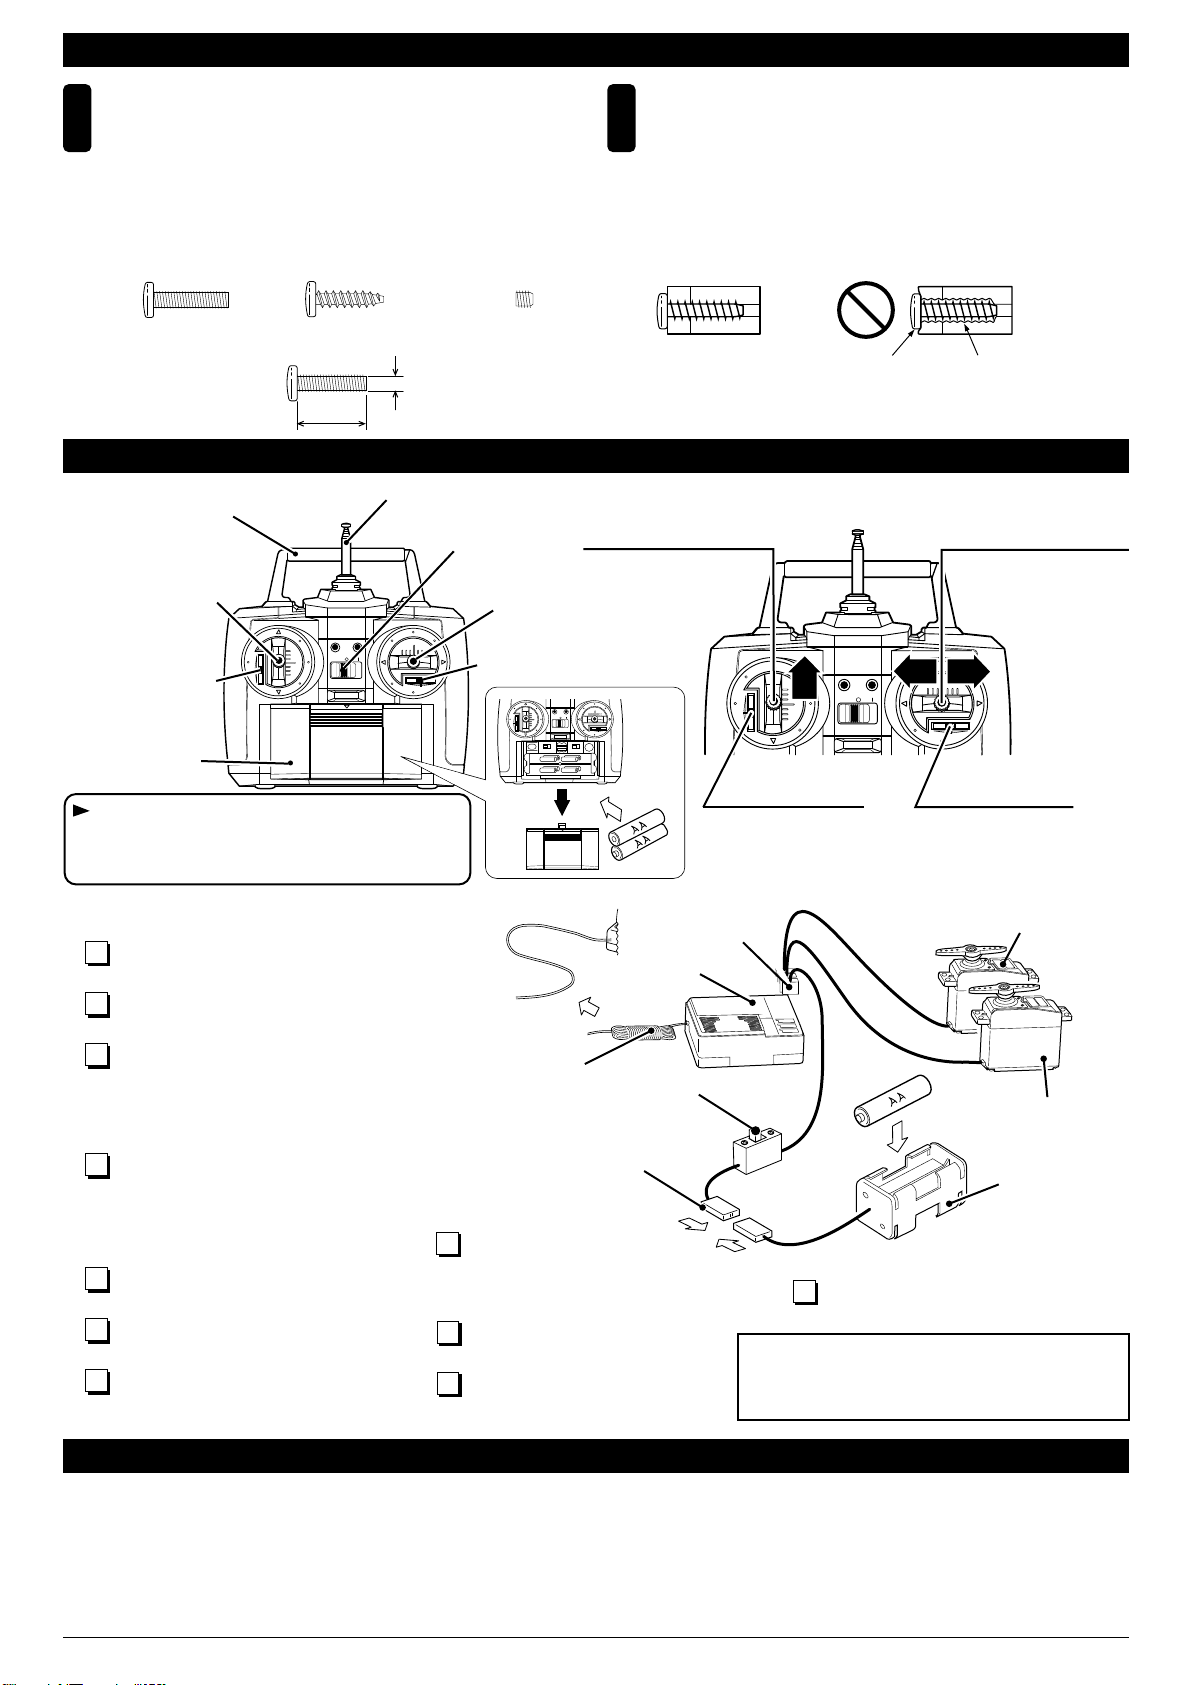
プロポの準備 RADIO PREPARATION
プロポの改造 Transmitter Modification
●プロポを下の順番にしたがってセットします。
Set up a radio control system as indicated below.
1各コネクターを接続する。
Plug in connectors.
2単3乾電池をセットする。
Install the AA-size batteries.
3送信機のアンテナを最後まで引き出す。
縮めて使用すると電波の到達距離が短く
なるので注意する。
Extend the transmitter antenna. If not, the
range of the transmitter will not be sufficient!
4受信機のアンテナをほどく。
縮めて使用すると電波の到達距離が短く
なるので注意する。
Undo the receiver antenna. If not, the
range of the receiver will not be sufficient!
5送信機の各トリムレバーを中央にする。
Center all trims. (Transmitter)
6送信機のスイッチを入れる。
Switch on. (Transmitter)
7受信機のスイッチを入れる。
Switch on. (Receiver)
8送信機のスティックを操作し
サーボが作動するか確認する。
Check that the servos move acc-
ording to your inputs. (Transmitter)
10
送信機のスイッチを切る。
Switch off. (Transmitter)
11
送信機のアンテナを縮める。
Retract the antenna. (Transmitter)
9受信機のスイッチを切る。
Switch off. (Receiver)
アンテナ
Antenna
コネクター
Connector
受信機
Receiver
コネクター
Connector
ラダースティック
Rudder Stick
ラダーサーボ
Rudder Servo
セールコントロールサーボ
Sail Control Servo
スイッチ
Switch
電池ボックス
Battery Box
CH.2
CH.1
BATT
ラダートリム
Rudder Trim
セールコントロール
スティック
Sail Control Stick
セール
コントロールトリム
Sail Control Trim
●セールの開閉操作は
このスティックでお
こないます。
Stick for sail control
to open and
close.
●セール全閉角をこの
トリムで調整します。
For adjusting sail closed
angle.
ラダースティック
Rudder Stick
●左右へ曲がるときの操
作はこのスティックで
おこないます。
プロポセットに付属している取扱説明書もあわせ
てお読みください。
In addition to this page, read the instruc-tion
manual supplied with your radio as well.
For steering (left and
right bends).
CH-2 CH-1
BATT.
CH-2 CH-1
BATT.
左 右
前
進
ラダートリム
Rudder Trim
●船がまっすぐ走るように
このトリムで調整します。
For adjusting straightline
running.
セールコントロール
スティック
Sail Control Stick
セールコントロール
トリム
Sail Control Trim
バッテリーカバー
Battery Cover
ハンドル
Handle
アンテナ
Antenna 電源スイッチ
Switch
3
セールコントロール側のリバーススイッチを
リバースにしてください。
Switch the sail control reverse switch
(transmitter).
セールコントロールスティックは、指を離したとき、その位置で止まるラチェット式に改造したほうが操縦しやすくなります。
詳しくは、使用している送信機の取扱説明書をお読みください。
Modify your transmitter so the sail control stick will remain in any position you moved it to, even when releasing it. For this, remove
the little spring which makes the sail control stick recoil into neutral position. This modification will make sailing much easier. For
more details, refer to the trans-mitter instruction manual.