manuals.online logo
Brands
  1. Home
  2. •
  3. Brands
  4. •
  5. Legamaster
  6. •
  7. Touchscreen
  8. •
  9. Legamaster ETX-5510UHD User manual

Legamaster ETX-5510UHD User manual

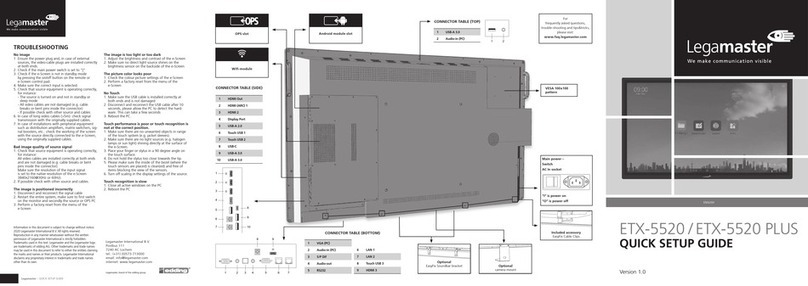
VESA – 100x100
mountung pattern
Information in this document is subject to change without notice.
2018 Legamaster International B.V. All rights reserved.
Reproduction in any manner whatsoever without the written
permission of Legamaster International is strictly forbidden.
Trademarks used in this text: Legamaster and the Legamaster logo
are trademarks of edding AG. Other trademarks and trade names
may be used in this document to refer to either the entities claiming
the marks and names or their products. Legamaster International
disclaims any proprietary interest in trademarks and trade names
other than its own.
QUICK SETUP GUIDE
ETX-5510UHD
Version 1.0
ENGLISH
Legamaster – QUICK SETUP GUIDE
12 11 913
14 10
1
2
4
3
5
6
7
8
1 USB 2.0
2 HDMI out
3 HDMI 1
4 HDMI 2
5 HDMI (ARC)
6 DisplayPort
7 VGA (PC)
8 PC audio in
9 LAN
10 Touch USB 2
11 Touch USB 1
12 SPDIF
13 Audio out
14 RS232
15 USB 2.0
“I“ is power on
“O” is power off
Main power –
Switch
AC In socket
Legamaster, brand of the edding group
Legamaster International B.V.
Postbus 111
7240 AC Lochem
tel.: (+31) (0)573-713000
email: info@legamaster.com
internet: www.legamaster.com
OPS slot
No image
1 Ensure the power plug and, in case of external
sources, the video-cable plugs are installed correctly
at both ends.
2. Check if the main power switch is set to “|“
3. Check if the e-Screen is not in standby mode
by pressing the on/off button on the remote or
e-Screen control pad.
4. Make sure the correct input is selected.
5. Check that source equipment is operating correctly,
for instance:
- The source is turned on and not in standby or
sleep mode
- All video cables are not damaged (e.g. cable
breaks or bent pins inside the connector)
- If possible check with other source and cables
6. In case of long video cables (>5m): check signal
transmission with the originally supplied cables.
7. In case of installations with peripheral equipment
such as distribution amplifiers, matrix switchers, sig-
nal boosters, etc.: check the working of the screen
with the source directly connected to the e-Screen,
using the originally supplied cables.
Bad image quality of source signal
1. Check that source equipment is operating correctly,
for instance:
All video cables are installed correctly at both ends
and are not damaged (e.g. cable breaks or bent
pins inside the connector).
Make sure the resolution of the input signal
is set to the native resolution of the e-Screen
3840x2160@30Hz or 60Hz).
2. If possible check with other source and cables.
The image is positioned incorrectly
1. Disconnect and reconnect the signal cable
2. Restart the entire system, make sure to first switch
on the monitor and secondly the source or OPS PC
3. Perform a factory reset from the menu of the
e-Screen
The image is too light or too dark
1. Adjust the brightness and contrast of the e-Screen
2. Make sure no direct light source shines on the
brightness sensor on the backside of the e-Screen
The picture color looks poor
1. Check the colour picture settings of the e-Screen
2. Perform a factory reset from the menu of the
e-Screen
No Touch
1. Make sure the USB cable is installed correctly at
both ends and is not damaged
2 Disconnect and reconnect the USB cable after 10
seconds, please allow the PC to detect the hard-
ware. This can take a few seconds
3. Reboot the PC.
Touch performance is poor or touch recognition is
not at the correct position.
1. Make sure there are no unwanted objects in range
of the touch system (e.g. jacket sleeves).
2. Make sure there are no light sources (e.g. halogen
lamps or sun light) shining directly at the surface of
the e-Screen.
3. Place your finger or stylus in a 90 degree angle on
the touch surface.
4. Do not hold the stylus too close towards the tip.
5. Please make sure the inside of the bezel (where the
touch sensors are placed) is clean(ed) and free of
items blocking the view of the sensors.
6. Turn off scaling in the display settings of the source.
Touch recognition is slow
1. Close all active windows on the PC
2. Reboot the PC
TROUBLESHOOTING
Android module slot
CONNECTOR TABLE
15
LM-QSG-ETX-5510_GB.indd 1-4 09.05.19 14:34
QUICK SETUP GUIDE QUICK SETUP GUIDE
Thank you for purchasing this Legamaster e-Screen
interactive display. This Quick Setup Guide will help
you setup the monitor and cover the basic operation
instructions.
Please refer to the user manual that can be found on
the USB drive for more detailed instructions and the
full safety and installation information.
Legamaster guarantees the repair or replacement,
free of charge, of faulty e-Screens and/or parts by an
authorized service partner for a warranty period of 5
years. The warranty shall take effect on the date of
purchase as stated on the receipt.
If you wish to make a claim under the warranty or
you have any other service issues, please contact your
dealer or Legamaster directly. Please refer to www.
Legamaster.com/warranty for specific warranty infor-
mation for your market.
This product, when disposed of, is supposed to be
collected and recycled according to your country‘s
legislation to reduce environmental burden.
When you dispose of this product, please contact a
distributor or an affiliate in your country. The contact
addresses are listed on the Legamaster website
http://www.legamaster.com.
By disposing this product correctly you will help
ensure that the waste undergoes the necessary
treatment, recovery and recycling and thus prevent
potential negative effects on the environment and
human health which could otherwise arise due to
inappropriate waste handling.
FCC:
FCC CFR Title 47
part 15 Subpart B.
CB:
IEC62368-1
CE:
EN55032
EN55024
EN61000-3-2
EN61000-3-3
EN62368
CAUTION
MOUNTING OF THIS PRODUCT CAN ONLY BE EXECUTED BY QUALIFIED STAFF
CAUTION
TO REDUCE THE RISK OF ELECTRIC SHOCK, MAKE SURE POWER CORD IS UNPLUGGED FROM WALL
SOCKET. TO FULLY DISENGAGE THE POWER TO THE UNIT, PLEASE DISCONNECT THE POWER CORD
FROM THE AC OUTLET. DO NOT REMOVE COVER (OR BACK). NO USER SERVICEABLE PARTS INSIDE.
REFER SERVICING TO QUALIFIED SERVICE
Item
IR Remote Control (Batteries Included)
Quick Setup-Guide
Power Cable
HDMi Cable
USB Cable
VGA Cable
2 x High precision stylus
USB drive with user manual
Label Description
Turn the display on and off
Back / return to previous menu
Navigational buttons
Select / confirm (when in menu) or Freeze screen
(when not navigating menu‘s)
Menu
Home
Source selection menu
Volume down
Mute
Volume Up
Adjusting the Volume
1. Using the remote or control panel, press the VOLUME+ or
VOLUME- to increase or decrease the volume.
Selecting the input source
1. Press the SOURCE button on the control pad. The screen
will display available sources. Select a source by touching
the icon displayed on screen.
2. Using the remote, press the SOURCE button and use the
directional arrows to select the desired source.
3. If the display cannot find a source, a “No signal” message
will appear.
Turning the display on
1. Connect the display to an AC power outlet
2. Ensure the AC switch is set to
“|“
.
3. Press the power button on the control pad, alternatively
you can use can use the power button on the remote
control.
Turning the display off
With the Power on, press the power button on the control pad.
A warning message will appear. Alternatively you can use the
power button on the remote control. To turn off power com-
pletely, turn the AC switch to „O“ or disconnect the AC power
cord from the power outlet.
Note: If there is no signal input for a period of time, the display will automatically go into power saving (sleep) mode.
Control pad table
Volume Up
Volume Down
Settings
Home
Back
Source
On/Off
INTRODUCTION
WARRANTY
RECYCLING INFORMATION
COMPLIANCE INCLUDED ACCESSORIES
REMOTE CONTROL
TURNING THE DISPLAY ON AND OFF
ADJUSTING THE VOLUME AND INPUT SOURCE
OPERATIONS
IR receiver
+ status LED Ambient light sensor
16 USB 2.0
17 USB 2.0
CONNECTOR TABLE
17 16
LM-QSG-ETX-5510_GB.indd 5-8 09.05.19 14:34

Other Legamaster Touchscreen manuals

Legamaster STX Series User manual

Legamaster

Legamaster STX Series User manual

Legamaster XTX-8600UHD User manual

Legamaster

Legamaster XTX-8600UHD User manual

Legamaster XTX-5500UHD User manual

Legamaster

Legamaster XTX-5500UHD User manual

Legamaster ETX-5520 User manual

Legamaster

Legamaster ETX-5520 User manual

Legamaster Panorama PAN-10500 User manual

Legamaster

Legamaster Panorama PAN-10500 User manual

Legamaster XTX-7500UHD User manual

Legamaster

Legamaster XTX-7500UHD User manual

Legamaster Panorama PAN-10500 User manual

Legamaster

Legamaster Panorama PAN-10500 User manual

Legamaster XTX-5500UHD User manual

Legamaster

Legamaster XTX-5500UHD User manual

Legamaster EVOLVE ETX-6530 User manual

Legamaster

Legamaster EVOLVE ETX-6530 User manual

Legamaster E-SCREEN User manual

Legamaster

Legamaster E-SCREEN User manual

Legamaster e-Screen 84 UMD User manual

Legamaster

Legamaster e-Screen 84 UMD User manual

Legamaster ETX-6520 User manual

Legamaster

Legamaster ETX-6520 User manual

Legamaster PROFESSIONAL e-Screen 55 inch ETD User manual

Legamaster

Legamaster PROFESSIONAL e-Screen 55 inch ETD User manual

Legamaster STX-7550UHD User manual

Legamaster

Legamaster STX-7550UHD User manual

Popular Touchscreen manuals by other brands

Vision OPLC V290-19-C30B installation guide

Vision

Vision OPLC V290-19-C30B installation guide

AXIOMTEK GOT-2770S user manual

AXIOMTEK

AXIOMTEK GOT-2770S user manual

Eaton Cutler-Hammer PanelMate Power Pro 1785... Replacement instructions

Eaton

Eaton Cutler-Hammer PanelMate Power Pro 1785... Replacement instructions

Faytech Mirror Touch PC manual

Faytech

Faytech Mirror Touch PC manual

Elan TS7 user guide

Elan

Elan TS7 user guide

Vantron TMC Series Quick installation guide

Vantron

Vantron TMC Series Quick installation guide

TCi pureKNX Series manual

TCi

TCi pureKNX Series manual

Elo TouchSystems 2200L Specification sheet

Elo TouchSystems

Elo TouchSystems 2200L Specification sheet

POS-X ION user manual

POS-X

POS-X ION user manual

COMFILE CUTOUCH CT1820 user manual

COMFILE

COMFILE CUTOUCH CT1820 user manual

Elo TouchSystems 2639L Product dimensions

Elo TouchSystems

Elo TouchSystems 2639L Product dimensions

MicroTouch SK-190P-A1 user manual

MicroTouch

MicroTouch SK-190P-A1 user manual

PROMULTIS Varitilt Standard Plus user manual

PROMULTIS

PROMULTIS Varitilt Standard Plus user manual

XtendLan DPM-IP71R Operation manual

XtendLan

XtendLan DPM-IP71R Operation manual

Johnson Controls S1-TTSCC01 Technical guide

Johnson Controls

Johnson Controls S1-TTSCC01 Technical guide

3M Chassis C2234PW user guide

3M

3M Chassis C2234PW user guide

Olivetti Explor 200M Service manual

Olivetti

Olivetti Explor 200M Service manual

AURES W-TOUCH user manual

AURES

AURES W-TOUCH user manual

manuals.online logo
manuals.online logoBrands
  • About & Mission
  • Contact us
  • Privacy Policy
  • Terms and Conditions

Copyright 2025 Manuals.Online. All Rights Reserved.