Legamaster EVOLVE ETX-6530 User manual

Product Content & Operation - Version 1.0
Touchscreen display
Safety & Recommendations
English Deutsch Nederlands Français Español

Product Content & Operation - Version 1.0 2
Table of contents
01 IMPORTANT INFORMATION 3
1.1 USE 3
1.2 EXEMPTIONS 4
02 SAFETY INSTRUCTIONS 4
2.1 SAFETY PRECAUTIONS 4
2.2 MOVING AND CARRYING NOTICE 5
2.3 INSTALLATION 5
2.4 WALLMOUNT SAFETY NOTICE 6
2.5 RECOMMENDED USE 7
2.6 CLEANING 8

Product Content & Operation - Version 1.0 3
IMPORTANT INFORMATION
1.IMPORTANT INFORMATION
WARNING:
TO PREVENT FIRE OR SHOCK HAZARDS, DO NOT EXPOSE THIS UNIT TO RAIN
OR MOISTURE. ALSO, DO NOT USE THIS UNIT‘S POLARIZED PLUG WITH AN
EXTENSION CORD RECEPTABLE OR OTHER OUTLETS UNLESS THE PRONGS
CAN BE FULLY INSERTED.REFRAIN FROM OPENING THE E-SCREENS HOUSING
AS THERE ARE HIGH VOLTAGE COMPONENTS INSIDE.
CAUTION:
TO REDUCE THE RISK OF ELECTRIC SHOCK, MAKE SURE POWER CORD IS
UNPLUGGED FROM WALL SOCKET. TO FULLY DISENGAGE THE POWER TO THE
UNIT, PLEASE DISCONNECT THE POWER CORD FROM THE AC OUTLET. DO NOT
REMOVE COVER (OR BACK). NO USER SERVICEABLE PARTS INSIDE. REFER
SERVICING TO QUALIFIED SERVICE.
WARNING:
FOR CONTINUED SAFETY, DEVICES WITH CLASS I CONSTRUCTION SHALL BE
CONNECTED TO A MAIN SOCKET OUTLET WITH A PROTECTIVE EARTHING
CONNECTION.
WARNING:
THIS IS A CLASS A PRODUCT MEANT TO BE USED IN PROFFECIONAL
ENVIROMENTS. - THIS PRODUCT MUST NOT BE USED IN RESIDENTIAL AREAS.
1.1. USE
•Transport the product upright with proper packaging. Avoid placing the product face up or down. Handle
with care!
•Do not send a static (non-moving) image to the e-screen, it may cause image ‘burn-in’ or image retention.
•“Burn in” and/or image retention is not covered under warranty.
•Make sure to change the image on the e-screen periodically. It is recommended to turn off the e-screen
for at least 6 hours after 16 hours of usage in a 24-hour period to help avoid image retention.

Product Content & Operation - Version 1.0 4
SAFETY INSTRUCTIONS
2. SAFETY INSTRUCTIONS
Before using this e-screen, please read this user
manual thoroughly to help protect against property
damage and to ensure your personal safety and the
safety of others.
• Read and follow all instructions and safety-
warnings found in this manual.
• For installation or adjustment, please follow the
instructions in this manual and refer all servicing to
qualified service personnel.
2.1 SAFETY PRECAUTIONS
If smoke or a peculiar smell comes from the e-
Screen, remove the power plug from the outlet
immediately. Failure to do so may result in fire or
electrical shock.
Contact your dealer for inspection.
If the e-Screen has been turned on but there is no
picture, remove the power plug from the outlet
immediately. Failure to do so may result in fire or
electrical shock.
Contact your dealer for inspection.
If water is spilled or objects are dropped inside the
e-Screen, remove the power plug from the outlet
immediately. Failure to do so may result in fire or
electrical shock.
Contact your dealer for inspection.
If the e-Screen is dropped or the e-screen‘s
housing is damaged, remove the power plug from
the outlet immediately. Failure to do so may result
in fire or electrical shock.
Contact your dealer for inspection.
If the power cord or plug is damaged or becomes
hot, turn off the main power switch of the e-
Screen, make sure the power plug has cooled
down and remove the power plug from the outlet.
If the e-Screen is still used in this condition, it may
cause fire or electrical shock. Contact your dealer
for replacement.
1.2. EXEMPTIONS
•This product isn’t warranted for any damage
caused by natural disaster (such as earthquake,
thunder, etc.), fire, acts by third parties,
accidents, owner’s intentional misuse and fault,
or use in other improper conditions.
•This product isn’t warranted for incidental
damages (such as profit loss or interruption in
business, modification or erasure of record data,
etc.) caused by use or inability to use of this
product.
•This product isn’t warranted for any damage
caused by inappropriate operation, or from not
following the user manual.
•This product isn’t warranted for any damage
caused by misuse or malfunction through
simultaneous use of this product and the
connected equipment or software.
•This product isn’t warranted for any damage
caused by neglect of the installation instructions.
•This product isn’t warranted for any damage
caused by improper installation.
•This product isn’t warranted for any damage
caused by disassembly, modification or repair by
non-authorized service centers or people.

Product Content & Operation - Version 1.0 5
SAFETY INSTRUCTIONS
2.2 MOVING AND CARRYING
NOTICE
Moving the product:
Moving the product requires at least four
people. Attempting to move the product with
fewer people may result in damage to the
display or in serious injury of the people
handling the screen. When moving a display in
its shipping carton, lift the carton using the
white handles.
Carrying the product:
This product is heavy; please follow proper
lifting techniques, as pictured below. Failure to
do so may cause injury.
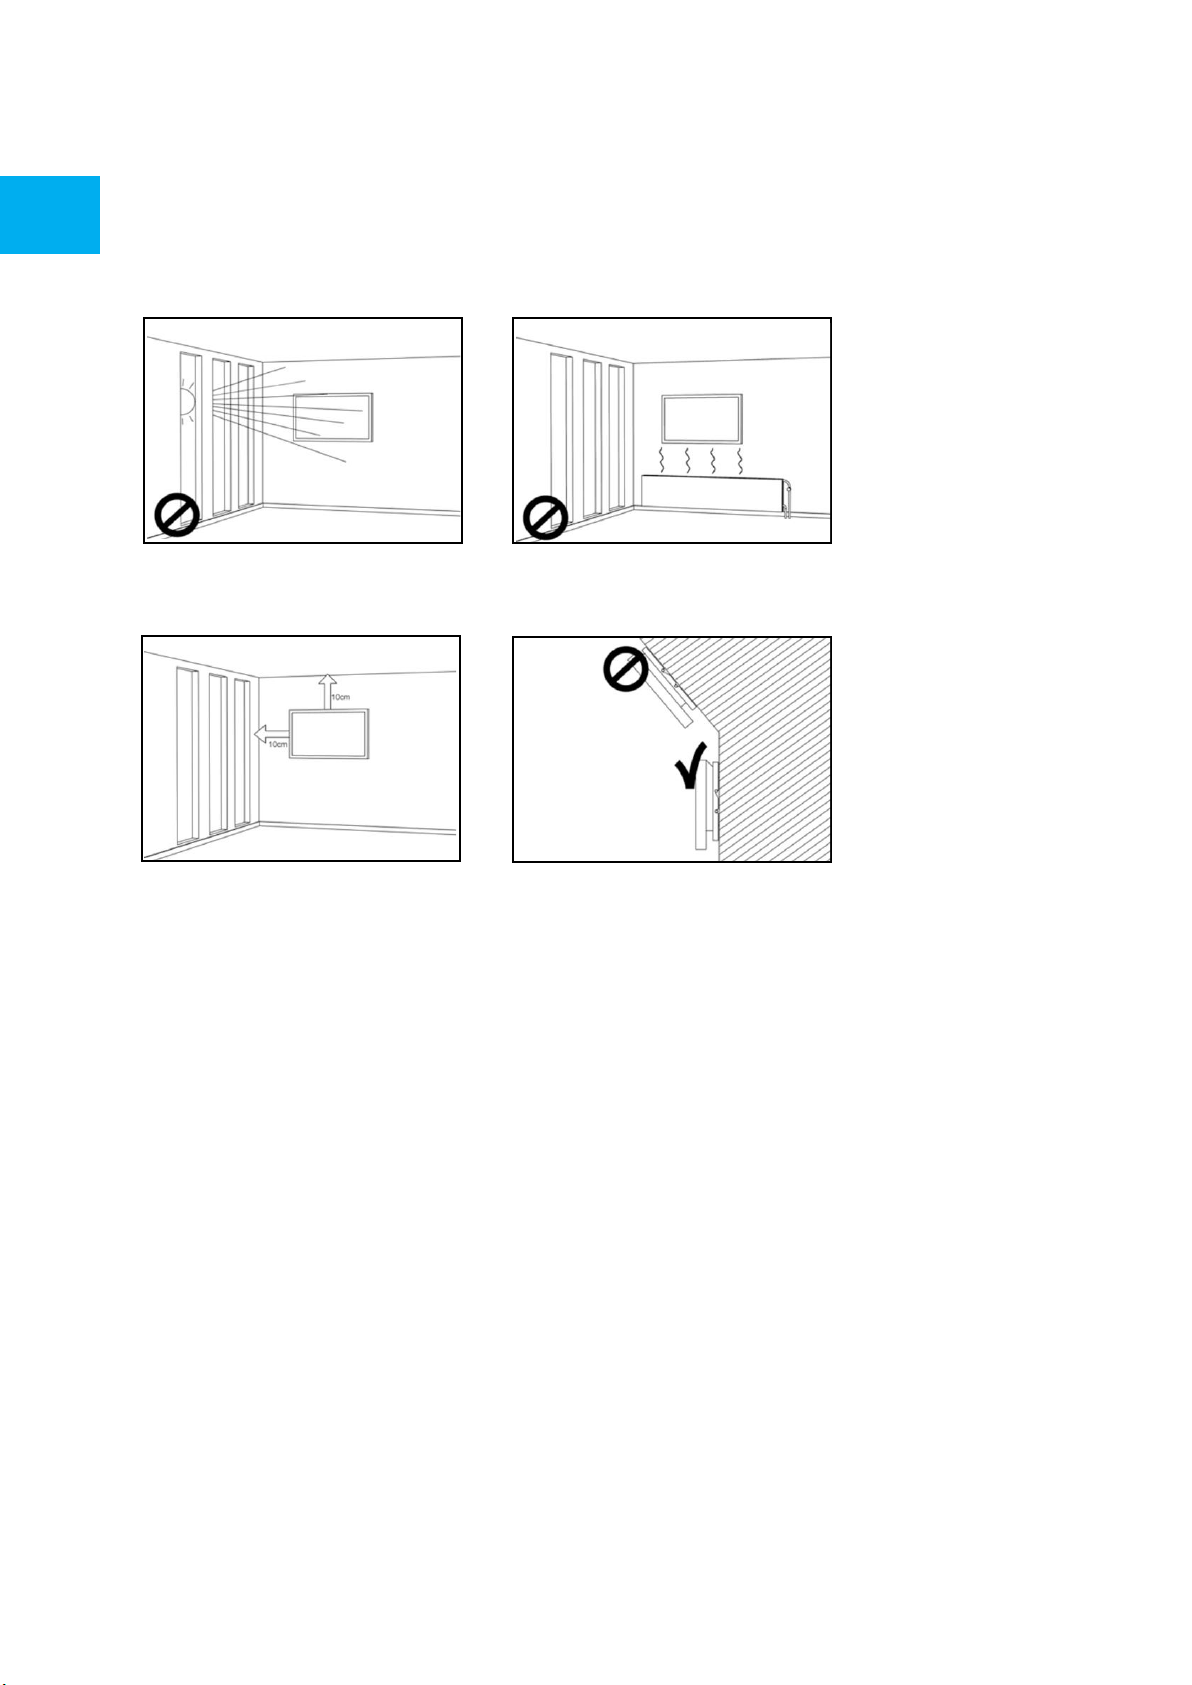
2.3 INSTALLATION
Don‘t install in a high-temperature environment.
If the e-screen is used in high-temperatures or in
direct sunlight, it may cause the housing of the
product or other parts to become distorted or
damaged, resulting in overheating or electrical
shock.
Don‘t install in a high-humidity environment.
This may cause overheating or electrical shock.
Don‘t install near any heat sources such as
radiators, heat registers, stoves, or other
apparatus that produce heat.
This may cause fire or electrical shock.
Don‘t overload outlets or cables beyond electrical
capacity. Don‘t use extension cords as it may cause
fire or electrical shock.
Don‘t insert the power plug into an outlet other
than 100~240V AC.
This may cause fire or electrical shock.
• Don’t use a damaged power plug or worn outlet.
• Don’t insert an improper power plug it may
cause fire or electric shock.
Don‘t place the e-screen on an unstable shelf or
surface. The e-screen may fall, causing injury.
Please install on a horizontal, stable, level surface.
Don‘t place objects on the e-screen.
• If the e-screen is covered or the vents are
blocked, the display could overheat and cause a
fire.
• If objects or liquids get inside the e-screen, this
may cause fire or electrical shock.
• Do not put heavy objects on the e-screen as they
may fall, causing injury.
• Please keep a 10 cm minimum distance between
e-screen, wall and/or other objects to ensure
sufficient ventilation.

Product Content & Operation - Version 1.0 6
SAFETY INSTRUCTIONS
2.4 WALLMOUNT SAFETY NOTICE
1. Please make sure that the bracket is mounted on a solid surface.
2. After mounting the screen, do not pull, push or shake the screen.
Don‘t move the e-screen when it is connected to the power cord and AV cables.
•When moving the e-screen, make sure to remove all cables first.
•When unpacking or carrying the e-screen, at least 4 people are needed. Make sure the e-screen is carried
upright.
•Transport the e-screen upright. Avoid placing the e-screen face up or down.
•Handle the e-screen gently. Do not drop.

Product Content & Operation - Version 1.0 7
SAFETY INSTRUCTIONS
2.5 RECOMMENDED USE
If you encounter a problem during installation, please contact your supplier for assistance. Don’t repair or
open the e-screen by yourself. Failure to do so may result in fire or electrical shock.
Contact your dealer for inspection.
Protect and correctly use the power cord/plug.
•Don‘t pinch the power cord/plug between hard surfaces.
• Don‘t step on the power cord/plug.
• Before inserting the power plug into the wall outlet, connect the power cord to the display.
• Using an e-screen with a damaged or non-original power cord can damage the screen, cause fires or
electrical shocks.
Using extension cords (not recommended)
If an extension cord must be used, ensure the voltage rating exceeds the max power consumption of the
display. If the voltage rating is less than the display, it will cause the extension cord to overheat.
Do not operate the screen during thunder or lightning.
Remove the powerplug from the power outlet.
1. Do not install screens in direct sunlight, humid conditions, or high temperatures.
4.

Product Content & Operation - Version 1.0 8
SAFETY INSTRUCTIONS
Don’t use any kind of liquid on the e-screen.
• If liquid is spilled on the e-screen, remove the power plug from the wall socket and ask qualified service
personnel to check the product.
• If liquid gets on e-screens glass plate, clean it with a dry and soft cloth immediately.
• Don’t use any chemicals on the e-screen.
• If metal or liquids get into the e-screen, it may cause a fire or an electrical shock.
Don’t install or remove the power plug with wet hands. This may cause an electrical shock.
If the e-screen will not be used for a long period of time, unplug the display. Preventing to do so may cause
premature wear of electrical components or fire.
Handle the e-screen with care, prevent glass breakage.
•If the glass of the e-screen is broken, liquids may escape. Please don‘t touch the liquid.
•If these liquids come into contact with skin or eyes, immediately wash it away with clean water and consult
a medical professional.
Precautions with the remote-control batteries
•Please only use approved AAA type batteries.
•Please be sure to insert batteries by matching the + and -.
•Don’t recharge, heat, disassemble, short or throw batteries into a fire.
•Don’t mix a new battery with a used one.
•Don’t mix different types of batteries together (only use the specified type).
2.6 CLEANING
Remove the power plug from the power outlet before cleaning.
Failure to do so may result in electrical shock or damage.
Cleaning the surface of the e-screen
•When the surface of the e-screen becomes dirty, wipe the surface lightly with a soft clean cloth.
•If the surface requires additional cleaning, lightly moisten the cloth.
•Do not to let any kind of liquid enter the e-screen as it may cause electrical shock or damage.
•Do not clean the e-screen with alcohol, solvents or ammonia, as this could damage the e-screen.

Product Content & Operation - Version 1.0 9
Touchscreen display
Product Content & Operation
English Deutsch Nederlands Français Español

Product Content & Operation - Version 1.0 10
TABLE OF CONTENTS
01 PACKAGE CONTENT 11
1.1 UNPACKING 11
1.2 INCLUDED ACCESORIES 11
02 INSTALLATION 11
2.1 ENVIROMENT CONDITIONS 11
2.2 GENERAL OVERVIEW OF THE SCREEN 12
2.3 INPUT / OUTPUT CONNECTOR INFORMATION 13
2.4 REMOTE CONTROL 13
2.4.1 CHANGING THE REMOTE-CONTROL BATTERY 14
03 TURNING THE SCREEN ON AND OFF 14
3.1 OPERATING THE SCREEN FOR THE FIRST TIME 15
3.2 QUICK LAUNCH MENU 16
3.3 SETTINGS MENU 17
3.4 UPDATING THE SCREEN 21
3.5 OPERATING THE SCREEN BUTTONS 21
04 TROUBLESHOOTING 22
05 COMPLIANCE 22

Product Content & Operation - Version 1.0 11
PACKAGE CONTENT / INSTALLATION
1.PACKAGE CONTENT
ITEMS
Power Cord 1.8m
Remote Control
Passive Stylus x2
1.1. UNPACKING
• The Touch Monitor is packed using cushions to protect the product during shipping.
• Before unpacking, prepare a stable, level, and clean surface near a wall outlet.
•Step 1: Place the box in an up-right stable position.
• Step 2: Remove the white handles and cut the banding
•Step 3: Smoothly lift the upper part of the box, this will reveal the touch monitor box content
• Step 4: Remove the top cushion and take the accessory bag out.
•Step 5: Extend the bag up and carefully cut the upper layer to unseal the touch monitor bag
• Step 6: Prepare your screen for installation, and then remove it from the box by lifting it.
1.2. INCLUDED ACCESORIES.
2. INSTALLATION
2.1 ENVIROMENT CONDITIONS
When operating the screen, ambient room conditions should not exceed the following:
•Operating temperature: -5˚C to 45˚C (41˚F to 104˚F)
•Humidity: less than 90% RH (Max)

Product Content & Operation - Version 1.0 12
OVERVIEW
2.2 GENERAL OVERVIEW OF THE SCREEN
110V-220V
Main Power
All inputs & Outputs
available here.
CONNECTOR BAY
Back, Home & Open
Apps
Easy access Buttons
High Precision IR
Touch System
Extra Thin Bezel
For Easy Fix Camera
(Optional)
Easy Fix Point
Down facing USB Ports for
easy connection
USB Ports
OPS Standard Connector
OPS Slot
Control power to the screen
once its connected
Main Power Switch

Product Content & Operation - Version 1.0 13
OVERVIEW
2.4 REMOTE CONTROL
2.3 INPUT / OUTPUT CONNECTOR INFORMATION
Turn the display ON and OFF.
Home: Head directly to the main home page
Source Selection Displays the input selection screen to select from
Navigation Buttons Easy navigation wheel
Select / Confirm: Confirm your on-screen selection
Back / Return to previous MENU Returns to the previously selected on
screen MENU.
Volume Down Lowers the audio volume.
Volume Up Raises the audio volume.
Settings MENU Direct access to the main settings MENU
Mute mutes the scree’s audio
USB-A 2.0 (x1) / USB-A 3.0 (x5)
USB-B 3.0 (x3)
HDMI 2.1 (x1) / HDMI 2.1 Out (x1)
HDMI 2.0 (x2)
DP 1.2 (x1)
Minijack 3,5 Stereo (x1)
USB-C (x2)
RS-232 (Serial)
RJ-45 (x1 IN) / RJ-45 (x1 Out)
SPDIF (Optical Audio)
VGA (x1)

Product Content & Operation - Version 1.0 14
OVERVIEW / OPERATING THE SCREEN
3. TURNING THE DISPLAY ON AND OFF
Please make sure the display is connected to an AC power-socket using the supplied power cable.
Set the AC-switch to “l “. The Touch monitor will start up, if not.
To switch the display on, push the center button “O” on the screen once, or push the power-button on the
remote control.
To switch the monitor off, press the center button “O” on the screen, open the quick launch menu and
select the “power off” option or push the power button on the remote control. The display will switch to
stand-by mode.
To turn off power completely, turn the AC switch to “O “or disconnect the AC power cord from the power
outlet.
2.4.1 CHANGING THE REMOTE-CONTROL BATTERY
1. Remove the battery cover:
On the backside of the remote-control, slide down the battery cover.
2. Insert batteries:
Use two AAA batteries and insert them according to the plus and minus indicators in the remote control.
3. Close the battery cover by sliding it back into place.
I. Discard batteries according to the local waste reduction and recovery regulations.
II. Do not keep used, empty batteries in the remote control. They can leak and result in damages to the
remote control.
III. Only use batteries according to the instructions and regulations found in this manual and to the
instructions and regulations set forth by the batterie’s manufacturer.
About the remote control
•Do not drop, shake, or bump.
•Avoid moist conditions, liquids, high-temperatures and/or exposure to direct sunlight.
•Don‘t dismantle.

Product Content & Operation - Version 1.0 15
OPERATING THE SCREEN
3.1 OPERATING THE SCREEN FOR THE FIRST TIME
When first starting up your screen you will be prompted to set-up some basic options:
Step 1: Language
Step 2: Choose your set-up, this step will let you select a default profile including premade configurations
being the fastest start, option two will be a custom set up that includes multiple screen customization
options and lastly option three is loading a backup option, to load a preexisting configuration via a USB stick.
In case you select the custom option, the available configurations will be:
Step 1: Connectivity option will be displayed, select between Ethernet or Wi-Fi and check for firmware
updates.
Step 2: Select your energy Mode: Multiple options will be displayed to select your preferred power
consumption profile, ECO mode will be ON as default, remember that changing this profile may affect the
screen’s power consumption.
Step 3: Source Settings menu: this menu will display all available inputs. From this menu you will be able to
select what inputs will be available for the user to select and utilize. Added to this selection you will be able
to create a shortcut to said input on the main screen’s interface.
Step 6: Set up a security PIN code.
Step 7: Time & Date: All options to configure you time and date will be displayed. Time zone, Time format
and Date format.
Step 8: System Configuration will allow you to choose between three different modes:
•Android ON: Will display all tools and features the screen has to offer.
•Android OFF: Will limit the interaction, disabling the Android interface and only providing basic
tools such as a Whiteboard App and Annotation tools.
•Launcher Only: Will disable all android tools and provide only a “Home screen” with the previously
selected inputs.
Step 9: Home Screen Settings: From this menu you will be able to select
•Home screen layout: Adding four, six or eight App-tiles to the main home screen.
•Home screen Background: Four default background will be available; you will also be able to load
you own background after running the first time set up.
•Clock Options: You will be able to select the type of clock display to add to your home screen, either
disabling it, having an analog or a Digital type of clock.

Product Content & Operation - Version 1.0 16
OPERATING THE SCREEN
3.2 QUICK LAUNCH MENU
By pushing the center button “O” on your screen once or clicking the floating arrows in the screen, the quick
launch menu will open. From this customizable menu, you will be able to access inputs, add most used apps
and control the screen.
All this option can be customized and suited to the user’s needs, changing the amount of direct input access
icons, images and names.
•Input: Click to select the desired
input / source
•Settings: Opens the settings-menu
•Annotation tool
•Home: Opens the Android
Launcher
•Brightness-slider
•Volume-slider
Power-buttons:
•Shutdown: shuts down the
screen and when applicable the
OPS computer.
•Sleep-mode induces a mode in
which screen and audio are
switched off, but from which the
screen can recover in a snap by
touching the screen with 2
fingers, or by pushing the Central
control button
• OPS-power switches the OPS
computer on or off.
•Quick Start: Click to have a
simple overview of the screen’s
accessibility options.
•User Manual: Will display the
screen’s manual
Action-buttons:
•< Back / previous screen
•O Home (Legamaster
launcher home-screen)
•Overview: Shows all open
apps and allows users to
quickly switch between
them, or close all open
apps at once.
•Stopwatch: Opens up a clock-
screen with timer, stopwatch
and alarm functionality
•Screen Recording: Activates a
screen recording tool.
•Screenshot: Opens a
screenshot tool to select an
area on your screen to capture
an image of.
•Calendar: opens up a calendar

Product Content & Operation - Version 1.0 17
OPERATING THE SCREEN
MAIN SETTINGS
LEVEL1
LEVEL 2
VALUES
EXPLANATION
NETWORK & CONNECTED DEVICES
Ethernet
MAC
address
shows the MAC address for the wired connection
IP address
shows the IP address for the wired connection
Ethernet
ON/OFF
Toggle ethernet-connection on / off for the screen itself. Disabling this
does not disable ethernet for the OPS
Wi-Fi
MAC
address
shows the MAC address for the Wi-Fi connection
IP address
shows the IP address for the Wi-Fi connection
Wi-Fi
ON/OFF
Toggle Wi-Fi on and off
Hotspot
Hotspot
ON/OFF
Toggle the hotspot-functionality on / off
Setup Wi-Fi
hotspot
Set-up the hotspot
Bluetooth
MAC
address
show the MAC address for the bluetooth adapter
Bluetooth
ON/OFF
Toggle bluetooth on/ off, show / connect with available devices
DEVICE
Picture
Picture
mode
Standard
Select pre-set picture modes
Dynamic
Soft
User
Picture mode where settings can be adjusted manually in 'Advanced'
Power
mode
User
Choose a power-mode: User = manual brightness setting, Auto =
Automatic brightness setting based on ambient light conditions,
balanced = brightness 75, ECO = brightness 50, DCR = 100. Power
consumption varies based on these settings.
Auto
Balanced
ECO Friendly
DCR
Color
tempreture
Standard
Select a color temperature mode
Cool
Warm
Eye protect
ON/OFF
Toggle Eye Protect mode on / off. When enabled, the brightness will
be reduced when writing.
Anti blue
light
ON/OFF
Toggle Anti blue light on / off. When enabled the amount of blue light
will be reduced.
Backlight
0-100
Manually adjust the brightness. Using this setting will change the
power mode setting to 'Manual'
Advanced
Contrast
0-100
In Picture mode 'User', use these settings to manually adjust the
picture settings
Brightness
0-100
Saturation
0-100
Sharpness
0-100
PC mode
PC / Video
Allows switching to Video mode, in which 'Overscan' can be used
Display
mode
16:9/P2P
Toggle picture aspect mode
MEMC
Off/Low/Middle/High
Change the MEMC level
Overscan
ON/OFF
toggle between overscan on and off.
HDR
ON/OFF
toggle between HDR on and off.
VGA auto
adjust
toggle VGA auto adjust o / off when receiving a VGA signal
3.3 SETTINGS MENU

Product Content & Operation - Version 1.0 18
OPERATING THE SCREEN
MAIN SETTINGS
LEVEL1
VALUES
EXPLANATION
DEVICE
Sound
Audio output
Speaker/SPDIF/ARC/Bluetooth
Choose the Audio output
Sound mode
Standard/Music/Movie/Sports/User
Select a pre-set sound mode. 'User' allows manual sound
settings
SPDIF Mode
RAW/PCM
Toggle SP/DIF mode between RAW / PCM
AVC
ON/OFF
toggle AVC on / off
Sound Effect
ON/OFF
toggle sound effect on / off
Volume
0-100
set volume
Balance
0-100
set balance
EQ 120Hz
0-100
Manually adjust settings when sound mode is set to 'User'
EQ 500Hz
0-100
EQ 1.5KHz
0-100
EQ 5KHz
0-100
EQ 10KHz
0-100

Product Content & Operation - Version 1.0 19
OPERATING THE SCREEN
MAIN SETTINGS
LEVEL1
LEVEL2
VALUES
EXPLANATION
SYSTEM
Security
Change
password
Change your password
Safe mode
ON/OFF
Safe mode password-protects the complete settings menu
App lock
Select individual apps that will be password-protected
App
install/uninstal
l lock
ON/OFF
App (de)install lock disables (de)installation of apps
Touch lock
ON/OFF
Touch lock disables touch functionality
Keypad lock
ON/OFF
Keypad lock disables use of the Central Control Button
IR lock
ON/OFF
IR lock disables use of the remote control
Network lock
ON/OFF
Network lock disables ethernet, Wi-Fi and Bluetooth connections
Cast App
AirServer / E-Share
Lets the user choose between both casting apps
Manage
apps
Installed apps
manage user-installed apps (FORCE STOP/UNINSTALL/CLEAR DATA)
All apps
manage all apps (FORCE STOP/DISABLE/CLEAR DATA)
Power
Power-on /
shutdown
timer
Shutdown
timer
set the shutdown timer
Power-on
timer
set the power-on timer
Power on
settings
Power on
mode
Direct
set power on mode to direct
Standby
set power on mode to standby
Memory
set power on mode to memory
Power on
source
Memory/Android/PC
/HDMI1/HDMI2/HD
MI3/DP/USB_C/VGA
Choose the source in which the screen powers-on
Power on
volume
Memory/User
Set the power-on volume. In 'User' users can select a power-on
volume manually
Volume
setting
0-100
Set the power-on volume
Boot OPS at
power-on
ON/OFF
Choose whether the OPS boots automatically when the screen is
power-on
Wake on lan
ON/OFF
Enable / disable wake on Lan
Keep power
and network
to OPS
ON/OFF
Enable / Disable Power and network connections to the OPS even if
the screen is OFF
Motion Detect
Motion
Detect
Mode
Off/Power Manager
Select the power Detect mode
Motion
Detection
Off/15/30/45/60
minutes
Dis- / enable the proximity sensor to put the screen in sleep mode
when no motion is detected by the proximity sensor
Shutdown
timer
OFF/1/10/20/30/60/
90/120/180 minutes
set a shutdown timer
Auto
shutdown
Off/1/3/5/10
minutes
Shuts down the screen when there is no signal

Product Content & Operation - Version 1.0 20
OPERATING THE SCREEN
MAIN SETTINGS
LEVEL1
LEVEL2
VALUES
EXPLANATION
OTHERS
More
Auto sense
OFF/Prompt/Direct
Select the auto sense mode. In auto sense, the screen will
detect new active signals and switch to that source
automatically (direct), or when confirmed (prompt). When
a signal is switched off, autosense will automatically check
for other active sources in the sequence OPS slot, HDMi 1,
HDMi 2, HDMi 3, DisplayPort, USB C, VGA always ending in
the Android launcher (when enabled)
Temperature
protection
ON/OFF
With temperature protection, a user can set an alarm
temperature in which the screen will shutdown
automatically
Palm
Rejection
ON/OFF
Enable / Disable Palm Rejection
Current
temperature
0-100
shows the current temperature of the screen
Alam
temperature
50-100
set the alam temperature value. When reached, the screen
will automatically shutdown to prevent further
temperature increase
HDMI
HDMI out
1080p 60Hz/2160p 30Hz/2160p 60Hz
set the HDMI out signal
HDMI EDID
version
EDID 1.4/EDID 2.0
set the HDMI EDID version
Date & time
Automatic date
& time
ON/OFF
Automatic date and time requires an active internet
connection. Disabling this setting allows users to maually
set the date & time
Date
Show or set the current date
Time
show or set the current time
Time zone
set the time zone
Use 24-hour
format
ON/OFF
Choose between a 12 or a 24 hr time format
Languages
Deutsch/English/Francais/Nederlands/Spanish
Set the language
Keyboard &
inputs
Current
Keyboard
Shows the current keyboard / allows users to switch
keyboards
Android
Keyboard(AOSP)
Configure the default (AOSP) keyboard
Manage
keyboards
Manage keyboards
Individuation
Fullscreen
Gesture
ON/OFF
Enable/Disable Fullscreen Gestures
Show Menu at
right
ON/OFF
Swtches the menu from the left as a default to the right.
Set wallpaper
change and set the wallpaper
Set 'no input'
wallpater
change and set the no input wallpaper
Set source label
Label various sources for easier recognition
Device
Device name
show or change the device name
Device model
shows the device model
System
information
Firmware version
shows all system information
Database
Copy
Export to USB
Export the screen configuration to a USB drive
Import from USB
Import the screen configuration from a USB drive
System
Updates
Local update
Updates the systems firmware using a USB drive
Online update
Checks for updates online
Reset
Restore factory settings. NOTE! This will erase all custom
settings, data and custom apps from your system
This manual suits for next models
3
Table of contents
Other Legamaster Touchscreen manuals

Legamaster
Legamaster ETX-5520 User manual

Legamaster
Legamaster Panorama PAN-10500 User manual

Legamaster
Legamaster ETX-5510UHD User manual

Legamaster
Legamaster XTX-7500UHD User manual

Legamaster
Legamaster XTX-5500UHD User manual

Legamaster
Legamaster E-SCREEN User manual

Legamaster
Legamaster STX-7550UHD User manual

Legamaster
Legamaster PROFESSIONAL e-Screen 55 inch ETD User manual

Legamaster
Legamaster ETX-6520 User manual

Legamaster
Legamaster e-Screen 84 UMD User manual