LEHNER POLARO E Datasheet

LEHNER
POLARO®E
Operating instructions with spare parts list
Control LAS 4
Software from version 3.3
Status: January 2019
Serial number: ..................................................................
Software version: ..............................................................
Original operating
instructions


LEHNER Maschinenbau GmbH
Haeuslesaecker 14
D-89198 Westerstetten, Germany
Tel.: +49 7348 9596-22
Fax: +49 7348 9596-40
www.lehner.eu
This document may not be distributed, duplicated or utilised,
nor may its content be communicated without express
permission. Compensation will be sought for all breaches. All
rights reserved in the event of patent, utility model or design
registration.
English

4
Table of contents
Contents
1 What you should know......................................................6
1.1 Foreword ................................................................................................ 6
1.2 About these operating instructions......................................................... 6
1.3 Description of the POLARO®E .....................................................................7
1.4 Intended use........................................................................................... 9
1.5 Reasonably predictable misuse ............................................................. 9
1.6 Warranty................................................................................................. 9
1.7 About your safety ................................................................................. 10
2 Mounting and starting .....................................................11
2.1 Installing the frame............................................................................... 11
2.2 Mountingthehopperanddeectorplate.............................................. 12
2.3 Electrical connection ............................................................................ 13
2.4 Filling the spreading material hopper ................................................... 14
3 Operating the POLARO®E................................................... 15
3.1 Controls on the control console............................................................ 15
3.2 Indicators in the display........................................................................ 16
3.3 Switching the spreading disc and agitator on and off........................... 17
3.4 Setting the speed ................................................................................. 19
3.5 Setting the slide opening...................................................................... 19
3.6 Opening/closing the slide ..................................................................... 20
3.7 Setting the working width ..................................................................... 21
3.8 Setting the spreading zone................................................................... 22
3.9 Empty sensor ....................................................................................... 22
3.10 Calibrating the empty indicator............................................................. 23

5
Table of contents
4 Settings and displays ......................................................24
4.1 Making settings .................................................................................... 24
4.2 Language ............................................................................................. 25
4.3 Selecting the empty indicator ............................................................... 25
4.4 Setting the signal for the electronic lifting gear control (EHR).............. 26
4.5 Adjusting the empty indicator ............................................................... 27
4.6 Displaying the spreader type................................................................ 28
4.7 Headland manager (optional accessory).............................................. 28
4.8 Checks ................................................................................................. 30
4.9 Spreading widths and turning procedure.............................................. 31
5 Maintenance and cleaning ..............................................32
5.1 Maintenance......................................................................................... 32
5.2 Cleaning ............................................................................................... 35
5.3 Transport and storage .......................................................................... 35
6 Appendix...........................................................................36
6.1 EC Declaration of Conformity............................................................... 36
6.2 Identication ......................................................................................... 37
6.3 Distribution box layout plan .................................................................. 38
6.4 Troubleshooting.................................................................................... 39
6.5 Spare parts list for the POLARO®E .................................................... 40
6.6 Spare parts list for the control unit........................................................ 42
6.7 Spare parts list for the hopper.............................................................. 44
6.8 Spare parts list for the saline agitator................................................... 46
6.9 Wacker spreading chart ....................................................................... 48

6
1 What you should know
1.1 Foreword
Congratulations on purchasing the POLARO®E, a high-quality and
innovative product. Thank you for placing your trust in us.
Thanks to its advanced design, meticulous material selection, state-
of-the art manufacturing techniques and the precision work of our
employees,thisequipmentmeetsallefciency,quality,reliability
and value requirements.
Maintaining and servicing according to the operating instructions
ensures the safety of the equipment and maintains the value of
your POLARO®E.
1.2 About these operating instructions
These operating instructions are part of the POLARO®E and must
always be readily available. They must be read, understood and
followed by everybody who works with the POLARO®E. Keep the
operating instructions for future use. If you come to sell your
POLARO®E, give the buyer these operating instructions;
they are an integral part of the equipment.
7
1 What you should know
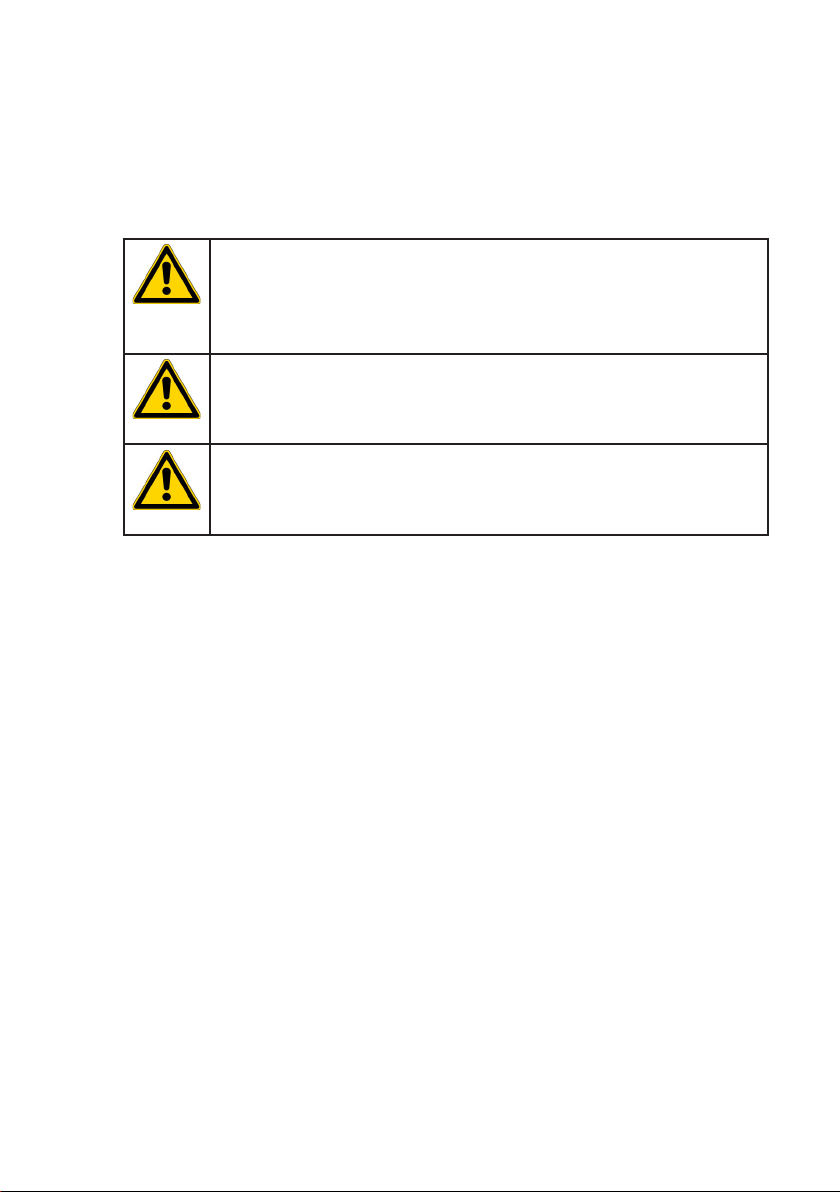
Warnings
Warningsintheseoperatinginstructionsareidentiedasfollows:
Danger!
Warning against immediate danger. Non-observance
of appropriate measures may result in death or severe
personal injury or serious damage to property.
Warning!
Warning of possible danger. Death, severe personal injury
or serious damage to property are possible.
Caution!
Warning of possible dangerous situations. Slight personal
injury or damage to property is possible.
1.3 Description of the POLARO®E
The POLARO®E is a spreader for spreading winter salt, grit, sand and
granulated fertilisers and comprises a solid frame, a spreading material
hopper and the electrical components. The frame includes the spreading
disc with slider/dosing equipment. The electrical components comprise
the drive motor, sensors and magnets, distribution control box, control
console cable, control cable, battery cable and control console.
A separate motor drives a slow-running agitator for grit, sand, smooth
owingsaltorgranulatedfertiliser.Asanalternativeforslow-owing
or damp salt, a special saline agitator is available as an accessory.
This agitator is mounted in an upright position in the hopper.
Thespeedofthespreadingplate,thedosingunitandtheowquantity
can be regulated from a control panel in the driver's cab.
The POLARO®E can be mounted on the front or rear of approved
carrier vehicles.

8
1 What you should know
Technical data
POLARO®E 70 POLARO®E
110
POLARO®E
170
POLARO®E
250
Dimensions L/W/H 570/485/870
mm
570/485/1050
mm
700/626/1070
mm
670/800/1100
mm
Unladen weight 29 kg 38 kg 42 kg 53 kg
Capacity 70 l 110 l 170 l 250 I
Volumetric capacity
Salt
90 kg 140 kg 220 kg 325 kg
Operating voltage 12 to 15 Volts
Fuse 25 Ampere
Power of drive motor (spreading disc) 100 W
Power of mixer motor 150 W
Speed range 40 to 600 rpm
Standard speed of agitator 54 rpm
Speed of saline agitator 27 - 29 rpm
Power consumption of motor Start up to 25 A
Normal operation up to 13 A
Operating temperature -10°C to +70°C
Storage temperature -30 °C to +70°C
Length of battery cable 3 m 5 m 5 m 5 m
Length of control console cable 2 m 2 m 2 m 2 m
Length of control cable 3 m 6 m 6 m 6 m

9
1.4 Intended use
The POLARO®E is a spreader for spreading winter salt, grit, sand and
granulated fertilisers.
1.5 Reasonably predictable misuse
Only use on approved carrier vehicles with suitable on-board electrical
systemsandsufcientstructuralintegrity.
Only use for approved media. The equipment must not be used for
spreading crop protection products.
1.6 Warranty
We offer a 24 month warranty on the POLARO®E.
Warranty repairs must be coordinated with the manufacturer before
any work is started.
For replacement parts, additional expenses are automatically
charged for any changes made to cables and plugs by the customer.
Replacement parts are to be returned carriage paid.
Any changes to cable or plug connections without factory approval
automatically invalidate the entire warranty. Rusted bearings are not
subject to the manufacturer's warranty. Motors may not be opened or
dismantled.
On receipt:
Check your POLARO®E for transport damage on receipt.
Any such damage must be reported to the manufacturer
within 24 hours of receipt.
1 What you should know

10
1 What you should know
1.7 About your safety
• Carefully read and observe these operating instructions before use.
Always keep this manual to hand at the point of use.
• Observe the accident prevention regulations, safety and operating
regulations and the regulations for environmental protection.
• Observe all applicable standards and guidelines.
• Observe the safety instructions.
• Before operation, check that the hopper is correctly seated in its
mounting and that the spreader is safely and correctly attached to the
carrier vehicle.
• Do not operate the spreader if there are technical safety defects.
• Immediately resolve any safety-related defects.
• Whentravellingonpublicroadsandstreets,observetheroadtrafc
regulations.
• There must be no other persons in the spreading zone.
• Switch off the motor before troubleshooting.
• Disconnect the electrical power supply for maintenance work.
• Never open the hopper when the agitator is running.
• Do not reach into the hopper during operation.
• Never reach into the rotating or blocked spreading disk whilst the motor
is running.
• Comply with the regulations of the spreading material manufacturer.
• It is essential to comply with the instructions of the spreading material
manufacturer in question.
• Spreading tables and additional information about the spreading
material used can be requested from the spreading material
manufacturer in question.
• LEHNER Agrar GmbH cannot accept any liability for the storage and
application of the spreading material.
This manual suits for next models
4
Table of contents
Other LEHNER Spreader manuals

LEHNER
LEHNER Vento User manual

LEHNER
LEHNER SuperVario X Guide

LEHNER
LEHNER VINERO Datasheet

LEHNER
LEHNER POLARO Datasheet

LEHNER
LEHNER POLARO User manual

LEHNER
LEHNER Vento II Guide

LEHNER
LEHNER POLARO User manual

LEHNER
LEHNER Polaro L Datasheet

LEHNER
LEHNER SuperVario User manual

LEHNER
LEHNER SuperVario Guide


Popular Spreader manuals by other brands


Fisher
Fisher POLY-CASTER 78601 owner's manual

TurfEx
TurfEx RS7200 Owner's/operator's manual

Ferris
Ferris Pathfinder Series Operator's manual

Fayat Group
Fayat Group DYNAPAC S100 operation & maintenance

Art's-Way Manufacturing
Art's-Way Manufacturing X700 Operator's manual & parts list

EASTMAN
EASTMAN CR 500 instruction manual


