LG D005KD1N111 User manual

ENGLISH
*MFL70421001*
31/05/2019
https://www.lg.com/global/business/ess/residential/dc-5
INSTALLATION MANUAL
Energy Storage
System
Please read this manual carefully before Installing
your set and retain it for future reference.
MODEL
D005KD1N111
Copyright © 2018-2019 LG Electronics Inc. All Rights Reserved.

Getting Started
2
Getting Started
1
Safety Information
IMPORTANT : THIS PRODUCT SHOULD NOT BE USED FOR ANY PURPOSE OTHER THAN THE
PURPOSE DESCRIBED IN THIS INSTALLATION MANUAL.
WARNING Indicates a potentially dangerous situation. Death or serious
injury may result if appropriate precautions are not taken.
yThere is high possibility of electric shock or serious burns due to the high voltages in power
conditioning circuits.
yHigh voltages on AC and DC cables. Risk of death or serious injury due to electric shock.
yA potentially hazardous circumstance such as excessive heat or electrolyte mist may occur
due to improper operating conditions, damage, misuse and/or abuse.
y_mnxuwtizhymf{jutyjsynfqifsljwxzhmfxijfymtwxjwntzxnsozw~g~Ņwj0mnlm{tqyfljxtw
explosion if appropriate precautions are not read or fully understood.
yOtstyuqfhjņfrrfgqjtwutyjsynfqq~j}uqtxn{jtgojhyxsjfwymjuwtizhy/
yDo not place any kind of objects on top of the product during operation.
yAll work on the PV modules, power conditioning system, and battery system must be carried
tzyg~vzfqnŅjiujwxtssjqtsq~/
yElectrical installations must be done in accordance with the local and national electrical safety
standards.
yWear rubber gloves and protective clothing (protective glasses and boots) when working on
high voltage/high current systems such as PCS and battery systems.
yThere is a risk of electric shock. Do not remove cover. There is no user serviceable parts inside.
]jkjwxjw{nhnslytvzfqnŅjifsifhhwjinyjixjw{nhjyjhmsnhnfs/
yElectrical shock hazard. Do not touch uninsulated wires when the product cover is removed.
yIn the event of fault, the system must not be restarted. Product maintenance of repairs must
gjujwktwrjig~vzfqnŅjiujwxtssjq0twujwxtssjqkwtrfsfzymtwnjixzuutwyhjsyjw/
CAUTION Indicates a situation where damage or injury could occur. If
it is not avoided, minor injury and/or damage to property
may result.
yThis product is intended for residential use only and should not be used for commercial or
industrial.
yBefore testing electrical parts inside the system, it takes at least 10-minute standby period of
time to complete discharging the system.
yThe contents included in this box are power conditioning system and its accessories, and the
entire weight amounts to over 25 kg. Serious injury may occur due to the heavy weight of
the product. Therefore, special care must be taken in handling. Make sure to have at least two
persons deliver and remove the package.

Getting Started 3
Getting Started
1
yDo not use the damaged, cracked or frayed electrical cables and connectors. Protect the
electrical cables from physical or mechanical abuse, such as being twisted, kinked, pinched,
closed in a door or walked upon. Periodically examine the electrical cables of your product, and
if its appearance indicates damage or deterioration, discontinue use of this product, and have
ymjhfgqjxwjuqfhji|nymfsj}fhywjuqfhjrjsyufwyg~fvzfqnŅjiujwxtssjq/
yEnsure that you connect the earth ground wire to prevent possible electric shock. Do not try
to ground the product by connecting it to telephone wires, lightning rods or gas pipes.
y_mjuwtizhyxmtzqistygjj}utxjiyt|fyjw"iwnuunsltwxuqfxmnsl-fsisttgojhyxŅqqji|nym
liquids, such as vases, should be placed on the product.
y_tuwj{jsyŅwjtwjqjhywnhxmthpmffwi0itstyj}utxjymnxuwtizhyntsytwfnstwrtnxyzwj/
yDo not block any ventilation openings. Ensure reliable operation of the product and protect it
from over heating. The openings shall never be blocked by placing any object on this product.
yThe temperature of metal enclosure may be high during operation.
yIn order to avoid radio-interference, all accessories (like a energy meter) intended for
connection to the product shall be suitable for use in residential, commercial and light-industry
fwjfx/`xzfqq~ymnxwjvznwjrjsynxkzqŅqqjinkymjjvznurjsyhtruqnjx|nymymjhqfxxMqnrnyxtk
EN55022.
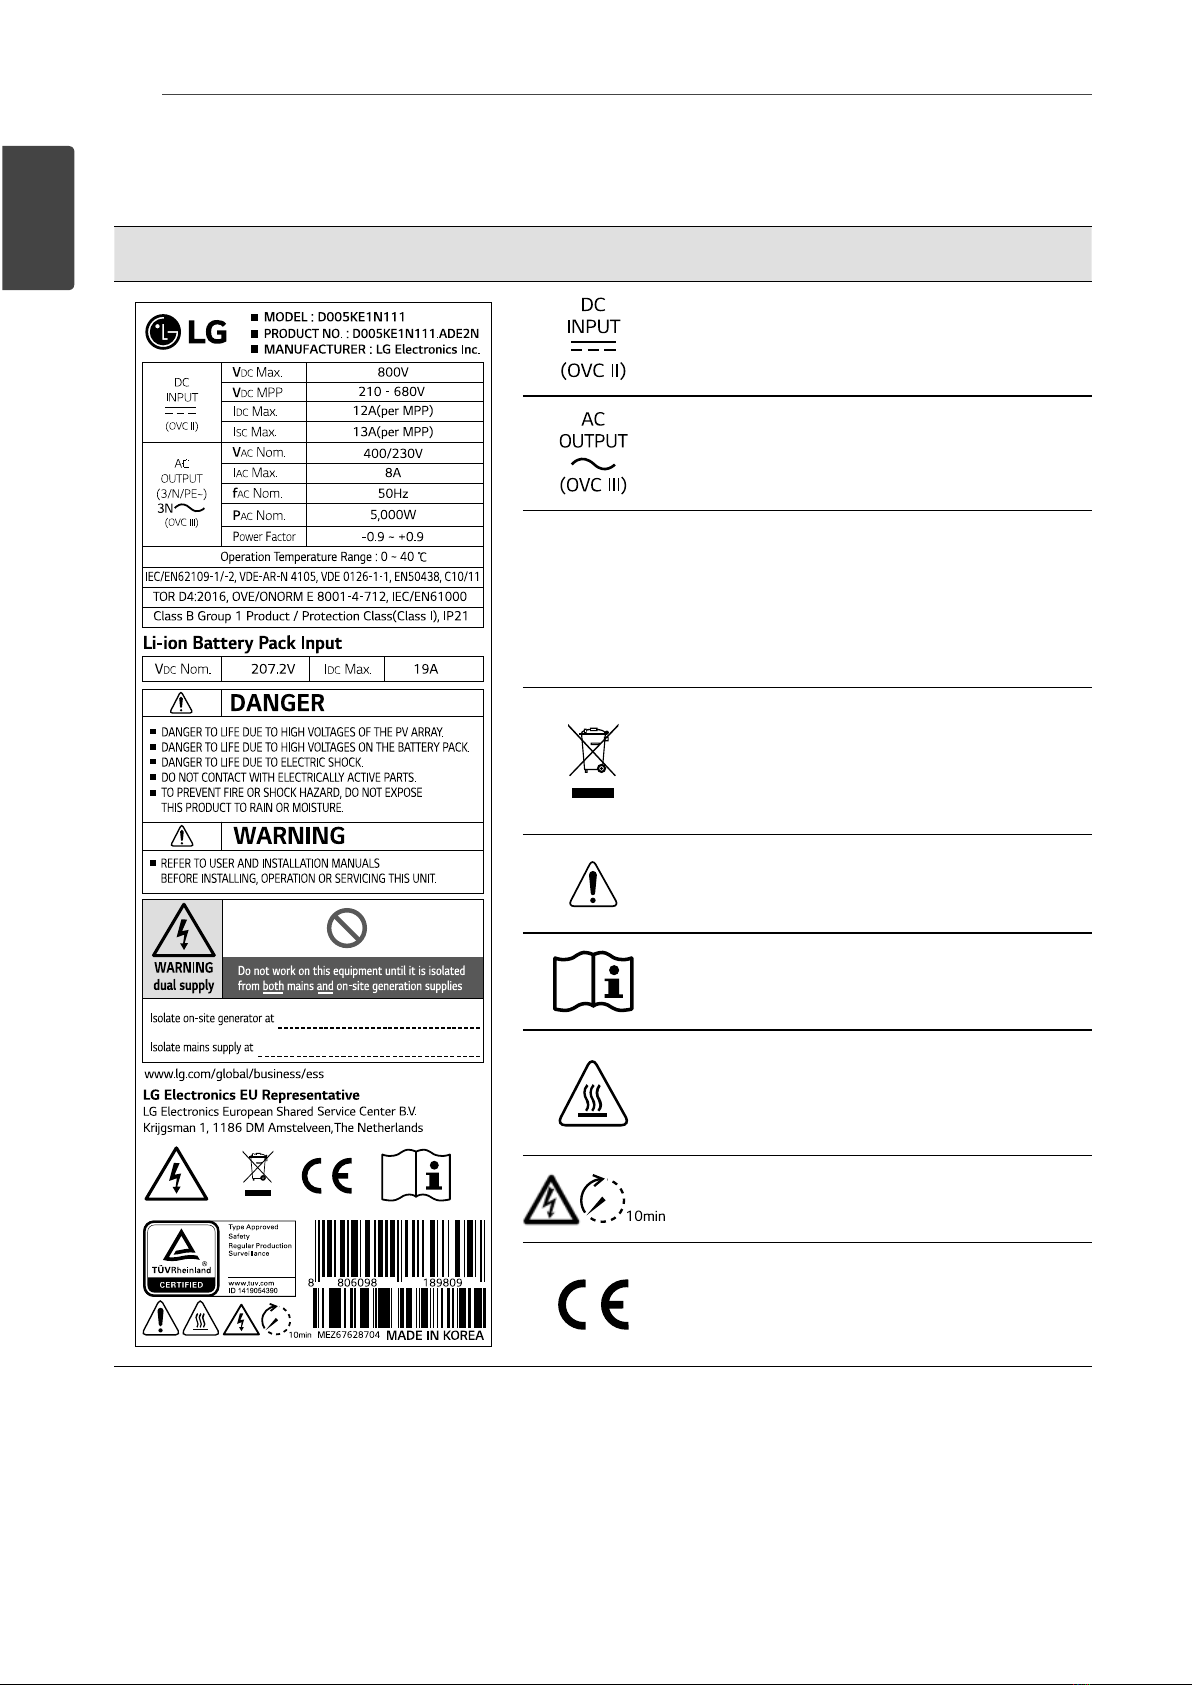
yThe product must be disposed of according to local regulations.
yThe electrical installation of this unit must only be performed by LGE service person or trained
nsxyfqqjw0vzfqnŅjiytnsxyfqq[N^/
yIf the AC circuit breaker is turned off and the PCS is not operated for a long time, the battery
may be overdischarged.
yConnect the DC+ and DC- cables to the correct DC+ and DC- terminals on the product.
yDanger of damaging the PCS by overload. Only connect the proper wire to DC terminal block.
Refer to the installation wiring diagram for details.
yDo not step on the product or the product package. The product may be damaged.
yOtstyinxutxjtkgfyyjwnjxnsfŅwj/_mjgfyyjwnjxrf~j}uqtij/
yDo not open or damage batteries. Released electrolyte is harmful to the skin and eyes. It may
be toxic.
yA battery can present a risk of electrical shock and high short-circuit current. The following
precautions should be observed when working on batteries.
a) Remove watches, ring, or other metal objects.
b) Use tools with insulated handles.
c) Wear rubber bloves, boots and glasses
d) Do not lay tools or metal parts on top of battery.
yDo not leave the ESS in the Fault standby state for a long time because of the battery
discharge may occur during the long standby state.
yIf the battery fault occurs immediately after starting PCS it means Battery failure. Check the
battery SOC also voltage and fault information, and turn off the power of the ESS until service
action is taken.

Getting Started
4
Getting Started
1
yIf the battery SOC is low the battery may charge from the grid for self-protection. (Emergency
Charging) This function is to prevent shutdown of the ESS, deep discharge and failure of the
Battery Extension Kit. An Emergency Charge is not an ESS fault.
NOTE
Indicates a risk of possible damage to the product.
yBefore making connections, please make sure the PV array open circuit voltage is within 800
V. Otherwise the product could be damaged.
yNever use any solvents, abrasives or corrosive materials to clean this product.
yDo not store on or place against any objects to the product. It may cause serious defects or
malfunction.
yBefore making a connection, make sure the PV switch on this product is switched off.
yThis unit is designed to feed power to the public grid only. Do not connect this unit to an
AC source or generator. Connecting the product to external devices could result in serious
damage to your equipment.
yServing of batteries should be performed or supervised by LG service person or trained
installer.
yThis document is for your reference only. Read the installation manual on the website below.
https://www.lg.com/global/business/ess/residential/dc-5
yPlease check the following website for warranty policy.
https://www.lg.com/global/business/ess/residential/dc-5

Getting Started 5
Getting Started
1
Product Features
This product is intended to store direct current (DC) electricity generated from photovoltaic (PV) to
the connected Lithium-Ion Battery, and convert direct current (DC) electricity from the connected
battery and PV to alternating current (AC) electricity and feed this into the grid.
Data Line
Alternative Current
Direct Current
PV Module
Air Conditioning
Washing Machine
OvenTVRefrigerator Heater
Battery
LED Lighting
Grid E-SensorBi-directional
Meter
Internet Cloud
PCS
Smart Phone
Battery
Energy Storage System
The electricity generated from a PV array can be stored to the connected battery or sold to energy
supply companies.
yDC-Coupled ESS
WRP^^hfsfhmnj{jmnlmjwx~xyjrjkŅhnjsh~izjytxnruqjwut|jwhts{jwxntsuwthjxx/
yThree-Phase Connection
3-phase connection secures phase balancing.
ySmart Management
With built-in Smart PMS, it analyses PV generation and load consumption and implements to
charge and discharge immediately. Also it monitors main system & battery conditions to maintain
its stable condition always.
yWeb-monitoring Service
Customers and installers can monitor their ESS with various devices such as PC, tablet or smart
phones.

Table of Contents
6
Table of Contents
Getting Started
Safety Information . . . . . . . . . . . . . . . . . . . . . . . . . . . . . . . . . . . . . . . . . . . . . . . . . . . . . . . . . . . . . . . . . . 2
Product Features. . . . . . . . . . . . . . . . . . . . . . . . . . . . . . . . . . . . . . . . . . . . . . . . . . . . . . . . . . . . . . . . . . . . 5
Unpacking . . . . . . . . . . . . . . . . . . . . . . . . . . . . . . . . . . . . . . . . . . . . . . . . . . . . . . . . . . . . . . . . . . . . . . . . .11
Contents of this product. . . . . . . . . . . . . . . . . . . . . . . . . . . . . . . . . . . . . . . . . . . . . . . . . . . . . . . . . . . .11
Additional components for installation. . . . . . . . . . . . . . . . . . . . . . . . . . . . . . . . . . . . . . . . . . . . . . .12
Name of each part. . . . . . . . . . . . . . . . . . . . . . . . . . . . . . . . . . . . . . . . . . . . . . . . . . . . . . . . . . . . . . . . . .13
Front and Rear. . . . . . . . . . . . . . . . . . . . . . . . . . . . . . . . . . . . . . . . . . . . . . . . . . . . . . . . . . . . . . . . . . . . .13
LED indications . . . . . . . . . . . . . . . . . . . . . . . . . . . . . . . . . . . . . . . . . . . . . . . . . . . . . . . . . . . . . . . . . . . .14
Bottom. . . . . . . . . . . . . . . . . . . . . . . . . . . . . . . . . . . . . . . . . . . . . . . . . . . . . . . . . . . . . . . . . . . . . . . . . . . .15
Installation
Choice of location . . . . . . . . . . . . . . . . . . . . . . . . . . . . . . . . . . . . . . . . . . . . . . . . . . . . . . . . . . . . . . . . . .16
Mounting Location . . . . . . . . . . . . . . . . . . . . . . . . . . . . . . . . . . . . . . . . . . . . . . . . . . . . . . . . . . . . . . . . .16
Minimum clearance. . . . . . . . . . . . . . . . . . . . . . . . . . . . . . . . . . . . . . . . . . . . . . . . . . . . . . . . . . . . . . . . .18
Wall Mounting . . . . . . . . . . . . . . . . . . . . . . . . . . . . . . . . . . . . . . . . . . . . . . . . . . . . . . . . . . . . . . . . . . . . .19
Connections . . . . . . . . . . . . . . . . . . . . . . . . . . . . . . . . . . . . . . . . . . . . . . . . . . . . . . . . . . . . . . . . . . . . . . .22
Connection Overview. . . . . . . . . . . . . . . . . . . . . . . . . . . . . . . . . . . . . . . . . . . . . . . . . . . . . . . . . . . . . . .22
Connection Diagram. . . . . . . . . . . . . . . . . . . . . . . . . . . . . . . . . . . . . . . . . . . . . . . . . . . . . . . . . . . . . . . .23
PV array connections . . . . . . . . . . . . . . . . . . . . . . . . . . . . . . . . . . . . . . . . . . . . . . . . . . . . . . . . . . . . . . .24
Battery connections. . . . . . . . . . . . . . . . . . . . . . . . . . . . . . . . . . . . . . . . . . . . . . . . . . . . . . . . . . . . . . . .28
Grid connections . . . . . . . . . . . . . . . . . . . . . . . . . . . . . . . . . . . . . . . . . . . . . . . . . . . . . . . . . . . . . . . . . . .32
Energy meter and internet connection . . . . . . . . . . . . . . . . . . . . . . . . . . . . . . . . . . . . . . . . . . . . . . .36
WLAN dongle connection. . . . . . . . . . . . . . . . . . . . . . . . . . . . . . . . . . . . . . . . . . . . . . . . . . . . . . . . . . .38
Turning on the product . . . . . . . . . . . . . . . . . . . . . . . . . . . . . . . . . . . . . . . . . . . . . . . . . . . . . . . . . . . . .38
Turning off the product . . . . . . . . . . . . . . . . . . . . . . . . . . . . . . . . . . . . . . . . . . . . . . . . . . . . . . . . . . . . .38

Table of Contents 7
1
2
3
4
5
Settings
Installer settings . . . . . . . . . . . . . . . . . . . . . . . . . . . . . . . . . . . . . . . . . . . . . . . . . . . . . . . . . . . . . . . . . . .39
Installing 'LG EnerVu Plus' App . . . . . . . . . . . . . . . . . . . . . . . . . . . . . . . . . . . . . . . . . . . . . . . . . . . . . .39
Connecting to a mobile device. . . . . . . . . . . . . . . . . . . . . . . . . . . . . . . . . . . . . . . . . . . . . . . . . . . . . . .40
Entering [Installer Settings] screen . . . . . . . . . . . . . . . . . . . . . . . . . . . . . . . . . . . . . . . . . . . . . . . . . .43
Mandatory settings . . . . . . . . . . . . . . . . . . . . . . . . . . . . . . . . . . . . . . . . . . . . . . . . . . . . . . . . . . . . . . . .44
Additional Settings. . . . . . . . . . . . . . . . . . . . . . . . . . . . . . . . . . . . . . . . . . . . . . . . . . . . . . . . . . . . . . . . .50
EnerVu settings . . . . . . . . . . . . . . . . . . . . . . . . . . . . . . . . . . . . . . . . . . . . . . . . . . . . . . . . . . . . . . . . . . . .53
Creating a new account (Owner) . . . . . . . . . . . . . . . . . . . . . . . . . . . . . . . . . . . . . . . . . . . . . . . . . . . .53
Creating a new account (Administrator) . . . . . . . . . . . . . . . . . . . . . . . . . . . . . . . . . . . . . . . . . . . . .56
Adding a new installer . . . . . . . . . . . . . . . . . . . . . . . . . . . . . . . . . . . . . . . . . . . . . . . . . . . . . . . . . . . . . .57
Registering the PCS (Web browser) . . . . . . . . . . . . . . . . . . . . . . . . . . . . . . . . . . . . . . . . . . . . . . . . .58
Registering the PCS (Mobile App) . . . . . . . . . . . . . . . . . . . . . . . . . . . . . . . . . . . . . . . . . . . . . . . . . . .60
Troubleshooting
Error Codes and Messages . . . . . . . . . . . . . . . . . . . . . . . . . . . . . . . . . . . . . . . . . . . . . . . . . . . . . . . . . .63
PCS Fault. . . . . . . . . . . . . . . . . . . . . . . . . . . . . . . . . . . . . . . . . . . . . . . . . . . . . . . . . . . . . . . . . . . . . . . . . .63
Battery Fault (Single). . . . . . . . . . . . . . . . . . . . . . . . . . . . . . . . . . . . . . . . . . . . . . . . . . . . . . . . . . . . . . .67
Extension Kit Fault . . . . . . . . . . . . . . . . . . . . . . . . . . . . . . . . . . . . . . . . . . . . . . . . . . . . . . . . . . . . . . . . .69
Battery Fault (Extension) . . . . . . . . . . . . . . . . . . . . . . . . . . . . . . . . . . . . . . . . . . . . . . . . . . . . . . . . . . .70
Appendix
Maintenance. . . . . . . . . . . . . . . . . . . . . . . . . . . . . . . . . . . . . . . . . . . . . . . . . . . . . . . . . . . . . . . . . . . . . . .76
Cleaning the product . . . . . . . . . . . . . . . . . . . . . . . . . . . . . . . . . . . . . . . . . . . . . . . . . . . . . . . . . . . . . . .76
Inspecting regularly . . . . . . . . . . . . . . . . . . . . . . . . . . . . . . . . . . . . . . . . . . . . . . . . . . . . . . . . . . . . . . . .76
Disposing the product . . . . . . . . . . . . . . . . . . . . . . . . . . . . . . . . . . . . . . . . . . . . . . . . . . . . . . . . . . . . . .76
Specifications. . . . . . . . . . . . . . . . . . . . . . . . . . . . . . . . . . . . . . . . . . . . . . . . . . . . . . . . . . . . . . . . . . . . . .77
Others . . . . . . . . . . . . . . . . . . . . . . . . . . . . . . . . . . . . . . . . . . . . . . . . . . . . . . . . . . . . . . . . . . . . . . . . . . . .80
Shift factor / effective characteristic cosȃ(P). . . . . . . . . . . . . . . . . . . . . . . . . . . . . . . . . . . . . . . .80
Reactive power / voltage characteristic Q(U) . . . . . . . . . . . . . . . . . . . . . . . . . . . . . . . . . . . . . . . . .81
Active power feed-in at overfrequency P(f). . . . . . . . . . . . . . . . . . . . . . . . . . . . . . . . . . . . . . . . . . .82
Voltage controlled active power control P(U) . . . . . . . . . . . . . . . . . . . . . . . . . . . . . . . . . . . . . . . . .83

Getting Started
8
Getting Started
1
Symbol used on the label
Label Symbol Description
Direct current input
Three phase four wire alternating
current conductor
IP21
This product is protected against
nsxjwyntstkŅsljwxfsi|nqqsty
ifrfljiizwnslfxujhnŅjiyjxyns
which it is exposed to vertically dripping
water.
This product should not be disposed of
with other household waste. Disposal
regulations should be observed in this
country.
Caution, risk of danger
Refer to the installation manual or
operating manual.
Caution, hot surface
Caution, risk of electric shock, energy
storage timed discharge
The relevant equipment complies with
the requirements in the EC guidelines.

Getting Started 9
Getting Started
1
Abbreviations on this manual
Abbreviation Designation Explanation
ESS Energy Storage System Inverter system that stores energy into a
battery and uses it.
PCS Power Conditioning
System
A device intended to convert DC electricity
generated from PV system to AC electricity and
feed it to household appliances.
PV Photovoltaic Solar panel system that converts solar energy
into direct current electricity
SOC State of charge Current state of a battery
BMS Battery Management
System
Electronic system that manages a rechargeable
battery.
DC Direct Current -
AC Alternating Current -
DHCP Dynamic Host
NtsŅlzwfynts
Protocol
Standardized network protocol used on
Internet Protocol (IP) networks for automatic
inxywngzynslsjy|twphtsŅlzwfyntsufwfrjyjwx0
such as IP addresses for interfaces and services.
LAN Local Area Network Network that interconnects computers within a
limited area.
IP Internet Protocol A set of rules for sending data across a network

Getting Started
10
Getting Started
1
Glossary
Terms Explanation
Azimuth In the Northern hemisphere, the azimuth angle indicates by how much
degrees the module surface deviates from a full south aspect. In the
southern hemisphere, it indicates the deviation from a full north aspect.
The azimuth angle is counted with positive values within the range from
south (0°) to west (90°) and it counted with negative values within the
range from south (0°) to east (-90°).
Tilt angle The tilt angle indicates by how much degrees the tilt of the module surface
deviates from the horizontal.
PV module The PV module refers to a panel designed to absorb the sun’s rays as a
source of energy for generating electricity.
PV array Technical device for the conversion of solar energy into electrical energy. All
serial and parallel installed and connected to PV modules of a PV system
are referred to as a PV array.

Getting Started 11
Getting Started
1
Unpacking
Contents of this product
Power conditioning system
(1EA)
Wall bracket (1EA) BMS cable (3m, 1EA)
Battery cable plug Grid cable plug Installation Manual and
Operating Manual (1EA each)
WLAN dongle (Inserted) Energy meter plug Heatpump plug
(Not supported)

Getting Started
12
Getting Started
1
Additional components for installation
Applied to Additional Components
Wall mounting
yStainless steel screws with diameter 6 mm - 8mm
yAnchors
PV connections
yMC4 connectors
yLead wires with the cross-sectional area 2.5 mm2- 6 mm2
Battery Connections
yLead wires with the cross-sectional area 2.5 mm2- 4 mm2
Grid connections
yLead wires with the cross-sectional area 2.5 mm2- 6 mm2
(including yellow green stripe cable)
Energy meter and
internet connections
yLAN cable
yRJ-45 plug
yEnergy meter cable
Grounding
yLAN cable
yRJ-45 plug
yEnergy meter cable

Getting Started 13
Getting Started
1
Name of each part
Front and Rear
A
B
CE
D
APCS body
BLED Indications
CLower Cover
DBracket connected part
EScrew holes for wall mounting

Getting Started
14
Getting Started
1
LED indications
LED Color Description
Power
Off Grid is not connected.
White Grid is connected.
White (Blink) PCS Fault
Solar
Off Energy is not being generated.
Green Energy is being generated.
White (Blink) PCS Fault
Battery
Off Stand by
Green Battery is in charging
Blue Battery is in discharging
Red (Blink) Battery error
White (Blink) PCS Fault
WLAN
Off Not connected
Green Network connected
Blue WLAN network connected
Red (Blink) Network disconnected

Getting Started 15
Getting Started
1
Bottom
ABattery DC cable connector
BBMS control connector
CPV1(+ and -) connectors
DPV2 (+ and -) connectors
EPV switch (DC Disconnect)
FDRM port (Not supported)
GEthernet port
HMeter connector
IHeat pump connector (Not supported)
JWireless connection button
KWLAN dongle port (USB type)
LAdditional PE connection hole
MAC grid cable connector
ON
OFF

Installation
16
Installation
2
Choice of location
Mounting Location
yThis product is designed to be installed
indoor use only. Do not install this product
outdoor.
yInstall this product on the place where PV
cables, energy meter cables, grid cables and
battery cables are easily accessible.
yThis product is designed to be installed on
the wall only. Do not install this product on
the ground.
yThe mounting surface must be able to
support the weight of this product (25 kg).
yDo not install the product on the ceiling.
yDo not install the product widthwise or install
on a wall with lean more than 10 degrees.
yDo not install the product tilting forward.
yInstall the product the connection side down.
yAppropriate operating temperature is from
0° C to 40° C.
yDo not install this product in the place
exposed to the direct sunlight.
yInstall the product in a clean, cool room.
This product must not be installed or used at altitudes above 2 000 m.

Installation 17
Installation
2
Otstynsxyfqqymnxuwtizhynsuqfhjx|mjwjņttinslkwjvzjsyq~thhzwx/
yDo not install this product to highly humid area such as bathroom.
yThis product generates low levels of noise at certain times, it should
not be installed close to living areas.
yNoise level may differ depending on the installed location.
yDo not install the product where there is vibration.
yDo not install this product in a place with ammonia, corrosive vapours,
acids or salts.
yInstall this product out of reach from children and pet.
Do not install this product in places and environments subject to heavy
build-up of dust.

Installation
18
Installation
2
Minimum clearance
300 mm
300 mm
300 mm 1500 mm
30 mm
500 mm
300 mm
500 mm
This product must be installed with clearance at the left, right, top, bottom and front of the product
fxxmt|snsymjŅlzwj/
Only the battery can be installed at the bottom clearance space of the product. If you install the
battery unit at the bottom clearance space, leave the clearance space between the battery and the
product more than 300 mm.
Minimum clearance (with extension)
300 mm
300 mm
300 mm 1500 mm
300 mm
30 mm
500 mm
300 mm
500 mm

Installation 19
Installation
2
Wall Mounting
This product must be installed on the wall considering appropriate environments described in
previous pages. Follow the mounting instruction described below exactly and securely.
A
430mm 430mm
Place the wall bracket on a wall where
meets every installation conditions and
clearance.
And indicate the positions to drill using
a pencil or the like. And drill holes on the
indicated positions.
WARNING
It is important to ensure the drilling
locations are not located on any electrical
wiring within the wall.
NOTE
When attaching the wall bracket to a wall, adjust the horizontal level using inclinometer.
BFix the wall bracket with screws and
anchors.
And insert anchors into the holes at the
lower part.
NOTE
yMjktwjŅ}nslymjgwfhpjyxhwj|x0hmjhpymjmtwntsyfqqj{jqtshjflfnszxnslnshqnstrjyjw/
yDepending on the surface, different screws and anchors may be required for installing
the wall bracket. Therefore, these screws and anchors are not content of the product. The
system installer is responsible for selecting the proper screws and anchors.
yIt is recommended to use stainless steel screws with M6 - M8.

Installation
20
Installation
2
CHang this product to the wall bracket.
Make sure that at least two persons work
together to move the product.
CAUTION
Don’t hold and lift lower cover in handling
and installing
D]jrt{jymjqt|jwht{jwŅ}nslxhwj|xfx
xmt|snsymjŅlzwj/
NOTE
Hold the lower cover when attaching
or removing the lower cover. Care with
handling the lower cover.
EDisassemble the lower cover from the
product.
Other manuals for D005KD1N111
2
Table of contents
Other LG Batteries Pack manuals